
Populaarsed kategooriad
Otsid lõnga?


Kommentaarid / Küsimused (6)
![]() Michelle kirjutas:
Michelle kirjutas:
Thanks for the reply about the neckline. But if you look at the photo of the finished garment on the model, the neckline starts only a few cms before the shoulder seam. The way the instructions read, the neckline starts much further down - only 10cm after the start of the armholes. The way the instructions read and the way the garment looks on the model are completely different.
13.01.2022 - 13:47DROPS Design vastas:
Dear Michelle, correct, you start neck 15 cm before shoulder, ie 10 cm after armhole (= armhole is a total of 25 cm). Feel free to make it shorter. Happy knitting!
13.01.2022 - 16:15
![]() Michelle kirjutas:
Michelle kirjutas:
Two problems: 1. I have left 8 stitches on a holder after 55cm but this leaves the front of the sweater looking more like a V neck than what is shown on the model photo. My tension is correct yet 55cm brings me to nowhere near where the pattern is showing as being at the neckline in the photo. Is there a typo?? 2. Pattern says only one ball of each shade other than brown & cream but I have run out of the olive half way up the 2nd sleeve and now it's out of stock!
11.01.2022 - 14:37DROPS Design vastas:
Dear Michelle, the neck on front piece started when piece measures 55 cm - see also measurement chart for the V-neck. You then continue back and forth decreasing for neck on each side, and cast off stitches for neck on back piece when piece measures 68 cm. The height of the neck is now shown on the chart, only its shape. You then will work M.1 around (picking sts around + 8 sts on thread). Sorry for the missing yarn, this info will be forwarded to our design team. Happy knitting!
12.01.2022 - 06:32
![]() Michelle kirjutas:
Michelle kirjutas:
What a good job I decided to watch some of the explanatory videos BEFORE buying all my yarn etc. There is nothing in the pattern itself that mentions that you need A SEWING MACHINE!!!! Is it possible to complete this sweater by splitting the front and the back at the beginning of the armholes and working from two lots of yarn? I really don't want to have to go out an buy a sewing machine - that makes it a very expensive sweater indeed.
18.11.2021 - 12:09DROPS Design vastas:
Dear Michelle, sure you can adjust the pattern to divide piece for armholes instead of casting on steek stitches - just cast on 1 extra st on each side for seam allowance and adapt pattern if necessary - or find with this video other way to work and cut steek stitches without sewing machine, but with a crochet hook. Happy knitting!
18.11.2021 - 17:18
![]() Rita kirjutas:
Rita kirjutas:
Grazie per la risposta, ma intrecciando solo sul diritto (ferri alterni), significa che lo scollo a V viene modellato sempre e solo da una parte delle 8 maglie messe in attesa sul ferro ausiliario. Cosa non capisco? Grazie Rita
07.05.2018 - 23:17DROPS Design vastas:
Buongiorno Rita, si, quando mette le maglie centrali in sospeso lavora le parti laterali in modo separato, come indicato, prima una spalla poi l'altra. Buon lavoro!
08.05.2018 - 09:23
![]() Rita kirjutas:
Rita kirjutas:
“Quando il lavoro misura 55 cm trasferire le 8 m centrali per il collo davanti su un fermamaglie e finire il lavoro avanti e indietro sui f. Continuare a intrecciare per modellare la scollatura a f alterni: 1 m 15 volte. “ significa che intreccio una maglia sul diritto vicino alle 8 maglie in attesa, poi giro il lavoro e intreccio una maglia sul rovescio vicino alle maglie in attesa. Faccio un avanti e un indietro senza intrecciare (ferri alterni) e poi ripeto per altre 14 volte? Grazie Rita
06.05.2018 - 23:26DROPS Design vastas:
Buongiorno Rita. Deve chiudere la maglia un ferro sì e un ferro no, quindi se intreccia la prima volta sul diritto del lavoro, lavora il ferro successivo (sul rovescio) senza intrecciare, poi intreccia nuovamente sul diritto. Buon lavoro!
07.05.2018 - 08:49
![]() Sophie Serot kirjutas:
Sophie Serot kirjutas:
Ce modèle est superbe j'ai promis de le réaliser pour ma fille le problème c'est qu'elle fait une taille xs/S comment adapter ce pull à sa taille (en réduisant d'un motif soit 14 mailles la réduction sera -t' elle suffisante et comment du coup adapter les manches? merci de votre aide je n'ai pas l'habitude des jacquards mais plutôt des torsades ou des points ajourés.
30.11.2016 - 16:29DROPS Design vastas:
Bonjour Mme Serot, vous pouvez vous aider du schéma des mesures et d'un modèle analogue qui lui irait pour ajuster comme vous le souhaitez. Pour toute assistance personnalisée, contactez votre magasin, il pourra vous aider et vous renseigner. Bon tricot!
01.12.2016 - 08:53
|
||||||||||||||||||||||||||||||||||
DROPS 43-10 |
||||||||||||||||||||||||||||||||||
|
|
||||||||||||||||||||||||||||||||||
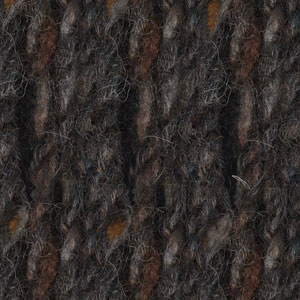
DROPS Alaska või Nepal lõngast mustriga kampsun
DROPS 43-10 |
||||||||||||||||||||||||||||||||||
|
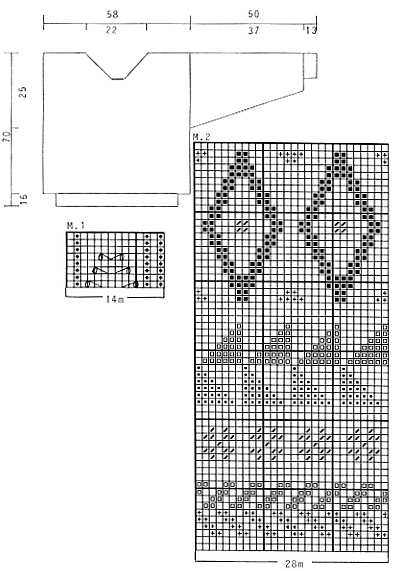
MUSTER Vaata skeemi (skeemil on 1 mustrikordus). Muster on vaadatuna töö paremalt poolt (PP). KEHAOSA Kootakse ringvarrastega, pärast lõigatakse käeaugud sisse. Loo 182 s 4 mm ringvarrastele pruuni lõngaga ja koo 1 ring parempidise koes, ning siis skeemi M.1 5 korda kõrguses (= u. 16 cm). Võta 5 mm ringvardad ja jätka skeemiga M.2, ning kasvata esimesel ringil 14 s ühtlaste vahedega = 196 s. JÄLGI KOETIHEDUST! Kui töö pikkus 45 cm, kasvata 5 s mõlemal küljel käeaukude jaoks (ära koo neid mustrisse, need lõigatakse pärast lahti. Säti mustrikordus esiosa keskele). Kui töö pikkus on 55 cm, tõsta esiosa keskmised 8 s kaelaaugu jaoks silmustehoidjale ja jätka edasi-tagasi kududes. Jätka kaelakaare kujundamist igal teisel real, kududes maha: 1 silmus 15 korda. SAMAL AJAL, kui töö pikkus on 68 cm, koo maha seljaosa keskmised 34 s kaelaaugu jaoks. Siis koo maha 2 silmust mõlemal pool kaela. Koo silmused maha, kui töö pikkus on 70 cm, lõpeta pärast mustrikordust. VARRUKAD Loo 42 s 4 mm ringvarrastele pruuni lõngaga ja koo 1 ring parempidise koes, ning siis skeemi M.1 4 korda kõrguses, SAMAL AJAL kasvata 1 s varruka siseküljel igal 5. real 6 korda. Võta 5 mm sukavardad, koo skeemi M.2 (säti mustrikordus varruka peale keskele) ja kasvata esimesel ringil 8 s ühtlaste vahedega = 56 s. SAMAL AJAL, pärast skeemi M.1 kasvata varruka siseküljel 2 s 15 korda igal 5. real = 86 s. Kui töö pikkus 50 cm, koo 2 cm pahempidises koes (õmblusvarude jaoks ühendamisel). Koo silmused maha. VIIMISTLUS Õmble mõlemal küljel kasvatatud silmuste keskele traagelniit (lõng). Õmble õmblusmasinaga õmblus mõlemale poole traagelniiti, 1. õmblus = 1/2 silmuse kaugusele, 2. õmblus = 1/2 silmuse kaugusele esimesest õmblusest. Lõika lahti käeaugud. Õmble kokku õlaõmblused. Korja 98 s kaelakaarelt 4 mm varrastele pruuni lõngaga ja koo mustrit M.1 2 korda kõrguses ning koo silmused maha. Õmble varrukad kehaosa külge töö PP järgmiselt: õmble kordamööda 1 silmus viimaselt ripskoes realt varrukal enne murdeserva ja 1 s kehaosalt masinõmbluse kõrvalt. Pööra töö pahupool välja ja kinnita varruka õmblusvaru üle lõikeserva kehaosal. |
||||||||||||||||||||||||||||||||||
Skeemi seletused |
||||||||||||||||||||||||||||||||||
|
||||||||||||||||||||||||||||||||||
 |
||||||||||||||||||||||||||||||||||
Kas oled teinud seda mustrit?Lisa oma piltidele viide #dropspattern või saada link projektile meie #dropsfan galeriisse. Vajad abi selle mustriga?Garnstudio.com kodulehel on 26 õppevideot, küsimuste/vastuste osa ja muudki. © 1982-2026 DROPS Design A/S. Kõik õigused kaitstud. See dokument, ning selle alajaotused on kaitsud autoriõigustega. Loe rohkem, mida meie mustritega võib teha, iga mustrilehe alt meie kodulehel. |
||||||||||||||||||||||||||||||||||


Tegeledes üle 40 aasta kudumise ja heegeldamise disainidega, pakub DROPS Design ühte suurimat tasuta mustrite kollektsiooni internetis - tõlgituna 17 keelde. Tänaseks on meil 325 kataloogi ja 12298 mustrit - millest 9439 on tõlgitud Eesti keelde.
Me anname endast parima, et tuua teieni kõike mida kudumine ja heegeldamine võib pakkuda - inspiratsiooni, nõuandeid ning ka kvaliteetseid lõngu parima hinnaga! Soovid kasutada mustreid muukski, kui ainult oma tarbeks? Loe infot meie Copyright osas iga lehekülje all. Rõõmsat loomist!
Jäta kommentaar mustrile DROPS 43-10
Ootame kommentaare selle mustri kohta!
Kui soovid midagi küsida, siis kiiremaks vastuse saamiseks veendu, et valid õige kategooria alloleval formil. Vajaliku väljad *.