
Populaarsed kategooriad
Otsid lõnga?


Kommentaarid / Küsimused (19)
![]() Sally kirjutas:
Sally kirjutas:
Hello, I am stuck on the neck/armhole decreases for the back, knitting size XS. I have cast off my 18 middle stitches so I am now starting with 12 stitches for each shoulder. How am I supposed to decrease to end up with 7 stitches per shoulder, if I am decreasing both for the neck (beginning of row) and the armhole (end of row)? Wouldn't I end up with an even number?
02.05.2026 - 05:49
![]() Vivien kirjutas:
Vivien kirjutas:
If I make L Size, how many ball to make it.
26.03.2026 - 11:34DROPS Design vastas:
Dear Vivien, you'll find the total amount of yarn required for each size under tab "Pattern" at the top of the pattern page; select L to get all relevant numbers for this size, incl. 400 g DROPS Paris/50 g a ball = 8 balls DROPS Paris are required in size L. Happy knitting!
26.03.2026 - 16:01
![]() Anna kirjutas:
Anna kirjutas:
I have just started decreasing for the armholes on the back piece. Just for clarification, when it says to “decrease on each side for a total of 12 times” (I’m knitting a size xs), then that means I knit 6 rows with 2 decreases on each side of the piece, right?
08.06.2025 - 04:36DROPS Design vastas:
Dear Anna, you need to decrease 12 times on each side (not 12 stitches). So you work 12 rows with decreases on each side and decrease 12 stitches on each side (or 24 stitches in total). Happy knitting!
08.06.2025 - 15:36
![]() Mayzie kirjutas:
Mayzie kirjutas:
Hi ! I'm approaching the shoulders of the front piece. Rather than bind off the neck, the front is placed on a thread. I knit up to the middle stitches, slipped them onto a thread, but now my working yarn is stuck in the middle of the row and I don't know how to continue the row without knitting the shoulders together. how to I finish this row so I can start one of the shoulders?
30.03.2025 - 16:46DROPS Design vastas:
Dear Mayzie, you should have worked one shoulder before reaching the neck stitches. You can now work in two ways: 1) you work the neck stitches as you slip them. Therefore, the thread will move forward and reach the second shoulder, which you can now work. From now on, only work this second shoulder (the other shoulder's stitches will be on a separate thread) and, after finishing this shoulder, cut the thread and rejoin at the first shoulder and work this shoulder. 2) You slip the neck stitches to a thread without working them and place the stitches on the second shoulder in another thread. The thread should be at the end of the first shoulder; work this shoulder first. Happy knitting!
30.03.2025 - 19:20
![]() Danubis Perez kirjutas:
Danubis Perez kirjutas:
Hola. Yo soy talla L y me dicen que monte 108 ptos , sabiendo que la espalda y el delantero se hacen por separado. El gráfico me dice que para mi talla son 52 cm...no habra un error ?, ya que de acuerdo a la tensión, 108 puntos no corresponden 52 cm. Me podías explicar eso por favor? Igual que para las cenefas de las mangas me parece muchos puntos... no será que los puntos estan mal calculados? Gracias, esperando su pronta respuesta!!
10.03.2025 - 05:00
![]() Alicja kirjutas:
Alicja kirjutas:
Dzień dobry, zupełnie nie rozumiem fragmentu dotyczącego tyłu, który zaczyna się od "PRZED DALSZĄ PRACĄ NAD ROBÓTKĄ UWAŻNIE PRZECZYTAĆ DALSZĄ CZĘŚĆ OPISU:" - jakbym nie robila wychodzi mi jedno ramiączko, nie ma dekoltu, mogę prosić o doprecyzowanie jak zamykać na dekolt i ramiona, żeby faktycznie wyszły?
26.01.2025 - 13:43DROPS Design vastas:
Witaj Alicjo, Teraz będziesz przerabiać tylko 1 ramię - i zamykać oczka z każdej strony, czyli jednocześnie na formowanie podkroju rękawa i na dekolt. Jak zakończysz 1 ramię, to wykonujesz drugie, tylko zamykasz oczka na dekolt i podkrój rękawa z drugiej strony (aby robótka była symetryczna). Pozdrawiamy!
27.01.2025 - 14:48
![]() JO kirjutas:
JO kirjutas:
Hi, Are you including edge stitch in your stitch counts? Or is it separate. Im finding it confusing the way its written.
27.07.2024 - 13:52DROPS Design vastas:
Hi Jo, edge stitch is included in stitch count. Happy knitting!
28.07.2024 - 17:57
![]() Veronica kirjutas:
Veronica kirjutas:
Hi, on this section for the decreases do I still do the one edge stitch in garter stitch in the beginning and end of each row? “Continue with stockinette stitch and decrease 1 stitch on each side of every row from the right side 12-13-13-15-15-19 times.” Thank you!
27.05.2024 - 05:56DROPS Design vastas:
Hi Veronica, When decreasing for the armholes and neck, use Decrease Tip at the top of the page: decrease after 3 stitches at the beginning of the row by knitting 1, slipping 1 stitch and passing the slipped stitch over; decrease at the end of the row by knitting 2 together before the last 3 stitches. So, yes you continue the edge stitches. Happy knitting!
27.05.2024 - 06:38
![]() Amelia kirjutas:
Amelia kirjutas:
What are the finished measurements for this piece?
12.03.2024 - 08:59DROPS Design vastas:
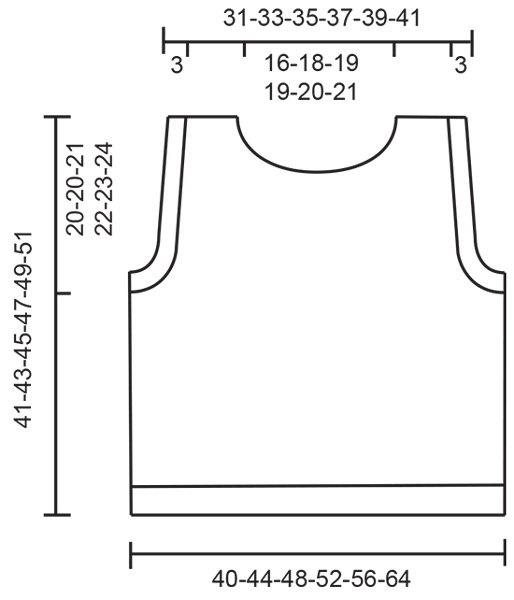
Dear Amelia, you can find the finished measurements of the piece on the schematic drawing below the instructions. I hope this helps. Happy Knitting!
12.03.2024 - 09:57
![]() Sonja kirjutas:
Sonja kirjutas:
Nach Abnahme am Ende des Bündchens habe ich mit 84 Maschen weitergestrickt. Nach der entsprechenden Länge dann mit abketten für die Armausschnitte weitergemacht. Dies in Größe M 13 beidseitig (=26 Maschen). Es blieben noch 50 übrig. Dann 20 Maschen für den Halsausschnitt abgegettet. Damit bleiben pro Schulter noch 15 Maschen übrig. Nun habe ich nur noch 9 Maschen übrig, aber es fehlen noch 10cm Länge. Habe ich zuviel abgenommen?
11.06.2023 - 12:39DROPS Design vastas:
Liebe Sonja, Maschenanzahl stimmt so, Halsausschnitt beginnt nach 37cm + ca 6 cm Abnahmen (6 Mal in jeder 2. Reihe) sind ca 42,5 cm, es fehlt nur noch 2,5 cm nach der 1. Abnahmen bis Abketten (45 cm) (mit 22 Reihen glatt rechts = 10 cm) - kann das Ihnen helfen?
12.06.2023 - 08:54
|
|
Bayou Belle#bayoubelletop |
|
 |
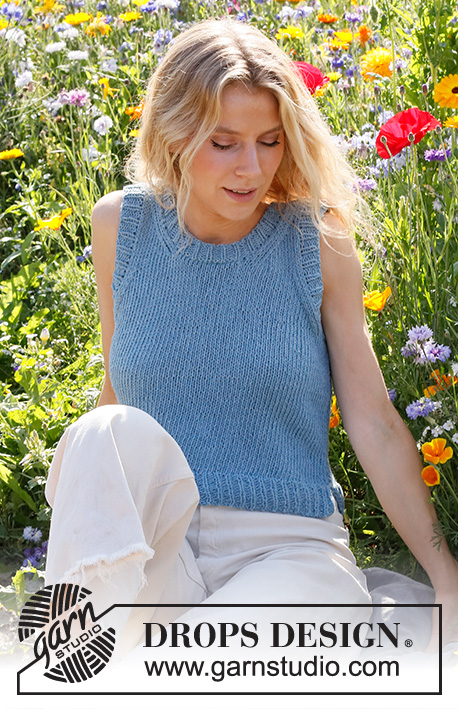 |
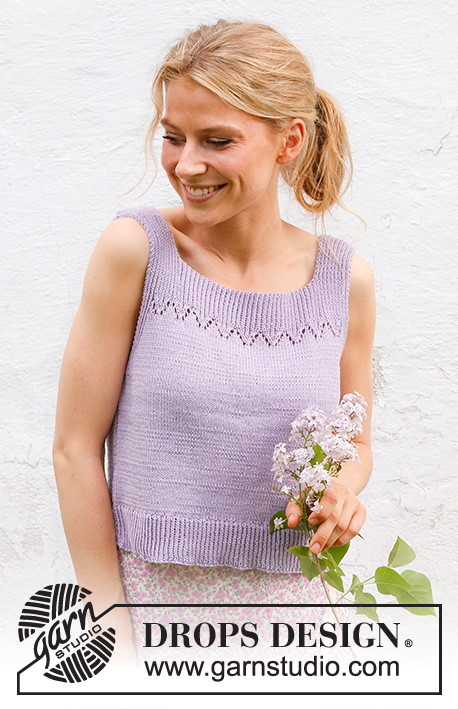
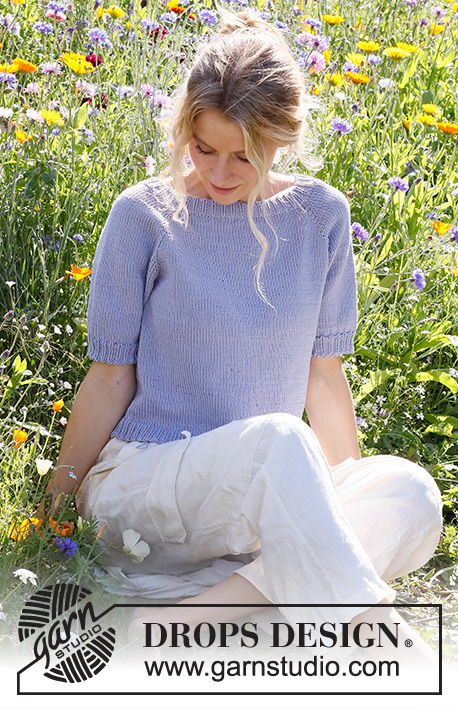
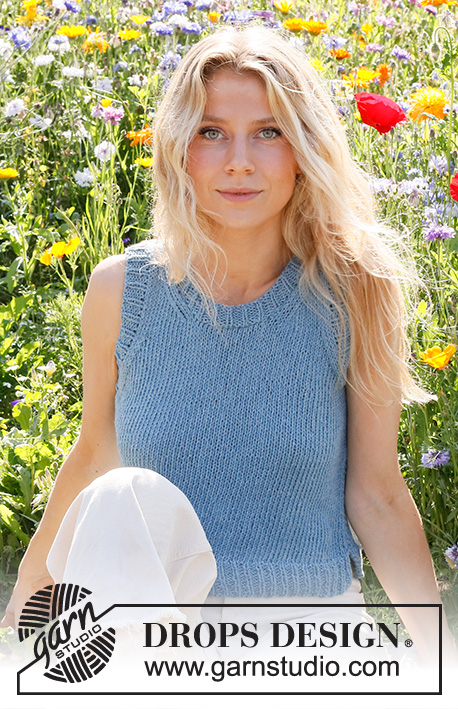
DROPS Paris lõngast alt üles parempidises koes kootud topp suurustele XS kuni XXL
DROPS 230-51 |
|
|
NÕUANDED: ------------------------------------------------------- RIPSKUDE (edasi-tagasi kududes): Koo parempidi silmuseid igal real. 1 ripsivall = 2 rida ripskoes. KAHANDAMISE NIPP (käeaukudes ja kaelakaarel): Kõik kahandused tehakse töö paremal pool. Kahanda pärast 3 ääresilmust rea alguses: koo 2 ületõstmisega kokku (tõsta 1 silmus parempidise võttega kudumata, koo 1 parempidi, tõsta kudumata silmus üle äsja kootud silmuse) (= 1 silmus kahandatud) Kahanda enne 3 ääresilmust rea lõpus: koo 2 parempidi kokku (= 1 silmus kahandatud). ------------------------------------------------------- ALUSTA SIIT: ------------------------------------------------------- TOPP – KOKKUVÕTE: Esi- ja seljaosa kootakse eraldi osadena edasi-tagasi alt üles. Osad õmmeldakse kokku õlgadest, lõpuks kootakse soonik ümber kaelakaare ja käeaukude. SELJAOSA: Loo 84-96-102-108-120-132 silmust 4 mm ringvarrastele DROPS Paris lõngaga. Koo soonikut töö paremal pool järgmiselt: koo 1 ääresilmus RIPSKOES - vaata ülevalt, koo soonikut 1 parempidi/2 pahempidi kuni jääb 2 silmust reale, koo 1 parempidi ja 1 ääresilmus ripskoes. Koo soonikut ja ripskude 5 cm – järgmine rida on töö paremal pool. Võta 5 mm ringvardad ja koo järgmine töö parempoolne rida nii: koo 1 ääresilmus ripskoes, koo 82-94-100-106-118-130 silmust, samal ajal kahanda 14-20-18-18-22-22 silmust ühtlaste vahedega neil silmustel, koo 1 ääresilmus ripskoes = 70-76-84-90-98-110 silmust. Koo parempidises koes, tehes 1 ääresilmuse ripskoes mõlemal küljel, kuni töö pikkus on 21-23-24-25-26-27 cm – viimane rida koo töö pahemal pool. JÄLGI KOETIHEDUST! Koo maha 2-2-4-4-6-6 silmust järgmise 2 rea alguses käeaukude jaoks = 66-72-76-82-86-98 silmust real. LOE JÄRGNEV OSA LÄBI ENNE JÄTKAMIST! Nüüd kahanda käeaukude jaoks ja pärast ka kaelaaugu jaoks järgmiselt - loe KAHANDAMISE NIPPI! Jätka parempidises koes, SAMAL AJAL kahanda 1 silmus mõlemal küljel igal töö parempoolsel real kokku 12-13-13-15-15-19 korda. SAMAL AJAL, kui töö kõrgus on 34-36-37-39-40-42 cm, koo maha keskmised 18-20-20-20-20-22 silmust järgmisel töö parempoolsel real kaelaaugu jaoks. Lõpeta õlad eraldi. Jätka kahandamist käeaukude jaoks ning kahanda 1 silmus igal töö parempoolsel real kaelaaugu jaoks 5-5-6-6-7-7 korda – loe KAHANDAMISE NIPPI. Kui kõik kahandused on tehtud kaelaaugu ja käeaukude jaoks, on õlal 7-8-9-10-11-12 silmust. Jätka kudumist, kuni töö pikkus on 41-43-45-47-49-51 cm. Koo silmused maha töö paremal pool. Tee teine õlg samamoodi. ESIOSA: Loo ja koo nagu seljaosa, kuni töö pikkus on 21-23-24-25-26-27 cm (järgmine rida on töö paremal pool). Koo maha 2-2-4-4-6-6 silmust järgmise 2 rea alguses käeaukude jaoks = 66-72-76-82-86-98 silmust real. LOE JÄRGNEV OSA LÄBI ENNE JÄTKAMIST! Nüüd kahanda käeaukude jaoks ja pärast ka kaelaaugu jaoks. Jätka parempidises koes, SAMAL AJAL kahanda 1 silmus mõlemal küljel igal töö parempoolsel real kokku 12-13-13-15-15-19 korda. SAMAL AJAL, kui töö kõrgus on 28-30-31-33-34-36 cm, tõsta keskmised 10-12-14-14-16-18 silmust abilõngale kaelaaugu jaoks. Lõpeta õlad eraldi. Jätka kahandamist käeaukude jaoks ning kahanda 1 silmus igal töö parempoolsel real kaelaaugu jaoks 9 korda – loe KAHANDAMISE NIPPI. Kui kõik kahandused on tehtud kaelaaugu ja käeaukude jaoks, on õlal 7-8-9-10-11-12 silmust. Jätka kudumist, kuni töö pikkus on 41-43-45-47-49-51 cm. Koo silmused maha töö paremal pool. Tee teine õlg samamoodi. VIIMISTLUS: Õmble õlad kokku. Õmble kokku küljeõmblused, jättes alt lahti 5 cm lõhikute jaoks. VARRUKATE ÄÄRISED: Alusta küljeõmblusest töö paremal pool ja koo 4 mm vardale 75-84-93-96-105-117 silmust ümber käeaugu – silmuste arv peab jaguma 3-ga. Koo ringselt soonikut 1 parempidi/2 pahempidi 3 cm. Koo silmused maha, parempidi silmused parempidi ja pahempidi silmused pahempidi. Korda teises käeaugus samamoodi. KAELUS: Korja ja koo 4 mm vardale töö paremal pool 93-102-105-108-111-117 silmust ümber kaelaaugu (kaasaarvatud silmused abilõngalt esiosa keskel - silmuste arv peab jaguma 3-ga). Koo ringselt soonikut 1 parempidi/2 pahempidi 3 cm. Koo silmused maha, parempidi silmused parempidi ja pahempidi silmused pahempidi. |
|
 |
|
Kas oled teinud seda mustrit?Lisa oma piltidele viide #dropspattern #bayoubelletop või saada link projektile meie #dropsfan galeriisse. Vajad abi selle mustriga?Garnstudio.com kodulehel on 29 õppevideot, küsimuste/vastuste osa ja muudki. © 1982-2026 DROPS Design A/S. Kõik õigused kaitstud. See dokument, ning selle alajaotused on kaitsud autoriõigustega. Loe rohkem, mida meie mustritega võib teha, iga mustrilehe alt meie kodulehel. |
|


Tegeledes üle 40 aasta kudumise ja heegeldamise disainidega, pakub DROPS Design ühte suurimat tasuta mustrite kollektsiooni internetis - tõlgituna 17 keelde. Tänaseks on meil 324 kataloogi ja 12290 mustrit - millest 9431 on tõlgitud Eesti keelde.
Me anname endast parima, et tuua teieni kõike mida kudumine ja heegeldamine võib pakkuda - inspiratsiooni, nõuandeid ning ka kvaliteetseid lõngu parima hinnaga! Soovid kasutada mustreid muukski, kui ainult oma tarbeks? Loe infot meie Copyright osas iga lehekülje all. Rõõmsat loomist!
Jäta kommentaar mustrile DROPS 230-51
Ootame kommentaare selle mustri kohta!
Kui soovid midagi küsida, siis kiiremaks vastuse saamiseks veendu, et valid õige kategooria alloleval formil. Vajaliku väljad *.