
Categorias populares
Procura um fio?


Comentários / Perguntas (41)
![]() Rousseau escreveu:
Rousseau escreveu:
Merci beaucoup. Bonne journée. AR
09.09.2024 - 13:09
![]() Anne ROUSSEAU escreveu:
Anne ROUSSEAU escreveu:
Bonjour. Je n'arrive pas à réaliser le point du tricot en suivant le diagramme j'obtiens le point de côte1/1! Dois je comprendre rang 2 maille endroit sur maille envers où maille à l'endroit si je suis sur l'envers ? Merci pour votre réponse. Cordialement. AR
08.09.2024 - 13:35DROPS Design respondeu:
Bonjour Mme Rousseau, la 2ème maille de A.1 se tricote à l'endroit sur l'endroit mais à l'endroit sur l'envers, autrement dit, c'est une maille point mousse, vous aurez ainsi des côtes 1 maille jersey (1ère maille de A.1), 1 maille point mousse (2ème maille de A.1). Bon tricot!
09.09.2024 - 10:25
![]() Monika escreveu:
Monika escreveu:
Hallo, welche Art Maschenanschlag eignet sich denn noch gut, außer dem üblichen Kreuzanschlag, und sieht auch gut aus? Italienischer Anschlag oder Norwegischer Anschlag zum Beispiel?
13.04.2024 - 21:50DROPS Design respondeu:
Liebe Monika, je nach jeder Strickerin kann die "beste" Technik verschieden sein, gerne können Sie bei Ihrer Maschenprobe versuchen, welche Technik Sie am besten haben. Viel Spaß beim Stricken!
15.04.2024 - 07:36
![]() Yvonne escreveu:
Yvonne escreveu:
Wenn ich in Runden stricken will, wie stricke ich in dann die Rückreihe?
05.03.2024 - 15:34DROPS Design respondeu:
Liebe Yvonne, wenn man A.1 für den Kragen in Runden strickt, liest man jede Runde rechts nach links - hier lesen Sie mehr über Diagramme. Viel Spaß beim stricken!
05.03.2024 - 15:38
![]() Ika Andersson escreveu:
Ika Andersson escreveu:
Det skulle underlätta för mig om det stod att det är mönsterstickning, slätstickning, vartannat varv räta, vartannat aviga. På avigvarvet stickas varannan maska avig, varannan rät. Nu står rätstickning och då stämmer inte mönster A1 riktigt så jag fick klura och testa lite.
17.02.2024 - 12:19
![]() Dian Nanda escreveu:
Dian Nanda escreveu:
Hi, i would like to make this project. But i have a question about the neck. Can i change the neck to a short round neck? How should i do to get the short round neck? Thank You!
13.12.2023 - 14:00DROPS Design respondeu:
Sure you can, just work the neck as long as you like it to be. Happy knitting!
13.12.2023 - 16:22
![]() Shelley escreveu:
Shelley escreveu:
Would like to confirm pattern. Is it, 'Cast on X stitches. Purl 1 row (WS). Repeat next two rows until X cm is reached. R1 (RS): K all the stitches. R2 (WS): K1, *K1, P1 until 1 stitch before the end, K1 Is that correct?
14.08.2023 - 05:57DROPS Design respondeu:
Dear Shelly, on first row in A.1 you will end the row with the first stich in A.1, as the number of stitches is uneven. This means, from WS you will work ; k1 (edge stitch), then P1 (= first stitch A.1) and repeat now (K1, P1) to the edge stitch, end with K1. Happy knitting!
14.08.2023 - 10:26
![]() Phoebe Andrew escreveu:
Phoebe Andrew escreveu:
Hi, would this work with your Andes and Brushed Alpaca yarn? (I got these yarns for another of your vest patterns but I've lost my printed out pattern and this is the closest one I can find!)
03.03.2023 - 19:29DROPS Design respondeu:
Dear Phoebe, you can't work this pattern with Andes, since the yarn used is thinner than Andes. You could try the following pattern, which is worked with Andes and a group C yarn: https://www.garnstudio.com/pattern.php?id=6213&cid=19. You can also check here all patterns worked in Andes: https://www.garnstudio.com/search.php?action=browse&c=women&y=drops-andes&lang=en. Happy knitting!
05.03.2023 - 19:39
![]() Mervi escreveu:
Mervi escreveu:
Tässä ohjeessa ei mikään pitänyt paikkaansa, ei silmukkamäärä, ei koko, ei langanmenekki, ei mikää. Ja , joo tein ”koepalan”
22.02.2023 - 21:34
![]() Liliana escreveu:
Liliana escreveu:
Me encanta, se puede hacer a crochet?
15.08.2022 - 20:50DROPS Design respondeu:
Hola Liliana, este es un patrón a punto, podrías adaptarlo a ganchillo pero nosotros no hacemos patrones personalizados. En nuestro catálago puedes encontrar otros patrones similares a ganchillo, como el siguiente: https://www.garnstudio.com/pattern.php?id=9792&cid=23
21.08.2022 - 21:15
|
|||||||
City Cover#citycovervest |
|||||||
 |
 |
||||||
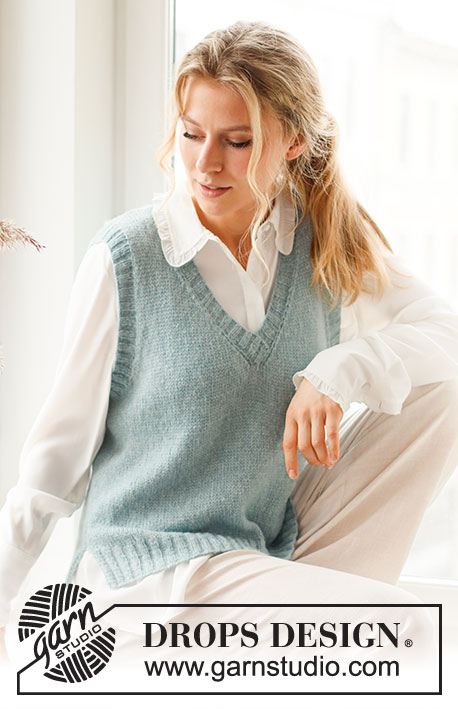
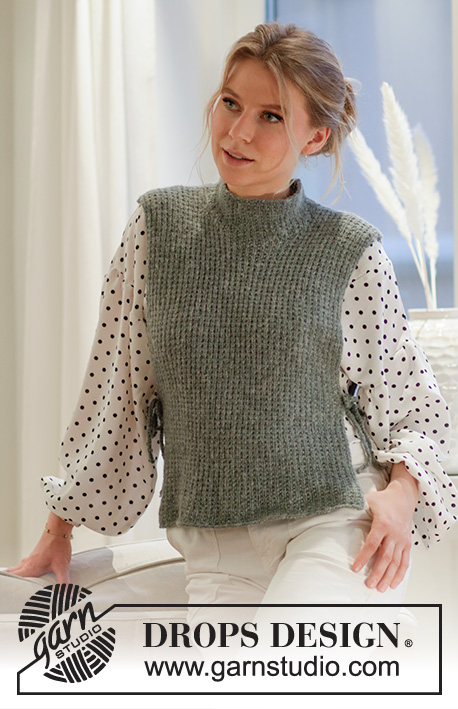
Colete em DROPS Sky, com ponto texturado, gola alta e aberturas nos lados. Do S ao XXXL.
DROPS 212-45 |
|||||||
|
------------------------------------------------------- TÉCNICAS USADAS: ------------------------------------------------------- PONTO JARRETEIRA (em idas e voltas): Tricotar todas as carreiras em meia. 1 barra jarreteira = Tricotar 2 carreiras meia. PONTO FANTASIA: Ver diagrama A.1. O diagrama mostra todas as carreiras, vistas pelo direito. ------------------------------------------------------- A PEÇA COMEÇA AQUI: ------------------------------------------------------- PULÔVER SEM MANGAS – SUMÁRIO DA PEÇA: Tricota-se em idas e voltas em diferentes partes unidas entre elas nos ombros. Levantar então as malhas para o decote. Fazem-se cordões/tranças no fim. COSTAS: Montar 77-79-81-83-85-87 malhas (incluindo 1 malha ourela de cada lado da peça) com a agulha circular 4,5 mm em Sky. Tricotar 1 carreira liga (= pelo avesso). Tricotar então da seguinte maneira: 1 malha ourela em ponto jarreteira – ver acima -, repetir A.1 até restar 1 malha, 1 malha ourela em ponto jarreteira. MANTER A MESMA TENSÃO DA INDICADA PARA A AMOSTRA. Quando a peça medir 48-50-52-54-56-58 cm, arrematar as 29-29-31-31-33-33 malhas centrais para o decote e terminar cada ombro separadamente. Continuar arrematando 1 malha na carreira seguinte a partir do decote = restam 23-24-24-25-25-26 malhas para o ombro. Quando a peça medir 50-52-54-56-58-60 cm, arrematar. Tricotar o outro ombro da mesma maneira. FRENTE: Montar 77-79-81-83-85-87 malhas (incluindo 1 malha ourela de cada lado da peça) com a agulha circular 4,5 mm em Sky. Tricotar 1 carreira liga (= pelo avesso). Tricotar então da seguinte maneira: 1 malha ourela em ponto jarreteira, repetir A.1 até restar 1 malha, 1 malha ourela em ponto jarreteira. Quando a peça medir 43-45-46-48-49-51 cm, colocar as 15-15-17-17-17-17 malhas centrais em espera num fio para o decote e terminar cada ombro separadamente. Continuar arrematando em todas as carreiras a partir do decote: 1 vez 3 malhas, 2 vezes 2 malhas e 1-1-1-1-2-2 vezes 1 malha = restam 23-24-24-25-25-26 malhas para o ombro. Quando a peça medir 50-52-54-56-58-60 cm, arrematar. Tricotar o outro ombro da mesma maneira. MONTAGEM: Unir as malhas arrematadas dos ombros entre elas. GOLA: Começando pelo direito, numa das costuras dos ombros, levantar com a pequena agulha circular 4,5 mm cerca de 78 a 92 malhas (incluindo as 15-15-17-17-17-17 malhas da frente em espera) a 1 malha do rebordo à volta do decote (o número de malhas deve ser múltiplo de 2). Tricotar (= A.1) em redondo durante 8 cm – ter atenção para tricotar as malhas em espera (ou seja, as malhas da frente) em meia por cima das malhas meia e em ponto jarreteira por cima das malhas em ponto jarreteira. Arrematar as malhas meia em meia e as malhas ponto jarreteira em liga. TRANÇAS DOS LADOS: Cortar 3 fios de 80 cm de comprimento e enfiá-los na peça, a cerca de 20 cm da carreira de montagem e a 2 malhas do rebordo ao longo da frente. Aparar os fios para que tenham todos o mesmo comprimento = temos 6 fios. Distribuí-los por 3 grupos de 2 fios, cada um, e fazer uma trança. Dar um nó no fim da trança para que não se desfaça. Cortar e aparar os fios. Repetir no outro lado da frente e de cada lado das costas. |
|||||||
Explicações do diagrama |
|||||||
|
|||||||
 |
|||||||
Terminou este projecto?Então, identifique as suas fotos com as tags #dropspattern #citycovervest ou mostre-as na galeria #dropsfan. Precisa de ajuda para este modelo?Encontrará 13 turotiais em vídeo, uma rubrica Comentários/Perguntas e muito mais ao visitar a página do modelo em www.garnstudio.com © 1982-2026 DROPS Design A/S. Todos os direitos reservados. Este documento, incluuindo as suas su-secções, tem copyrights. Saia mais o que pode fazer com os nossos modelos no fim de cada uma das páginas do nosso site. |
|||||||


Com mais de 40 anos no design de modelos de tricô e de croché, a DROPS Design oferece uma das mais vastas colecções demodelos gratuitos na Internet - traduzidos em 17 línguas. Neste dia de hoje, temos 324 catálogos e 12290 modelos - dos quais 12271 estão traduzidos em português.
Trabalhamos com muito empenho para lhe proporcionar o melhor que o tricô e o croché têm para oferecer, para lhe fornecer inspiração e conselhos bem como fios da mais elevada qualidade a preços incríveis! Gostaria de usar os nossos modelos para outros fins que não uso pessoal? Pode ler o que lhe é permitido fazer no Copyright texto que se encontra na parte de baixo de todos os nossos modelos. Bom tricô! Bom croché!
Deixe um comentário acerca do modelo DROPS 212-45
Gostaríamos muito de saber o que tem a dizer-nos acerca deste modelo!
Se deixar uma pergunta acerca do modelo, certifique-se de que escolhe a categoria adequada no formulário abaixo para acelerar o processo relativo à resposta. Os campos obrigatórios estão assinalados com um *.