
Categorias populares
Procura um fio?


Comentários / Perguntas (44)
![]() Juliane escreveu:
Juliane escreveu:
Hallo, sind die * richtig gesetzt? Es stoßen A4 und A1 aneinander - das ergibt eine Asymmetrie und nicht genügend Linksbereiche. Mir scheint die Anleitung an dieser Stelle fehlerhaft zu sein. Danke fürs Überprüfen! Viele Grüße, Juliane
07.10.2025 - 19:42DROPS Design respondeu:
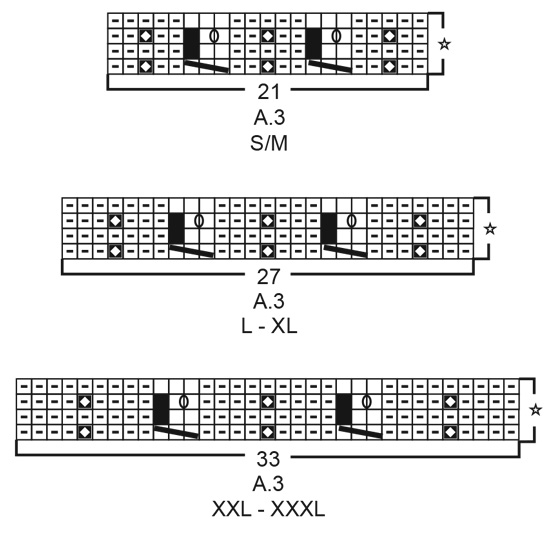
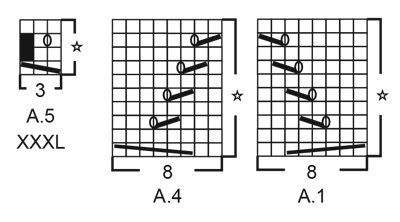
Liebe Juliane, ja, die Sternchen sind richtig gesetzt, die beiden Muster stoßen nicht direkt aneinander: * 1-1-6-6 Maschen links, A.1 (= 8 Maschen), A.2 (= 15-19-19-23 Maschen), A.1 (= 8 Maschen), A.3 (= 21-27-27-33 Maschen), A.4 (= 8 Maschen), A.2 (= 15-19-19-23 Maschen) und A.4 (= 8 Maschen) *, von *-* noch 1 x wiederholen. D.h. Sie stricken noch 1 bzw. 6 Linksmaschen nach A.4 und dann kommt erst wieder A.1. Die beiden Bereiche, in denen A.1 und A.4 nebeneinander liegen, sind genau an den Seiten des Rocks. Viel Spaß beim Stricken!
23.10.2025 - 01:04
![]() Aurelia escreveu:
Aurelia escreveu:
Bonjour, je souhaiterais faire des tutos entiers de votre gamme de pull de snood de jupe et de châles en me filme en train de tricoter du début à la fin sur Youtube je voulais voir avec vous si cela vous dérangeait si vous prenez sur vos modèles de votre site en vous citant dans mes vidéos. Merci de me contacter via facebook en entrant mon nom et mon prénom.
07.10.2025 - 11:56
![]() Aurelia escreveu:
Aurelia escreveu:
Bonsoir merci pour votre réponse je commence enfin à m'en sortir, je voulais savoir s'il était possible de m'expliquer avec les mêmes motifs pour faire un châle à manches longues si vous avez un tuto n'hésitez pas à me le faire savoir. Cordialement Aurélia.
04.10.2025 - 17:00
![]() Aurelia escreveu:
Aurelia escreveu:
Je n'ai pas compris ? Je dois faire autour un rang 1 de A1,6m envers,rang 1 de a2,6menvers,rang1 de A3, 6menvers, rang 1 de A4 et idem sur les autres rangs ?
24.09.2025 - 17:14DROPS Design respondeu:
Bonjour Aurélie, au tout 1er tour, vous tricotez le 1er tour des diagrammes dans l'ordre indiqué (avec les mailles envers), au 2ème tour, vous tricotez le 2ème tour des diagrammes et ainsi de suite, après le 4ème tour, A.2 et A.3 sont terminés (= 4 tours chacun), au 5ème tour, vous tricotez le 5ème tour de A.1 et A.4 mais vous tricotez de nouveau le 1er tour de A.2 et A.3 (vous les répétez en hauteur). Quand les diagrammes sont terminés en hauteur, vous devez les répéter, mais ils ne vont pas tous se répéter en même temps car ils se tricotent sur un nombre de rangs différents. Bon tricot!
25.09.2025 - 16:33
![]() Aurelia escreveu:
Aurelia escreveu:
Désolé de vous déranger j'espère que je ne vous embête pas, je voulais savoir si on devait tricoter le rang 1 de tous les diagrammes en même temps au premier tour ou pas merci pour vos réponses si rapide
24.09.2025 - 15:49DROPS Design respondeu:
Bonjour Aurélia, les diagrammes ne se répètent pas tous sur le même nombre de rangs en hauteur, donc si au 1er rang, vous tricotez bien le 1er rang de A.1, A.2, A.3, et A.4, lorsque le diagramme est terminé en hauteur (les 4 rangs de A.2 et A.3), vous les recommencez au 1er rang alors que vous continuez A.1 et A.4 comme le diagramme le montre. A.1 et A.4 se répètent sur 10 rangs et en même temps, A.2 et A.4 se répètent sur 4 rangs. Bon tricot!
24.09.2025 - 16:48
![]() Aurelia escreveu:
Aurelia escreveu:
Bonjour, je voulais savoir s’il y avais des vidéos qui explique le point avec le petit carré blanc sur fond noir ? Je n’arrive pas à le faire
23.09.2025 - 11:57DROPS Design respondeu:
Bonjour Aurélia, retrouvez ici, en vidéo comment on tricote ce type de torsades (même si la technique est un peu différente: on passe de 3 mailles à 2 mailles endroit et de nouveau à 3 mailles endroit). Bon tricot!
24.09.2025 - 16:47
![]() Aurelia escreveu:
Aurelia escreveu:
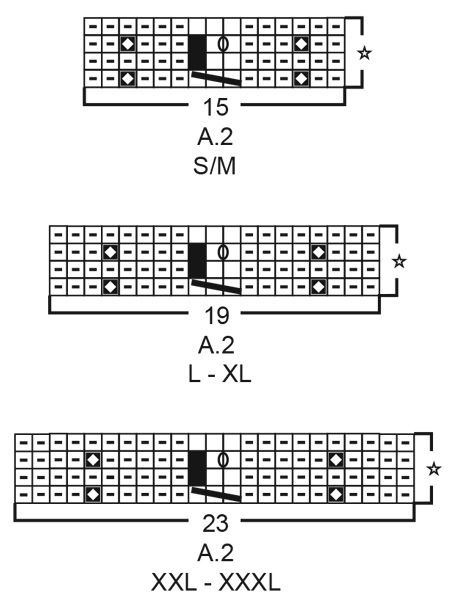
Je n'arrive pas a comprendre le diagramme a.2 a faire les points j'ai toujours que 24m sa serait simpas si possible de faire un petit tuto en montrant tout les points des diagrammes si possible en français jen demande beaucoup désolé j'espère que c'est faisable.
20.09.2025 - 23:10DROPS Design respondeu:
Bonjour Aurélia, en taille XXL et XXXL, vous devez avoir 23 mailles dans chaque A.2: 4 m env, 1 m en côtes anglaises, 5 m envers, une torsade ajourée sur 3 mailles (on diminue 1 m au 1er rang et on fait 1 jeté au 3ème rang; on aura ainsi 2 m après le 1er et le 2ème rang et 3 m après le 3ème et le 4ème rang), 5 m env, 1 m en côtes anglaises et 4 m envers. Retrouvez ici comment tricoter ce type de torsades (un peu différente dans la vidéo, mais l'idée est la même). Bon tricot!
24.09.2025 - 07:27
![]() Aurelia escreveu:
Aurelia escreveu:
Bonsoir, auriez vous des vidéos qui explique le diagramme a.2 du modèle 199-46 pour la jupe je n'arrive pas a la faire et je ne trouve pas le modèle sur youtube merci de me répondre rapidement bon tricot
20.09.2025 - 19:33DROPS Design respondeu:
Bonjour Aurelia, nous n'avons pas de video sur ce diagramme. Quel probleme avez-vous? J'envoyerai la demande pour preparer le video sur ce sujet. Bon tricot!
20.09.2025 - 20:23
![]() Cindy Royea escreveu:
Cindy Royea escreveu:
I am knitting s/m size. When I add the stitches in the pattern they add up to 168, which is correct but when I finish the 1st round, I have 15 stitches left over??? I checked and I didn’t miss any charts. What am I doing wrong?
03.02.2025 - 18:17DROPS Design respondeu:
Hi Cindy, In your size, the first round consists of purl 1 + A.1 (8stitches) + A.2 (15 stitches) + A.1 (8) + A.3 (21 stitches) + A.4 (8 stitches) + A.2 (15) + A.4 (8), which is then repeated one more time. 1 + 8 + 15 + 8 + 21 + 8 + 15 + 8 = 84. And 84 x 2 = 168. Hope this helps and happy knitting!
04.02.2025 - 07:01
![]() Daniela Blindu escreveu:
Daniela Blindu escreveu:
Ho lavorato ai ferri questa gonna in merino extra fine, l'ho comprata da un negozio in Romania andrele.ro, la prima volta ho ordinato 5 bobine, poi quando non ne ho avuto abbastanza ne ho ordinate altre 2, lo stesso codice 51, perché è l'ombra diverso? Non penso di poter indossare questa gonna.
30.11.2024 - 14:49
|
||||||||||||||||||||||||||||||||||
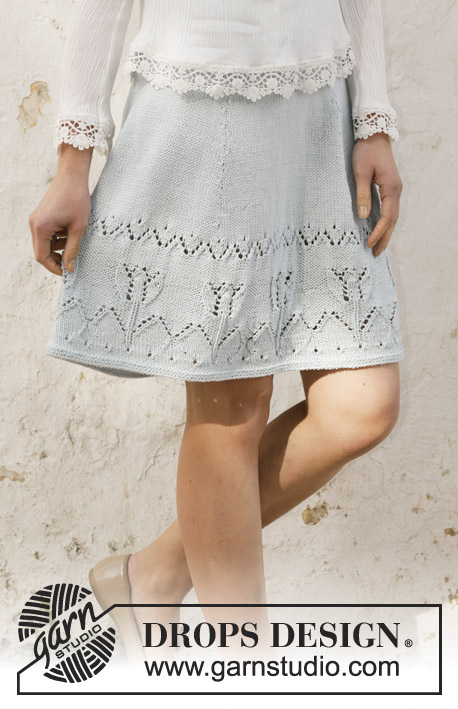
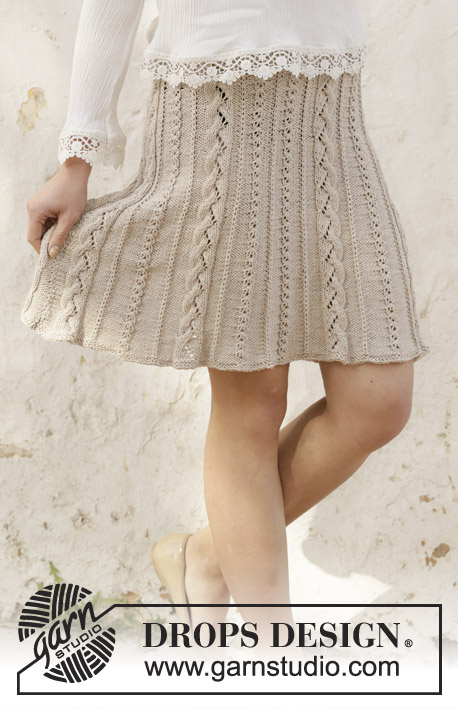
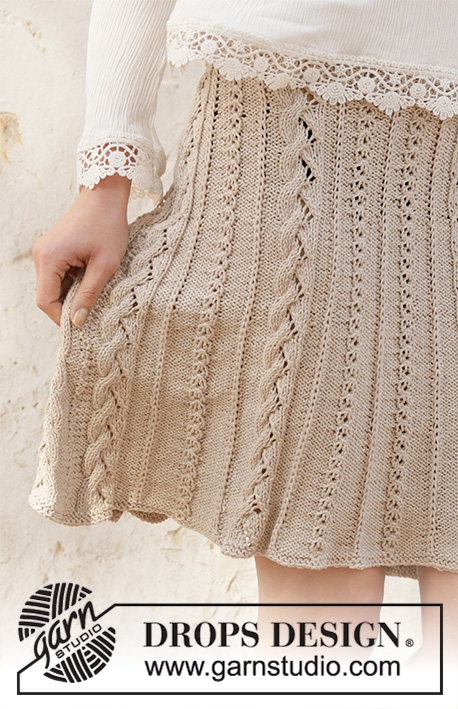
Cable Waterfall#cablewaterfallskirt |
||||||||||||||||||||||||||||||||||
 |
 |
|||||||||||||||||||||||||||||||||
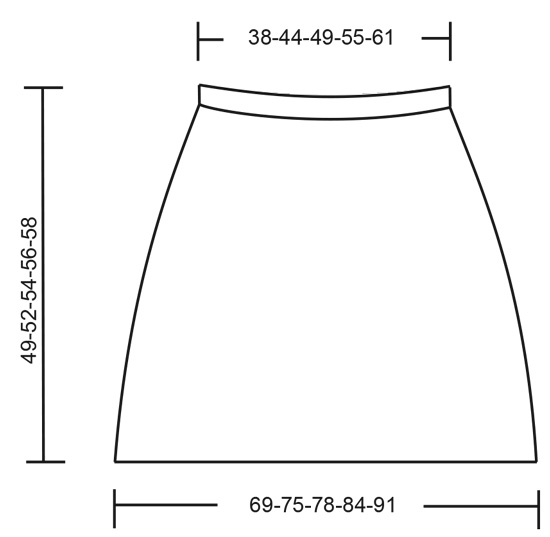
Saia tricotada de cima para baixo, com torcidos e ponto rendado, em DROPS Cotton Light Do S ao XXXL.
DROPS 199-46 |
||||||||||||||||||||||||||||||||||
|
------------------------------------------------------- TÉCNICAS USADAS: ------------------------------------------------------- PONTO JARRETEIRA (em redondo): 1 barra jarreteira em altura = 2 carreiras. Tricotar 1 volta meia e 1 volta liga. PONTO FANTASIA: Ver os diagramas A.1 a A.5 – ver diagrama indicado para cada tamanho. A.5 tricota-se apenas no tamanho XXXL. DICA TRICÔ: O número de malhas indicado nos torcidos e o ponto rendado baseia-se em 3 malhas em cada um dos pequenos torcidos; é de notar que o número de malhas destes pequenos torcidos pode variar entre 3 e 2 e mudar o número de malhas da carreira. AUMENTOS-1 (a intervalos regulares): Para calcular quando aumentar a intervalos regulares, contar o número total de malhas (por ex. 184 malhas) e dividi-lo pelo número de aumentos a fazer (por ex. 12) = 15.3. Neste exemplo, vai-se aumentar fazendo 1 laçada depois de cerca de cada 15.ª malha. Na carreira seguinte, tricotar as laçadas torcidas em meia para evitar buracos. AUMENTOS-2 (nas secções de malhas liga): Para aumentar 1 malha numa secção de malhas liga, fazer 1 laçada. Na carreira seguinte, tricotar a laçada torcida em liga para evitar um buraco. Tricotar então as novas malhas em liga. NOTA: ficará mais perfeito se aumentar alternadamente no princípio de no fim das secções de malhas liga (e não ao meio). ------------------------------------------------------- A PEÇA COMEÇA AQUI: ------------------------------------------------------- SAIA – SUMÁRIO DA PEÇA: Tricota-se de cima para baixo, em redondo na agulha circular. Tricota-se primeiro uma bainha em ponto meia por onde irá passar o elástico e continua-se então com os torcidos e o ponto rendado. BAINHA: Montar 160-184-206-232-256 malhas com a agulha circular 3 mm em Cotton Lignito. Tricotar em ponto meia durante 2 cm, 1 volta liga (= carreira de dobra) e continuar em ponto meia durante 2 cm. Tricotar então 1 volta meia aumentando 8-12-0-2-0 malhas a intervalos regulares – ver AUMENTOS-1 = 168-196-206-234-256 malhas. Tricotar então a saia como indicado abaixo. SAIA: Continuar com a agulha circular 4 mm e tricotar a 1.ª carreira da seguinte maneira: TAMANHOS S/M, L, XL e XXL: * 1-1-6-6 malhas liga, A.1 (= 8 malhas), A.2 (= 15-19-19-23 malhas), A.1 (= 8 malhas), A.3 (= 21-27-27-33 malhas), A.4 (= 8 malhas), A.2 (= 15-19-19-23 malhas) e A.4 (= 8 malhas)*, repetir de * a * mais 1 vez. TAMANHO XXXL: *A.5 (= 3 malhas), 7 malhas liga, A.1 (= 8 malhas), A.2 (= 23 malhas), A.1 (= 8 malhas), A.3 (= 33 malhas), A.4 (= 8 malhas), A.2 (= 23 malhas), A.4 (= 8 malhas) e 7 malhas liga*, repetir de * a * mais 1 vez. TODOS OS TAMANHOS: Continuar desta maneira e ver DICA TRICÔ! Quando a peça medir 8 cm a partir da carreira de dobra, aumentar 1 malha numa em cada duas secções de malhas liga – ver AUMENTOS-2 (= aumenta-se 15-15-15-15-16 malhas). Repetir estes aumentos quando a peça medir 12 cm a partir da carreira de dobra, mas aumentar , então, nas secções em malhas liga onde não se aumentou da primeira vez = 198-226-236-264-288 malhas. Continuar como antes com 1 malha a mais em cada secção de malhas liga. MANTER A MESMA TENSÃO DA INDICADA PARA A AMOSTRA! Quando a peça medir 16 cm a partir da carreira de dobra, aumentar 1 malha numa em cada duas secções de malhas liga (= aumenta-se 15-15-15-15-16 malhas). Quando a peça medir 22-22-22-23-23 cm, aumentar 1 malha nas outras secções de malhas liga (= aumenta-se 15-15-15-15-16 malhas). Aumentar desta maneira numa em cada duas secções de malhas liga a cada 6-6-6-7-7 cm até se ter aumentado mais 2 vezes em cada secção de malhas liga (4 vezes ao todo incluindo os aumentos nas malhas liga do princípio da saia) = 288-316-326-354-384 malhas. Continuar até a peça medir 48-51-53-55-57 cm a partir da carreira de dobra (ou até ao comprimento desejado; resta mais 1 cm antes do fim). Retomar a agulha circular 3 mm e tricotar 2 BARRAS JARRETEIRA – ver acima - em todas as malhas. Retomar a agulha circular 4 mm (para evitar que as malhas arrematadas fiquem demasiado apertadas) e arrematar em meia. A saia mede cerca de 49-52-54-56-58 cm a partir da carreira de dobra. MONTAGEM: Dobrar a bainha pelo avesso e costurar com pontos cuidados, deixando uma pequena abertura para enfiar o elástico. |
||||||||||||||||||||||||||||||||||
Explicações do diagrama |
||||||||||||||||||||||||||||||||||
|
||||||||||||||||||||||||||||||||||
 |
||||||||||||||||||||||||||||||||||
 |
||||||||||||||||||||||||||||||||||
 |
||||||||||||||||||||||||||||||||||
 |
||||||||||||||||||||||||||||||||||
Terminou este projecto?Então, identifique as suas fotos com as tags #dropspattern #cablewaterfallskirt ou mostre-as na galeria #dropsfan. Precisa de ajuda para este modelo?Encontrará 20 turotiais em vídeo, uma rubrica Comentários/Perguntas e muito mais ao visitar a página do modelo em www.garnstudio.com © 1982-2026 DROPS Design A/S. Todos os direitos reservados. Este documento, incluuindo as suas su-secções, tem copyrights. Saia mais o que pode fazer com os nossos modelos no fim de cada uma das páginas do nosso site. |
||||||||||||||||||||||||||||||||||


Com mais de 40 anos no design de modelos de tricô e de croché, a DROPS Design oferece uma das mais vastas colecções demodelos gratuitos na Internet - traduzidos em 17 línguas. Neste dia de hoje, temos 324 catálogos e 12290 modelos - dos quais 12271 estão traduzidos em português.
Trabalhamos com muito empenho para lhe proporcionar o melhor que o tricô e o croché têm para oferecer, para lhe fornecer inspiração e conselhos bem como fios da mais elevada qualidade a preços incríveis! Gostaria de usar os nossos modelos para outros fins que não uso pessoal? Pode ler o que lhe é permitido fazer no Copyright texto que se encontra na parte de baixo de todos os nossos modelos. Bom tricô! Bom croché!
Deixe um comentário acerca do modelo DROPS 199-46
Gostaríamos muito de saber o que tem a dizer-nos acerca deste modelo!
Se deixar uma pergunta acerca do modelo, certifique-se de que escolhe a categoria adequada no formulário abaixo para acelerar o processo relativo à resposta. Os campos obrigatórios estão assinalados com um *.