
Categorias populares
Procura um fio?


Comentários / Perguntas (102)
Carol escreveu:
Why do you not have a video for the complete pattern.so we can look at the video like on youtube. Thank you.
26.07.2015 - 10:48DROPS Design respondeu:
Dear Carol. It's not possible for us to publish videos of a complete pattern, we only make on techniques, stitches and pattern diagrams. If you need help with a specific part of the pattern, we will take a look at it.
27.07.2015 - 15:34
![]() Studer Brigitta escreveu:
Studer Brigitta escreveu:
Hallo, das Abnehmen auf der linken Seite ist nicht beschrieben! Wie muss das gemacht werden mit den Luftmaschen? Diese Anleitung ist recht spärlich beschrieben, könnte eine Auffrischung brauchen.
21.07.2015 - 06:54DROPS Design respondeu:
Die Abnahmen werden beidseitig gemacht, d.h. immer am Anfang jeder R. Die Anleitung wurde neu übersetzt und ist nun hoffentlich etwas deutlicher, ansonsten fragen Sie gerne noch einmal nach. Gutes Gelingen!
28.07.2015 - 16:56
![]() Summer escreveu:
Summer escreveu:
How would you instead of having a button connect it in the back?
04.07.2015 - 04:56DROPS Design respondeu:
Dear Summer, you can make 2 twisted strings or a ch and sew them at each end of piece then cross them and tie them with a knot. A button may be a good idea to hold both pieces tog. Happy crocheting!
04.07.2015 - 09:27
![]() Tam escreveu:
Tam escreveu:
I don't understand the part that inc 1 dc on each side every row 8 times . That mean I'm do inc 8 times the hold row 1 from beginning 1 the end and another 6 during the row ????
24.06.2015 - 18:27DROPS Design respondeu:
Dear Tam, you inc 1 st at the beg + 1 st at the end of row (= 2 sts inc per row) for 8 rows (1st size) = you have a total of 145 sts on row 9. Happy crocheting!
25.06.2015 - 10:24
![]() Stephanie escreveu:
Stephanie escreveu:
After reading pattern and looking at the diagram for drops 65-13 pattern I don't understand the instructions right above the chart
04.06.2015 - 16:46DROPS Design respondeu:
Dear Stephanie, you will find above measurement chart all diagram text, 1 symbol represent 1 st / 1 group of st - read more about diagrams here. Happy crocheting!
05.06.2015 - 09:48
![]() Pam escreveu:
Pam escreveu:
I have just got rolling with no problem.Rows 2 through 9-10-11-12: 1 dc in each dc from the previous row--at the same time, inc 1 dc on each side every row 8-9-10-11 times. What does 8-9-10-11 times mean. It doesn't make sense to me. Does it mean to increase row 3 through row 12 ? Maybe if you clear up if I am understanding this part I will be able to get through the decreasing also.
09.04.2015 - 07:50DROPS Design respondeu:
Dear Pam, this refers to the size, eg in 1st size, you work rows 2 through row 9, inc every row 8 times (in 2nd size through row 10, inc 9 times etc..). Happy crocheting!
09.04.2015 - 09:56
![]() Kathy escreveu:
Kathy escreveu:
Hi, this is a beautiful pattern, I've been trying to do the math of the pattern in my head after reading through the comments below. From my understanding, to dec on both sides takes 2 rows (so for example: dec 4 dc, size S = 6 rows in total). But with that, there would be a total of 38 rows of dec yet the chart only shows 25 rows. What am doing wrong?
03.04.2015 - 04:32DROPS Design respondeu:
Dear Kathy, you decrease at the beg and at the end of every row, ie to dec 4dc, work as stated under crocheting tip, (skip first 4 dc at beg of row ...) and at the end of same row, turn when 4 dc remain before the end of row = you have decreased 4 dc each side on the same row. Happy crocheting!
03.04.2015 - 09:22
![]() Maria escreveu:
Maria escreveu:
Thanks for you reply but I need further clarification. I'm crocheting size small, have completed the 145 dc's. According to the instructions I'm supposed to start decreasing on both sides on every row, meaning that I have to start decreasing 4 dc's at the beginning of the row by chaining 6 and starting working on the 5th chain, how do I decrease the 4 dc's at the end of the same row? If I do what you suggest in your answer I'll be only decreasing 4 dc's at only one end of the row.
24.03.2015 - 21:38DROPS Design respondeu:
Dear Maria, (answer edited) to dec 4 dc work 1 row as stated: turn at the end of row, ch 6, skip 4 dc and work in 5th dc on row and work remaining sts on row until 4 sts remain (= you have decreased 4 dc each side), turn and work next decrease. Repeat how many times required in pattern (and continue same way (see crocheting tip) when dec 3 dc and 2 dc each side. Happy crocheting!
25.03.2015 - 09:01
![]() Maria escreveu:
Maria escreveu:
Beautiful pattern but need help to continue working on it. Would you please clarify the decreasing (dec) instructions. The pattern calls for dec on both sides of every row, but the directions under Crocheting tip refer only to the end of the row. The same doesn't work for the beginning of the row. Thanking you in advance, María
23.03.2015 - 23:27DROPS Design respondeu:
Dear Maria, (answer edited) when you have worked the row with dec at the end of the first row, turn work when the number of sts remain before end of row. Happy crocheting!
24.03.2015 - 09:31
![]() Rebecca escreveu:
Rebecca escreveu:
Hi! Question- do you design all of the patterns on your website? I look forward to hearing from you :)
22.03.2015 - 07:41DROPS Design respondeu:
Dear Rebecca, you are correct, we do. Happy crocheting!
23.03.2015 - 09:53
|
|||||||||||||
Mediterranean Love Top#mediterraneanlovetop |
|||||||||||||
 |
 |
||||||||||||
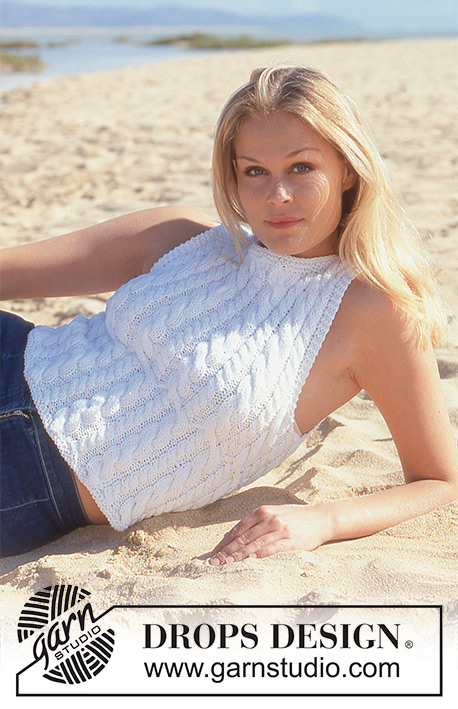
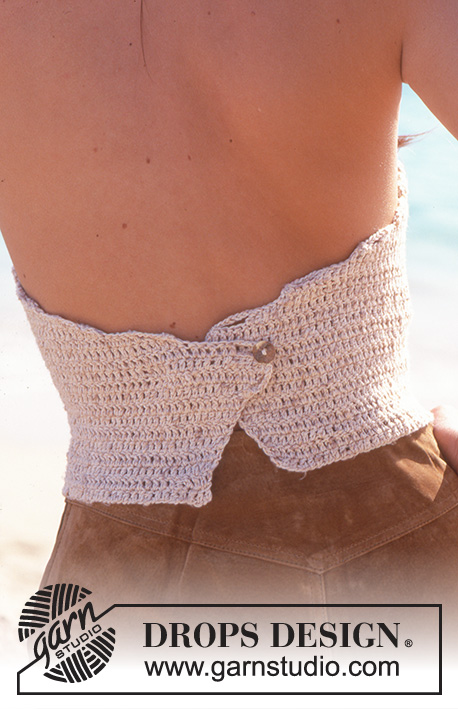
Top em croché com costas nuas em DROPS Safran Mouliné ou Safran
DROPS 65-13 |
|||||||||||||
|
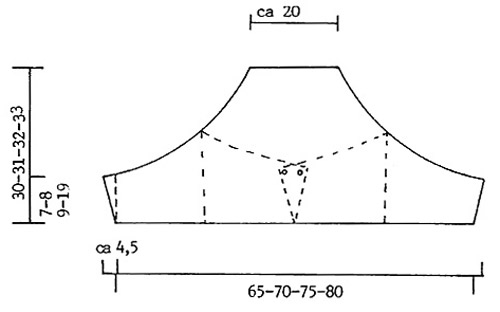
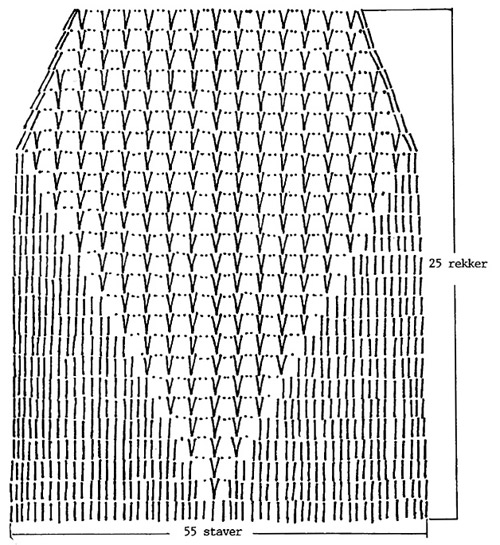
---------------------------------------------------------- NOTA: Existem termos diferentes de tricô e croché em português de Portugal e do Brasil. Malha = Ponto Canelado = Barra Ponto Jarreteira = Cordões de Tricô Ponto Liga = Ponto Tricô Croché : mpa – meio ponto alto pa – ponto alto pad – ponto alto doplo pat – ponto alto triplo pb – ponto baixo pbx – ponto baixíssimo pc – ponto corrente ---------------------------------------------------------- AMOSTRA : 20 pontos x 11 carreiras = 10 x 10 cm PONTO FANTASIA : Ver diagrama. O diagrama é igual para todos os tamanhos. DICA CROCHÉ : Para diminuir 4 pa : no princípio da carreira, 6 pc, saltar os 4 primeiros pa da carreira e começar no 5.º pa da carreira, crochetar até restarem 4 pa, virar. Para diminuir 3 pa : no fim da carreira, 5 pc, saltar os 3 primeiros pa da carreira e começar no 4.º pa da carreira, crochetar até restarem 3 pa, virar. Para diminuir 2 pa : no fim da carreira, virar, 4 pc, saltar os 2 primeiros pa pa da carreira e começar no 3.º pa da carreira, crochetar até restarem 2 pa, virar. TOP COSTAS & FRENTES : Montar uma corrente de 170 - 183 - 196 - 210 pc C 1 : 3 pa (substituir o 1.º pa por 3 pc) * saltar 1 pc, 1 pa em cada um dos 3 pontos seguintes * repetir de * a * (crochetar 3 pa nos 4 pc) até restarem 0-1-2-0 pc, 1 pa em cada pc = = 129-139-149-159 pa C 2 a 9-10-11-12 : 1 pa em cada pa da carreira precedente – AO MESMO TEMPO, aumentar 1 pa de cada lado da peça 8-9-10-11 vezes em todas as carreiras = 145-157-169-181 pa. A peça mede cerca de 7-8-9-10 cm de altura total. *** Diminuir então de cada lado da peça em todas as carreiras – ver acima- e, AO MESMO TEMPO, começar a fazer o diagrama – ter atenção para centrar o motivo na peça – nos 55 pa centrais. Diminuir de cada lado da peça da seguinte maneira : 2-3-6-8 vezes 4 pa, 3-7-7-7 vezes 3 pa, 14-9-6-5 vezes 2 pa, depois, continuar a crochetar seguindo o diagrama. Quando o diagrama esta terminado, a peça mede cerca de 30-31-32-34 cm de altura total. MONTAGEM : Com a agulha de croché 3 mm crochetar 1 casa de cada lado das costas da seguinte maneira : 1 pa, 2 pbx ½ cm mais abaixo, 1 pa. Experimentar o top para saber onde costurar os botões – costurar um botão na parte de baixo da metade esquerda das costas e 1 na parte de cima da metade direita das costas. Crochetar 3 correntes com cerca de 1 metro de comprimento, cada uma. Entrançá-las, dar um nó em cada extremidade e passar os cordões pela última carreira da frente. ________________________________________ |
|||||||||||||
Explicações do diagrama |
|||||||||||||
|
|||||||||||||
 |
|||||||||||||
 |
|||||||||||||
Terminou este projecto?Então, identifique as suas fotos com as tags #dropspattern #mediterraneanlovetop ou mostre-as na galeria #dropsfan. Precisa de ajuda para este modelo?Encontrará 4 turotiais em vídeo, uma rubrica Comentários/Perguntas e muito mais ao visitar a página do modelo em www.garnstudio.com © 1982-2026 DROPS Design A/S. Todos os direitos reservados. Este documento, incluuindo as suas su-secções, tem copyrights. Saia mais o que pode fazer com os nossos modelos no fim de cada uma das páginas do nosso site. |
|||||||||||||


Com mais de 40 anos no design de modelos de tricô e de croché, a DROPS Design oferece uma das mais vastas colecções demodelos gratuitos na Internet - traduzidos em 17 línguas. Neste dia de hoje, temos 324 catálogos e 12290 modelos - dos quais 12271 estão traduzidos em português.
Trabalhamos com muito empenho para lhe proporcionar o melhor que o tricô e o croché têm para oferecer, para lhe fornecer inspiração e conselhos bem como fios da mais elevada qualidade a preços incríveis! Gostaria de usar os nossos modelos para outros fins que não uso pessoal? Pode ler o que lhe é permitido fazer no Copyright texto que se encontra na parte de baixo de todos os nossos modelos. Bom tricô! Bom croché!
Deixe um comentário acerca do modelo DROPS 65-13
Gostaríamos muito de saber o que tem a dizer-nos acerca deste modelo!
Se deixar uma pergunta acerca do modelo, certifique-se de que escolhe a categoria adequada no formulário abaixo para acelerar o processo relativo à resposta. Os campos obrigatórios estão assinalados com um *.