
Categorias populares
Procura um fio?


Comentários / Perguntas (68)
![]() Laura Holm escreveu:
Laura Holm escreveu:
Hej:-) Hvad menes der med: "A.2 (=2 fm) 6-7-7-8-8-9 gange i bredden"? (Linje 5 i opskriften)
17.04.2016 - 17:26DROPS Design respondeu:
Hej Laura. Du haekler A.2 (som er 2 fm) 6-7-8 eller 9 gange i bredden afhaengigt af hvilken str du laver
18.04.2016 - 14:20Rainbow escreveu:
Thanks for helping. Is there a video tht shows how to do the below? "sew small stitches through both layers to make a tunnel to thread the tie through." Regards Rainbow
06.03.2016 - 08:59DROPS Design respondeu:
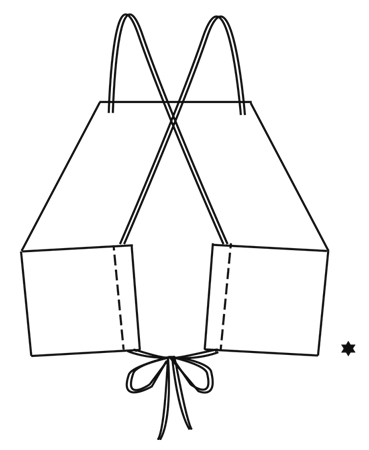
Dear Mrs Rainbow, there is no such video yet but your request has been added to our list - while it comes, I'll try to reword you how to process: fold 2 cm in each side towards WS (see also dotted line in chart) and sew small sts along this dotted line to keep the edge on place and you get a tunnel casing where you can then thread the string through - see chart at the very bottom, with top from WS and string through the tunnel casings on each side. Happy crocheting!
07.03.2016 - 10:08Rainbow escreveu:
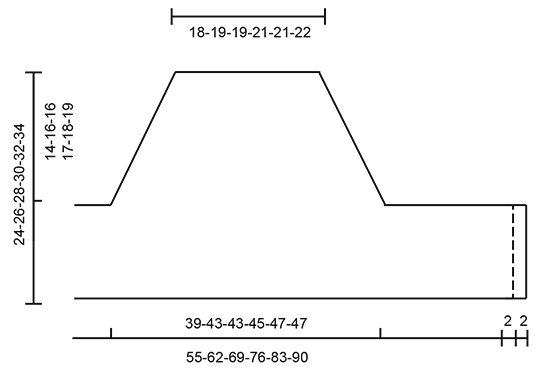
Then work 1 dc in every dc until piece measures 24-26-28-30-32-34 cm / 9½"-10 1/4"-11"-11 3/4"-12½"-13½" from cast-on edge mid front. Cast-on edge mid front means from beginning top?? Regards Rainbow
05.03.2016 - 06:50DROPS Design respondeu:
Dear Mrs Rainbow, yes you measure from cast-on edge, ie from top edge of front piece, this is the total length of top (see also measurement chart - in cm). Happy crocheting!
05.03.2016 - 18:09Rainbow escreveu:
Continue with 1 dc in every dc and continue to dec lace pattern mid front into a tip. don't get this, could you please explain?? Thanks, Rainbow
02.03.2016 - 12:45DROPS Design respondeu:
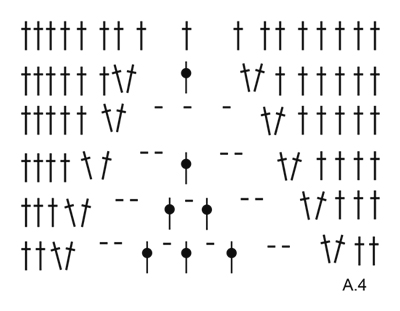
Dear Mrs Rainbow, you continue working A.1, A.2 and A.3 so that lace pattern dec as shown in A.1 and A.3. When there are only 4 ch-spaces remaining at the tip, work then diagram A.4. Happy crocheting!
02.03.2016 - 15:00Rainbow escreveu:
Work 27-30-37-44-49-57 ch (includes 5 ch to turn with), turn and work as follows: Work 1 dc in 6th ch from hook, then work 1 dc in each of the next 1-4-6-3-3-6 ch, * skip ch 1, work 1 dc in each of the next 4 dc *, repeat from *-* 3-3-4-6-7-8 more times, continue pattern as before over the 71-77-77-81-85-85 dc, then work 27-30-37-44-49-57 ch (includes 5 ch to turn with). Means?? From right side once and left side once??
01.03.2016 - 09:50DROPS Design respondeu:
Dear Rainbow, yes you crochet 27-30-37-44-49-57 ch on one side, turn and work as explained to the end of row, then at the end of this row, crochet 27-30-37-44-49-57 ch, turn and work next row. You have now inc on both sides of top. Happy crocheting!
01.03.2016 - 13:29
![]() Lindie escreveu:
Lindie escreveu:
Kære jer, Denne opskrift volder mig lidt udfordringer. Skal nu begynde forfra for 3. gang. Kan ikke forstå diagrammet. Der er 33 m når A.1-A.3 påbegyndes. Men der beskrives kun de 23 af maskerne. Hvordan hækler jeg de 10 i midten? På forhånd tak Mh Lindie
01.02.2016 - 11:21DROPS Design respondeu:
Hej Lindie. Du har 33 m og haekler: A.1 = 11 m, saa gentager du A.2 6 gange (= 12 m) og slutter af med A.3 = 10 m = 33 m haeklet
11.02.2016 - 15:25
![]() Malu De LEon escreveu:
Malu De LEon escreveu:
Could you please put the sizes measurements? Size S - M - L - XL and etc are for which size of bust?
26.01.2016 - 03:52DROPS Design respondeu:
Dear Mrs De Leon, you will find at the bottom of the pattern a measurement chart with all measurements in cm - taken flat from side to side. Compare these to a similar garment you have and like the shape to find out the matching size. Happy crocheting!
26.01.2016 - 10:32
![]() Gisele escreveu:
Gisele escreveu:
I love this! So original
10.12.2015 - 11:22
|
|||||||||||||||||||
Mandarina#mandarinatop |
|||||||||||||||||||
 |
 |
||||||||||||||||||
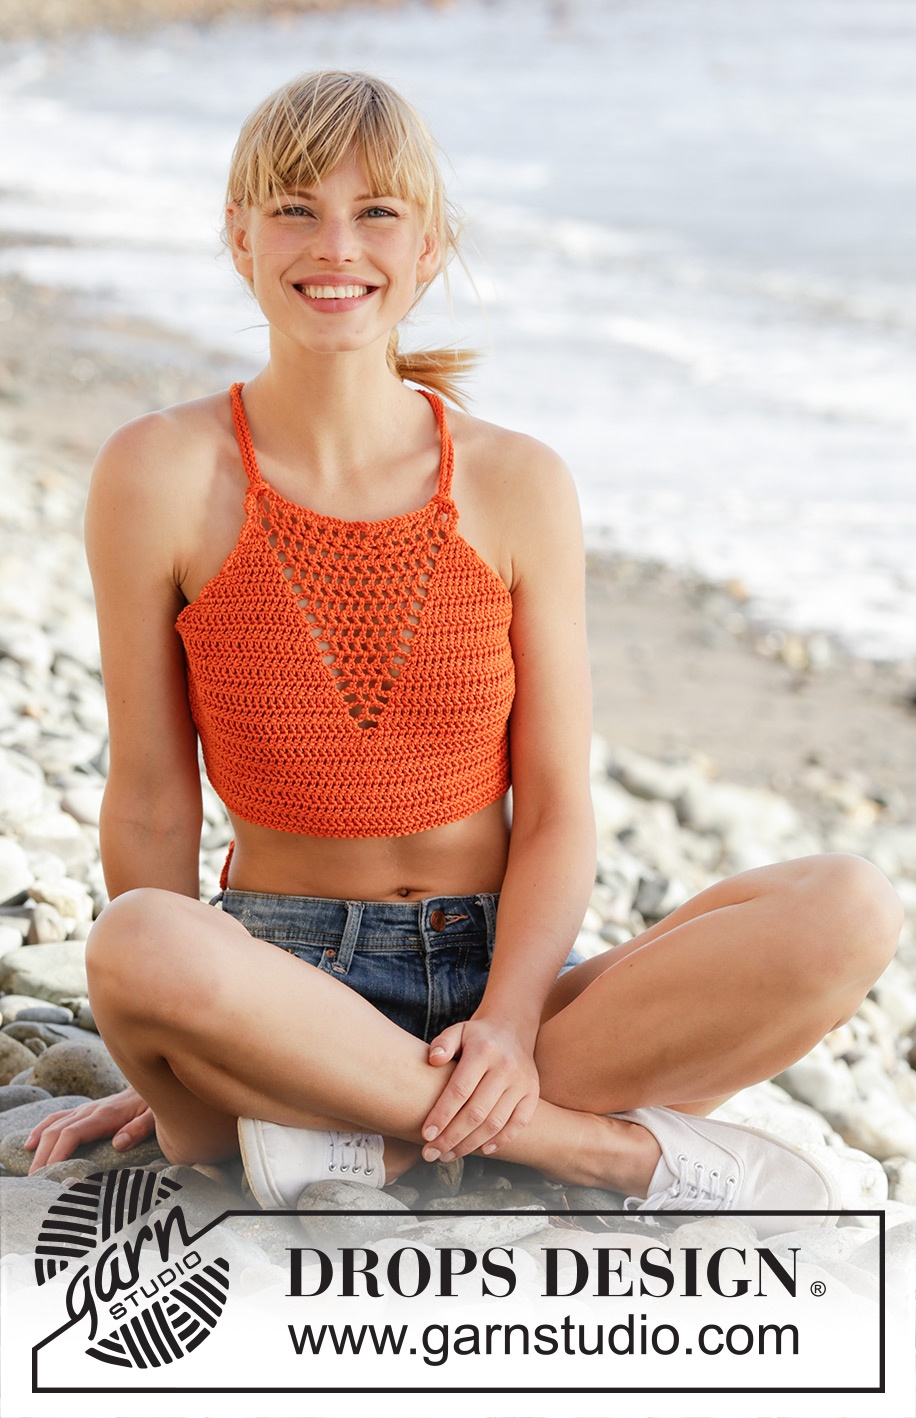
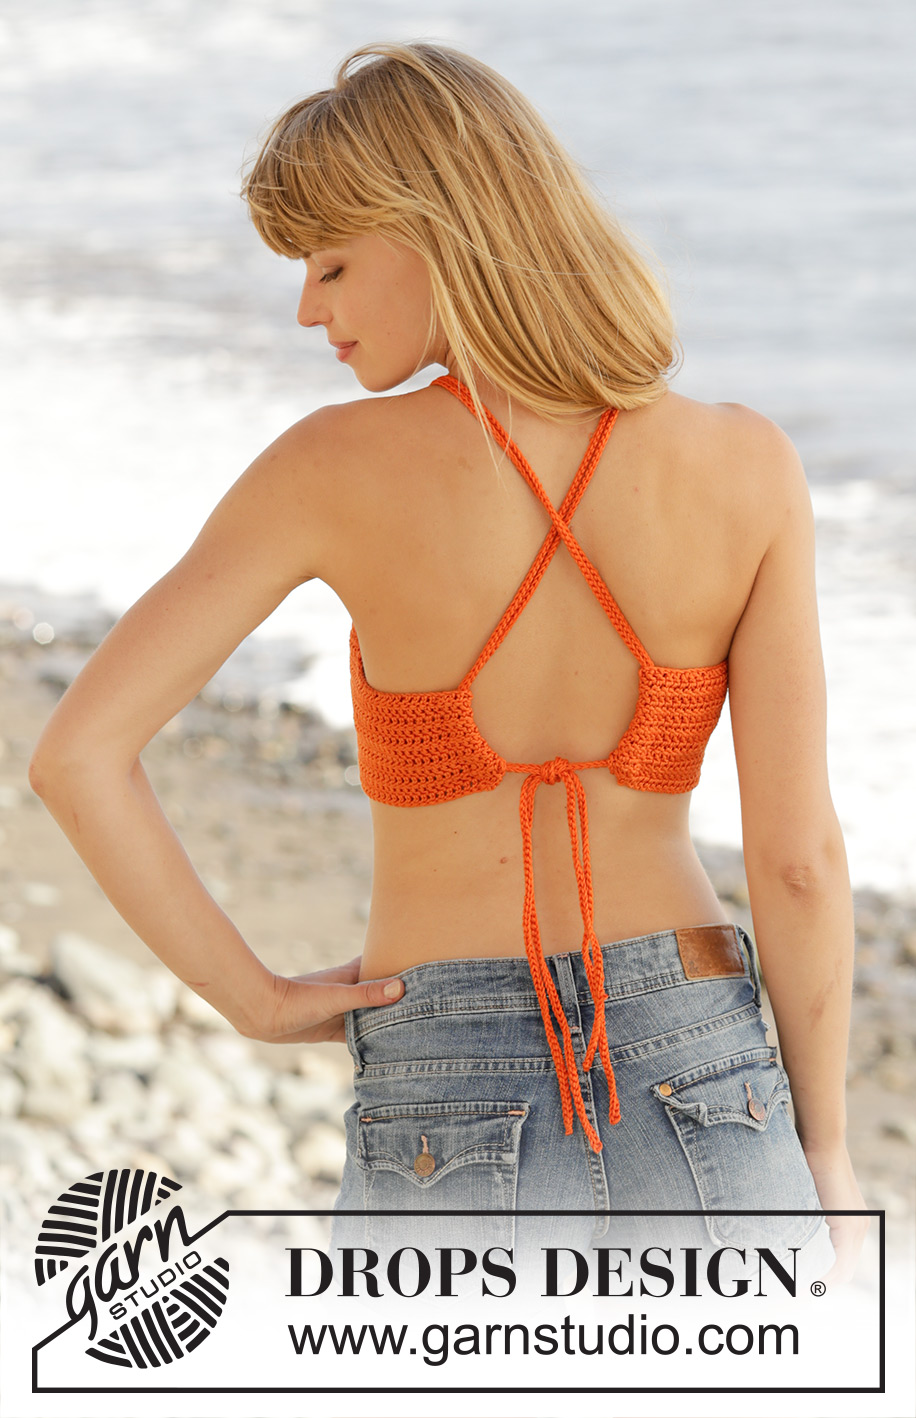
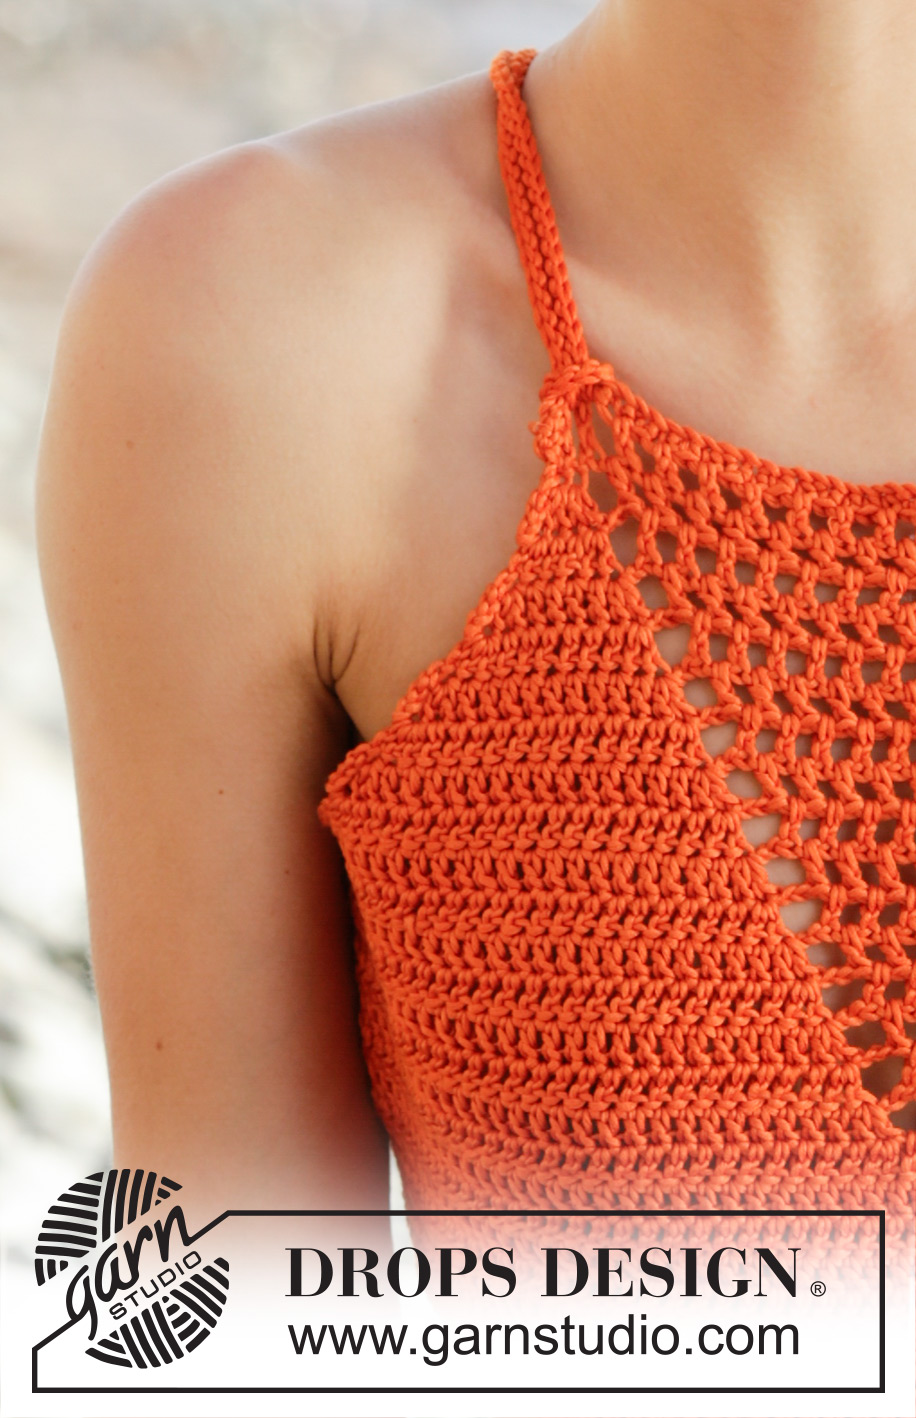
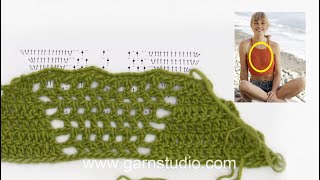
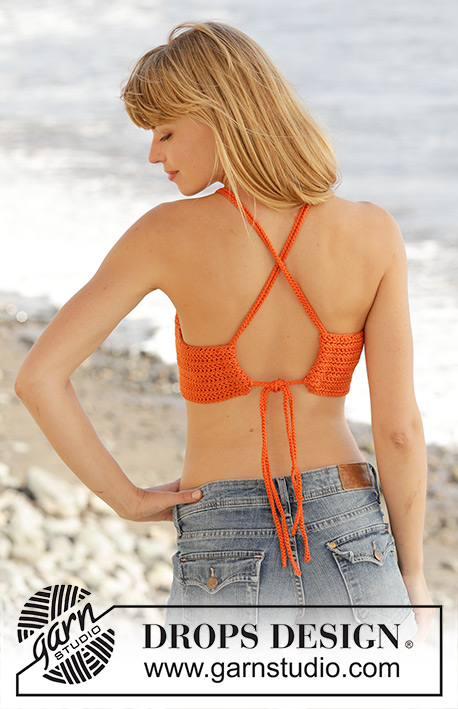
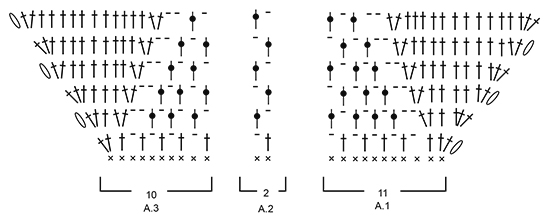
Top DROPS em croché, em pontos altos, ponto rendado, com cordões na parte de trás, crochetado de cima para baixo, em ”Muskat”. Tamanhos S-XXXL.
DROPS 170-16 |
|||||||||||||||||||
|
---------------------------------------------------------- NOTA: Existem termos diferentes de tricô e croché em português de Portugal e do Brasil. Tricô: Malha = Ponto Canelado = Barra Ponto Jarreteira = Cordões de Tricô Ponto Liga = Ponto Tricô Croché: mpa - meio ponto alto pa - ponto alto pad - ponto alto duplo pat - ponto alto triplo pb - ponto baixo pbx - ponto baixíssimo pc - ponto corrente ---------------------------------------------------------- DICA CROCHÉ: No princípio de cada carreira de pa, crochetar 5 pc para virar. Estes 5 pc não substituem o 1.º pa. PONTO FANTASIA: Ver diagramas A.1 a A.4. ---------------------------------------------------------- TOP: Crocheta-se em idas e voltas, de cima para baixo. Montar frouxamente uma corrente de 42-44-44-47-47-49 pc (incluindo 1 pc para virar) com a agulha de croché 4 mm em Muskat. Virar e crochetar da seguinte maneira: 1 pb no 2.º pc a partir da agulha de croché (= 1 pb + 1 pc para virar), 1 pb em cada um dos 2-4-4-2-2-4 pc seguintes, *saltar 1 pc, 1 pb em cada um dos 4 pc seguintes*, repetir de * a * mais 6-6-6-7-7-7 vezes, 1 pb em cada um dos 2 últimos pc = 33-35-35-37-37-39 pb. Virar e crochetar da seguinte maneira: A.1 nos 11 primeiros pb, 6-7-7-8-8-9 vezes A.2 (= 2 pb) em largura, A.3 por cima dos 10 últimos pb - VER DICA CROCHÉ! NÃO ESQUECER DE MANTER A MESMA TENSÃO DA INDICADA PARA A AMOSTRA! Quando os diagramas A.1 a A.3 tiverem sido crochetados 1 vez em altura, continuar o ponto fantasia e aumentar da mesma maneira até um total de 13-14-14-15-16-17 carreiras ter sido crochetada. Temos, então, 71-77-77-81-85-85 pa/pc. Os aumentos de cada lado de A.1 e A.3 estão, agora, feitos mas o ponto rendado continua a diminuir em ponta a meio da frente. Continuar desta maneira: 27-30-37-44-49-57 pc (incluindo 5 pc para virar), virar e crochetar da seguinte maneira: 1 pa no 6.º pc a partir da agulha de croché, crochetar então 1 pa em cada um dos 1-4-6-3-3-6 pc seguintes, *saltar 1 pc, 1 pa em cada um dos 4 pc seguintes*, repetir de * a * mais 3-3-4-6-7-8 vezes, continuar como antes nos 71-77-77-81-85-85 pa seguintes, crochetar então 27-30-37-44-49-57 pc (incluindo 5 pc para virar). Virar e crochetar da seguinte maneira: 1 pa no 6.º pc a partir da agulha de croché, crochetar então 1 pa em cada um dos 1-4-6-3-3-6 pc seguintes, *saltar 1 pc, 1 pa em cada um dos 4 pa seguintes*, repetir de * a * mais 3-3-4-6-7-8 vezes, continuar como antes por cima das 71-77-77-81-85-85 pa seguintes, crochetar então 1 pa em cada um dos últimos pa = 107-119-131-145-157-171 pa/pc. Continuar com 1 pa em cada pa e continuar a diminuir o ponto rendado a meio da frente, em ponta. Quando restam 4 aros, terminar o motivo como indicado no diagrama A.4. Crochetar então 1 pa em cada pa até a peça medir 24-26-28-30-32-34 cm desde a montagem a meio da frente. Arrematar. MONTAGEM: Dobrar os 2 cm de cada lado da peça pelo avesso e costurar com pequenos pontos cuidados enfiando a agulha nas 2 partes para criar uma bainha por onde irá passar os cordões. CORDÕES: Crochetar frouxamente 1 cordão da seguinte maneira: Montar uma corrente com a agulha de croché 4 mm em Muskat até o cordão medir 140-150-160-170-180-190 cm, virar e crochetar 1 pbx em cada pc mas ter atenção para que os pbx não sejam mais apertados do que os pc da corrente. Arrematar. Crochetar um outro cordão igual. Começando pelo direito, enfiar uma das extremidade de um dos cordões no ajour da parte de cima do top, à volta do pa e voltar a passá-lo no ajour seguinte (= as 2 extremidades do cordão pelo direito). Ajustar a altura para que as 2 extremidades tenham o mesmo comprimento, depois passar estes 2 fios na argola pelo avesso e arrematar. Repetir do outro lado. Cruzar os cordões na parte de trás e enfiá-los na bainha – ver esquema. Atar o top com um nó. |
|||||||||||||||||||
Explicações do diagrama |
|||||||||||||||||||
|
|||||||||||||||||||
 |
|||||||||||||||||||
 |
|||||||||||||||||||
 |
|||||||||||||||||||
 |
|||||||||||||||||||
Terminou este projecto?Então, identifique as suas fotos com as tags #dropspattern #mandarinatop ou mostre-as na galeria #dropsfan. Precisa de ajuda para este modelo?Encontrará 6 turotiais em vídeo, uma rubrica Comentários/Perguntas e muito mais ao visitar a página do modelo em www.garnstudio.com © 1982-2026 DROPS Design A/S. Todos os direitos reservados. Este documento, incluuindo as suas su-secções, tem copyrights. Saia mais o que pode fazer com os nossos modelos no fim de cada uma das páginas do nosso site. |
|||||||||||||||||||


Com mais de 40 anos no design de modelos de tricô e de croché, a DROPS Design oferece uma das mais vastas colecções demodelos gratuitos na Internet - traduzidos em 17 línguas. Neste dia de hoje, temos 324 catálogos e 12290 modelos - dos quais 12271 estão traduzidos em português.
Trabalhamos com muito empenho para lhe proporcionar o melhor que o tricô e o croché têm para oferecer, para lhe fornecer inspiração e conselhos bem como fios da mais elevada qualidade a preços incríveis! Gostaria de usar os nossos modelos para outros fins que não uso pessoal? Pode ler o que lhe é permitido fazer no Copyright texto que se encontra na parte de baixo de todos os nossos modelos. Bom tricô! Bom croché!
Deixe um comentário acerca do modelo DROPS 170-16
Gostaríamos muito de saber o que tem a dizer-nos acerca deste modelo!
Se deixar uma pergunta acerca do modelo, certifique-se de que escolhe a categoria adequada no formulário abaixo para acelerar o processo relativo à resposta. Os campos obrigatórios estão assinalados com um *.