
Categorias populares
Procura um fio?


Comentários / Perguntas (40)
![]() Stacey escreveu:
Stacey escreveu:
Sorry me again I’m still confused When it says alternate increase right and left side of the markers dose that mean ? Increase on the right side of each 8 markers each row and then on the left side on the next row and then back to right side again next row ? Because if you increase both right and left side of the 8 markers that’s 16 stitch’s increase each row not 8 and that’s where I’m getting confused because I don’t understand the wording ?
12.09.2019 - 09:17DROPS Design respondeu:
Dear Stacey, as shown in the video linked below, when you have to increase alternately on the right side and left side of each marker, work fist increase row increasing on the right side of each marker, then work the next increase row increasing on the left side of each marker and continue like this = you increase 8 stitches on each increase row. Happy crocheting!
12.09.2019 - 09:24
![]() Stacey escreveu:
Stacey escreveu:
Im confused by the pattern Where is says increase left and right of the markers seen on RS side Dose this mean only increase either side of the 8 marks every other row ? So one row increase and then the other just crochet into each stitch and the first row where it says just on the right does it mean increase only on the right on the first row and then just crochet the next row and then increase both sides on the next and then crochet every stitch no increase?
11.09.2019 - 22:00DROPS Design respondeu:
Dear Stacey, this video shows how to increase alternately on the right and left side of markers ; there are 8 markers and you increase 8 stitches per increase row. Happy crocheting!
12.09.2019 - 08:52
![]() Heather escreveu:
Heather escreveu:
I've done a test piece for increasing right and left of the markers. However one side the dcs increase and the other side stays at 4dc before the first 2dc increase. Ive followed the video, surely the number of dcs should increase on both sides/ends? Evenly When working the pattern are you doing 2 rows of right side marker increase before alternating right/left?
14.03.2019 - 20:34DROPS Design respondeu:
Dear Heather, you should increase alternately on right and left side of the markers - seen from RS, ie seen from RS the increase will be worked atlernately before and after the markers so that the number of sts increases on each side of markers. Happy crocheting!
15.03.2019 - 08:34
![]() Mirte escreveu:
Mirte escreveu:
Hallo, bedankt voor het antwoord op mijn vorige vraag! Ik vind nog iets niet duidelijk. In de tekst over de pas staat : “Meerder hierna afwisselend links en rechts van elke markeerder (gezien aan de goede kant). “. Klopt het dat de vermeerderingen vanuit de buitenkant van het vest telkens aan de zelfde kant van de markeerder komen omdat het werk elke toer gedraaid wordt? Zo ziet het eruit in de video, maar de toevoeging in de tekst tussen () schept verwarring. Mvg
25.11.2018 - 13:17DROPS Design respondeu:
Dag Mirte
Je meerdert de ene keer aan de linker kant en de andere keer aan de rechter kant van de markeerders, gezien vanaf de goede kant. Dus als het werk klaar is, zie je op de goede kant dat er de ene toer aan de ene kant en de andere toer aan de andere kant gemeerderd is. Als je op de verkeerde kant aan het haken bent moet je hier dus rekening mee houden (want rechts op de goede kant is op de verkeerde kant links en vice verca). Hoop dat het zo duidelijk is :)
28.11.2018 - 12:54
![]() Mirte escreveu:
Mirte escreveu:
Zijn de rijen stokjes identiek of er in de rondte wordt gehaakt (mouwen) of heen en weer (pas). Op de mouwen heb je dan alleen de “voorkant”, terwijl je op de pas voor- en achterkant afwisselt. Hoe kun je ervoor zorgen dat er geen verschil is? Groeten, Mirte
20.11.2018 - 15:58DROPS Design respondeu:
Dag Mirte
Om de mouwen en de panden er gelijk uit te laten zien, kan je de mouwen ook heen en weer haken vanaf de scheiding door steeds het werk te keren nadat je een halve vaste in de derde losse het begin van de toer hebt gehaakt.
21.11.2018 - 10:46
![]() Charley escreveu:
Charley escreveu:
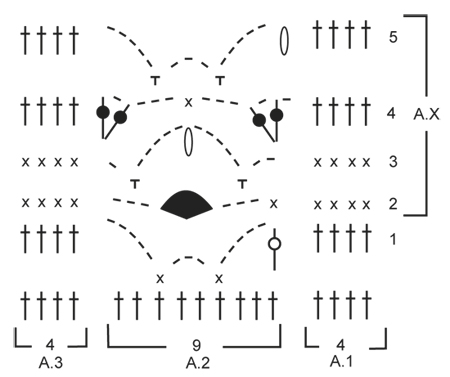
Hi, I am working the body and can\'t seem to make it add up. In row 1 of the body I start with 116 stitches for the medium but I\'m not left with 4 stitches at the end to make it even. I see on the diagram it shows the pattern uses 9 stitches but 2tog+sk2+sc+sk2+sc+sk2 is 10 stitches. I can\'t work out where I\'m going wrong, if anyone can offer any insight that would be great! Thank you
13.06.2018 - 22:28Charley respondeu:
After posting my question I have now seen my error. I was crocheting 2dc tog from previous row but have read properly now and it's 2dc tog in the same stitch. Thank you for the pattern x
13.06.2018 - 22:35
![]() Nancy Janssens escreveu:
Nancy Janssens escreveu:
Ik haak maat XXL. Een vraagje bij de pas: Ik vermeerder afwisselend links en rechts van de markeerders en om de toer 2 keer. Doe ik deze 2 keer ook thv de markeerders en zoja de welke en in welke toer? Vb toer 2 en 4? Of meer verspreid in de pas?
10.10.2017 - 19:55DROPS Design respondeu:
Hallo Nancy, Het is de bedoeling dat je het meerderen steeds afwisselend rechts en links van de markeerders doet. Als je om de twee naalden meerdert, meerder je de ene keer bijvoorbeeld links van de markeerders en 2 naalden later rechts van de markeerders. Je wisselt dus steeds af: als je de vorige keer links van de markeerders hebt gemeerderd, doe je het de volgende keer rechts van de markeerders en zo ga je steeds heen en weer.
04.11.2017 - 14:26
![]() Petra Vincken escreveu:
Petra Vincken escreveu:
Hoi, ik moet nu de eerste regel van het lijf haken , mijn vraag is nu,,er staat , ga nu verder met 1 stk in elke stk/L op de toer , wil dat zeggen dat iK op die2 maal 8L die ik heb moeten haken in de vorige toer ook stokjes op moet haken? alvast bedankt ,Petra
26.05.2017 - 10:18DROPS Design respondeu:
Hallo Petra, Ja, dat klopt helemaal. Op iedere losse haak je een stokje en op ieder stokje haak je een stokje.
26.05.2017 - 16:13
![]() Stanneke escreveu:
Stanneke escreveu:
Hallo, ik begrijp bij de mouw niet zo goed wat wordt bedoeld met: naai de opening onder de mouw dicht (bij de afwerking) Moet je deze steken niet meenemen met het in het rond haken van de mouw? Dank alvast!
21.01.2017 - 15:43DROPS Design respondeu:
Hoi Stanneke. Je hebt gelijk. Je hoeft geen naad te sluiten. Wij zullen het weghalen.
26.01.2017 - 12:00
![]() Melli escreveu:
Melli escreveu:
Hallo, Nachdem ich 9 Reihen mit je 1 Stb. Zunahmen gehäkelt habe, steht in jeder 2. Reihe -3- (für Größe M) x arb. Wie soll ich dies verstehen? Nach den 9 Reihen habe ich nämlich 147 Stb. (14cm ). Mir fehlen also 33 Stb. bis 180/ und 9cm bis 23. Vielen Dank im Voraus LG Melli
15.10.2016 - 17:02DROPS Design respondeu:
Liebe Melli, in der Größe M haben Sie 76 Stb, dann sollen Sie 1 M. an jeder Markierung (= 8 Zunahmen) in jede R. ins. 10 x zunehmen: 70 + (8 Zunahmen x 10 = 80) = 156 - dann nehmen Sie 1 M. an jeder Markierung in jede 2. R. ins 3 x = 156+ (8 Zunahmen x 3) = 180 M.
17.10.2016 - 09:09
|
|||||||||||||||||||||||||
Lakeside Cardigan#lakesidecardigan |
|||||||||||||||||||||||||
|
|
|||||||||||||||||||||||||
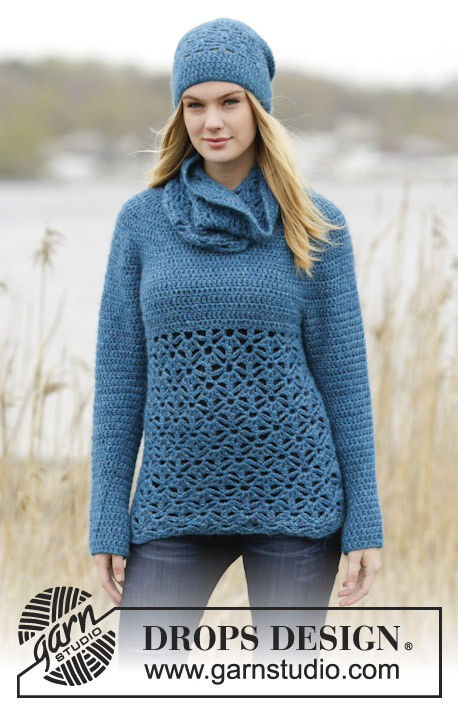
Casaco DROPS em croché com encaixe arredondado, pontos altos e ponto de ajours, crochetado de cima para baixo (top down), em ”Air”. Do S ao XXXL.
DROPS 164-33 |
|||||||||||||||||||||||||
|
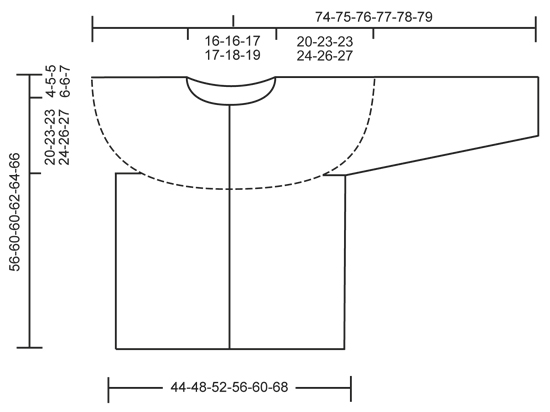
---------------------------------------------------------- NOTA: Existem termos diferentes de tricô e croché em português de Portugal e do Brasil. Malha = Ponto Canelado = Barra Ponto Jarreteira = Cordões de Tricô Ponto Liga = Ponto Tricô Croché : mpa – meio ponto alto pa – ponto alto pad – ponto alto duplo pat – ponto alto triplo pb – ponto baixo pbx – ponto baixíssimo pc – ponto corrente ---------------------------------------------------------- DICA CROCHÉ: No princípio de cada carreira de pb, crochetar 1 pc para virar. O pc não substitui o 1.º pb. Substituir o 1.º pa no princípio de cada carreira de pa por 3 pc. Mangas: Quando se crocheta em redondo, terminar todas as carreiras com 1 pbx no 3.º pc do princípio da carreira. PONTO FANTASIA: Ver diagramas A.1 a A.3. CROCHETAR JUNTAMENTE 2 PA (num pa): Crochetar 1 pa no pa seguinte mas não fazer a última laçada, crochetar 1 outro pa no mesmo pa, mas na última laçada, crochetar juntamente todas as argolas que estão na agulha de croché. CROCHETAR JUNTAMENTE 2 PA (à volta de um pc): Crochetar 1 pa à volta do pc do meio do grupo de pa mas não fazer a última laçada, crochetar 1 outro pa no mesmo pc, mas na última laçada, crochetar juntamente todas as argolas que estão na agulha de croché. GRUPO DE PA: Crochetar um grupo de pa à volta do aro da seguinte maneira: *1 pa, 1 pc*, repetir de * a * mais 2 vezes à volta do mesmo aro, 1 pa à volta do mesmo aro,. AUMENTOS: Para aumentar 1 pa, crochetar 2 pa num pb/pa. DIMINUIÇÕES: Diminuir 1 pa no princípio e no fim da carreira da seguinte maneira: Crochetar 1 pa (= 3 pc no princípio da carreira), *1 pa, mas não fazer a última laçada (= 2 argolas na agulha de croché), crochetar então o pa seguinte mas na última laçada, crochetar juntamente todas as argolas que estão na agulha de croché*, repetir de * a * quando restarem 3 pa antes do fim da carreira = 1 ponto diminuído de cada lado do marcador. ---------------------------------------------------------- CASACO: Crocheta-se de cima para baixo, em idas e voltas a partir do meio da frente. ENCAIXE: Montar uma corrente de 75-78-84-89-93-98 pc (incluindo 1 pc para virar) com a agulha de croché 6 mm em Air. Crochetar a carreira seguinte da seguinte maneira - VER DICA CROCHÉ: CARREIRA 1: 1 pb no 2.º pc a partir da agulha de croché, 1 pb em cada um dos 1-4-2-7-3-8 pc seguintes, *saltar 1 pc, 1 pb em cada um dos 7 pc seguintes*, repetir de * a * 8-8-9-9-10-10 mais 10 vezes = 65-68-73-78-81-86 pb. CARREIRA 2: 1 pa em cada um dos 4 primeiros pb (= orla da frente), 1 pa em cada pb até restarem 4 pb e, AO MESMO TEMPO, aumentar 6-8-8-10-12-23 pa a intervalos regulares - VER AUMENTOS -, 1 pa em cada um dos 4 últimos pb = 71-76-81-88-93-109 pa. Colocar então um total de 8 marcadores da seguinte maneira, sem crochetar ao mesmo tempo: Colocar 4 marcadores de cada lado da peça da seguinte maneira: 1 marcador depois de 13-13-14-14-16-19 pa, o marcador seguinte depois de 2 pa, o marcador seguinte depois de 9-11-12-14-14-17 pa, e terminar com o último marcador depois de 2 pa. Temos 19-20-21-24-25-29 pa entre os 2 marcadores do meio, no lado das costas do casaco. Continuar em pa (= 1 pa em cada pa) e, AO MESMO TEMPO, aumentar 1 pa à direita de cada um dos 8 marcadores. Aumentar então alternadamente à direita e à esquerda de cada marcador (visto pelo direito). Repetir estes aumentos mais 9-9-11-12-13-16 vezes em todas as carreiras, e 2-3-2-2-2-0 vezes a cada 2 carreiras = 167-180-193-208-221-245 pa. A peça mede cerca de 20-23-23-24-26-27 cm. NÃO ESQUECER DE MANTER A MESMA TENSÃO DA INDICADA PARA A AMOSTRA! Na carreira seguinte, crochetar da seguinte maneira: 25-27-29-31-34-38 pa (frente), 8 pc (sob a manga), saltar 38-40-42-45-47-50 pa da carreira precedente (= manga), 41-46-51-56-59-69 pa (dos), 8 pc (sob a manga), saltar 38-40-42-45-47-50 pa da carreira precedente (= manga) e 25-27-29-31-34-38 pa (frente). Colocar 1 marcador e passar a medir a partir daqui! COSTAS & FRENTES: Temos, agora, 107-116-125-134-143-161 m/p para as costas e as frentes. Passar a medir a partir daqui. Crochetar então 1 pa em cada pa/pc, virar e crochetar então a carreira seguinte no PONTO FANTASIA - ver acima -, da seguinte maneira: CARREIRA 1: 1 pa em cada um dos 4 primeiros pa (= A.1), crochetar então A.2 da seguinte maneira: *CROCHETAR JUNTAMENTE 2 PA (NUM PA) - ver acima -, 5 pc, saltar 2 pa, 1 pb no pa seguinte, 3 pc, saltar 2 pa, 1 pb no pa seguinte, 5 pc, saltar 2 pa*, repetir de * a * mais 10-11-12-13-14-16 vezes, 1 pa em cada um dos pa restantes (= A.3). CARREIRA 2: 1 pb em cada um dos 4 primeiros pa, *3 pc, saltar 1 aro, crochetar 1 GRUPO DE PA - ver acima -, à volta do aro seguinte, 3 pc, saltar 1 aro, 1 pb nos 2 pa crochetados juntamente *, repetir de * a * mais 10-11-12-13-14-16 vezes, 1 pb em cada um dos 4 últimos pa. CARREIRA 3: 1 pb em cada um dos 4 primeiros pb, *2 pc, 1 pb à volta do aro seguinte, 5 pc, CROCHETAR JUNTAMENTE 2 PA (à volta do pc) - ver acima -, 5 pc, 1 pb à volta do aro seguinte depois do grupo de pa, 1 pc*, repetir de * a * mais 10-11-12-13-14-16 vezes, 1 pb em cada um dos 4 últimos pb. CARREIRA 4: 1 pa em cada um dos 4 primeiros pb, (1 pa, 1 pc, 1 pa) à volta do 1.º aro, 3 pc, saltar 1 aro, 1 pb nos 2 pa crochetados juntamente, 3 pc, saltar 1 aro, * (1 pa, 1 pc, 1 pa, 1 pc, 1 pa, 1 pc, 1 pa) à volta do aro seguinte, 3 pc, saltar 1 aro, 1 pb nos 2 pa crochetados juntamente, 3 pc, saltar 1 aro*, repetir de * a * mais 9-10-11-12-13-15 vezes, (1 pa, 1 pc, 1 pa, 1 pc) à volta do último aro, 1 pa em cada um dos 4 últimos pb. CARREIRA 5: 1 pa em cada um dos 4 primeiros pa, *crochetar juntamente 2 pa JUNTAMENTE (à volta do pc), 5 pc, 1 pb à volta do aro depois do grupo de pa, 3 pc, 1 pb à volta do aro seguinte, 5 pc*, repetir de * a * mais 10-11-12-13-14-16 vezes, 1 pa em cada um dos 4 últimos pa. Continuar desta maneira e repetir A.X (= carreiras 2 -5) em idas e voltas até a peça medir cerca de 32 cm para todos os tamanhos – ajustar a altura para terminar depois de uma carreira 2 ou 4 de A.1-A.3. A peça mede 56-60-60-62-64-66 cm au total. MANGAS: As mangas crochetam-se em redondo, de cima para baixo. Colocar 1 marcador a meio dos 8 pc sob a manga e passar a medir a partir daqui – fazer seguir o marcador até ao fim. Unir o fio com 1 pbx no 5.º dos 8 pc da cava e crochetar: 3 pc (= 1 pa), 1 pa em cada um dos 3 pc seguintes, 1 pa em cada um dos pa da manga e 1 pa nos 4 últimos pc sob a manga = 46-48-50-53-55-58 pa - ver DICA CROCHÉ! Continuar em pa e, AO MESMO TEMPO, quando a manga medir cerca de 4 cm, começar a diminuir - VER DIMINUIÇÕES. Repetir estas diminuições mais 8-9-10-10-11-12 vezes a cada 3-2-2-2-2-1 carreiras = restam 28-28-28-31-31-32 pa. Arrematar quando a manga medir 46-44-44-43-42-40 cm. Crochetar a outra manga da mesma maneira. MONTAGEM: Costurar os botões na frente esquerda, o de cima a cerca de 1 cm da gola, colocar os seguintes com um espaço de cerca de 8-8-9-9-9-10 cm. Abotoar entre 2 pa da frente direita. |
|||||||||||||||||||||||||
Explicações do diagrama |
|||||||||||||||||||||||||
|
|||||||||||||||||||||||||
 |
|||||||||||||||||||||||||
 |
|||||||||||||||||||||||||
Terminou este projecto?Então, identifique as suas fotos com as tags #dropspattern #lakesidecardigan ou mostre-as na galeria #dropsfan. Precisa de ajuda para este modelo?Encontrará 17 turotiais em vídeo, uma rubrica Comentários/Perguntas e muito mais ao visitar a página do modelo em www.garnstudio.com © 1982-2026 DROPS Design A/S. Todos os direitos reservados. Este documento, incluuindo as suas su-secções, tem copyrights. Saia mais o que pode fazer com os nossos modelos no fim de cada uma das páginas do nosso site. |
|||||||||||||||||||||||||


Com mais de 40 anos no design de modelos de tricô e de croché, a DROPS Design oferece uma das mais vastas colecções demodelos gratuitos na Internet - traduzidos em 17 línguas. Neste dia de hoje, temos 324 catálogos e 12290 modelos - dos quais 12271 estão traduzidos em português.
Trabalhamos com muito empenho para lhe proporcionar o melhor que o tricô e o croché têm para oferecer, para lhe fornecer inspiração e conselhos bem como fios da mais elevada qualidade a preços incríveis! Gostaria de usar os nossos modelos para outros fins que não uso pessoal? Pode ler o que lhe é permitido fazer no Copyright texto que se encontra na parte de baixo de todos os nossos modelos. Bom tricô! Bom croché!
Deixe um comentário acerca do modelo DROPS 164-33
Gostaríamos muito de saber o que tem a dizer-nos acerca deste modelo!
Se deixar uma pergunta acerca do modelo, certifique-se de que escolhe a categoria adequada no formulário abaixo para acelerar o processo relativo à resposta. Os campos obrigatórios estão assinalados com um *.