
Categorias populares
Procura um fio?


Comentários / Perguntas (18)
![]() Michaela Lindahl escreveu:
Michaela Lindahl escreveu:
Hej! Jag förstår inte hur jag ska maska av när jag är färdig med öglan. Dvs jag förstår inte ” Nu stickas m från fram- och baksidan räta tills 2 och 2 SAMTIDIGT som de maskas av.” Och jag hittar tyvärr inte någon video som förklarar. Tack för att ni alltid hjälper till!
12.01.2025 - 21:20DROPS Design respondeu:
Hej Michaela, du stikker højre pind ind i første maske på den ene pind og ind i første maske på den anden pind, strikker maskerne sammen og lukker af efterhånden :)
14.01.2025 - 14:35
![]() Etta Otten escreveu:
Etta Otten escreveu:
Bovenstaand tel patroon hoort niet bij bovenstaande foto, maar bij Mandoline 1987’s Kitted Potholder #1. De foto staat hieronder.
04.04.2023 - 16:12
![]() Etta Otten escreveu:
Etta Otten escreveu:
Graag wil ik de pannenlappen DROPS 159-25 DROPS design: Model nr. r-683 breien, maar als ik naar de foto kijk, mis ik een paar telpatronen in de werkbeschrijving. Alleen A.1 is te zien. Moet ik de rest op een andere plek zoeken? Graag hoor ik van u. Vriendelijke groet.
03.04.2023 - 22:08DROPS Design respondeu:
Dag Etta,
Er is ook maar 1 patroon, alleen A.1. Alle kabels e.d. zijn hierin verwerkt.
05.04.2023 - 07:45
![]() Antje Konopka escreveu:
Antje Konopka escreveu:
Ich verstehe leider das Diagramm nicht. Wie stricke ich denn A1 in der Mitte? Also in den ersten 4 Reihen?
18.04.2022 - 23:55DROPS Design respondeu:
Liebe Frau Konopka, die Zöpfe und das Lochmuster werden nicht genauso in der Höhe wiederholt, dh das Lochmuster in der Mitte wiederholen Sie wenn die ersten 8 Reihen fertig sind, aber die Zöpfe beidseitig stricken Sie wie zuvor (= in jede 6. Runde). Viel Spaß beim stricken!
19.04.2022 - 11:53
![]() Claudia Mackenzie escreveu:
Claudia Mackenzie escreveu:
Well I have started the Pattern A1 but noticed that where the marker was at the first start of round 1 by the time I did the 56 stitchs it did not reach the marker(where we increased 9 on the knit 1-49ers) so I thought just do the 56 sts so I went to the next round and noticed that the same thing happened. I guess what confusing me is are the 56st in pattern A1 suppose to reach the marker each time? Or do we just knit the pattern A1 and when the stitches end we knit to the marker then due P
15.01.2022 - 03:36DROPS Design respondeu:
Dear Mrs Mackenzie, after you have increased between 1st and 2nd marker the 2nd marker is now in the 58th stitch (not in the 49th anymore because of the increases), and you work: K1, A.1 (= 56 sts), K1, P2, K43, P2 - there are more sts on front piece because of the cable but width will be the same on front and back. Hope it will help. Happy knitting!
19.01.2022 - 10:18
![]() Claudia Mackenzie escreveu:
Claudia Mackenzie escreveu:
Thank you for your response.it is helpful and I looked at the lesson .I know each square is a stitch so when you have the lines going through 2 of the square does that mean when do it twice or just one time. Example 1st round in A1: purl ,purl (slip1st as if to knit,K1,Psso) do we do it twice?Then you do a 1Yo,K2 tog ,purl,purl.This is how I’m reading the pattern. Now 2nd round in pattern A1: purl,purl,knit,knit,purl,knit 6,purl,knit2,purl2,knit9,purl,purl,knit,knit,
13.01.2022 - 00:42DROPS Design respondeu:
Hi Claudia, If you mean the 2 squares side by side with a diagonal line through, then this means the explanation covers 2 stitches (you do not do it twice). !st row in A.1 is : P2, psso, 1 yarn over, P1, K6, P1, 1 yarn over, K2 together, P2 and so on. You are correct in your reading of row 2. Happy knitting!
13.01.2022 - 07:54
![]() Claudia Mackenzie escreveu:
Claudia Mackenzie escreveu:
In the pattern for this pot holder in the 56 stitch. you in the first row purl twice then you slip one as if to knit then do your 6 cables then purl then knit2 together.then the next row purl2,Knit 2,Purl1 then do you do a cable or knit?after that you Purl 1 then K2 or do you knit 2together.In other words do you only do the cables or slip 1 or knit togeather where the vertical lines are? I see that in the middle of the 56 stitches you have some vertical lines and can see that it is in di
12.01.2022 - 09:43DROPS Design respondeu:
Dear Mrs Mackenzie, in diagram A.1 you will have decreases and yarn over (see 4th and 5th symbol for decreases) and at the same time you will work cables (as shown in next to last + last symbol). When the lace pattern in the middle of A.1 is done, repeat from first row, while continuing the cables on each side, ie the middle panel is worked over 8 round but the cables are worked over every 6th round (and the small lace pattern on each side on every other round). This lesson might help you understanding how to read diagrams. Happy knitting!
12.01.2022 - 15:55
![]() Claudia Mackenzie escreveu:
Claudia Mackenzie escreveu:
So when do you start the pattern in A1?Do you do the purl 1 round then knit 1 round first then when you get to the 5th round is that when you start the increases of 9 sts. Or do you start the increases at each knit 1 round?
08.01.2022 - 04:18DROPS Design respondeu:
Dear Mrs Mackenzie, cast on the stitches, then purl 1 round, knit 1 round, purl 1 round, knit 1 round and purl 1 round. Insert the 2 markers without working the stitches, on next round, knit all stitches increasing between 1st and 2nd marker. On next round, start working A.1 between first 2 markers. Happy knitting!
10.01.2022 - 07:43
![]() MJ escreveu:
MJ escreveu:
Hei! Så nydelige grytekluter! Men jeg trenger litt hjelp med diagrammet. Hvorfor er det tegnet flere omganger på sidene?? Hva gjør man da med maskene i midten?
26.07.2019 - 00:50DROPS Design respondeu:
Hej, ja vist er de fine :) du fortsætter bare de midterste masker fra starten igen. Det er fordi de yderste snoninger i hver side skal strikkes på hver 6.pind. God fornøjelse!
02.08.2019 - 09:37
![]() Maria escreveu:
Maria escreveu:
Hei! Blir disse tykke og trygge grytekluter som beskytter hendene, eller vil hullmønsteret gjøre at de først og fremst er dekorative? Jeg står mellom å strikke disse eller strikke "sun-baked" en gang til.
10.04.2018 - 21:02DROPS Design respondeu:
Hei Maria. Disse gryteklutene strikkes rundt så de blir dobble. Du kan derfor helt fint bruke dem. God fornøyelse
12.04.2018 - 15:50
|
||||||||||||||||||||||
Helping Hand#helpinghandpotholder |
||||||||||||||||||||||
|
|
||||||||||||||||||||||
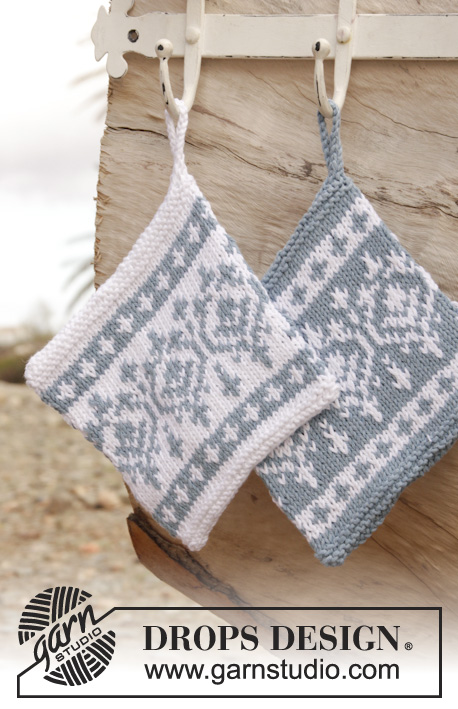
Pegas DROPS em ponto fantasia, em ”Muskat”.
DROPS 159-25 |
||||||||||||||||||||||
|
---------------------------------------------------------- NOTA: Existem termos diferentes de tricô e croché em português de Portugal e do Brasil. Malha = Ponto Canelado = Barra Ponto Jarreteira = Cordões de Tricô Ponto Liga = Ponto Tricô Croché : mpa – meio ponto alto pa – ponto alto pad – ponto alto duplo pat – ponto alto triplo pb – ponto baixo pbx – ponto baixíssimo pc – ponto corrente ---------------------------------------------------------- PONTO FANTASIA: Ver diagrama A.1. ---------------------------------------------------------- PEGA: Tricota-se em redondo na agulha circular. Montar 96 ms/pts com a agulha circular 3 mm em Muskat. Tricotar 1 carreira liga/tricô, 1 carreira meia, 1 carreira liga/tricô, 1 carreira meia e 1 carreira liga/tricô. Colocar 1 marcador na 1.ª m/p do princípio da carreira e 1 outro na 49.ª m/p (= referências para os lados). Tricotar 1 carreira meia e, AO MESMO TEMPO, distribuir 9 aumentos entre o 1.º e o 2.º marcador (porque o ponto fantasia “aperta” o a peça, precisamos de mais ms/pts para a frente) = 105 ms/pts. Tricotar a 1.ª carreira da seguinte maneira: 1 m/p meia (= a m/p com o marcador), A.1 (= 56 ms/pts), 1 m/p meia (= a m/p com o marcador), 2 ms/pts liga/tricô, 43 ms/pts meia e 2 ms/pts liga/tricô. Continuar desta maneira até a peça medir cerca de 19 cm - ajustar a altura para parar depois de 1 motivo do meio de A.1 em altura. Tricotar, então, 1 carreira meia e, AO MESMO TEMPO, distribuir 9 diminuições entre o 1.º e o 2.º marcador para ter o mesmo número de ms/pts para a frente e para as costas = 96 ms/pts ao todo. Tricotar 1 carreira liga/tricô, 1 carreira meia e 1 carreira liga/tricô. Tricotar então 1 carreira meia e, AO MESMO TEMPO, montar 20 ms/pts no fim da carreira para a alça, virar, arrematar as 20 ms/pts montadas, depois, dobrar a pega ao meio com os marcadores de cada lado da peça. Tricotar, então, as ms/pts da frente e das costas juntamente em meia, 2 a 2 e, AO MESMO TEMPO, arrematar as ms/pts. Unir entre elas as ms/pts da carreira de montagem na parte de baixo da pega, com pequenos pontos. Costurar a extremidade da alça ao canto da pega. Tricotar outra pega. |
||||||||||||||||||||||
Explicações do diagrama |
||||||||||||||||||||||
|
||||||||||||||||||||||
 |
||||||||||||||||||||||
Terminou este projecto?Então, identifique as suas fotos com as tags #dropspattern #helpinghandpotholder ou mostre-as na galeria #dropsfan. Precisa de ajuda para este modelo?Encontrará 15 turotiais em vídeo, uma rubrica Comentários/Perguntas e muito mais ao visitar a página do modelo em www.garnstudio.com © 1982-2026 DROPS Design A/S. Todos os direitos reservados. Este documento, incluuindo as suas su-secções, tem copyrights. Saia mais o que pode fazer com os nossos modelos no fim de cada uma das páginas do nosso site. |
||||||||||||||||||||||


Com mais de 40 anos no design de modelos de tricô e de croché, a DROPS Design oferece uma das mais vastas colecções demodelos gratuitos na Internet - traduzidos em 17 línguas. Neste dia de hoje, temos 324 catálogos e 12290 modelos - dos quais 12271 estão traduzidos em português.
Trabalhamos com muito empenho para lhe proporcionar o melhor que o tricô e o croché têm para oferecer, para lhe fornecer inspiração e conselhos bem como fios da mais elevada qualidade a preços incríveis! Gostaria de usar os nossos modelos para outros fins que não uso pessoal? Pode ler o que lhe é permitido fazer no Copyright texto que se encontra na parte de baixo de todos os nossos modelos. Bom tricô! Bom croché!
Deixe um comentário acerca do modelo DROPS 159-25
Gostaríamos muito de saber o que tem a dizer-nos acerca deste modelo!
Se deixar uma pergunta acerca do modelo, certifique-se de que escolhe a categoria adequada no formulário abaixo para acelerar o processo relativo à resposta. Os campos obrigatórios estão assinalados com um *.