
Categorias populares
Procura um fio?


Comentários / Perguntas (195)
![]() Kari Kunkes escreveu:
Kari Kunkes escreveu:
Just a observation for those who crochet using American terms. The slip stitch in this pattern is actually a single crochet.
01.10.2019 - 14:49
![]() ASMA escreveu:
ASMA escreveu:
Je n'ai pas compris comment tricoter les manches est ce que je tricote sur les 31 ml puis sur le dos et je termine sur les 29ml je n'ai pas compris 2 fois A1 ou 2 fois A1 2
21.09.2019 - 20:30DROPS Design respondeu:
Bonjour Asma, vous commencez par la 1ère manche sur les 31 ml (= 1 bride dans la 4ème ml à partir du crochet car les 3 premières ml = 1ère bride, et 1 bride dans les 4 ml suivantes = 6 brides), puis A.1, 2 x A.2, crochetez ensuite les mailles du dos: 1 ou 2 fois A.2 (cf taille), A.3, 4-11 brides, A.1, A.2, A.3, 4-11 brides, A.1, 1 ou 2 fois A.1, 1 x A.2 au-dessus des dernières m du dos et 1 x A.2 au-dessus des 8 premières ml des 29 ml, 1 x A.3 et vous terminez par la 2ème manche (et 1 bride dans chacune des 6 dernières des 29 ml). Bon crochet!
23.09.2019 - 09:11
![]() Miep Van Grieken escreveu:
Miep Van Grieken escreveu:
Bij de maten XXL en XXXL is het aantal opgezette lossen niet goed opgegeven. Bij beide maten moeten er met 12 lossen meer begonnen worden. Jammer dat dit niet goed uitgerekend is.
15.09.2019 - 00:13
![]() Miep Van Grieken escreveu:
Miep Van Grieken escreveu:
Bij de maten XXL en XXXL is het aantal opgezette lossen niet goed opgegeven. Bij beide maten moeten er met 12 lossen meer begonnen worden. Jammer dat dit niet goed uitgerekend is.
14.09.2019 - 23:55
![]() Virginie escreveu:
Virginie escreveu:
Bonjour, J'ai fini le dos et le devant côté droit de la veste en taille L. Je ne comprends pas comment crocheter le col châle. Le col se travaille-t-il uniquement sur le côté droit ou se continue t-il sur le dos et sur le côté gauche? A quel endroit se commence t-il? Et doit-on faire la même chose côté gauche? Merci pour votre réponse
08.08.2019 - 09:21DROPS Design respondeu:
Bonjour Virginie, pour faire le col châle du devant droit, commencez sur l'endroit de l'ouvrage en crochetant les 27-27-29-30-32-32 premières brides comme indiqué, puis continuez en rangs raccourcis (les mailles des différentes hauteur vont former d'elles-mêmes l'arrondi du col châle) pendant 10 cm (côté épaule) soit jusqu'à la moitié de l'encolure dos environ. Vous ferez ensuite le col châle du devant gauche de la même façon (en crochetant les dernières mailles sur l'endroit cette fois - et le rang des ms se fera sur l'endroit au lieu de sur l'envers). Assemblez ensuite le dernier rang des 2 cols puis le côté du col le long de l'encolure dos. Bon crochet!
08.08.2019 - 10:09
![]() Barbara Nuttmann escreveu:
Barbara Nuttmann escreveu:
My question was ask above but not answered! I’m doing szL.. I got first row with 9dc..then first row A.z, when I get to 9dc the only way to make it balance is ch3 sk 1 stitch, 7dc, ch3, sk one stitch, slip stitch??? Then..what do I do when I get to this solid area on rows a.z 2,3,4???
15.07.2019 - 21:23DROPS Design respondeu:
Dear Mrs Nuttmann, in size L you will have on row 1 in A.z: 3 ch, 7 dc, 3 ch (see NOTE in pattern) as you worked, then on next rows in A.z you will have again 9 dc - the 3 ch from row 1 replace the first and the last of the 9 dc. Happy crocheting!
16.07.2019 - 09:18
![]() Raffaella escreveu:
Raffaella escreveu:
Grazie
11.07.2019 - 13:58
![]() Raffaella escreveu:
Raffaella escreveu:
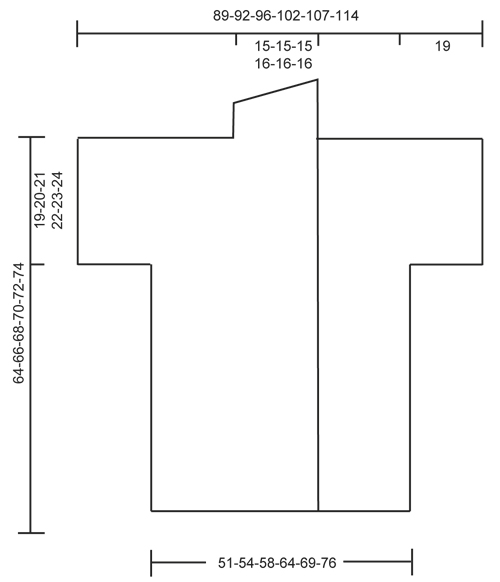
The numbers that are at the base and sideways are the numbers of chains according to the size?
11.07.2019 - 13:49DROPS Design respondeu:
Dear Raffaella, each number refers to the size in the order of the size, ie for example you cast on 83 chains in size S -87 chains in size M, 93 chains in size L, 101 chains in size XL, 111 chains in size XXL and 121 chains in size XXXL. Happy crocheting!
11.07.2019 - 13:52
![]() Denise escreveu:
Denise escreveu:
Could I use Red Heart With Love 4 ply worsted weight to make this project? If so, would there need to be any adjustments to the pattern?
05.07.2019 - 17:55DROPS Design respondeu:
Dear Denise, the DROPS patterns are written and made available free to support the DROPS yarns. I hope you will understand that we cannot help you with substitutions of yarns made by other companies. However, you should always make a swatch, check gauge and make necessary changes accordingly. Happy Crafting!
07.07.2019 - 17:18
![]() Dotty Maddock escreveu:
Dotty Maddock escreveu:
This sweater came out, in the end, beautifully. However, the instructions are misleading and incomplete. For example, the only way I knew about attaching the shawl collar was through reading questions and answers here. There are missing instructions to turn and chain (at the end of rows), and it is just very confusing. Not for inexperienced crocheters, and frustrating for even experienced ones. You've been warned.
09.04.2019 - 00:40DROPS Design respondeu:
Dear Mrs Maddock, thanks for your comment, we are sorry to hear that, your comment has been forwarded to our design team. Happy crocheting!
09.04.2019 - 10:59
|
||||||||||||||||||||||
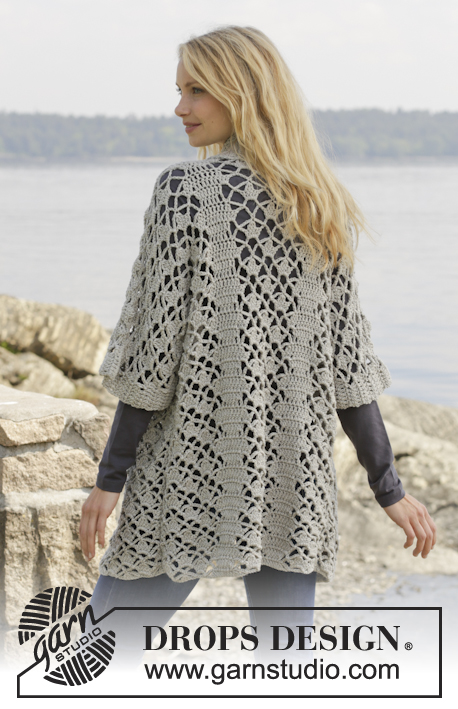
Shining Star#shiningstarcardigan |
||||||||||||||||||||||
 |
 |
|||||||||||||||||||||
Casaco rendado DROPS em croché, com gola xaile, em ”Merino Extra Fine”. Do S ao XXXL
DROPS 157-18 |
||||||||||||||||||||||
|
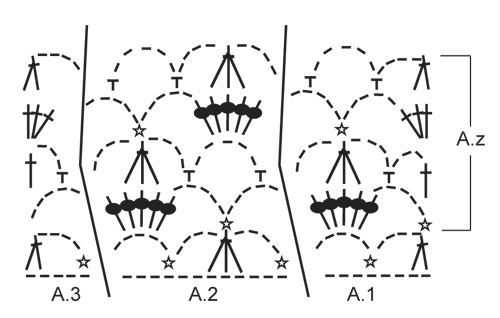
---------------------------------------------------------- NOTA: Existem termos diferentes de tricô e croché em português de Portugal e do Brasil. TRICÔ : Malha = Ponto Canelado = Barra Ponto Jarreteira = Cordões de Tricô Ponto Liga = Ponto Tricô CROCHÉ : mpa – meio ponto alto pa – ponto alto pad – ponto alto duplo pat – ponto alto triplo pb – ponto baixo pbx – ponto baixíssimo pc – ponto corrente ---------------------------------------------------------- DICA CROCHÉ: No princípio de cada carreira de pa, substituir o 1.º pa por 3 pc. PONTO FANTASIA: Ver diagramas A.1-A.3. ---------------------------------------------------------- COSTAS: Crocheta-se em idas e voltas. Montar uma corrente de 83-87-93-101-111-121 pc com a agulha de croché 5 mm em Merino Extra Fine. Crochetar então da seguinte maneira pelo direito: A.1 – ver acima -, nos 8 primeiros pc, NOTA: substituir o 1.º pa por 3 pc – ver DICA CROCHÉ acima -, A.2 acima dos 12-12-12-12-24-24 pc seguintes, A.3 acima dos 5 pc seguintes, 1 pa em cada um dos 4-6-9-13-6-11 pc seguintes, A.1, A.2, A.3, 1 pa em cada um dos 4-6-9-13-6-11 pc seguintes, A.1, A.2 acima dos 12-12-12-12-24-24 pc seguintes e A.3. Repetir então A.z em altura até ao fim. NOTA: Na 1.ª carreira de A.z (= pelo avesso), crochetar da seguinte maneira: A.3, 1-1-1-1-2-2 vezes A.2 em largura, A.1, 3 pc (substituem 1 pa), 1 pa em cada um dos 2-4-7-11-4-9 pa seguintes, 3 pc (substituem 1 pa), 1 pb no ponto seguinte, A.3, A.2, A.1, 3 pc (substituem 1 pa), 1 pb no ponto seguinte, 1 pa em cada um dos 2-4-7-11-4-9 pa seguintes, 3 pc (substituem 1 pa), A.3, 1-1-1-1-2-2 vezes A.2 em largura e A.1. NÃO ESQUECER DE MANTER A MESMA TENSÃO DA INDICADA PARA A AMOSTRA! A cerca de 45-46-47-48-49-50 cm de altura total - ajustar a altura para terminar com a 2.ª carreira de A.z - cortar o fio. Crochetar então as mangas da seguinte maneira: montar frouxamente uma corrente de 29 pc, e começando pelo avesso, continuar A.3, A.2 e A.1 e B nas costas como antes e terminar, montando frouxamente uma corrente de 31 pc, virar. Crochetar, então, pelo direito a 1.ª carreira de A.1-A.3 nos pc e, AO MESMO TEMPO, continuar no ponto fantasia nas costas como antes (ou seja, crochetar a 4.ª carreira de A.z nestas ms/pts) da seguinte maneira: Crochetar 1 pa em cada um dos 6 primeiros pc, A.1 acima dos 8 pc seguintes, 2 vezes A.2 em largura (ou seja, crochetar o último A.2 nos 5 últimos pc e o resto de A.2 acima de A.1), 1-1-1-1-2-2 vezes A.2 em largura como antes, A.3, 1 pa em cada um dos 4-6-9-13-6-11 pa seguintes, A.1, A.2, A.3, 1 pa em cada um dos 4-6-9-13-6-11 pa seguintes, A.1, 1-1-1-1-2-2 vezes A.2 em largura, depois, 2 vezes A.2 em largura (ou seja, crochetar o 1.º A.2 acima de A.3 e dos 6 pc seguintes), A.3 acima dos 5 pc seguintes e 1 pa em cada um dos 6 últimos pc. Continuar desta maneira até a peça medir cerca de 62-64-66-68-70-72 cm – ajustar para arrematar depois de 1 carreira pelo avesso. Terminar então cada ombro/manga separadamente da seguinte maneira: OMBRO/MANGA DIREITA: Crochetar 6 pa, 1 vez A.1 e 3-3-3-3-4-4 vezes A.2, A.3, 1 pa em cada um dos 4-6-9-13-6-11 pa seguintes. Virar e crochetar no ponto fantasia como antes. Continuar desta maneira até a peça medir 64-66-68-70-72-74 cm de altura total - ajustar para terminar com um motivo completo de A.z. Arrematar. OMBRO/MANGA ESQUERDA: Crochetar o ombro/manga esquerda da mesma maneira mas em sentido contrário, crochetar A.1 em vez de A.3 no princípio da carreira. FRENTE DIREITA: Crocheta-se em idas e voltas. Montar uma corrente de 63-65-70-74-81-86 pc (incluindo 3 pc para virar) com a agulha de croché 5 mm em Merino Extra Fine. Crochetar 1 pa no 4.º pc a partir da agulha de croché, 1 pa em cada um dos 5-5-7-7-9-9 pc seguintes (= orla da frente), A.1 acima dos 8 pc seguintes, A.2 acima dos 12 pc seguintes, A.3 acima dos 5 pc seguintes, 1 pa em cada um dos 4-6-9-13-6-11 pc seguintes, A.1 acima dos 8 pc seguintes, A.2 acima dos 12-12-12-12-24-24 pc seguintes, A.3 nos 5 últimos pc. Repetir então A.z em altura até ao fim. NOTA: Na 1.ª carreira de A.z (= pelo avesso), crochetar da seguinte maneira: A.3, 1-1-1-1-2-2 vezes A.2 em largura, A.1, 3 pc (substituem 1 pa), 1 pb no ponto seguinte, 1 pa em cada um dos 2-4-7-11-4-9 pa seguintes, 3 pc (substituem 1 pa), 1 pb no ponto seguinte, A.3, A.2, A.1, 3 pc (substituem 1 pa), 1 pa em cada um dos 5-5-7-7-9-9 pc seguintes. A cerca de 45-46-47-48-49-50 cm de altura total - ajustar para terminar com a 2.ª carreira de A.z. Cortar o fio. Montar então frouxamente uma corrente de 29 pc para a manga e continuar como se fez para as costas. A 64-66-68-70-72-74 cm de altura total - ajustar para terminar um motivo completo de A.z (ou seja, a última carreira é pelo direito) - cortar o fio. Crochetar então a gola xaile. GOLA XAILE: Crochetar a gola xaile em idas e voltas, começando pelo direito da seguinte maneira: 1 pa em cada um dos 6-6-8-8-10-10 primeiros pa, 1 pa no 1.º pa de A.1, *3 pa no aro seguinte*, repetir de * a * mais 2 vezes, 1 pa no pa seguinte, *3 pa no aro seguinte*, repetir de * a * mais 2 vezes, 1 pa no último pa de A.3, 0-0-0-1-1-1 pa no pa seguinte = 27-27-29-30-32-32 pa. Crochetar então carreiras encurtadas nos pontos da orla da frente da seguinte maneira: CARREIRA 1 (pelo avesso): 5 pb, 5 mpa, 17-17-19-20-22-22 pa CARREIRA 2 (pelo direito): 1 pa em cada um dos 27-27-29-30-32-32 pontos. Repetir estas 2 carreiras até a peça medir cerca de 10 cm no lado mais estreito – ajustar para terminar com a 2.ª carreira (pelo direito). Arrematar. FRENTE ESQUERDA: Crochetar como a frente direita, mas em sentido contrário. Seguir o diagrama A.3 em vez de A.1 no princípio da carreira. A 45-46-47-48-49-50 cm de altura total - ajustar para terminar com a 2.ª carreira de A.z -, crochetar como antes na frente, pelo avesso, montar então frouxamente uma corrente de 31 pc para a manga. A 64-66-68-70-72-74 cm de altura total - ajustar para terminar com um motivo completo de A.z (ou seja, a última carreira é pelo direito), crochetar a gola xaile. NOTA: não é necessário cortar o fio. MONTAGEM: Colocar as frentes acima das costas e crochetar os ombros da seguinte maneira: 1 pb enfiando a agulha nas 2 partes, *3 pc, 1 pb no aro seguinte*, repetir de * a * a todo o comprimento do ombro/manga e terminar com 1 pb. Crochetar os lados juntamente da seguinte maneira: 1 pb, *3 pc, 1 pb no aro da carreira seguinte*, repetir de * a * a todo o comprimento do lado e terminar com 1 pb. Crochetar sob as mangas da seguinte maneira: *1 pb no pc do aro seguinte, 3 pc*, repetir de * a * e terminar com 1 pb. |
||||||||||||||||||||||
Explicações do diagrama |
||||||||||||||||||||||
|
||||||||||||||||||||||
 |
||||||||||||||||||||||
 |
||||||||||||||||||||||
Terminou este projecto?Então, identifique as suas fotos com as tags #dropspattern #shiningstarcardigan ou mostre-as na galeria #dropsfan. Precisa de ajuda para este modelo?Encontrará 8 turotiais em vídeo, uma rubrica Comentários/Perguntas e muito mais ao visitar a página do modelo em www.garnstudio.com © 1982-2026 DROPS Design A/S. Todos os direitos reservados. Este documento, incluuindo as suas su-secções, tem copyrights. Saia mais o que pode fazer com os nossos modelos no fim de cada uma das páginas do nosso site. |
||||||||||||||||||||||


Com mais de 40 anos no design de modelos de tricô e de croché, a DROPS Design oferece uma das mais vastas colecções demodelos gratuitos na Internet - traduzidos em 17 línguas. Neste dia de hoje, temos 324 catálogos e 12290 modelos - dos quais 12271 estão traduzidos em português.
Trabalhamos com muito empenho para lhe proporcionar o melhor que o tricô e o croché têm para oferecer, para lhe fornecer inspiração e conselhos bem como fios da mais elevada qualidade a preços incríveis! Gostaria de usar os nossos modelos para outros fins que não uso pessoal? Pode ler o que lhe é permitido fazer no Copyright texto que se encontra na parte de baixo de todos os nossos modelos. Bom tricô! Bom croché!
Deixe um comentário acerca do modelo DROPS 157-18
Gostaríamos muito de saber o que tem a dizer-nos acerca deste modelo!
Se deixar uma pergunta acerca do modelo, certifique-se de que escolhe a categoria adequada no formulário abaixo para acelerar o processo relativo à resposta. Os campos obrigatórios estão assinalados com um *.