
Categorias populares
Procura um fio?


Comentários / Perguntas (141)
![]() Sandra escreveu:
Sandra escreveu:
Ahh. ich habs jetzt auch verstanden... die brushed alpaca silk hat 9 Knäuel zu 25g... ich bräuchte bei der air also auch 9 Knäuel... Aber trotzdem ein super cooles Modell und tolle Wolle!! :-)
22.01.2016 - 09:40DROPS Design respondeu:
Antwort siehe unten! :-) Viel Spaß beim Weiterstricken!
30.01.2016 - 11:12
![]() Sandra escreveu:
Sandra escreveu:
Guten Morgen! Ich versuche das Modell (Größe M) mit der Drops Air zu stricken... da beide Garne zur gleichen Gruppe gehören, habe ich ebenfalls 5 Knäuel gekauft. Aber reicht das? Ich habe schon ~3 Knäuel verstrickt und habe erst 10 cm vom Rumpfteil gestrickt (beim Anprobieren gerade unterhalb der Brust). Die Größen stimmen, aber ich kann mir nicht vorstellen, dass 2 halbe Knäuel für den Rumpf und einer für beide Ärmel reicht? Gibt es mit der Air Erfahrungen? Vielen Dank schonmal, Sandra
22.01.2016 - 09:25DROPS Design respondeu:
Sie müssen stets bei einem Alternativgarn die Lauflänge des Garns beachten und dementsprechend umrechnen. Brushed Alpaca Silk hat 140 m auf 25 g, also benötigen Sie für den Pulli für Größe M (225 g) 1260 m (9 x 25 g). Drops Air hat 150 m pro 50 g, also rechnen Sie 1260 m durch 150 m = 8,4, also auch 9 Knäuel.
30.01.2016 - 11:12
![]() Marie France Milette escreveu:
Marie France Milette escreveu:
Bonjour merci pour ce patron voici ma question. Pour l'empiècement, lorsque je fais les 23 m en fausse côte est ce que les jeter sont calculé comme une mailles ? merci
21.12.2015 - 02:27DROPS Design respondeu:
Bonjour Mme Milette, les jetés ne comptent pas comme des mailles (ils "appartiennent" à la m glissée). Bon tricot!
21.12.2015 - 11:26
![]() Elke escreveu:
Elke escreveu:
Habe den Pullover nochmal gestrickt mit Nadelstärke 8 statt 9. Das kommt an der Raglanpasse gut hin, wahrscheinlich hätte ich auch Stärke 7 nehmen können. Die Breite des Strickstücks entspricht allerdings eher Größe L als M, trotz der nochmal überprüften korrekten Maschenprobe. Da ich normalerweise eng stricke, verstehe ich das nicht wirklich. Durch die Weite wirkt der Pulli nicht ganz so elegant wie auf dem Bild, sieht aber trotzdem schön aus und die Wolle ist superweich. LG, Elke
16.12.2015 - 18:07
![]() Elke escreveu:
Elke escreveu:
Habe den Pullover fast fertig, er ist aber zu weit und sieht viel gröber aus als auf dem Bild,! Obwohl die Maschenprobe glatt rechts genau gestimmt , hat. Maschenprobe rundgestricktes falsches Patent gejt ja nicht, habe jich deshalb auf glatt rechts verlassen. Habt ihr einen Tipp, mit welchet Nadelstärke ich en feineres Strickbild und 10 cm weniger in der Breite hinbekomme? LG, Elke
01.12.2015 - 18:45DROPS Design respondeu:
Das lässt sich pauschal nicht sagen, Sie müssten es selbst herausfinden, indem Sie ein Probestück im falschen Patent mit einer dünneren Nadel stricken und dann mit Ihrem Pullover vergleichen (auf 10 cm umgerechnet). Damit können Sie ermitteln, um wie viel der Pullover enger wird, wenn Sie ihn mit einer dünneren Nadel stricken. Achten Sie aber darauf, dass die Höhenmaße bleiben, Sie sollten bei der Raglanpasse immer mal wieder vergleichen und ggf. eine Ziwschenreihe einfügen, sollte die Passe kürzer werden.
05.12.2015 - 17:51
![]() Gerrie Hekman escreveu:
Gerrie Hekman escreveu:
Wellicht is het handig om bij een patroon te vermelden dat als je een garenalternatief neemt dat de looplengte van groot belang is. (Als wiskundige had ik dit natuurlijk moeten weten). Ik ben bezig met 157-20 en had geen zin in pluizige wol (brushed alpaca silk) en ben gegaan voor een aangeraden alternatief Big Fabel 912, ik had al extra genomen, maar ik heb nog niet genoeg en nu is deze wol uit het assortiment.
11.11.2015 - 15:40
![]() Gerrie escreveu:
Gerrie escreveu:
Is het nodig om voor de hals, de steken op te nemen en dan nog eens 2 ribbels te breien, of kan dat ook meteen aan het begin.
25.10.2015 - 08:15DROPS Design respondeu:
Hoi Gerrie. Ik denk dat je ook kan beginnen met de 2 ribbels
27.10.2015 - 14:43
![]() Lene Hasle escreveu:
Lene Hasle escreveu:
For mig at se blir der ikke falsk patent, hvis man følger strikkeanvisningen
21.10.2015 - 14:47
![]() Ellen escreveu:
Ellen escreveu:
När jag lagt upp 55 maskor och ska börja sticka runt på rundstickan (80 cm) så är ju kabeln alldeles för lång för att jag ska kunna sticka runt. Ska jag använda strumpstickorna tills jag ökat tillräckligt många maskor? Tacksam för snabbt svar! Tack!
27.07.2015 - 21:42DROPS Design respondeu:
Hej Ellen, Ja börja med strumpst eller så får du börja med en mindre rundsticka. Lycka till!
28.07.2015 - 12:31Cathy Atlija escreveu:
Sorry, last question (I hope) - can I replace the false english rib with english rib? The stitches are about the same but the rows are different, would that totally throw off the raglan seams? Because this yarn is so fluffy and you're increasing on every other row, I'm finding it really hard to see the pattern in the few rows I've knitted and it just doesn't look right. Wish I could translate all the other comments and see if others had this problem!
07.04.2015 - 05:09DROPS Design respondeu:
Dear Mrs Atlija, you can work another pattern but remember to check your gauge. You may have to knit some cm before pattern can be visible (make a swatch first to get used to work the pattern and see after some cm how it will look). Remember you can also get help from your DROPS store. Happy knitting!
07.04.2015 - 10:36
|
|
Lazy Afternoon#lazyafternoonsweater |
|
|
|
|
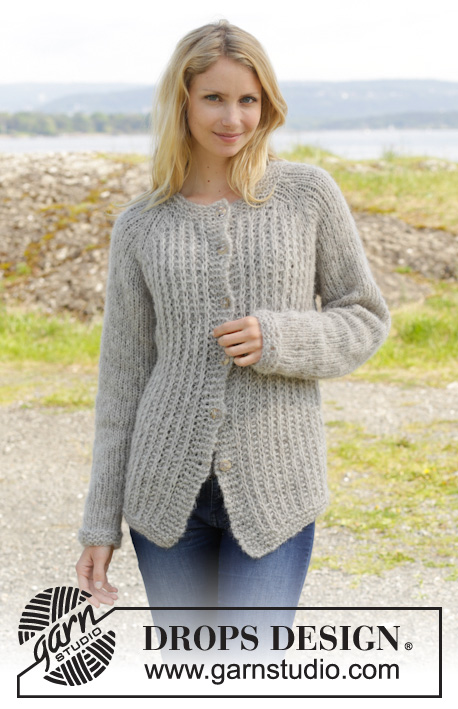
Pulôver DROPS com raglan e falso canelado/barra inglês, tricotado com 2 fios ”Brushed Alpaca Silk”. Do S ao XXXL
DROPS 157-20 |
|
|
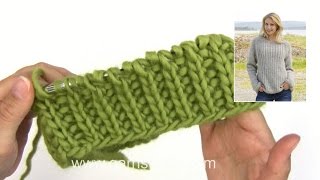
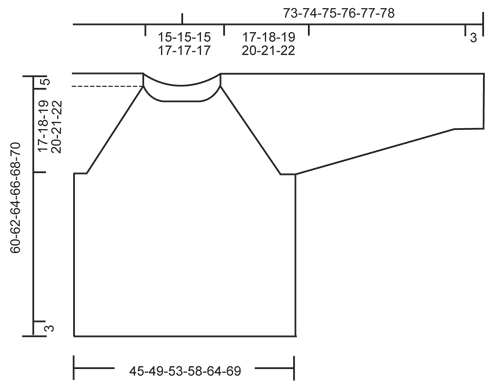
---------------------------------------------------------- NOTA: Existem termos diferentes de tricô e croché em português de Portugal e do Brasil. TRICÔ : Malha = Ponto Canelado = Barra Ponto Jarreteira = Cordões de Tricô Ponto Liga = Ponto Tricô CROCHÉ : mpa – meio ponto alto pa – ponto alto pad – ponto alto duplo pat – ponto alto triplo pb – ponto baixo pbx – ponto baixíssimo pc – ponto corrente ---------------------------------------------------------- PONTO JARRETEIRA (em redondo na agulha circular): 1 barra jarreteira = 2 carreiras. Tricotar *1 carreira meia e 1 carreira liga/tricô *, repetir de * a *. FALSO CANELADO/BARRA INGLÊS (em idas e voltas na agulha circular): CARREIRA 1: *1 m/p ponto meia, 1 laçada, deslizar 1 m/p em ‘liga/tricô*, repetir de * a * até restar 1 m/p, terminar com 1 m/p ponto meia. CARREIRA 2: 1 m/p ponto meia, * tricotar juntamente em liga/tricô a laçada e a m/p deslizada da carreira precedente, 1 m/p ponto meia *, repetir de * a *. Repetir as carreiras 1 e 2. RAGLAN: Aumentar de cada lado de cada marcador da seguinte maneira: Tricotar até restar 1 m/p antes do marcador, 1 laçada, 2 ms/pts em ponto meia e 1 laçada. Repetir nos restantes marcadores da carreira. Na carreira seguinte, tricotar as laçadas torcidas em meia (ou seja, enfiar a agulha na alça de trás e não na alça da frente) para evitar buracos. DIMINUIÇÕES (mangas): Diminuir da seguinte maneira ANTES da m/p com o marcador : Deslizar 1 m/p em meia, 1 m/p meia, passar a m/p deslizada por cima da m/p tricotada. Diminuir da seguinte maneira DEPOIS da m/p com o marcador : 2 ms/pts tricotadas juntamente em meia. ---------------------------------------------------------- PULÔVER: Tricota-se de cima para baixo, em redondo, na agulha circular/agulhas de pontas duplas. No fim, levantam-se as ms/pts à volta do decote para tricotar a gola em ponto jarreteira. ENCAIXE: Montar 55-55-55-59-59-59 ms/pts com 2 fios Brushed Alpaca Silk tricotados juntamente e a agulha circular 9 mm. Tricotar 1 barra em ponto jarreteira - ver acima – e, AO MESMO TEMPO, na 2.ª carreira, distribuir 9 aumentos para todos os tamanhos = 64-64-64-68-68-68 ms/pts. Na carreira seguinte, tricotar da seguinte maneira a partir do lado direito do raglan das costas: 1 m/p em ponto meia, colocar o 1.º marcador aqui, 9 ms/pts em ponto meia, colocar o 2.º marcador aqui, 1 m/p em ponto meia, 21-21-21-23-23-23 ms/pts em FALSO CANELADO/BARRA INGLÊS – ver acima (= frente), 1 m/p em ponto meia, colocar o 3.º marcador aqui, 9 ms/pts em ponto meia, colocar o 4.º marcador aqui, 1 m/p em ponto meia, 21-21-21-23-23-23 ms/pts em falso canelado/barra inglês (= costas). Continuar desta maneira e, AO MESMO TEMPO, na carreira seguinte, começar a fazer os aumentos para o RAGLAN – ver acima! Repetir estes aumentos mais 5-7-10-13-18-22 vezes a cada 2 carreiras, e 5-5-4-3-1-0 vezes a cada 4 carreiras = 152-168-184-204-228-252 ms/pts. NOTA: Tricotar os aumentos da frente e das costas em falso canelado/barra inglês e os aumentos das mangas em ponto meia. NÃO ESQUECER DE MANTER A MESMA TENSÃO DA INDICADA PARA A AMOSTRA! A peça mede 22-23-24-25-26-27 cm a partir do ombro. Tricotar mais 1 carreira como antes mas parar, então, 1 m/p antes do 1.º marcador (ou seja, 1 m/p antes do princípio da carreira). Colocar as 33-37-41-45-51-57 ms/pts seguintes num alfinete de ms/pts (= manga), montar 7 ms/pts sob a manga, tricotar as 43-47-51-57-63-69 ms/pts seguintes (= frente), colocar as 33-37-41-45-51-57 ms/pts seguintes num alfinete de ms/pts (= manga), montar 7 ms/pts sob a manga, tricotar as 43-47-51-57-63-69 ms/pts seguintes (= costas). COSTAS & FRENTE : Temos, então, 100-108-116-128-140-152 ms/pts. Continuar em falso canelado/barra inglês como antes. Tricotar em liga/tricô a m/p que fica a meio das 7 novas ms/pts sob cada manga, e as restantes ms/pts em falso canelado/barra inglês. Continuar desta maneira até a peça medir 35-36-37-38-39-40 cm depois das novas ms/pts sob a manga. Tricotar, então, 3 barras jarreteira antes de arrematar frouxamente. MANGAS: Retomar as 33-37-41-45-51-57 ms/pts e colocá-las na agulha circular/nas agulhas de pontas duplas. Tricotar 1 carreira em ponto meia em todas as ms/pts, montar 7 ms/pts no fim da carreira = 40-44-48-52-58-64 ms/pts. Colocar um marcador a meio das novas ms/pts montadas sob a manga. PASSAR A MEDIR A PARTIR DAQUI. Tricotar então a manga em ponto meia, em redondo. A 4 cm, começar a diminuir – VER DIMINUIÇÕES. Repetir estas diminuições mais 6-7-9-10-13-15 vezes a cada 5½-5-4-3½-2½-2½ cm = 26-28-28-30-30-32 ms/pts. A 41-41-41-40-40-40 cm, tricotar 3 barras jarreteira e arrematar frouxamente. MONTAGEM: Fechar a abertura sob as mangas com uma costura. GOLA: Com 2 fios Brushed Alpaca Silk, levantar 1 m/p em cada m/p em ponto jarreteira do decote = 55-55-55-59-59-59 ms/pts. Tricotar 2 barras jarreteira e arrematar frouxamente. |
|
 |
|
Terminou este projecto?Então, identifique as suas fotos com as tags #dropspattern #lazyafternoonsweater ou mostre-as na galeria #dropsfan. Precisa de ajuda para este modelo?Encontrará 23 turotiais em vídeo, uma rubrica Comentários/Perguntas e muito mais ao visitar a página do modelo em www.garnstudio.com © 1982-2026 DROPS Design A/S. Todos os direitos reservados. Este documento, incluuindo as suas su-secções, tem copyrights. Saia mais o que pode fazer com os nossos modelos no fim de cada uma das páginas do nosso site. |


Com mais de 40 anos no design de modelos de tricô e de croché, a DROPS Design oferece uma das mais vastas colecções demodelos gratuitos na Internet - traduzidos em 17 línguas. Neste dia de hoje, temos 324 catálogos e 12290 modelos - dos quais 12271 estão traduzidos em português.
Trabalhamos com muito empenho para lhe proporcionar o melhor que o tricô e o croché têm para oferecer, para lhe fornecer inspiração e conselhos bem como fios da mais elevada qualidade a preços incríveis! Gostaria de usar os nossos modelos para outros fins que não uso pessoal? Pode ler o que lhe é permitido fazer no Copyright texto que se encontra na parte de baixo de todos os nossos modelos. Bom tricô! Bom croché!
Deixe um comentário acerca do modelo DROPS 157-20
Gostaríamos muito de saber o que tem a dizer-nos acerca deste modelo!
Se deixar uma pergunta acerca do modelo, certifique-se de que escolhe a categoria adequada no formulário abaixo para acelerar o processo relativo à resposta. Os campos obrigatórios estão assinalados com um *.