
Categorias populares
Procura um fio?


Comentários / Perguntas (162)
![]() Yvonne Duckstein escreveu:
Yvonne Duckstein escreveu:
Hallo, das Häkeln des Reglan bedeutet nur das oberste Teil über der Brust? Man häkelt das Musterbild nur 1x ?! Und dann kommen in den letzten beiden Reihen die Zunahmen? Habe ich das so richtig verstanden? Danke und Beste Grüße Yvonne Duckstein
30.03.2026 - 14:32DROPS Design respondeu:
Liebe Frau Duckstein, das Diagram A.z wird insgesamt 2 Mal in der Höhe gehäkelt. Die Zunahmen werden bei den 2 letzten Reihen vom 1. Rapport in der Höhe gehäkelt, dann bei den 2 letzten Reihen vom 2. Rapport in der Höhe (4 Reihen mit Zunahmen). Viel Spaß beim Häkeln!
07.04.2026 - 14:06
![]() Rebours escreveu:
Rebours escreveu:
Encolure beaucoup trop importante comment la diminuer Merci si vous avez une obtion0
19.12.2025 - 17:50
![]() Barre escreveu:
Barre escreveu:
Je me retrouve avec 12 A2
15.12.2025 - 17:50DROPS Design respondeu:
Bonjour Mme Barre, vérifiez bien votre nombre de mailles et le décompte donné hier (on commence par A.1, on répète 10 fois A.2 et on termine par A.3, on aura ainsi 12 groupes de double-brides au total pour la manche. Bon crochet!
16.12.2025 - 08:57
![]() Barre escreveu:
Barre escreveu:
Sur les ms ont continu toujours en ms si non on a plus de 10 A1 MERCI
15.12.2025 - 17:27DROPS Design respondeu:
Bonjour Mme Barre, en taille S/M vous avez sauté 40 m de l'empiècement pour la manche, vous allez crocheter ces 40 m dans le point fantaisie A.1-A.2-A.3 exactement comme avant + dans les 9 mailles crochetées sous la manche; si vous avez davantage de mailles, vous pouvez probablement ajuster en fonction de votre nombre; attention à ce que vous ayez suffisamment de mailles pour crocheter le point fantaisie. Bon crochet!
16.12.2025 - 08:56
![]() Barre escreveu:
Barre escreveu:
Je suis arrivée à la manche mais j'ai un problème j'ai mais 49 ms mais pourquoi après vous dites de continuer sur les 40 mailles sur les 9 mailles on fait quoi Merci
14.12.2025 - 19:40DROPS Design respondeu:
Bonjour Mme Barre, on crochète le tout 1er rang des manches en mailles serrées: 1 ms dans la 1ère des 8 ml et 1 ms dans les 40 ms de l'empiècement = 49 ms. Crochetez ensuite: A.1 (= 6 m), répétez 10 fois A.2 (= 8 m x 10 = 40) et terminez par A.3 (= 3 m) = 6+40+3=49 m. Commencez les tours par 4 ml pour remplacer 1 double-bride / 1 ml pour remplacer 1 ms et terminez les tours par 1 mc dans la 4ème/la 1ère ml du début du tour. Bon crochet!
15.12.2025 - 15:17
![]() Barre escreveu:
Barre escreveu:
À la fin du 1er rang du dos quand on a crocheter les 60 mailles que fait on Merci
02.12.2025 - 18:59DROPS Design respondeu:
Bonjour Mme Barre, lorsque vous divisez l'ouvrage, vous sautez les mailles des manches que vous remplacez par 8 mailles en l'air, et, au 2ème rang, vous crochetez les diagrammes comme avant en sautant les 8 mailles en l'air des emmanchures. Crochetez ainsi toutes les mailles comme avant: on va avoir ainsi, A.4, A.1 puis A.2 pour la fin du devant, tout le long du dos, au début de l'autre devant et on termine par A.4 et A.4 (vu sur l'endroit). Bon crochet!
03.12.2025 - 08:15
![]() Rebours escreveu:
Rebours escreveu:
Lorsque l'on a terminé le 1er A2il faut bien piquer dans 1maille il y a quelque chose qui m'échappe à ce moment la
12.11.2025 - 15:21DROPS Design respondeu:
Bonjour Mem Rebours, à la fin du dernier A.2 (sur les 24 mailles), vous terminez A.2 par 3 ml, vous crochetez les 8 ml et vous sautez les mailles de la manche, puis vous reprenez A.2 dans le motif suivant (1 ml, vous sautez 1 ms, les double-brides, etc...). Quand vous crochèterez le rang suivant, crochetez les 5 double-brides dans l'arceau d'1 ml comme avant et tout le rang (donc rien dans les 8 mailles en l'air de chaque côté sous les manches. Bon crochet!
12.11.2025 - 16:52
![]() Rebours escreveu:
Rebours escreveu:
Lorsqu'on arrive à la 24 ème maille du devant l'on fait une maille serrée ou une double bride Merci
10.11.2025 - 11:59DROPS Design respondeu:
Bonjour Mme Rebours, terminez le dernier A.2 en largeur par 3 mailles en l'air, sautez les 2 ms suivantes, puis crochetez 8 mailles en l'air, sautez les mailles indiquées pour la manche et commencez le A.2 du dos dans la maille suivante; au tour suivant, rappelez-vous que les 8 mailles en l'air ne seront pas crochetées. Bon crochet!
11.11.2025 - 15:59
![]() Barre escreveu:
Barre escreveu:
Excusez moi mais je ne comprend pas comment faire avec les 8 mailles en l'air
04.11.2025 - 08:31DROPS Design respondeu:
Bonjour Mme Barre, lorsque vous crochetez le rang de division manches/dos et devants, vous les crochetez à la place des manches, et au rang suivant, vous sautez ces 8 mailles en l'air, vous ne les crochetez pas pour le bas du gilet, vous les crochèterez seulement quand vous ferez les manches. Bon crochet!
04.11.2025 - 17:12
![]() Barre escreveu:
Barre escreveu:
Les 8 mailles en l'air ne font pas 40 mailles
01.11.2025 - 19:35DROPS Design respondeu:
Bonjour Mme Barre, les 8 mailles en l'air sont faites quand on saute les 40 mailles des manches, elles seront crochetées ensuite lorsque l'on termine les manches. Bon crochet!
03.11.2025 - 07:38
|
|||||||||||||||||||
Nevertheless#neverthelesscardigan |
|||||||||||||||||||
|
|
|||||||||||||||||||
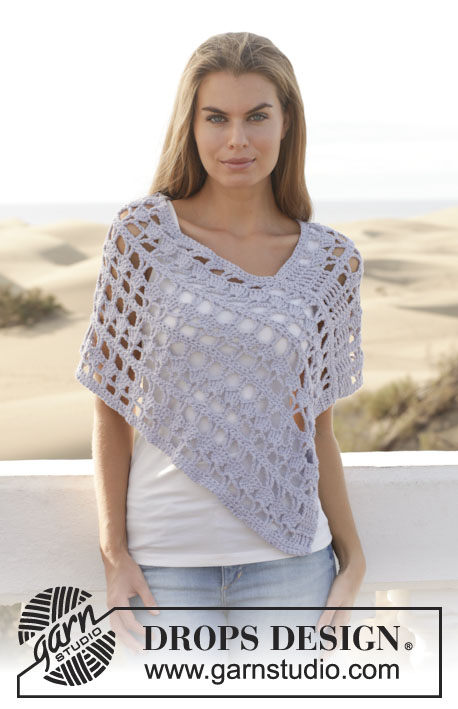
Casaco DROPS em croché, em "Paris". Do S ao XXXL
DROPS 153-10 |
|||||||||||||||||||
|
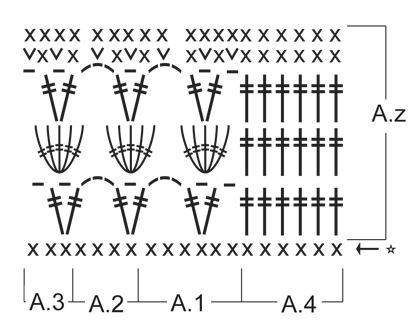
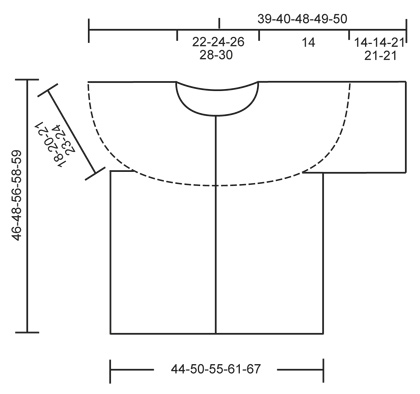
---------------------------------------------------------- NOTA: Existem termos diferentes de tricô e croché em português de Portugal e do Brasil. TRICÔ : Malha = Ponto Canelado = Barra Ponto Jarreteira = Cordões de Tricô Ponto Liga = Ponto Tricô CROCHÉ : mpa – meio ponto alto pa – ponto alto pad – ponto alto duplo pat – ponto alto triplo pb – ponto baixo pbx – ponto baixíssimo pc – ponto corrente ---------------------------------------------------------- PONTO FANTASIA: Ver diagramas A.1 a A.4. DICA CROCHÉ: Substituir o 1.º pb no princípio de cada carreira de pb por 1 pc. Substituir o 1.º pad no princípio de cada carreira de pad por 4 pc. AUMENTOS: Para aumentar, crochetar 2 pb num pb. ---------------------------------------------------------- CASACO : Faz-se de cima para baixo, em idas e voltas, a partir do meio da frente. ENCAIXE: Montar frouxamente uma corrente de 156-166-177-188-198 pc (incluindo 1 pc para virar) com a agulha de croché 5 mm em Paris. Crochetar a 1.ª carreira da seguinte maneira: 1 pb no 2.º pc a partir da agulha de croché, *1 pb em cada um dos 3 pc seguintes, saltar 1 pc*, repetir de * a *, e terminar com 1 pb em cada um dos 2-4-3-2-4 últimos pc = 117-125-133-141-149 pb (= 1.ª carreira do diagrama) - VER DICA CROCHÉ. Continuar da seguinte maneira: A.4 (= orla da frente), A.1, A.2 acima dos 96-104-112-120-128 pb seguintes (= 24-26-28-30-32 vezes), terminar com A.3 e A.4 (= orla da frente). Crochetar 1 vez o diagrama A.z em altura e, AO MESMO TEMPO, nas 2 últimas carreiras, aumentar 24-28-32-36-40 pontos a intervalos regulares em cada uma das 2 carreiras (= 48-56-64-72-80 aumentos ao todo) – VER AUMENTOS acima. NOTA: não aumentar acima de A.4 = 165-181-197-213-229 pb/pts. Crochetar então 1 vez o diagrama A.z em altura (A.2 é, agora, repetido 36-40-44-48-52 vezes em largura) e, AO MESMO TEMPO, nas 2 últimas carreiras, aumentar 22-26-30-34-38 pb/pts a intervalos regulares em cada uma dessas 2 carreiras (= 44-52-60-68-76 aumentos ao todo). NOTA: não aumentar acima de A.4 = 209-233-257-281-305 pontos. COSTAS & FRENTES : PASSAR A MEDIR A PARTIR DAQUI. Continuar da seguinte maneira: A.4, A.1, A.2 acima dos 24-28-32-36-40 pb seguintes (= 6-7-8-9-10 vezes) (= frente), 8 pc (cava), saltar os 40-44-48-52-56 pb seguintes da carreira precedente (= manga, estes pontos são crochetados mais tarde), A.2 acima dos 60-68-76-84-92 pb seguintes (= costas), 8 pc (cava), saltar os 40-44-48-52-56 pb seguintes da carreira precedente (= manga, estes pontos são crochetados mais tarde), A.2 acima dos 24-28-32-36-40 pb seguintes (= frente) e terminar com A.3 e A.4. Continuar da seguinte maneira: A.4, A.1, A.2 acima dos 24-28-32-36-40 pb seguintes (= 6-7-8-9-10 vezes em largura) (= frente), saltar 8 pc (cava), A.2 acima dos 60-68-76-84-92 pb seguintes (= costas), saltar 8 pc (cava), A.2 acima dos 24-28-32-36-40 pb seguintes (= frente) e terminar com A.3 e A.4. Repetir A.z até a peça medir cerca de 28-28-35-35-35 cm, arrematar depois de 1 motivo completo de A.z. A peça mede cerca de 46-48-56-58-59 cm a partir do ombro. MANGAS: Crochetam-se em redondo, de cima para baixo. PASSAR A MEDIR A PARTIR DAQUI. Começar a meio sob a manga da seguinte maneira: Crochetar 2 pb no 1.º pc (dos 8 pc), 1 pb em cada um dos 7 pc seguintes e 1 pb em cada um dos 40-44-48-52-56 pb do encaixe = 49-53-57-61-65 pb. Continuar da seguinte maneira: 4 pc, A.1, A.2 acima dos 40-44-48-52-56 pontos seguintes (= 10-11-12-13-14 vezes em largura), terminar com A.3 e 1 pbx no 4.º pc. Continuar desta maneira até a peça medir cerca de 14-14-21-21-21 cm, e arrematar depois de 1 motivo completo de A.z. Arrematar. MONTAGEM: Crochetar uma orla em pb à volta do decote da seguinte maneira : *1 pb em cada um dos 3 pc seguintes, saltar 1 pc*, repetir de * a *, e terminar com 1 pb em cada um dos 4-6-5-4-6 últimos pc = 118-126-134-142-150 pb. Costurar os botões na orla da frente esquerda, a cerca de 7 cm uns dos outros. |
|||||||||||||||||||
Explicações do diagrama |
|||||||||||||||||||
|
|||||||||||||||||||
 |
|||||||||||||||||||
 |
|||||||||||||||||||
Terminou este projecto?Então, identifique as suas fotos com as tags #dropspattern #neverthelesscardigan ou mostre-as na galeria #dropsfan. Precisa de ajuda para este modelo?Encontrará 6 turotiais em vídeo, uma rubrica Comentários/Perguntas e muito mais ao visitar a página do modelo em www.garnstudio.com © 1982-2026 DROPS Design A/S. Todos os direitos reservados. Este documento, incluuindo as suas su-secções, tem copyrights. Saia mais o que pode fazer com os nossos modelos no fim de cada uma das páginas do nosso site. |
|||||||||||||||||||


Com mais de 40 anos no design de modelos de tricô e de croché, a DROPS Design oferece uma das mais vastas colecções demodelos gratuitos na Internet - traduzidos em 17 línguas. Neste dia de hoje, temos 324 catálogos e 12290 modelos - dos quais 12271 estão traduzidos em português.
Trabalhamos com muito empenho para lhe proporcionar o melhor que o tricô e o croché têm para oferecer, para lhe fornecer inspiração e conselhos bem como fios da mais elevada qualidade a preços incríveis! Gostaria de usar os nossos modelos para outros fins que não uso pessoal? Pode ler o que lhe é permitido fazer no Copyright texto que se encontra na parte de baixo de todos os nossos modelos. Bom tricô! Bom croché!
Deixe um comentário acerca do modelo DROPS 153-10
Gostaríamos muito de saber o que tem a dizer-nos acerca deste modelo!
Se deixar uma pergunta acerca do modelo, certifique-se de que escolhe a categoria adequada no formulário abaixo para acelerar o processo relativo à resposta. Os campos obrigatórios estão assinalados com um *.