
Categorias populares
Procura um fio?


Comentários / Perguntas (52)
![]() Selva escreveu:
Selva escreveu:
Bonjour, Je ne comprends pas le diagramme A1, Au second rang, j'ai une maille en trop. Pourriez -vous m'expliquer ? Cdt.
16.03.2025 - 22:18DROPS Design respondeu:
Bonjour Mme Selva, c'est normal, vous avez fait 1 jeté entre les 2 mailles endroit vous avez donc 1 m en plus; au 3ème rang, vous allez diminuer cette maille en plus: glissez la 1ère de ces 3 mailles endroit comme pour la tricoter à l'envers, tricotez les 2 mailles suivantes à l'endroit et passez la maille glissée par-dessus les 2 mailles tricotées = il reste 2 mailles de nouveau. (n'oubliez pas le jeté du 2ème rang qu'il faudra laisser tomber au 3ème rang). Retrouvez ici comment tricoter ce type de petites torsades. Bon tricot!
17.03.2025 - 09:51
![]() Kath escreveu:
Kath escreveu:
Where's A1? I don't see it in the pattern.
13.05.2022 - 23:52DROPS Design respondeu:
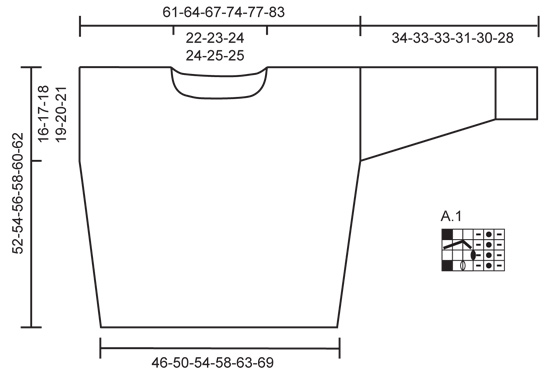
Dear Kath, you can find chart A.1 just under the sleeve in the measurements sketch, below the pattern instructions. Happy knitting!
15.05.2022 - 22:32
![]() Eva escreveu:
Eva escreveu:
Nagyon orulok, hogy vannak ezek a mintak, de a megadott fonalmennyiseg nem elegendo. Hogy leget az, higy a magyar leirasban kevesebbet adnak meg, mint pl az angolnal?
25.12.2021 - 20:08
![]() Jackie escreveu:
Jackie escreveu:
This is a lovely jumper and worth the time and effort it took to work out the pattern! Last advice very helpful however you do need to remember that rows 1 and 3 you start with the pattern as stated but with rows 2 and 4 you need to first do 4 stitches (plus the edge stitch makes 5 total) as follows: K (edge stitch), K1, P1 twisted, K1 then do the pattern. Also, don't forget to drop the yarn overs in row 3. They are there purely to make the thread loose enough to go over 2 stitches.
12.08.2020 - 17:39
![]() Victoria escreveu:
Victoria escreveu:
Thank you so much :)
09.07.2020 - 16:16
![]() Victoria escreveu:
Victoria escreveu:
I have read the lesson but still find it confusing - perhaps it is my age. I cannot see how hard it would be to provide 4 lines of pattern for those of us who are struggling with the digram
08.07.2020 - 17:12DROPS Design respondeu:
Hi Victoria, The jumper is worked back and forth, so the rows alternate from the right side to the wrong side (when working from the wrong side, you work from left to right). Starting on the right side the pattern is as follows Row 1: P1, K1 twisted, P1, K1. 1YO, K1, repeat. Row 2: P3, 1YO, K1, P1 twisted, K1, repeat Row 3: P1, K1 twisted, P1, slip 1, k2, psso, repeat Row 4: P2, K1, P1 twisted, K1, repeat. Happy knitting!
09.07.2020 - 07:39
![]() Victoria escreveu:
Victoria escreveu:
I have read all the Q&As but I'm still struggling with the pattern in the A1 diagram. Is it possible to PLEASE just write out the full instructions. From the numbers of questions here I am sure many knitters would appreciate it. Thx
08.07.2020 - 15:54DROPS Design respondeu:
Dear Victoria, The DROPS patterns are knitted and crocheted by thousands and thousands of people around the world. We understand however that in certain countries, with different knitting/crochet traditions than Scandinavia, our patterns might be written in a way that differs from what some are used to. But of course we want everyone to understand our patterns, so that’s why we have created an extensive library of tutorial videos as well as step by step lessons that explain how to follow the techniques we use and how to read the diagrams in our patterns. Give them a try!
08.07.2020 - 16:43
![]() Mia escreveu:
Mia escreveu:
Hello, other than the garter edge stitch, how do we knit the 4 stitches in row 2 that we knitted at the end of row 1, before we start on the A.1 Diagram (pattern?) I am saying this because in row 1 we are not finishing the row with the same 6 stitches that are part of the A.1 Diagram. The 4 stitches are extra, not part of the A.1 Diagram. Can you please describe row 2 right at the start? like edge garter stitch, ...... Thank you
30.03.2020 - 09:16DROPS Design respondeu:
Dear Mia, from RS you work: 1 edge st in garter st, repeat A.1 until 4 sts remain and work these 4 sts like this: P1, K1 twisted, P1, 1 edge st in garter st. From WS work: 1 edge st in garter st, K1, P1 twisted, K1, repeat A.1 (reading now from the left towards the right), 1 edge st in garter st. read more about diagrams here. Happy knitting!
30.03.2020 - 11:30
![]() Lotte Meincke escreveu:
Lotte Meincke escreveu:
Hvad gør man, når der står at “omslaget slippes ned på næste pind”??? (Opskrift 153-12) Findes der videoer, der viser, hvad der menes med symbolerne? Mvh Lotte
13.02.2020 - 12:20DROPS Design respondeu:
Hej Lotte, prøv at lave en lille strikkeprøve over de 5 masker i diagrammet, med 2 kantmasker i hver side 1.pind strikker du 2 kantm, 1vr, 1drejet ret, 1vrang, 1ret, 1 omslag, 1ret, 2 kantm 2.pind strikker du (fra vrangen) 2kantm, 3 vrang, 1omslag, 1 ret, 1 drejet vrang, 1ret, 2kantm 3.pind strikker du (fra retten) 2 kantm, 1vrang, 1drejet ret, 1vrang, slip omlaget af pinden så der bliver hul, tag 1 m løst af p som om den strikkes vrang, 2ret, løft den løse maske over de 2ret, 2kantm 4.pind strikker du fra vrangen, 2kantm, 2vrang, 1ret, 1 drejet vrang,1ret, 2kantm Strik gerne de 4 pinde 2-3 gange i højden så du kan se systemet. God fornøjelse!
14.02.2020 - 11:22
![]() Manuela escreveu:
Manuela escreveu:
Herzlichen Dank für die rasche Antwort, natürlich gleich ausprobiert und klappt wunderbar. Möchte jedoch darauf hinweisen dass dann die Beschreibung des Symbols nicht korrekt ist, bei dieser wird nämlich davon gesprochen diesen Umschlag in der nächsten Reihe rechts zu stricken ! LG und danke nochmal
30.09.2019 - 17:07
|
||||||||||||||||||||||
Ibiza#ibizasweater |
||||||||||||||||||||||
|
|
||||||||||||||||||||||
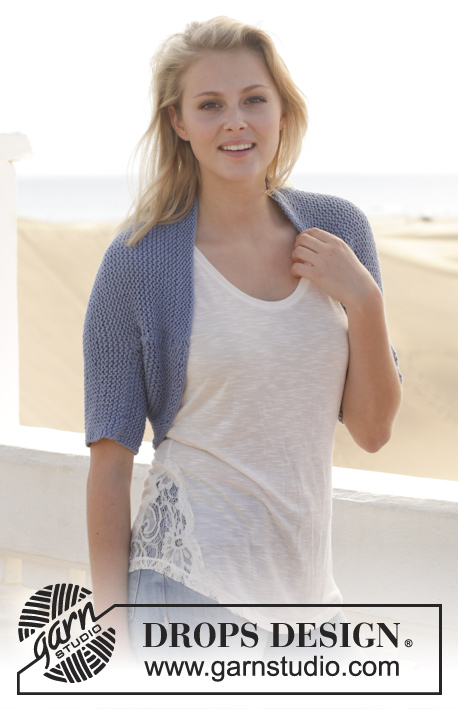
Pulôver DROPS com ponto de ajours, em ”Paris”. Do S ao XXXL.
DROPS 153-12 |
||||||||||||||||||||||
|
---------------------------------------------------------- NOTA: Existem termos diferentes de tricô e croché em português de Portugal e do Brasil. TRICÔ : Malha = Ponto Canelado = Barra Ponto Jarreteira = Cordões de Tricô Ponto Liga = Ponto Tricô CROCHÉ : mpa – meio ponto alto pa – ponto alto pad – ponto alto duplo pat – ponto alto triplo pb – ponto baixo pbx – ponto baixíssimo pc – ponto corrente ---------------------------------------------------------- PONTO JARRETEIRA (em idas e voltas) : Tricotar todas as carreiras em meia. 1 barra jarreteira = 2 carreiras meia. PONTO FANTASIA : Ver diagrama A.1. O diagrama mostra todas as carreiras do ponto fantasia, vistas pelo direito. ---------------------------------------------------------- PULÔVER: Tricota-se em idas e voltas, em diferentes partes que, depois, são unidas entre elas. FRENTE : Montar 76-83-88-94-103-113 ms/pts (incluindo 1 m/p ourela de cada lado da peça) com as agulhas 5.5 mm e tricotar 3 barras jarreteira. Continuar então em ponto meia com 1 m/p ourela em PONTO JARRETEIRA - ver acima - de cada lado da peça. A cerca de 2 cm de altura total, aumentar 1 m/p de cada lado da peça, aumentar com 1 laçada a 1 m/p ourela dos rebordos, e tricotar as laçadas torcidas (tricotar na alça de trás e não na alça da frente) na carreira seguinte para evitar buracos. Repetir estes aumentos mais 11-10-10-12-10-10 vezes a cerca de cada 3-3½-3½-3-3½-3½ cm (= 12-11-11-13-11-11 vezes ao todo) = temos 100-105-110-120-125-135 ms/pts. Continuar até a peça medir 36-37-38-39-40-41 cm, colocar um marcador de cada lado da peça - referências para montar as mangas. Tricotar então da seguinte maneira pelo direito: 1 m/p ourela em ponto jarreteira, repetir A.1 até restarem 4 ms/pts, 1 m/p liga/tricô, 1 m/p torcida em meia, 1 m/p liga/tricô e 1 m/p ourela em ponto jarreteira. A m/p tricotada torcida em meia pelo direito tricota-se torcida em liga/tricô pelo avesso. Continuar desta maneira até a peça medir 46-48-50-52-54-56 cm - ajustar a altura para depois de 1 motivo completo de A.1 em altura. Tricotar então as 35-37-39-44-46-51 primeiras ms/pts como antes, arrematar as 30-31-32-32-33-33 ms/pts seguintes e tricotar as restantes ms/pts como antes. Terminar cada ombro separadamente - AO MESMO TEMPO arrematar 3 vezes 1 m/p no princípio de cada carreira a partir do decote = restam 32-34-36-41-43-48 ms/pts para cada ombro. Continuar até a peça medir 52-54-56-58-60-62 cm e arrematar. COSTAS : Tricota-se como a frente, MAS continuar até a peça medir 50-52-54-56-58-60 cm - ajustar a altura para depois de 1 motivo completo de A.1 em altura - e formar o decote. Tricotar como antes as 33-35-37-42-44-49 primeiras ms/pts, arrematar as 34-35-36-36-37-37 ms/pts seguintes e tricotar as restantes ms/pts como antes. Terminar então cada ombro separadamente - AO MESMO TEMPO, arrematar 1 m/p no princípio da carreira seguinte a partir do decote = restam 32-34-36-41-43-48 ms/pts para cada ombro. Continuar até a peça medir 52-54-56-58-60-62 cm e arrematar. MANGAS : Montar 45-45-50-50-53-53 ms/pts com as agulhas 5.5 mm (incluindo 1 m/p ourela de cada lado da peça) e tricotar 3 barras jarreteira em idas e voltas. Continuar então da seguinte maneira: 1 m/p ourela em ponto jarreteira, 0-0-0-0-2-2 ms/pts liga/tricô, A.1 até restarem 4-4-4-4-5-5 ms/pts, 1 m/p liga/tricô, 1 m/p torcida em meia, 1-1-1-1-2-2 ms/pts liga/tricô e 1 m/p ourela em ponto jarreteira. A m/p tricotada torcida em meia pelo direito tricota-se torcida em liga/tricô pelo avesso. Continuar até a peça medir 12 cm - ajustar a altura para depois de 1 motivo completo de A.1 em altura. Continuar, então, em ponto meia e, ao mesmo tempo, aumentar 1 m/p de cada lado da peça a 1 m/p ourela em ponto jarreteira dos rebordos, e repetir estes aumentos mais 3-4-4-5-4-5 vezes a cada 6½-4½-4½-3½-4-2½ cm cerca de (= 4-5-5-6-5-6 vezes ao todo) = temos 53-55-60-62-63-65 ms/pts. Continuar até a peça medir 34-33-33-31-30-28 cm e arrematar (mais curto nos tamanhos maiores porque os ombros são mais largos). Tricotar a outra manga da mesma maneira. MONTAGEM E GOLA: Costurar um ombro. Levantar, pelo direito, 80-100 ms/pts à volta do decote. Tricotar 3 barras jarreteira em idas e voltas, e arrematar. Costurar o outro ombro e a gola. Montar as mangas entre os 2 marcadores da frente e das costas. Fazer a costura sob as mangas e a dos lados a 1 m/p ourela do rebordo. |
||||||||||||||||||||||
Explicações do diagrama |
||||||||||||||||||||||
|
||||||||||||||||||||||
 |
||||||||||||||||||||||
Terminou este projecto?Então, identifique as suas fotos com as tags #dropspattern #ibizasweater ou mostre-as na galeria #dropsfan. Precisa de ajuda para este modelo?Encontrará 20 turotiais em vídeo, uma rubrica Comentários/Perguntas e muito mais ao visitar a página do modelo em www.garnstudio.com © 1982-2026 DROPS Design A/S. Todos os direitos reservados. Este documento, incluuindo as suas su-secções, tem copyrights. Saia mais o que pode fazer com os nossos modelos no fim de cada uma das páginas do nosso site. |
||||||||||||||||||||||


Com mais de 40 anos no design de modelos de tricô e de croché, a DROPS Design oferece uma das mais vastas colecções demodelos gratuitos na Internet - traduzidos em 17 línguas. Neste dia de hoje, temos 324 catálogos e 12290 modelos - dos quais 12271 estão traduzidos em português.
Trabalhamos com muito empenho para lhe proporcionar o melhor que o tricô e o croché têm para oferecer, para lhe fornecer inspiração e conselhos bem como fios da mais elevada qualidade a preços incríveis! Gostaria de usar os nossos modelos para outros fins que não uso pessoal? Pode ler o que lhe é permitido fazer no Copyright texto que se encontra na parte de baixo de todos os nossos modelos. Bom tricô! Bom croché!
Deixe um comentário acerca do modelo DROPS 153-12
Gostaríamos muito de saber o que tem a dizer-nos acerca deste modelo!
Se deixar uma pergunta acerca do modelo, certifique-se de que escolhe a categoria adequada no formulário abaixo para acelerar o processo relativo à resposta. Os campos obrigatórios estão assinalados com um *.