
Categorias populares
Procura um fio?


Comentários / Perguntas (92)
![]() Jill escreveu:
Jill escreveu:
The pattern states to do 220 chains. Turn and start doing 3 sc's / skip 1 ch... Do I do a chain stitch between the 3 sc's? Or do I just skip a chain which would decrease total stitches in the row to 165 stitches? Thanks so much.
29.03.2014 - 23:16DROPS Design respondeu:
Dear Jill, you will just skip 1 ch as stated, ie, you have more sts on foundation ch than on 1st row so that edge will not be too tight and dec to 165 sts (3rd size). Happy crocheting!
31.03.2014 - 09:15
![]() Mireille escreveu:
Mireille escreveu:
Ik snap A1- A3 niet in mijn ogen is dit gewoon allemaal vaste over de hele toer. Na A1-A2 120 vaste= 30 x de breedte begrijp ik ook niet s van. Wie kan mij dit uitleggen? Alvast bedankt.
14.03.2014 - 14:34DROPS Design respondeu:
Hoi Mireille. Eerste rij van de teltekeningen A.1, A.2 en A.3 zijn inderdaad gewoon vasten (staat ook in het patroon: 1 v in elke v). Je haakt A.2 over de volgende 120 v = dit betekent dat je het patroon A.2 30 keer hebt herhaald in de breedte. Veel haakplezier.
14.03.2014 - 16:03
![]() Marianne Edlund escreveu:
Marianne Edlund escreveu:
Hej, jag får inte ihop mönstret! Vad menas med 30 ggr på bredden. Tacksam för förklaring. Hälsning
10.03.2014 - 14:50DROPS Design respondeu:
Hei Marianne. Det betyder at du har gentaget mönster A.2 30 ganger i bredden (over de 120 fm).
11.03.2014 - 16:55
![]() Robin Blackburn escreveu:
Robin Blackburn escreveu:
Hi, I love this beautiful poncho (Atardecer design) and am anxious to crochet this! However, I was wondering if the chart/diagram instructions were available as written instructions as I have great difficulty in reading diagrams. I would be willing to purchase the written pattern. Please let me know and thank you for your help! Robin
08.03.2014 - 23:13DROPS Design respondeu:
Dear Mrs Blackburn, each stitch is figured in diagram with 1 symbol. Follow each row step by step as it is in diagram. For any further assistance, please contact the store where you bought your yarn or any crochet forum. Happy crocheting!
10.03.2014 - 08:48
![]() Nita Sands escreveu:
Nita Sands escreveu:
Question- Is A.3 the last 9 stitches and A.1 and A.2 = 16 stitches?
08.03.2014 - 06:50DROPS Design respondeu:
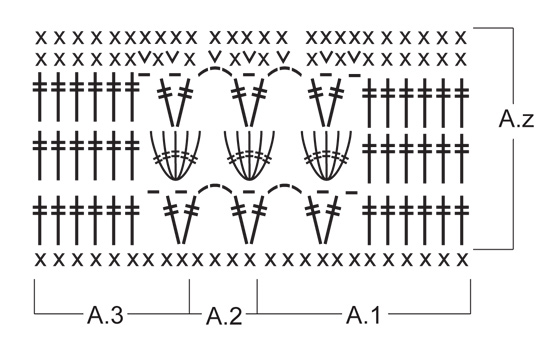
Dear Mrs Sands, A.1 is worked over the first 12 sts (seen from RS), A.2 is repeated over the next 4 sts, and A.3 is worked over the last 9 sts. Happy crocheting!
08.03.2014 - 10:31
![]() Nita Sands escreveu:
Nita Sands escreveu:
I would really like to make this. Is it possible to get written instructions? I don't understand diagrams that overlap. if not thank you anyway. All your things are so very very pretty.
08.03.2014 - 06:35
![]() Barbara Evans escreveu:
Barbara Evans escreveu:
Although I have only just started a sample of the pattern, I am fairly sure that the dividing marker on the chart between A2 & A3 is wrongly placed therefore A3 should only consist of six dc?
02.03.2014 - 21:24DROPS Design respondeu:
Dear Mrs Evans, A.2 shows how to work over the middle sts, A.3 show how to finish the "V" sts before the 6 end sts. On 1st row in A.Z, repeat A.2 (= 4 sts) until 9 sts remain, then work A.3 over these last 9 sts. Happy crocheting!
03.03.2014 - 10:00
![]() Kerstin escreveu:
Kerstin escreveu:
Leider stimmt die Maschenprobe überhaupt nicht. Bei Doppelstäbchen komme ich auf höchstens 6R bei 10cm. Ändere ich die Nadelstärke, stimmt es bei der Anzahl der Stäbchen nicht mehr:-( mit einfachen Stäbchen würde es in etwa hinkommen...
26.02.2014 - 16:45DROPS Design respondeu:
Liebe Kerstin, Sie haben Recht, wir haben dies zum Überprüfen an die Design-Abteilung zurückgegeben. Wichtig sind hier aber die D-Stb in der Breite und diese Angabe ist korrekt, die Masse in der Höhe sind in der Anleitung in cm angegeben, daran können Sie sich halten und gerne in der Zwischenzeit schon häkeln.
27.02.2014 - 09:05
![]() Rian Dirksen escreveu:
Rian Dirksen escreveu:
Houdt A2 echt op boven het 16e kruisje vanaf rechts en begin je dan weer met het 1e kruisje van rechts? Lijkt me niet erg logisch maar zo lijkt het op het telpatroon gezien het vericale streepje. En dan eindig je met 3 l. en begin je weer met de 6 dubbelstokje?
20.02.2014 - 01:12DROPS Design respondeu:
Hoi Rian. Ja, dat klopt. Je herhaalt A.2 en dat betekent dat je wel eindigt met 3 l en dan weer begint met 1 dstk, 1 l, 1 dstk. Bij het overgaan naar A.3 past het ook bij elkaar. Veel haakplezier verder.
21.02.2014 - 10:44
![]() Dawn Curran escreveu:
Dawn Curran escreveu:
I just want to check what the correct tension is on this project. It says 14dtrx9rows with 5mm hook but even at 4mm I'm no where close yet normally my tension squares are correct. What have other people found?
19.02.2014 - 15:28DROPS Design respondeu:
Dear Mrs Curran, most important is to get the 14 dtr = 10 cm, some crochet looser, some other tighter, so crochet hook size is just for your information, but has to be adapted to every tension. So that if you get correct tension with crochet hook size 4mm, just go ahead. Happy crocheting!
19.02.2014 - 16:34
|
||||||||||||||||
Atardecer#atardecer |
||||||||||||||||
|
|
||||||||||||||||
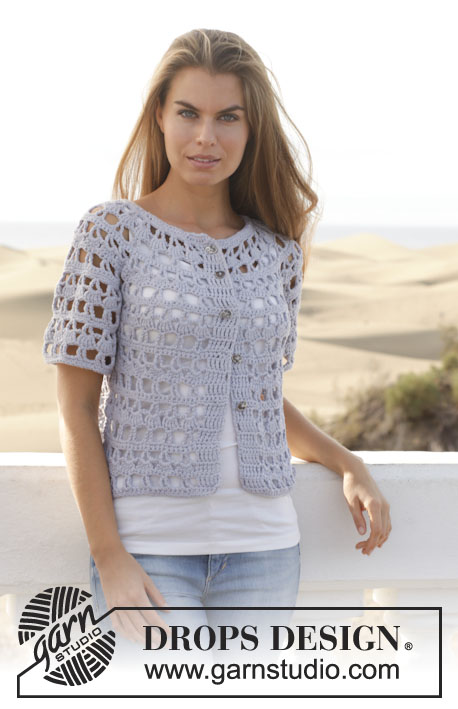
Poncho DROPS em croché, em "Paris". Do S ao XXXL.
DROPS 153-11 |
||||||||||||||||
|
---------------------------------------------------------- NOTA: Existem termos diferentes de tricô e croché em português de Portugal e do Brasil. TRICÔ : Malha = Ponto Canelado = Barra Ponto Jarreteira = Cordões de Tricô Ponto Liga = Ponto Tricô CROCHÉ : mpa – meio ponto alto pa – ponto alto pad – ponto alto duplo pat – ponto alto triplo pb – ponto baixo pbx – ponto baixíssimo pc – ponto corrente ---------------------------------------------------------- PONTO FANTASIA: Ver diagramas A.1 a A.3. DICA CROCHÉ: Substituir o 1.º pb no princípio de cada carreira de pb por 1 pc. Substituir o 1.º pad de cada pad carreira por 4 pc. ---------------------------------------------------------- PONCHO: Crocheta-se em idas e voltas. Montar frouxamente uma corrente de 188-199-220-231 pc (incluindo 1 pc para virar) com a agulha de croché 5 mm em Paris. Crochetar 1 pb no 2.º pc a partir da agulha de croché, 1 pb em cada um dos 2 pc seguintes, saltar 1 pc, *1 pb em cada um dos 3 pc seguintes, saltar 1 pc*, repetir de * a * e terminar com 1 pb em cada um dos 3-2-3-2 últimos pc = 141-149-165-173 pb. Crochetar 1 pb em cada pb (= 1.ª carreira do diagrama A.1-A.3) – VER DICA CROCHÉ! Continuar da seguinte maneira: A.1, A.2 acima dos 120-128-144-152 pb seguintes (= 30-32-36-38 vezes em largura), terminar com A.3. Repetir A.z até a peça medir cerca de 30-30-38-38 cm, arrematar depois de 1 motivo completo de A.z. Arrematar e entretecer os fios. MONTAGEM: Costurar um dos lados mais curtos, orla com orla, ao longo da extremidade de um dos lados mais compridos para evitar que a costura seja demasiado grossa (o lado oposto forma, agora, uma ponta a meio da frente). |
||||||||||||||||
Explicações do diagrama |
||||||||||||||||
|
||||||||||||||||
 |
||||||||||||||||
Terminou este projecto?Então, identifique as suas fotos com as tags #dropspattern #atardecer ou mostre-as na galeria #dropsfan. Precisa de ajuda para este modelo?Encontrará 6 turotiais em vídeo, uma rubrica Comentários/Perguntas e muito mais ao visitar a página do modelo em www.garnstudio.com © 1982-2026 DROPS Design A/S. Todos os direitos reservados. Este documento, incluuindo as suas su-secções, tem copyrights. Saia mais o que pode fazer com os nossos modelos no fim de cada uma das páginas do nosso site. |
||||||||||||||||


Com mais de 40 anos no design de modelos de tricô e de croché, a DROPS Design oferece uma das mais vastas colecções demodelos gratuitos na Internet - traduzidos em 17 línguas. Neste dia de hoje, temos 324 catálogos e 12290 modelos - dos quais 12271 estão traduzidos em português.
Trabalhamos com muito empenho para lhe proporcionar o melhor que o tricô e o croché têm para oferecer, para lhe fornecer inspiração e conselhos bem como fios da mais elevada qualidade a preços incríveis! Gostaria de usar os nossos modelos para outros fins que não uso pessoal? Pode ler o que lhe é permitido fazer no Copyright texto que se encontra na parte de baixo de todos os nossos modelos. Bom tricô! Bom croché!
Deixe um comentário acerca do modelo DROPS 153-11
Gostaríamos muito de saber o que tem a dizer-nos acerca deste modelo!
Se deixar uma pergunta acerca do modelo, certifique-se de que escolhe a categoria adequada no formulário abaixo para acelerar o processo relativo à resposta. Os campos obrigatórios estão assinalados com um *.