
Categorias populares
Procura um fio?


Comentários / Perguntas (27)
Cecilia escreveu:
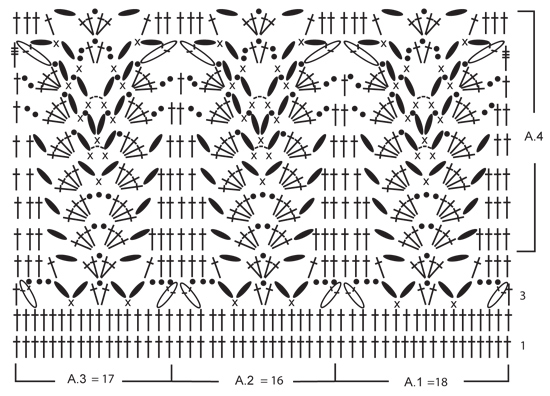
Hi, this is really a beautiful pattern, as I am a beginner it took me a while of doing and undoing but I think I figured it out eventually. I have a question though, the dcs in lines 7-11 and the 2tr in line 11 should they be worked in the chain stitches or in the chain space? Is there a way to tell from the diagram? Thank you in advance
05.02.2017 - 22:58DROPS Design respondeu:
Dear Cecilia, you can work these dc around the chain spaces. Happy crocheting!
06.02.2017 - 11:43
![]() Bouwina escreveu:
Bouwina escreveu:
Hallo Ik ben aan de sjaal begonnen en wil graag het teken van de 3l even controleren Zijn dat gewoon 3 lossen en die zwarte stippen ook lossen? Dus de 3e toer zijn 6 lossen en dan 1 vaste en dan weer 6 lossen? Alvast bedankt. Gr Bouwina
12.11.2015 - 22:27DROPS Design respondeu:
Hoi Bouwina. Ja, beide zijn voor lossen, de toer 3 is inderdaad 6 lossen en dan een vaste
13.11.2015 - 15:44
![]() Kikki Brill escreveu:
Kikki Brill escreveu:
Skrev litt uklart. Jeg mener at jeg ser at det står 71 i oppskriften men teller jeg A1 A2 og A3 så blir det 51, enda jeg har gjort A2 to ganger. Et lite tips: Det blir enklere å telle om stavsymbolet på raden under der du holder på er i en annen farge der du skal feste nål for ny maske i raden over, blir litt kryss for øynene å telle mange svarte kors etter hverandre. Tusen takk.
02.06.2015 - 20:34DROPS Design respondeu:
Hej Kikki, så her står det: 1 st i hver av de første 2 st, MØNSTER etter diag A.1(=18m), A.2(=16m) totalt 2 ganger, A.3 (=17m), og avslutt med 1 st i hver av de neste 2 st (= 3.rad i diag). 1+1+18+16+16+17+1+1=71m
04.06.2015 - 13:34
![]() Kikki Brill escreveu:
Kikki Brill escreveu:
Hei Nå har jeg gjort oppskriften flere ganger og får ikke tellingen til å fungere. Det står legg opp 84 løst lm og så ender det med 71 staver. Men, jeg har nå telt og telt og heklet flere ganger og hver gang får jeg en manko altså, 51 i stedet for 71. Jeg tror jeg har gjort det riktig i A2, altså telt og heklet den riktig to ganger, men får ikke mønsteret til å gå opp. Hva er det jeg ikke ser? Vennlig hilsen Kikki Brill
02.06.2015 - 20:32DROPS Design respondeu:
Hej Kikki, se svar ovenfor :)
04.06.2015 - 13:34
![]() Bianca escreveu:
Bianca escreveu:
Hallo Ik ben enthousiast aan de sjaal begonnen maar begrijp niet de 3tekens die alle drie lossen aangeven. En er staat in de beschrijving toer 3 begin met twee stokjes en dan patroon. Moet ik dan ook gewoon het eerste stokje van het patroon haken. Alvast mijn hartelijke dank. Bianca
26.05.2015 - 21:27DROPS Design respondeu:
Hoi Bianca. Je moet het teken voor de 3 l haken in de losse (zwarte stip) van de vorige toer, dan 1 v in dezelfde losse, 2 l, 1 stk enzovoort. Toer 3 begint met 1 stk (A.1) = 3 l en dan 2 stk in hetzelfde stokje enzovoort.
27.05.2015 - 14:50
![]() Di escreveu:
Di escreveu:
Hallo ! Ich würde sehr gerne diesen Schal häkeln , hänge aber schon an Reihe 3 fest 😕 ich habe 71 maschen dann beginne ich mit Reihe drei wie beschrieben und häkle die Abbildungen , Abbildung 2 ( Mustersatz 2) häkle ich zwei Mal und dann nr. 3 aber ich kann nicht mit zwei Stäbchen abschliessen da ich , egal was ich mache , immer noch 5 maschen frei habe 😳 Was mache ich falsch ?? Bitte Hilfe 😕
27.03.2015 - 20:26DROPS Design respondeu:
Am Anfang von R 3 häkeln Sie ja auch zuerst 2 Stb. Dann kommt A.1 über 18 Stb, dann 2 x A.2, also über insgesamt 32 Stb, dann A.3 über 17 Stb und zuletzt die 2 Stb, das macht 71 Stb, über die gehäkelt wird. Am besten markieren Sie sich in der 2. R genau die Anzahl der Stb, die für die jeweiligen Musterabschnitte benötigt werden, dann können Sie besser kontrollieren, wo Sie evtl. einen Fehler machen. Man muss z.B. genau aufpassen, dass man die richtige Anzahl Stb überspringt.
29.03.2015 - 13:11
![]() Kendra escreveu:
Kendra escreveu:
Do you have this pattern written out? I'm having a hard time following the diagram. I think it is beautiful. Mine just isn't looking the same.
08.02.2015 - 03:38DROPS Design respondeu:
Dear Kendra, start diagram at the bottom corner on the right side and read from the right towards the left from RS and from the left towards the right from WS. A.1 / A.3 show how to start/end the pattern, A.2 is repeated 2 times inbetween - remember to start with 2 dc and end with 2 dc. Happy crocheting!
08.02.2015 - 19:15Shruti escreveu:
I dont understand how to do 3ch symbol shown vertically..What is the difference between the 3 ch two symbols (3rd and 6th)?
28.10.2014 - 20:27DROPS Design respondeu:
Dear Shruti, both symbols are the same (= 3 ch) but to make it easier to read they are used on different places. Happy crocheting!
29.10.2014 - 09:40
![]() Patrizia escreveu:
Patrizia escreveu:
Buongiorno,ho provato a realizzare questo scialle ma non riesco ad andare avanti nello schema,dopo le prime due righe,non capisco come devo procedere,potete aiutarmi?
11.06.2014 - 09:53DROPS Design respondeu:
Buongiorno Patrizia, se ci spiega esattamente cosa non le torna del diagramma possiamo aiutarla meglio. Si ricordi di iniziare a lavorare il diagramma dal basso verso l'alto e da destra verso sinistra. Buon lavoro!!
11.06.2014 - 13:48
![]() Lynn escreveu:
Lynn escreveu:
When I do 3rd road I do not seem to have enough stitches even though I have what is specified 71 trs also diagram say I tr in first stitch but written info say tr in first 2 tr?
29.03.2014 - 11:00DROPS Design respondeu:
Dear Lynn, On 3rd row, work first 1 tr in each of the next first 2 tr, then work A.1, A.2 2 times, A.3 and 1 tr in each of the last 2 sts., i.e. you will have 2 tr before working A.1 and 2 tr after A.3 all the way, but on 11th row, work 2 triple tr instead of 2 tr each side. Happy crocheting!
31.03.2014 - 08:43
|
||||||||||||||||||||||
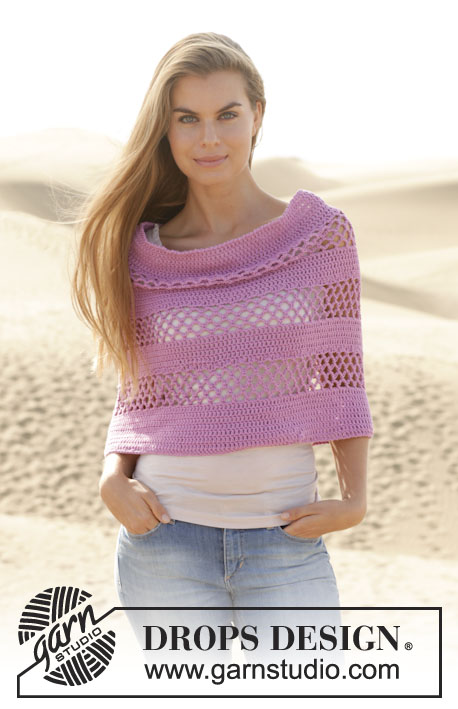
Hold Me#holdmeshawl |
||||||||||||||||||||||
|
|
||||||||||||||||||||||
Écharpe com ajours DROPS em pontos altos, em ”BabyAlpaca Silk”.
DROPS 154-38 |
||||||||||||||||||||||
|
---------------------------------------------------------- NOTA: Existem termos diferentes de tricô e croché em português de Portugal e do Brasil. TRICÔ : Malha = Ponto Canelado = Barra Ponto Jarreteira = Cordões de Tricô Ponto Liga = Ponto Tricô CROCHÉ : mpa – meio ponto alto pa – ponto alto pad – ponto alto duplo pat – ponto alto triplo pb – ponto baixo pbx – ponto baixíssimo pc – ponto corrente ---------------------------------------------------------- DICA CROCHÉ: No princípio de uma nova carreira, substituir o 1.º pa por 3 pc e 1 pat por 5 pc. PONTO FANTASIA: Ver diagramas A.1-A.4. Os diagramas mostram todas as carreiras do ponto fantasia, vistas pelo direito. ---------------------------------------------------------- ÉCHARPE : Crocheta-se em 2 partes, a partir do meio da écharpe em direcção aos lados. Montar frouxamente uma corrente de 84 pc com a agulha de croché 4 mm em BabyAlpaca Silk. CARREIRA 1: 1 pa no 4.º pc a partir da agulha de croché (= 2 pa), depois, 1 pa nos 3 pc seguintes, *saltar 1 pc, 1 pa em cada um dos 6 pc seguintes*, repetir de * a * 11 vezes ao todo = 71 pa (= 1.ª carreira de A.1, A.2 e A.3). CARREIRA 2: 1 pa em cada pa – VER DICA CROCHÉ! (= 2.ª carreira do diagrama). CARREIRA 3: Continuar da seguinte maneira: 1 pa em cada um dos 2 primeiros pa, PONTO FANTASIA seguindo o diagrama A.1, repetir 2 vezes ao todo A.2, A.3, e terminar com 1 pa em cada um dos 2 pa seguintes (= 3.ª carreira do diagrama). NÃO ESQUECER DE MANTER A MESMA TENSÃO DA INDICADA PARA A AMOSTRA! Continuar desta maneira no ponto fantasia com 2 pa de cada lado da peça e, AO MESMO TEMPO, na 11.ª carreira, crochetar 3 pat de cada lado da peça em vez dos pa. Quando os diagramas A.1, A.2 e A.3 tiverem sido feitos 1 vez em altura, continuar o ponto fantasia da mesma maneira mais, agora, crochetar A.4 com 2 pa de cada lado da peça (não esquecer os pat de cada lado da peça na 7.ª carreira de A.4). Depois de ter repetido 8 vezes A.4 ao todo em altura, a peça mede cerca de 74 cm. Arrematar. Crochetar em pa no pc da corrente de montagem da seguinte maneira: 3 pc no 1.º pc (= 1 pa), 1 pa em cada um dos 4 pc seguintes, *saltar 1 pc, 1 pa em cada um dos 6 pc seguintes*, repetir de * a * 11 vezes ao todo = 71 pa. Na carreira seguinte, crochetar a partir da 2.ª carreira do diagrama (= pelo avesso). Continuar como para a 1.ª parte, no ponto fantasia, com 2 pa de cada lado da peça. Depois de ter repetido 8 vezes A.4 ao todo em altura, arrematar. |
||||||||||||||||||||||
Explicações do diagrama |
||||||||||||||||||||||
|
||||||||||||||||||||||
 |
||||||||||||||||||||||
Terminou este projecto?Então, identifique as suas fotos com as tags #dropspattern #holdmeshawl ou mostre-as na galeria #dropsfan. Precisa de ajuda para este modelo?Encontrará 5 turotiais em vídeo, uma rubrica Comentários/Perguntas e muito mais ao visitar a página do modelo em www.garnstudio.com © 1982-2026 DROPS Design A/S. Todos os direitos reservados. Este documento, incluuindo as suas su-secções, tem copyrights. Saia mais o que pode fazer com os nossos modelos no fim de cada uma das páginas do nosso site. |
||||||||||||||||||||||


Com mais de 40 anos no design de modelos de tricô e de croché, a DROPS Design oferece uma das mais vastas colecções demodelos gratuitos na Internet - traduzidos em 17 línguas. Neste dia de hoje, temos 324 catálogos e 12290 modelos - dos quais 12271 estão traduzidos em português.
Trabalhamos com muito empenho para lhe proporcionar o melhor que o tricô e o croché têm para oferecer, para lhe fornecer inspiração e conselhos bem como fios da mais elevada qualidade a preços incríveis! Gostaria de usar os nossos modelos para outros fins que não uso pessoal? Pode ler o que lhe é permitido fazer no Copyright texto que se encontra na parte de baixo de todos os nossos modelos. Bom tricô! Bom croché!
Deixe um comentário acerca do modelo DROPS 154-38
Gostaríamos muito de saber o que tem a dizer-nos acerca deste modelo!
Se deixar uma pergunta acerca do modelo, certifique-se de que escolhe a categoria adequada no formulário abaixo para acelerar o processo relativo à resposta. Os campos obrigatórios estão assinalados com um *.