
Categorias populares
Procura um fio?


Comentários / Perguntas (99)
![]() Sandrine escreveu:
Sandrine escreveu:
"TOUR 1: 4 B dans chaque arceau = 128 B." ne correspond pas à ce qui figure sur le diagramme : on ne voit pas 4 brides mais 1 bride 2 ml 1bride 2 ml... "TOUR 2: 1 B dans chaque B, EN MÊME TEMPS diminuer 2 B à intervalles réguliers = 126 B." ne correspond pas à ce qui figure sur le diagramme : on voit 1 bride 3 ml 1bride 3 ml... et ainsi de suite pour les tours suivants. Que faut-il faire ?
28.11.2015 - 11:56DROPS Design respondeu:
Bonjour Sandrine, effectivement ces 11 tours sont crochetés quand A.1 est terminé. Après avoir crocheté 1 fois A.1 en hauteur, on a 32 arceaux (4 fois les 8 arceaux de chaque A.1 tout le tour), et on continue ainsi avec au 1er tour, 4 B dans chaque arceau (= 4x32) = 128 B - mais bien une fois A.1 terminé. Bon crochet!
30.11.2015 - 10:30
![]() Sandrine escreveu:
Sandrine escreveu:
Bonjour, je trouve le modèle très joli mais je n'arrive pas à crocheter ni en suivant le diagramme ni les indications écrites qui selon moi ne coïncident pas : Dans la réponse du 08.10.2015 kl. 09:46, vous écrivez " = sautez 1 ms entre chaque B, et faites bien 2 ml entre chaque" or avec 32 ms si on en saute une il n'y a que 16 brides au final et non 32 et donc 16 arceaux au lieu de 32.
28.11.2015 - 11:55DROPS Design respondeu:
Bonjour Sandrine, à la fin du 1er tour de A.1, on doit bien avoir 16 B et 16 arceaux, c'est à la fin de A.1 (après les 10 tours) que l'on a 32 arceaux. Bon crochet!
30.11.2015 - 10:28
![]() Est_el_le escreveu:
Est_el_le escreveu:
Bonjour Merci pour votre réponse... Nouvelle question: pour le deuxième tour on crochete les brides dans les ml du rang précédent ou dans les arceaux? Merci Estelle
08.10.2015 - 14:04DROPS Design respondeu:
Bonjour Est_el_le, les brides du 2ème tour sont crochetées autour des arceaux. Bon crochet!
08.10.2015 - 17:26
![]() Est_el_le escreveu:
Est_el_le escreveu:
Bonjour je n'ai pas l'habitude de crocheter en suivant un diagramme du coup je ne sais pas comment commencer. Dans quelles mailles serrées dois je crocheter les brides du 1er rang ? Merci d'avance pour votre aide et au cas où n'y a t il pas moyen d'avoir les explications du diagramme écrite rang par rang? Estelle
08.10.2015 - 08:37DROPS Design respondeu:
Bonjour Est_el_le, crochetez dans la ms où "pointe" la B du rang 1 soit: 1 B dans la 2ème ms, 2 ml, 1 B dans la 3ème ms, 2 ml, 1 B dans la 5ème ms, 2 ml, 1 B dans la 7ème ms, 2 ml ... (= sautez 1 ms entre chaque B, et faites bien 2 ml entre chaque). Bon crochet!
08.10.2015 - 09:46
![]() Michaela escreveu:
Michaela escreveu:
Ich wüßte gerne, wie gross der Durchmesser der Mütze ist, und zwar nach dem Ende von A1 bevor man mit den Runden mit den Stäbchen beginnt. Dann kann man das anpassen, wenn die Maschenprobe nicht ganz stimmt.
03.10.2015 - 22:12DROPS Design respondeu:
Leider haben wir kein Maß des Mützentellers vorliegen. Sie müssten die Mütze dann einfach immer mal wieder anprobieren und ggf. die Stäbchenzahl anpassen.
13.10.2015 - 22:19
![]() Coutarel escreveu:
Coutarel escreveu:
Le 1 er tour du diagramme A1 vous commencez le rang 1 par une maille serrée une bride pas 2 mailles en l'air pour commencer et à la fin du rang comment termine t'on ?
07.08.2015 - 06:21DROPS Design respondeu:
Bonjour Mme Coutarel, remplacez la 1ère ms du tour par 1 ml et la 1ère B des tours de A.1 par 3 ml, et terminez chaque tour avec 1 mc dans la 1ère/la 3ème ml du début du tour (cf "Info Crochet" au début des explications). Bon crochet!
07.08.2015 - 09:42Therese escreveu:
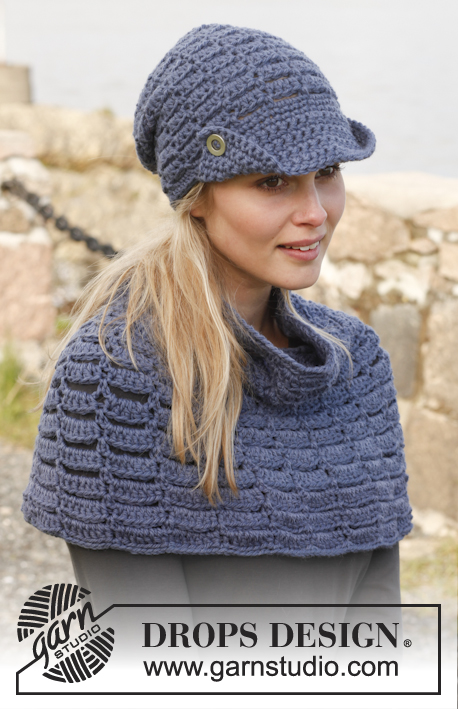
This is a beautiful pattern, thank you for making it freely available. I can't see how much yarn is required to make both the beret and the neck warmer...could you please clarify. Thank you
07.06.2015 - 15:36DROPS Design respondeu:
Dear Therese, you will find total weight of required yarn under tab "materials" at the right side of the picture, ie 100 g for the beret (= 2 balls 50 g Karisma) and 200 g for the neckwarmer (= 4 balls 50 g Karisma), ie a total of 6 balls for the whole set. Happy crocheting!
08.06.2015 - 08:55
![]() Maria Livingston escreveu:
Maria Livingston escreveu:
I love this hat pattern but I do not understand how to do the pattern according to the diagram given in A.1. Is there some way to explain how to do this without having to follow the picture diagram? Help!!!!
31.12.2014 - 17:17DROPS Design respondeu:
Dear Mrs Livingstone, each symbol in the diagram represent 1 st, work A.1 in the round repeating diagram a total of 4 times in the round, starting at the bottom corner on the right side and working from the right towards the left every round. Happy crocheting!
02.01.2015 - 16:09
![]() Barbora Smerekova escreveu:
Barbora Smerekova escreveu:
Hi, I am not sure what ch4 (= 1st dc+ 1st ch) mean. Am I suppose to crochet 1 dc and then chain 1 four times or just chain 4 and then 1st dc and 1st ch. Thank you for your help
12.11.2014 - 07:25DROPS Design respondeu:
Dear Mrs Smerekova, at the beg of row the 4 ch will replace 1st dc + 1st ch, then skip first ch-space and work *1 dc in next ch-space, ch 1*, repeat from *to* and finish with 1 dc in last ch-space and 1 sl st in first ch you made with 4ch at beg of round. Happy crocheting!
12.11.2014 - 09:57
![]() Joke Haakvrouwtje escreveu:
Joke Haakvrouwtje escreveu:
Heelerg leuk patroon. Heerlijk om te haken. Dank je wel voor het delen Drops.
03.11.2014 - 13:34
|
|||||||||||||
Victoriana#victorianaset |
|||||||||||||
 |
 |
||||||||||||
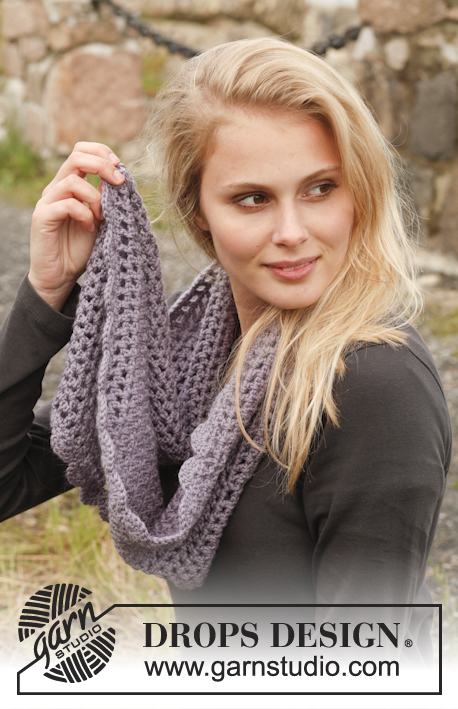
Boina e gola DROPS em croché, em ”Karisma”.
DROPS 149-8 |
|||||||||||||
|
-------------------------------------------------------- NOTA: Existem termos diferentes de tricô e croché em português de Portugal e do Brasil. TRICÔ : Malha = Ponto Canelado = Barra Ponto Jarreteira = Cordões de Tricô Ponto Liga = Ponto Tricô CROCHÉ : mpa – meio ponto alto pa – ponto alto pad – ponto alto duplo pat – ponto alto triplo pb – ponto baixo pbx – ponto baixíssimo pc – ponto corrente ---------------------------------------------------------- DICA CROCHÉ: Substituir o 1.º pb da carreira por 1 pc. Unir com 1 pbx no pc do princípio da carreira. Substituir o 1.º pa das carreiras de pa por 3 pc. Unir com 1 pbx no 3.º pc do princípio da carreira. PONTO FANTASIA: Ver diagrama A.1. PONTO CARANGUEJO: Crochetar uma carreira de pb mas em sentido contrário, ou seja, crochetando da esquerda para a direita. CARREIRAS EM PA E PC: Crochetar todas as carreiras de pa e pc da seguinte maneira: Virar para crochetar pelo avesso, crochetar 4 pc (= 1.º pa + 1.º pc), saltar o 1.º aro (= último pc da carreira precedente), * 1 pa no aro seguinte, 1 pc *. Repetir de * a *, e terminar a carreira com 1 pa no último aro (= aro de 4 pc da carreira precedente), 1 pbx no aro de 4 pc do princípio da carreira - ou seja, crochetar alternadamente pelo direito e pelo avesso para ter um bonito acabamento/princípio de carreira. ---------------------------------------------------------- BOINA: Crocheta-se de cima para baixo. CARREIRA 1: Crochetar 4 pc com a agulha de croché 4 mm e o fio Karisma e unir em redondo com 1 pbx no 1.º pc, crochetar 8 pb no aro de pc – VER DICA CROCHÉ. CARREIRA 2: Crochetar 2 pb em cada pb, em toda a carreira = 16 pb. NÃO ESQUECER DE MANTER A MESMA TENSÃO DA INDICADA PARA A AMOSTRA ! CARREIRA 3: * 1 pb no pb seguinte, 2 pb no pb seguinte *, repetir de * a * = 24 pb. CARREIRA 4: * 1 pb em cada um dos 2 pb seguintes, 2 pb no pb seguinte *, repetir de * a * = 32 pb. Crochetar então A.1 (= 4 vezes em toda a carreira). Depois de ter crochetado 1 ve A.1 em altura, temos 32 aros. Continuar da seguinte maneira: CARREIRA 1: 4 pa em cada aro = 128 pa. CARREIRA 2: 1 pa em cada pa e, AO MESMO TEMPO diminuir 2 pa a intervalos regulares = 126 pa. CARREIRA 3: 1 pa em cada pa, mas crochetar juntamente cada 13.º e 14.º pa = 117 pa. CARREIRA 4: 1 pa em cada pa, mas crochetar juntamente cada 12.º e 13.º pa = 108 pa. CARREIRA 5: 1 pa em cada pa, mas crochetar juntamente cada 11.º e 12.º pa = 99 pa. CARREIRA 6: 1 pa em cada pa e, AO MESMO TEMPO, diminuir 11 pa a intervalos regulares = 88 pa. CARREIRAS 7-10: 1 pa em cada pa, em toda a carreira. CARREIRA 11: Continuar com o fio em dobro e crochetar 1 carreira em PONTO CARANGUEJO - ver explicações acima. --------------------------------------------------------- GOLA: Crocheta-se em redondo em Karisma com a agulha de croché 4 mm. Crochetar frouxamente uma corrente de 228 pc, unir com 1 pbx no 1.º pc. Crochetar 4 pc (= 1.º pa + 1.º pc), * saltar 1 pc, 1 pa no pc seguinte, 1 pc *, repetir de * a * em toda a carreira e terminar com 1 pbx no aro de 4 pc do princípio da carreira = 114 pa + pc. Crochetar então em CARREIRAS DE PA E PC – ver explicações acima. Continuar desta maneira até a peça medir 18 cm de altura. Crochetar então uma orla de leques da seguinte maneira: CARREIRA 1: 1 pc no 1.º pb, 1 pb em cada pa e 1 pb em cada pc em toda a carreira e terminar com 1 pbx no 1.º pc = 228 pb. CARREIRA 2: 1 pc no 1.º pb, * saltar 2 pb, 6 pa no pb seguinte, saltar 2 pb, 1 pb no pb seguinte *, repetir de * a * em toda a carreira e terminar com 1 pbx no 1.º pc = 38 leques. Fazer a mesma orla do outro lado. Arrematar. |
|||||||||||||
Explicações do diagrama |
|||||||||||||
|
|||||||||||||
 |
|||||||||||||
Terminou este projecto?Então, identifique as suas fotos com as tags #dropspattern #victorianaset ou mostre-as na galeria #dropsfan. Precisa de ajuda para este modelo?Encontrará 6 turotiais em vídeo, uma rubrica Comentários/Perguntas e muito mais ao visitar a página do modelo em www.garnstudio.com © 1982-2026 DROPS Design A/S. Todos os direitos reservados. Este documento, incluuindo as suas su-secções, tem copyrights. Saia mais o que pode fazer com os nossos modelos no fim de cada uma das páginas do nosso site. |
|||||||||||||


Com mais de 40 anos no design de modelos de tricô e de croché, a DROPS Design oferece uma das mais vastas colecções demodelos gratuitos na Internet - traduzidos em 17 línguas. Neste dia de hoje, temos 324 catálogos e 12290 modelos - dos quais 12271 estão traduzidos em português.
Trabalhamos com muito empenho para lhe proporcionar o melhor que o tricô e o croché têm para oferecer, para lhe fornecer inspiração e conselhos bem como fios da mais elevada qualidade a preços incríveis! Gostaria de usar os nossos modelos para outros fins que não uso pessoal? Pode ler o que lhe é permitido fazer no Copyright texto que se encontra na parte de baixo de todos os nossos modelos. Bom tricô! Bom croché!
Deixe um comentário acerca do modelo DROPS 149-8
Gostaríamos muito de saber o que tem a dizer-nos acerca deste modelo!
Se deixar uma pergunta acerca do modelo, certifique-se de que escolhe a categoria adequada no formulário abaixo para acelerar o processo relativo à resposta. Os campos obrigatórios estão assinalados com um *.