
Categorias populares
Procura um fio?


Comentários / Perguntas (101)
![]() Lisbet Holze Jespersen escreveu:
Lisbet Holze Jespersen escreveu:
Hej igen. Den 11.1.2016 havde jeg nogle spørgsmål til opskrift 151-02. Da jeg p.t. sidder og strikker denne poncho må I gerne svare hurtigste muligt.
16.01.2016 - 23:58
![]() Lisbet Holze Jespersen escreveu:
Lisbet Holze Jespersen escreveu:
Sign.forklaring: 2 skrå op 1 skrå ned. Sæt 2 m på hj.pind bag arb. 1 ret og 1 vr. + 1 ret fra hj.p.. selvom der er sat 2 m på hj.pind. Der må være noget galt??? Sign.forklaring med at hente masker op bagfra. 3 m ialt. På næste pind strikkes således:1 løs af 2 r sammen. Løs m over 2 r sammen. Iflg. sign. skal der strikkes 1 vr ???
11.01.2016 - 15:01DROPS Design respondeu:
= sæt 2 m på h.j.p bag arb, 1 ret, 1 vr + 1 ret fra hj.p. Det er de 2 sidste masker du strikker fra hjælpepinden. God fornøjelse!
26.01.2016 - 15:04
![]() M.boer escreveu:
M.boer escreveu:
In het patroon van deze poncho moet je in een naald 2 steken samenbreien/ of een overhaling. In de volgende naald kom je dus steken tekort , je kan dan niet 1 recht 1 averecht breien boven de b.v samengebreide steken want die heb je nergens toegevoegd. Graag uitleg / reactie. B.v.d. Vr.groet, Marja Boer.
05.05.2015 - 21:32DROPS Design respondeu:
Hoi Marja. Je maakt ook 1 omslag bij elke 2 samenbreien/overhaling. Zoals ik het lees kom je dan uit met een gelijk aantal steken.
06.05.2015 - 17:38
![]() Sue escreveu:
Sue escreveu:
Have you produced a video tutorial for the3/6 stitch because I have no idea where or how to even start with that? Thank you.
27.01.2015 - 22:37DROPS Design respondeu:
Dear Sue, there is no video available yet, but to work this st, *insert your needle 3/6 rows below, get yarn from WS and go back through that st with the yarn from RS (you have 1 more st on the right needle)*, then work next st and repeat from *-* once again in the same st below, you have now 3 sts on the right needle, on next round, work these 3 sts: Slip 1 as if to K, K2 tog, psso (1 st remains). Happy knitting!
28.01.2015 - 10:57
![]() Françoise Bastin escreveu:
Françoise Bastin escreveu:
Bonjour, J'ai réalisé ce poncho en rouge, il est magnifique. J'ai repris la base mais changé les deux panneaux de dessin. En fait j'ai repris presque l'entièreté d'un diagramme d'un pull pour homme (n°135-3). Je le trouve aussi magnifique. Je vais procéder de la même manière pour une autre personne et cela donnera 3 ponchos différents. Françoise.
21.01.2015 - 10:32RHS escreveu:
Hi Is the circumference of the neck 42cm or 84cm?
08.01.2015 - 12:25DROPS Design respondeu:
Dear RHS, measurements in chart are taken flat, from side to side, circumference of the neck will be then approx. 84 cm (neck will be 42 cm from side to side when lying flat). Happy knitting!
08.01.2015 - 13:40
![]() Sandra escreveu:
Sandra escreveu:
Hallo an Alle, weiß denn jemand wieviel Wolle für Größe S/M benötigt wird :-) ? Dankeschön
25.12.2014 - 18:56DROPS Design respondeu:
Den Garnverbrauch finden Sie neben dem Foto unter der gestrichelten Linie, dort ist das Material samt Verbrauch angegeben.
29.12.2014 - 10:11Renée escreveu:
Thank you for your help!
04.12.2014 - 15:26Renée escreveu:
Thanks for confirming. Just one final aspect I am a little unsure of regarding the insert needle 3/6 rows down, when you create the 2nd loop (the 3rd of the 3 sts), you stick the needle through the same stitch as you stuck it through to create the first loop. Is that correct? i.e. both loops/strands of yarn are pulled through the same stitch.
04.12.2014 - 13:37DROPS Design respondeu:
Dear Renée, that's correct, you will then have 3 sts instead of 1 on this place (1st st picked below + K1 + 2nd st picked below) that you will dec to 1 st on next round. Happy knitting!
04.12.2014 - 15:05Renée escreveu:
I already looked at the images you are directing me to and I did not find them particularly helpful. Can you please check my post from 29/11/14 at 15:06 where I have described what I think is required for the stitch 3/6 rows down and then confirm that this is correct or not. The description provided in the pattern is too vague and should be rewritten as it is quite misleading.
03.12.2014 - 17:02DROPS Design respondeu:
Dear Renée, you are correct, *you insert needle some rows below, get the yarn from WS and pull it through the st (= towards RS) = you will have an extra st "loop" on right needle* - work 1 st and repeat again from *-* = 3 st on right needle - on next round, work these 3 sts: Slip 1 as if to K, K2 tog, psso. Happy knitting!
03.12.2014 - 17:34
|
||||||||||||||||||||||||||||||||||||||||||||||||||||
Frozen Ivy#frozenivyponcho |
||||||||||||||||||||||||||||||||||||||||||||||||||||
|
|
||||||||||||||||||||||||||||||||||||||||||||||||||||
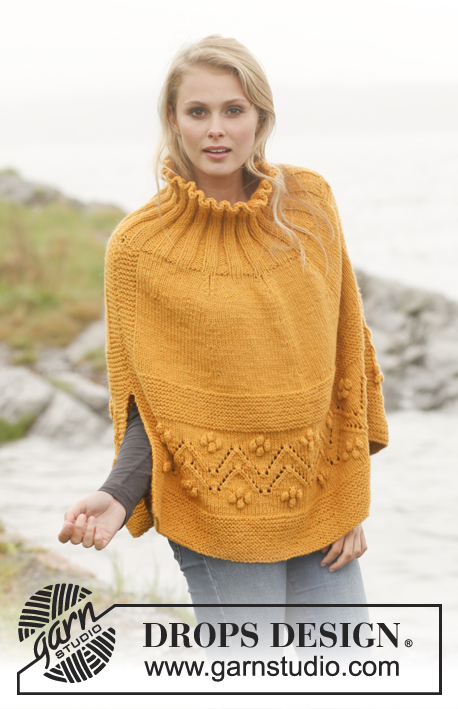
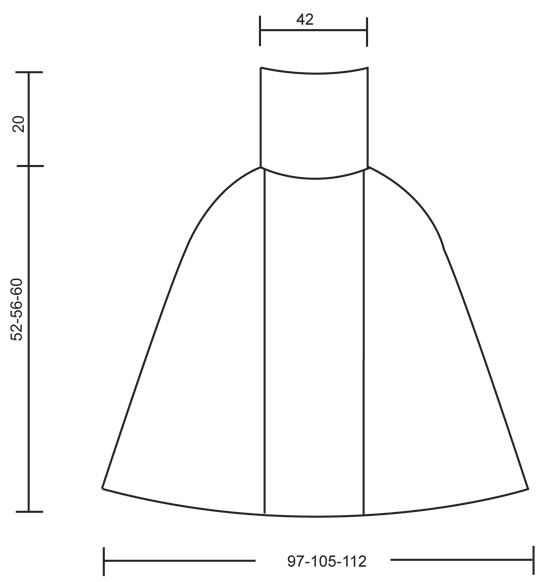
Poncho DROPS com tranças e motivo de folhas, em ”Karisma”. Do S ao XXXL.
DROPS 151-2 |
||||||||||||||||||||||||||||||||||||||||||||||||||||
|
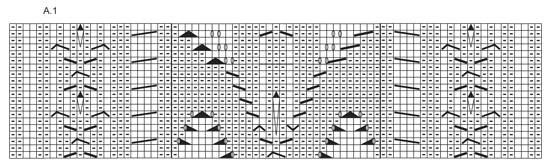
---------------------------------------------------------- NOTA: Existem termos diferentes de tricô e croché em português de Portugal e do Brasil. TRICÔ : Malha = Ponto Canelado = Barra Ponto Jarreteira = Cordões de Tricô Ponto Liga = Ponto Tricô CROCHÉ : mpa – meio ponto alto pa – ponto alto pad – ponto alto duplo pat – ponto alto triplo pb – ponto baixo pbx – ponto baixíssimo pc – ponto corrente ---------------------------------------------------------- PONTO FANTASIA: Ver diagrama A.1. DIMINUIÇÕES: Começar 6 ms/pts antes do marcador e tricotar da seguinte maneira: 2 ms/pts tricotadas juntamente em meia, 1 m/p meia, 2 ms/pts liga/tricô, 2 ms/pts meia (o marcador está a meio destas 2 ms/pts), 2 ms/pts liga/tricô, 1 m/p meia, deslizar 1 m/p em meia, 1 m/p meia, passar a m/p deslizada por cima da m/p tricotada. ---------------------------------------------------------- PONCHO: Montar 408-440-472 ms/pts com a agulha circular 3.5 mm e o fio Karisma. Tricotar em canelado/barra 2 ms/pts liga/tricô/2 ms/pts meia durante 8 cm. Continuar com a agulha circular 4 mm e tricotar da seguinte maneira: A.1 acima des 82 primeiras ms/pts e, AO MESMO TEMPO, distribuir 3 diminuições nestas ms/pts (= 79 ms/pts), *26-30-34 ms/pts em ponto meia, canelado/barra 2 ms/pts liga/tricô, 2 ms/pts meia, 2 ms/pts liga/tricô acima das 6 ms/pts seguintes (estas ms/pts estão directamente acima de 2 ms/pts liga/tricô, 2 ms/pts meia, 2 ms/pts liga/tricô do canelado/barra ) *, repetir de * a * mais 2 vezes, 26-30-34 ms/pts em ponto meia, A.1 acima das 82 ms/pts seguintes e, AO MESMO TEMPO, distribuir 3 diminuições acima dessas ms/pts (= 79 ms/pts), * 26-30-34 ms/pts em ponto meia, 2 ms/pts liga/tricô, 2 ms/pts meia, 2 ms/pts liga/tricô acima das 6 ms/pts seguintes (estas ms/pts estão directamente acima de 2 ms/pts liga/tricô, 2 ms/pts meia, 2 ms/pts liga/tricô do canelado/barra ) *, repetir de * a * mais 2 vezes, 26-30-34 ms/pts em ponto meia = 402-434-466 ms/pts. Colocar 4 marcadores da seguinte maneira: o 1.º marcador depois de 108-112-116 ms/pts (entre 2 ms/pts meia do 1.º canelado/barra), o 2.º marcador depois de 172-184-196 ms/pts (entre 2 ms/pts meia do 3.º canelado/barra), o 3.º marcador depois de 309-329-349 ms/pts (entre 2 ms/pts meia do 4.º canelado/barra), e o 4.º marcador depois de 373-401-429 ms/pts (entre 2 ms/pts meia do 6.º canelado/barra). Continuar desta maneira e, AO MESMO TEMPO, a 10 cm de altura total, diminuir 1 m/p de cada lado dos marcadores - VER DIMINUIÇÕES. Repetir estas diminuições 19-19-19 vezes a cada 2 cm, e, depois, a cada 5-9-13 vezes a cada 1 cm (24-28-32 diminuições ao todo) = restam 210 ms/pts para todos os tamanhos. A peça mede cerca de 52-56-60 cm. Continuar com a agulha circular 3.5 mm e tricotar 1 carreira meia e, AO MESMO TEMPO, distribuir 42 diminuições = 168 ms/pts. Tricotar 1 carreira liga/tricô e continuar em canelado/barra 2 ms/pts meia/2 ms/pts liga/tricô durante 20 cm. Arrematar as ms/pts como elas se apresentam. |
||||||||||||||||||||||||||||||||||||||||||||||||||||
Explicações do diagrama |
||||||||||||||||||||||||||||||||||||||||||||||||||||
|
||||||||||||||||||||||||||||||||||||||||||||||||||||
 |
||||||||||||||||||||||||||||||||||||||||||||||||||||
 |
||||||||||||||||||||||||||||||||||||||||||||||||||||
Terminou este projecto?Então, identifique as suas fotos com as tags #dropspattern #frozenivyponcho ou mostre-as na galeria #dropsfan. Precisa de ajuda para este modelo?Encontrará 15 turotiais em vídeo, uma rubrica Comentários/Perguntas e muito mais ao visitar a página do modelo em www.garnstudio.com © 1982-2026 DROPS Design A/S. Todos os direitos reservados. Este documento, incluuindo as suas su-secções, tem copyrights. Saia mais o que pode fazer com os nossos modelos no fim de cada uma das páginas do nosso site. |
||||||||||||||||||||||||||||||||||||||||||||||||||||


Com mais de 40 anos no design de modelos de tricô e de croché, a DROPS Design oferece uma das mais vastas colecções demodelos gratuitos na Internet - traduzidos em 17 línguas. Neste dia de hoje, temos 324 catálogos e 12290 modelos - dos quais 12271 estão traduzidos em português.
Trabalhamos com muito empenho para lhe proporcionar o melhor que o tricô e o croché têm para oferecer, para lhe fornecer inspiração e conselhos bem como fios da mais elevada qualidade a preços incríveis! Gostaria de usar os nossos modelos para outros fins que não uso pessoal? Pode ler o que lhe é permitido fazer no Copyright texto que se encontra na parte de baixo de todos os nossos modelos. Bom tricô! Bom croché!
Deixe um comentário acerca do modelo DROPS 151-2
Gostaríamos muito de saber o que tem a dizer-nos acerca deste modelo!
Se deixar uma pergunta acerca do modelo, certifique-se de que escolhe a categoria adequada no formulário abaixo para acelerar o processo relativo à resposta. Os campos obrigatórios estão assinalados com um *.