
Categorias populares
Procura um fio?


Comentários / Perguntas (38)
![]() Willeke escreveu:
Willeke escreveu:
Hoe is de onderkant nadat je de kop gevuld hebt dicht gemaakt. Groetjes Willeke
21.07.2025 - 16:21DROPS Design respondeu:
Dag Willeke,
Je kunt de kop vullen, maar volgens het patroon wordt het verder niet dicht gemaakt, dus de vulling zit er als het ware los in.
22.07.2025 - 21:27
![]() April Stevenson escreveu:
April Stevenson escreveu:
Ok so this is a clarification question about the head of the chicken. I understand moving the st marker 12 st ahead before you reach your last stitch. So when you crochet 12 st it reach your new stitch marker spot do you slip stitch into the first stitch on the left the start of the 24 st to create a circle that you work upwards?
15.11.2024 - 20:53DROPS Design respondeu:
Dear April, you move the marker 12 stitches back, so you will have 12 stitches between the marker and the stitch where you stop (which would be the mid-front of the head). Then, from there, without cutting the thread, work 12 more stitches. The 12 stitches from before + the new 12 stitches = 24 stitches, so now you have the 24 stitches of the head. Then join the round simply with a dc in the stitch with the marker (first stitch of the head) and continue working as indicated over the 24 stitches. Happy crochetting!
17.11.2024 - 20:52
![]() Raquel escreveu:
Raquel escreveu:
Cuanto debería medir la pieza desde el centro de la labor (vuelta 1) hasta la última vuelta del cuerpo antes de empezar a hacer la cabeza?
30.10.2024 - 01:10DROPS Design respondeu:
Hola Raquel, la altura de la labor antes de empezar la cabeza serían 16cm. La base de la pieza son 20 cm de diámetro (desde el centro 10cm). Así que deberías tener 10 cm de media base (plana) y 16 cm de altura.
03.11.2024 - 13:03
![]() Betsy escreveu:
Betsy escreveu:
Thank you for this adorable hen pattern. I just finished my first one ( love it so much I want to make another ) I had no trouble following the pattern. I added wattles and gave her white tail feathers.
24.10.2024 - 17:08
![]() Marion Nijman escreveu:
Marion Nijman escreveu:
Hallo ik ben nu bij de kop maar snap niet hoe het verder moet ik. Weer niet hoe dat zit met die 24 vasten ik kom op 12 vasten ., ik denk dat er nu rond gehaakt moet worden klopt dat verder bedankt alvast groetjes marion nijman
02.04.2024 - 12:02DROPS Design respondeu:
Dag Marion,
Op midden voor van de kop zit de markeerder en aan beide kanten daarvan zitten 12 vasten waarover je de kop in de rondte haakt.
03.04.2024 - 20:26
![]() Sandra escreveu:
Sandra escreveu:
Hej! Ska de 16 centimetrarna mätas från mitten eller från sista varvet med ökning? Mvh Sandra
06.03.2024 - 10:39DROPS Design respondeu:
Hei Sandra. Fra siste omgang med økninger. Omgang 1. til 21. med økninger er bunnen, høyden på høna blir da fra siste omgang med økninger. mvh DROPS Design
11.03.2024 - 10:10
![]() Brandie Stewart escreveu:
Brandie Stewart escreveu:
I am having a hard time working the head portion of this pattern. When starting the head, it's a new round, I move my stitch marker from its og spot to 12 SC over, then do I start from that marker and crochet 12 more SC then SC in each of those making a 14 count? Or do crochet 12 SC into the last 12 SC to make it stacked?
15.02.2024 - 20:18DROPS Design respondeu:
Dear Mrs Stewart, the marker is inserted into the 12th sc before the end of the round, now work 1 sc in each of the next 12 sc = the first 12 sc at the beginning of the round and join now in the round working 1 sc in the stitch with the marker = there are 24 sc for head: 12 before marker + 12 after marker. Happy crocheting!
16.02.2024 - 07:44
![]() Ashleigh Cole escreveu:
Ashleigh Cole escreveu:
Hello, I’m making the body of the chicken and it more wide and narrow than the one on the picture. I did the same amount of stitches and everything it says in the body category, however, it is more than like a wide basket (a taco shape) than a bag (a u shape) I was wondering if you could tell me what I did wrong or how to fix it?
06.01.2024 - 03:26DROPS Design respondeu:
Dear Ashleigh, firstly, if the shape is too different, it may be an issue with the gauge. Also, after finishing and assemblying the piece, you will shape as much as possible to your desired shape, so if it isn't finished yet then maybe that is the difference with the one in the photo. Happy crocheting!
08.01.2024 - 00:05
![]() Sandy escreveu:
Sandy escreveu:
I had asked the question about working the head of the pattern. My second message indicated that I still didn't understand even with your response. BUT, I figured it out! So happy for myself. LOVING this pattern now that I figured it out. So happy with the results so far. Thank you for your help!
17.03.2023 - 03:05
![]() Sandy escreveu:
Sandy escreveu:
Your response to my last question, unfortunately did not answer my question. Do you have a video tutorial for this pattern? I don't understand the directions for the head. It would be helpful for me to see a tutorial. I am not understanding what is meant by moving the market 12 stitches and then turning so the marker is toward me and then working in the round. I am very visual and I am just not getting how to work this step of the pattern. A video would be most helpful. Thank you.
17.03.2023 - 01:27DROPS Design respondeu:
Dear Sandy, we don't have any video to that pattern sorry, the head is worked following the body part, at the end of the bordy, you moved the marker in the 12th stitch before the last stitch worked, for the head, you will now work 12 sts, these 12 sts + the 12 sts worked at the end of previous round are now a total of 24 sts and you will worke now these 24 stitches in the round, work now 1 st in each of the 24 sts starting with the first of the 12 sts worked at the end of previous round on body, and continue with 1 st in each st for 6 rounds. Hope it can help. Happy crocheting!
17.03.2023 - 08:53
|
|
Henny Penny#hennypennybasket |
|
 |
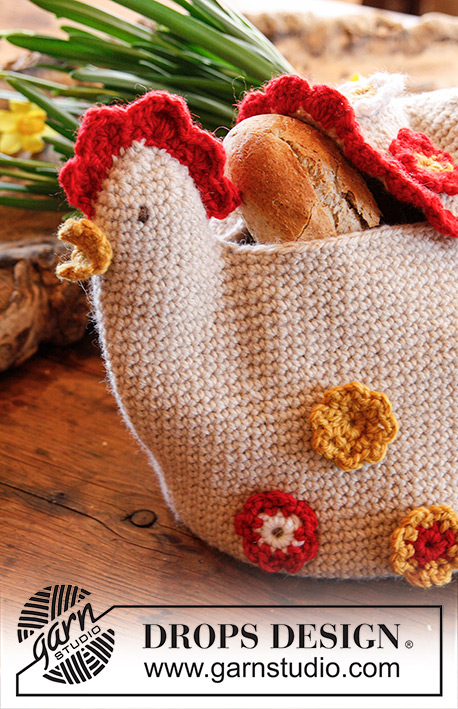 |
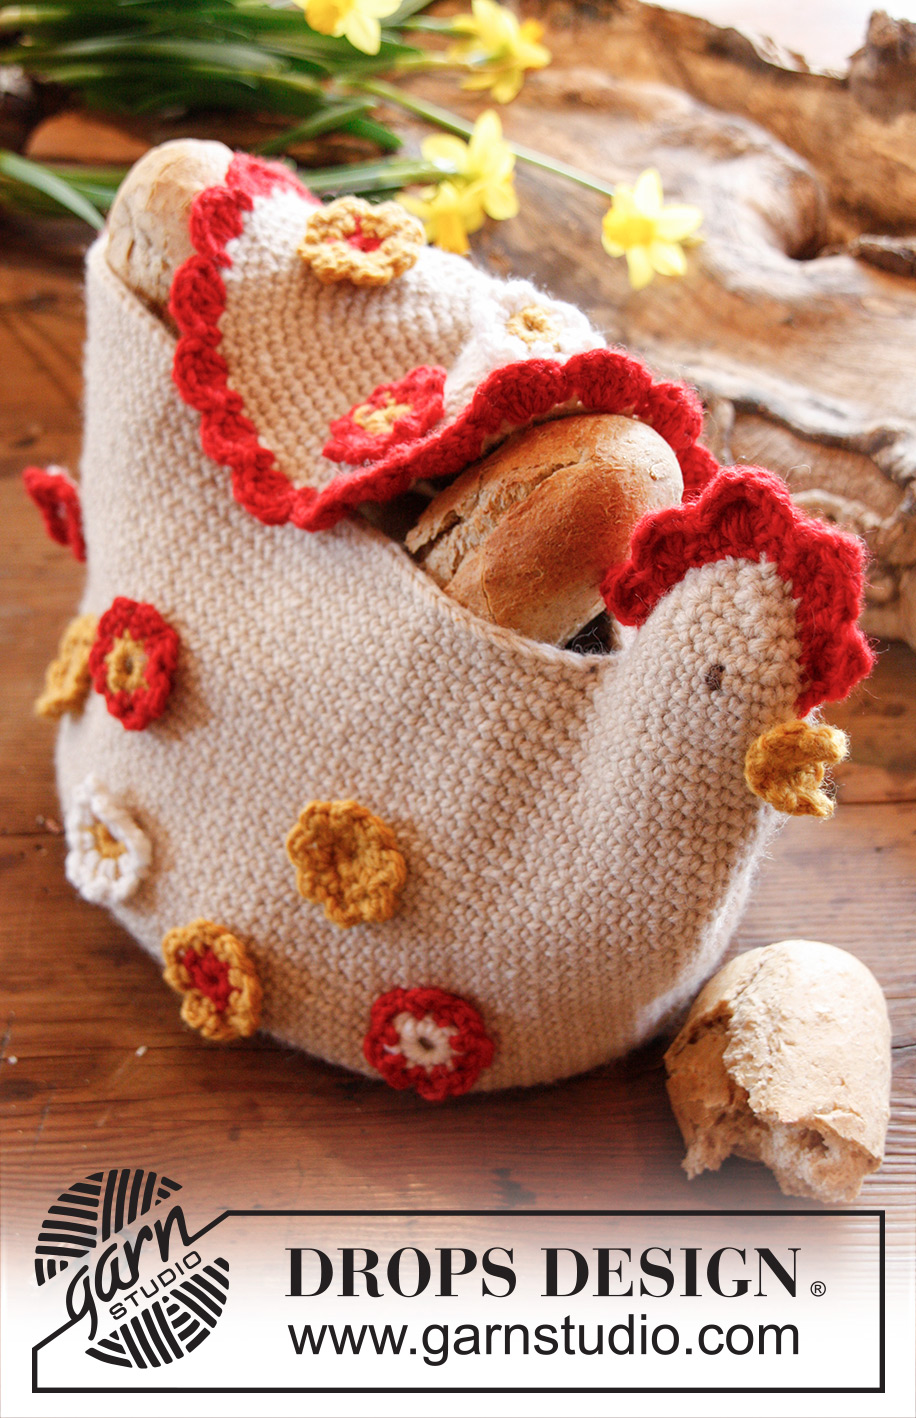
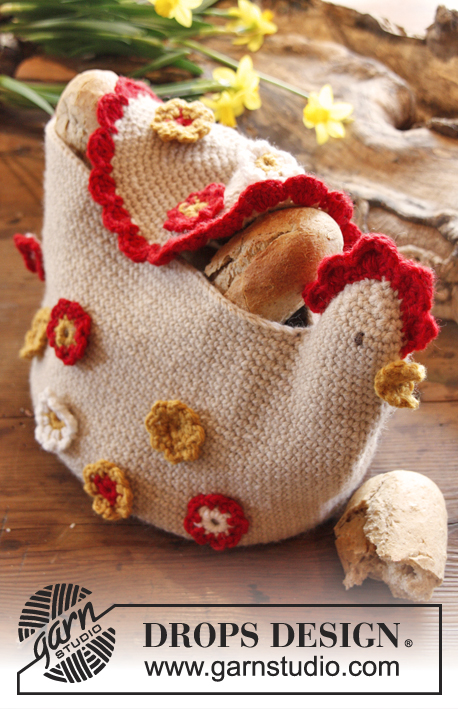
Páscoa DROPS : cesto em forma de galinha em croché, em "Nepal".
DROPS Extra 0-908 |
|
|
-------------------------------------------------------- NOTA: Existem termos diferentes de tricô e croché em português de Portugal e do Brasil. TRICÔ : Malha = Ponto Canelado = Barra Ponto Jarreteira = Cordões de Tricô Ponto Liga = Ponto Tricô CROCHÉ : mpa – meio ponto alto pa – ponto alto pad – ponto alto duplo pat – ponto alto triplo pb – ponto baixo pbx – ponto baixíssimo pc – ponto corrente -------------------------------------------------------- ARO MÁGICO: Quando se crocheta em redondo, começar com esta técnica evita um buraco ao meio (em vez do aro de pc) : Pegar na ponta do fio e enrolá-lo uma vez à volta do dedo indicador para formar uma argola. Segurar na argola com o polegar e o dedo médio esquerdo, colocar o fio por cima do dedo indicador esquerdo, enfiar a agulha de croché na argola, fazer 1 laçada e passar a laçada pela argola, crochetar 1 pc, depois, continuar em pb à volta do aro. Quando o número de pb desejado está feito, puxar a ponta do fio para fechar o aro. Fixar o fio à parte de trás da peça, pelo avesso. Continuar em redondo, em espiral. CROCHETAR EM REDONDO, EM ESPIRAL: Depois do último pb da carreira, continuar a carreira seguinte com 1 pb no pb seguinte (= 1.º pb da carreira precedente). NOTA: Colocar um marcador no princípio da carreira entre o último pb e o 1.º pb da carreira e fazer deslizar o marcador à medida que vai crochetando. AUMENTOS: Para aumentar 1 ponto, crochetar 2 pb no pb seguinte. DIMINUIÇÕES: Para diminuir 1 pb : crochetar juntamente 2 pb da seguinte maneira: * enfiar a agulha de croché no pb seguinte, puxar uma argola *, repetir de * a * mais uma vez, fazer 1 laçada e crochetar juntamente as 3 argolas que estão na agulha de croché. -------------------------------------------------------- CESTO: Crocheta-se em redondo, em espiral. Começar com um ARO MÁGICO - ver acima – para o fundo do cesto, em bege claro, com a agulha de croché 4 mm. CARREIRA 1: 8 pb no aro mágico - ver CROCHETAR EM REDONDO, EM ESPIRAL acima. CARREIRA 2: Aumentar 1 pb em cada pb - ver AUMENTOS acima = 16 pb. CARREIRA 3: * 1 pb no pb seguinte, aumentar 1 pb *, repetir de * a * em toda a carreira = 24 pb. CARREIRA 4: * 1 pb em cada um dos 2 pb seguintes, aumentar 1 pb *, repetir de * a * em toda a carreira = 32 pb. CARREIRA 5: * 1 pb em cada um dos 3 pb seguintes, aumentar 1 pb *, repetir de * a * em toda a carreira = 40 pb. CARREIRA 6 (e todas as carreiras pares) : Crochetar 1 pb em cada pb. CARREIRA 7: * 1 pb em cada um dos 4 pb seguintes, aumentar 1 pb *, repetir de * a * em toda a carreira = 48 pb. CARREIRA 9: * 1 pb em cada um dos 5 pb seguintes, aumentar 1 pb *, repetir de * a * em toda a carreira = 56 pb. CARREIRA 11: * 1 pb em cada um dos 6 pb seguintes, aumentar 1 pb *, repetir de * a * em toda a carreira = 64 pb. CARREIRA 13: * 1 pb em cada um dos 7 pb seguintes, aumentar 1 pb *, repetir de * a * em toda a carreira = 72 pb. CARREIRA 15: * 1 pb em cada um dos 5 pb seguintes, aumentar 1 pb *, repetir de * a * em toda a carreira = 84 pb. CARREIRA 17: * 1 pb em cada um dos 6 pb seguintes, aumentar 1 pb *, repetir de * a * em toda a carreira = 96 pb. CARREIRA 19: * 1 pb em cada um dos 7 pb seguintes, aumentar 1 pb *, repetir de * a * em toda a carreira = 108 pb. CARREIRA 21: * 1 pb em cada um dos 8 pb seguintes , aumentar 1 pb *, repetir de * a * em toda a carreira = 120 pb. Crochetar, então, 1 pb em cada pb até o cesto medir cerca de 16 cm de altura. Quando o último pb da última carreira estiver feito, mover o marcador para o 12.º pb a partir da agulha de croché (à direita do último pb, no fim da carreira = meio da frente da cabeça). Não cortar o fio. CABEÇA: Continuar, crochetando 1 pb em cada um dos 12 pb seguintes. Temos, agora, um total de 24 pb a contar do ponto com o marcador. Crochetar, então, a cabeça em redondo, acima desses 24 pb da seguinte maneira: Virar o cesto para que o pb com o marcador fique virado para si, crochetar 1 pb nesse pb (este pb é, agora, o 1.º pb da carreira. Fazer deslizar o marcador à medida que for crochetando), continuar com 1 pb em cada um dos 23 pb seguintes = 24 pb da carreira. Fazer deslizar o marcador à medida que for crochetando. Crochetar, então, 1 pb em cada pb durante mais 5 carreiras (= um total de 6 carreiras). Diminuir, então, da seguinte maneira: CARREIRA 1: * 1 pb em cada um dos 4 pb seguintes, diminuir 1 pb - VER DIMINUIÇÕES acima *, repetir de * a * em toda a carreira = 20 pb. CARREIRA 2: * 1 pb em cada um dos 3 pb seguintes, diminuir 1 pb *, repetir de * a * em toda a carreira = 16 pb. CARREIRA 3: * 1 pb em cada um dos 2 pb seguintes, diminuir 1 pb *, repetir de * a * em toda a carreira = 12 pb. CARREIRA 4: * 1 pb no pb seguinte, diminuir 1 pb *, repetir de * a * em toda a carreira = 8 pb. CARREIRA 5: Crochetar juntamente todos os pb, 2 a 2 = 4 pb. Cortar o fio. Passar a ponta do fio pelos 4 últimos pb. CRISTA: Crocheta-se em idas e voltas. Montar uma corrente de 20 pc em vermelho e, depois, crochetar 1 pbx no 2.º pc a partir da agulha de croché, e, em seguida, 1 pbx em cada pc = 19 pbx, virar. Saltar o 1.º pbx, no pbx seguinte crochetar : 1 pa, 1 pad e 1 pa, saltar 1 pbx, 1 pb no pbx seguinte, saltar 1 pbx, no pbx seguinte crochetar : 2 pa, 1 pad e 2 pa, saltar 1 pbx, 1 pb no pbx seguinte, saltar 1 pbx, no pbx seguinte crochetar : 2 pa, 3 pad e 2 pa, saltar 1 pbx, 1 pb no pbx seguinte, saltar 1 pbx, no pbx seguinte crochetar : 2 pa, 1 pad e 2 pa, saltar 1 pbx, 1 pb no pbx seguinte, saltar 1 pbx, no pbx seguinte crochetar : 1 pa, 1 pad e 1 pa, terminar com 1 pbx no último pbx, arrematar. BICO : Crocheta-se em idas e voltas. Montar uma corrente de 2 pc em ocre. CARREIRA 1: 2 pb no 2.º pc a partir da agulha de croché = 2 pb, virar. CARREIRA 2: 1 pc, aumentar 1 pb em cada pb = 4 pb, virar CARREIRAS 3-4: 1 pc, 1 pb em cada pb. CARREIRA 5: 1 pc, crochetar juntamente todos os pb, 2 a 2 = 2 pb. CARREIRA 6: 1 pc, crochetar juntamente os 2 pb = 1 pb. Arrematar. CAUDA : Crocheta-se em idas e voltas. Montar uma corrente de 12 pc em vermelho, depois, crochetar 1 pb no 2.º pc a partir da agulha de croché, e 1 pb em cada pc = 11 pb, virar. Saltar o 1.º pb, no pb seguinte, crochetar 3 pa, saltar 1 pb, 1 pb no pb seguinte, saltar 1 pb, no pb seguinte crochetar da seguinte maneira: 1 pa, 3 pad e 1 pa, saltar 1 pb, 1 pb no pb seguinte, saltar 1 pb, no pb seguinte crochetar 3 pa, terminar com 1 pbx no último pb, parar. ASA : Crocheta-se em redondo, em espiral. Começar com um ARO MÁGICO em bege claro. Crochetar as carreiras 1 a 17 do cesto = 96 pb. CARREIRA 18: Continuar em vermelho e continuar da seguinte maneira: * 1 pb, saltar 1 pb, 5 pa no pb seguinte, saltar 1 pb *, repetir de * a * em toda a carreira, arrematar. FLORES : Crochetam-se em redondo. Fazer 2 vezes cada flor. FLOR 1: CARREIRA 1: Montar 3 pc em ocre e unir em redondo com 1 pbx no 1.º pc. Crochetar 1 pc, 8 pb no aro de pc, terminar com 1 pbx no 1.º pb. CARREIRA 2: 1 pc, * 1 pb no pb seguinte, 3 pc *, repetir de * a * em toda a carreira, terminar com 3 pc e 1 pbx no 1.º pb (= 8 aros). Arrematar. FLOR 2: Como a FLOR 1 mas crochetar a 1.ª CARREIRA em ocre e a 2.ª CARREIRA em vermelho. FLOR 3: Como a FLOR 1 mas crochetar a 1.ª CARREIRA em vermelho e a 2.ª CARREIRA em ocre. FLOR 4: Como a FLOR 1 mas crochetar a 1.ª CARREIRA em branco e a 2.ª CARREIRA em vermelho. FLOR 5: Como a FLOR 1 mas crochetar a 1.ª CARREIRA em ocre e a 2.ª CARREIRA em branco. MONTAGEM : Costurar a crista na parte de cima da cabeça. Costurar a cauda no outro lado do cesto. Costurar o bico na parte da frente da cabeça e bordar os olhos em castanho médio. Colocar a asa por cima do cesto, fixando-a a um dos lados. Usar a asa como tampa. Colocar um pouco de algodão de enchimento ou de papel ou de um material semelhante na parte de cima da cabeça para a forrar. |
|
Terminou este projecto?Então, identifique as suas fotos com as tags #dropspattern #hennypennybasket ou mostre-as na galeria #dropsfan. Precisa de ajuda para este modelo?Encontrará 9 turotiais em vídeo, uma rubrica Comentários/Perguntas e muito mais ao visitar a página do modelo em www.garnstudio.com © 1982-2026 DROPS Design A/S. Todos os direitos reservados. Este documento, incluuindo as suas su-secções, tem copyrights. Saia mais o que pode fazer com os nossos modelos no fim de cada uma das páginas do nosso site. |
|


Com mais de 40 anos no design de modelos de tricô e de croché, a DROPS Design oferece uma das mais vastas colecções demodelos gratuitos na Internet - traduzidos em 17 línguas. Neste dia de hoje, temos 324 catálogos e 12290 modelos - dos quais 12271 estão traduzidos em português.
Trabalhamos com muito empenho para lhe proporcionar o melhor que o tricô e o croché têm para oferecer, para lhe fornecer inspiração e conselhos bem como fios da mais elevada qualidade a preços incríveis! Gostaria de usar os nossos modelos para outros fins que não uso pessoal? Pode ler o que lhe é permitido fazer no Copyright texto que se encontra na parte de baixo de todos os nossos modelos. Bom tricô! Bom croché!
Deixe um comentário acerca do modelo DROPS Extra 0-908
Gostaríamos muito de saber o que tem a dizer-nos acerca deste modelo!
Se deixar uma pergunta acerca do modelo, certifique-se de que escolhe a categoria adequada no formulário abaixo para acelerar o processo relativo à resposta. Os campos obrigatórios estão assinalados com um *.