
Categorias populares
Procura um fio?


Comentários / Perguntas (21)
![]() Gisele Worley escreveu:
Gisele Worley escreveu:
Can you please help with how to proceed after row 14 in the diagram. It is so confusing. Please give an example of how to knit row 15. Thank you
07.10.2025 - 14:13
![]() Gisele Worley escreveu:
Gisele Worley escreveu:
Why rows 13 and 14 missing 4 stitches. What do I do about that?
06.10.2025 - 14:20DROPS Design respondeu:
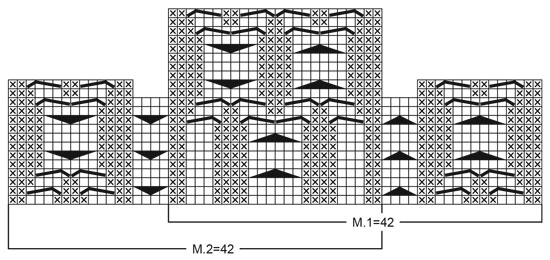
Hi Gisele, you start working this part of diagram (4 stitches in each side) from the bottom and you keep working other parts of diagram. Happy knitting!
03.11.2025 - 07:58
![]() Gisele Worley escreveu:
Gisele Worley escreveu:
Why does the pattern stop half way on both sides of M1 and M2? Also there are 4 stitches on two rows on both sides in the pattern that are empty. What does that refer to or mean?
05.10.2025 - 03:44DROPS Design respondeu:
Hi Gisele, The empty squares are knitted, the crossed squares are purled (see diagram explanations above the diagrams). Regards, Drops team.
06.10.2025 - 06:51
![]() Simone Rödiger escreveu:
Simone Rödiger escreveu:
M2 und M1 sind in einem Diagramm dargestellt. Bis wohin geht der Rapport in der Höhe wegen evtl. wiederholen. Wie geht es weiter, wo die Lücken sind. z.B. wo es nur in der Mitte hoch weiter gezeichnet ist das Diagramm. Was muss ich wann stricken? Vielen Dank für Ihre Hilfe
05.11.2024 - 15:35DROPS Design respondeu:
Liebe Frau Rödiger, die Zöpfe werden nicht über die gleiche Reihenanzahl gestrickt, dh wenn das Diagram fertig in der Höhe ist, stricken Sie bei der nächsten Reihe wieder, aber die anderen Diagramme stricken Sie wie zuvor weiter. Viel Spaß beim Stricken!
05.11.2024 - 16:49
![]() Rödiger escreveu:
Rödiger escreveu:
Wie liest man das strickdiagramm? Sind die Rückseiten mit darauf oder geht es hochzu beim zählen Reihe 1, Reihe 3, Reihe 5 usw. Und die Rückreihen werden so gestrickt. Linke Maschen rechts und rechte Maschen links
20.10.2024 - 18:16DROPS Design respondeu:
Liebe Frau Rödiger, alle Reihen sind im Diagram gezeichnet, die Hin- sowie die Rückreihen; Hinreihen lesen Sie rechts nach links und Rückreihen lesen Sie links nach rechts. 1 leeres Kästchen = 1 Masche glatt rechts (rechts bei den Hinreihen, links bei den Rückreihen gestrickt) und 1 Kreuzchen = 1 Masche glatt links (links bei den Hinreihen, rechts bei den Rückreihen gestrickt). Viel Spaß beim Stricken!
21.10.2024 - 09:03
![]() Elizabeth Petrie escreveu:
Elizabeth Petrie escreveu:
Me again! I'm ready to decrease for the sleeve cap and have cast off 6 under the arm. Do I work back and forth still on the double-pointed needle, or move everything to regular needles? For the next decreases, they're supposed to be "every other row," but does that mean just the right side? Wouldn't the sleeve then be lopsided, with decreases only on the one side? Or should I split the decreases up: one decrease on the right side, the next on the wrong side, etc.? Thanks!
14.11.2023 - 01:04DROPS Design respondeu:
Hi Elizabeth, Yes, you continue back and forth for the sleeve cap, so use the needles you feel most comfortable with for this part. Each further cast-off is on both sides of the sleeve cap (both the beginning and end of the row) on the first row, then work the next row without casting off, etc. Hope this helps and happy knitting!
14.11.2023 - 06:35
![]() Elizabeth Petrie escreveu:
Elizabeth Petrie escreveu:
I've reached the desired length (38 cm), but how to continue is confusing. The 234 stitches include the 1 garter stitch at each side. So I'm continuing the pattern over 232 stitches. If I cast off after 56, that puts me in the middle of a stitch pattern in M3; is that correct? Also, the instructions at this point say "knit the next row as follows: 56, c/o 6, 110, c/o 6, 56." Does this mean "knit" all these stitches, or just continue in the pattern? I'm assuming the latter. Thanks.
31.10.2023 - 22:08DROPS Design respondeu:
Dear Mrs Petrie, the 56 sts includes the edge stitch, just work this row in pattern as before: 56 sts (front piece), cast off 6 sts, work 110 sts (back piece), cast off 6 sts and work the remaining 56 sts = 234 stitches. Happy knitting!
02.11.2023 - 17:06
![]() Elizabeth escreveu:
Elizabeth escreveu:
Follow-up question re: M1 and M2: up to row 12, everything is clear. Rows 13 and 14: how do I deal with the "missing" 4 stitches on each side? After that, do I start again at row 1 for the sides of M1 and M2, while continuing on rows 15 through 22 in the middle section? I can't see how the patterns will match up, since there's a difference of 10 rows rather than a straight doubling. It is very frustrating. I'm almost ready to give up and knit something else.
04.10.2023 - 01:47DROPS Design respondeu:
See previous answer - you just have to repeat the diagram parts in height, not the diagram as drawn in chart. Happy knitting!
04.10.2023 - 08:08
![]() Elizabeth escreveu:
Elizabeth escreveu:
I'm still confused: after row 12 of the diagrams M1 and M2, rows 13 and 14 have 4 knit stitches missing. From row 15 to 22, there are only 24 stitches illustrated. How do I continue the pattern unit the piece measures the desired length? Just by repeating rows 1 through 12? Or do I assume the "missing" pattern has just continued from row 15 on? Also, when decreasing and casting off for the armholes and neck piece, do I continue in the patterns with the stitches that are left? Thank you!
04.10.2023 - 01:38DROPS Design respondeu:
Dear Elizabeth, all cable patterns in the diagram are not repeated over the same number of rows in height; when diagram part/cable part is done in height, repeat this section from 1st row but continue the other diagrams just as before. Happy knitting!
04.10.2023 - 08:08
![]() Elizabeth escreveu:
Elizabeth escreveu:
For this pattern, what length(s) of the circular needles is/are required? This is the one guideline that is missing in many of the DROPS patterns, and is pretty important information! Thanks.🇨🇦🙂
16.09.2023 - 01:54DROPS Design respondeu:
Dear Elizabeth, we try to add all of the information for the necessary materials in all of our patterns. However, some of our older patterns may be slightly outdated and lack some information available in the newer ones. In this case, you need circular needles of 80cm. For the sleeves you could use double pointed needles or a circular needle of 40cm. Happy knitting!
17.09.2023 - 21:18
|
||||||||||||||||||||||||||||
Blushing Bluebell#blushingbluebelljacket |
||||||||||||||||||||||||||||
 |
 |
|||||||||||||||||||||||||||
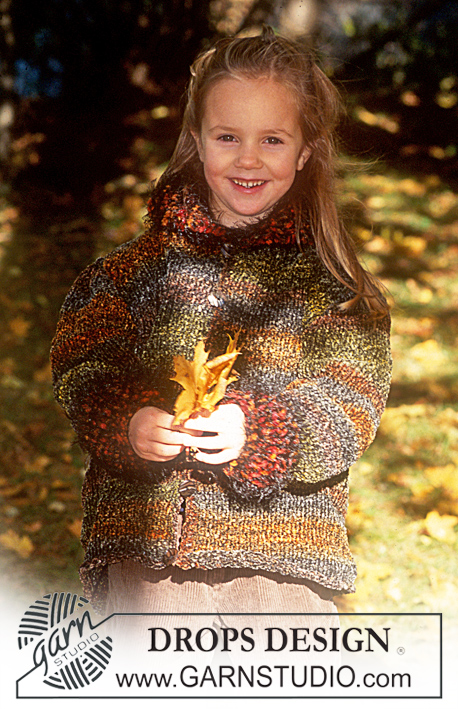
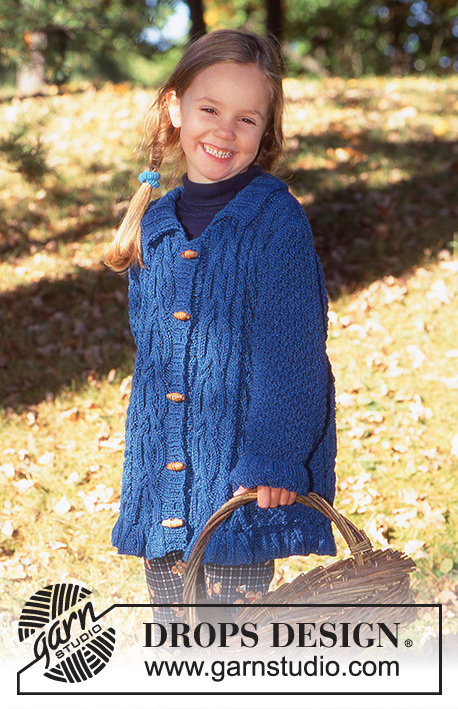
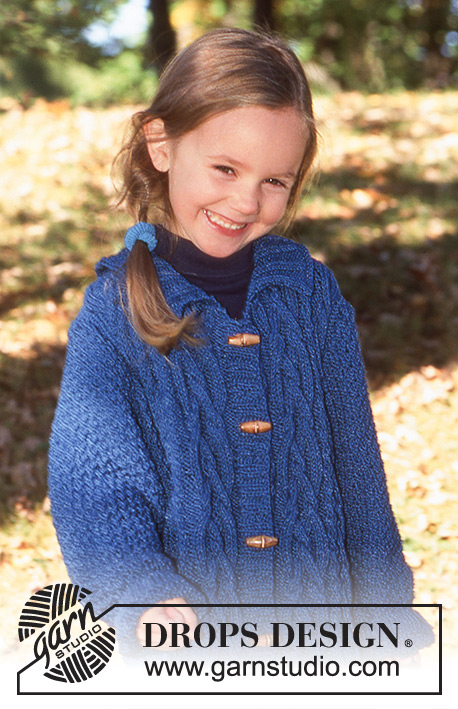
Casaco comprido DROPS com tranças em Den-M-Nit
DROPS Children 9-22 |
||||||||||||||||||||||||||||
|
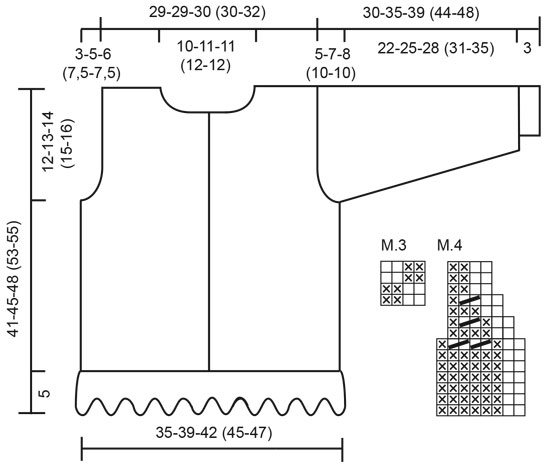
---------------------------------------------------------- NOTA: Existem termos diferentes de tricô e croché em português de Portugal e do Brasil. Malha = Ponto Canelado = Barra Ponto Jarreteira = Cordões de Tricô Ponto Liga = Ponto Tricô Croché: mpa – meio ponto alto pa – ponto alto pad – ponto alto duplo pat – ponto alto triplo pb – ponto baixo pbx – ponto baixíssimo pc – ponto corrente ---------------------------------------------------------- Amostra: 22 ms/pts x 30 carreiras = 10 x 10 cm em ponto fantasia M3 com as agulhas 3,5 mm. Usar agulhas mais finas ou mais grossas para obter a amostra se necessário. Ponto jarreteira tricotado em idas e voltas: Tricotar todas as carreiras em meia Ponto jarreteira tricotado em redondo: 1 carreira liga/tricô, 1 carreira meia Canelado/barra 1: ver diagrama M4 abaixo Canelado/barra 2: *2 ms/pts meia, 2 ms/pts liga/tricô * repetir de *a * Ponto fantasia: Ver diagramas abaixo. Os diagramas mostram os motivos pelo direito – ter atenção para que as tranças estejam pelo direito. Explicações Costas & frente: Tricota-se em idas e voltas na agulha circular a partir do meio da frente. Com o fio azul e a agulha circular 3 mm montar 308-340-364 (388-412) ms/pts (incluindo 1 m/p ourela de cada lado da peça). Tricotar em canelado/barra 1 (ver diagrama M4), com as ms/pts ourela em ponto jarreteira. Depois do canelado/barra 1, restam 156-172-184 (196-208) ms/pts. Continuar com a agulha circular 3,5 mm e tricotar 2 carreiras em ponto jarreteira e, ao mesmo tempo, distribuir 38 aumentos na 1.ª carreira = 194-210-220 (234-246) ms/pts. Depois da 2.ª carreira em ponto jarreteira tricotar a carreira seguinte (pelo direito): 1 m/p ourela em ponto jarreteira, M2 (= 42 ms/pts), 12-20-23 (32-38) ms/pts de M3, M1 (= 42 ms/pts), M2 (= 42 ms/pts), 12-20-26 (32-38) ms/pts de M3, M1 (=42 ms/pts), 1 m/p ourela em ponto jarreteira. Cortar o fio e começar a carreira seguinte pelo direito novamente (as tranças estão no direito da peça). Continuar nos diferentes pontos fantasia. Não esquecer de manter a mesma tensão da indicada para a amostra. A 29-32-34 (38-39) cm de altura total, tricotar a carreira seguinte: 46-50-53 (56-59) ms/pts para a frente, arrematar 6 ms/pts para a cava, 90-98-104 (110-116) ms/pts para as costas, arrematar 6 ms/pts para a cava, 46-50-53 (56-59) ms/pts para a frente. Terminar cada parte separadamente. Frente direita: = 46-50-53 (56-59) ms/pts. Arrematar para as cavas a cada 2 carreiras: 0-0-0 (1-1) vezes 3 ms/pts, 0-3-3 (3-4) vezes 2 ms/pts, 4-2-3 (3-2) vezes 1 m/p = 42-42-44 (44-46) ms/pts. Continuar em ponto fantasia, com as ms/pts ourela no lado das cavas em ponto jarreteira. A 37-41-44 (48-50) cm de altura total, arrematar para o decote 1 vez 5-6-6 (7-7) ms/pts, depois, a cada 2 carreiras: 2 vezes 2 ms/pts e 3 vezes 1 m/p = 30-29-31 (30-32) ms/pts para o ombro. A 40-44-47 (52-54) cm de altura total, tricotar 1 carreira ponto meia e, ao mesmo tempo, distribuir 5 diminuições no ombro = 25-24-26 (25-27) ms/pts. Tricotar 2 carreiras em ponto jarreteira e arrematar. Frente esquerda: Tricota-se como a frente direita, mas em sentido contrário. Costas: = 90-98-104 (110-116) ms/pts. Formar as cavas de cada lado da peça a cada 2 carreiras como se fez para as frentes = 82-82-86 (86-90) ms/pts. Continuar em ponto fantasia, com as ourela no lado cavas em ponto jarreteira. A 39-43-46 (51-53) cm de altura total, arrematar para o decote as 20-22-22 (24-24) ms/pts centrais, depois, 1 m/p no lado do decote na carreira seguinte = 30-29-31 (30-32) ms/pts para cada ombro. Tricotar 1 carreira ponto meia e, ao mesmo tempo, distribuir 5 diminuições no ombro = 25-24-26 (25-27) ms/pts. Tricotar 2 carreiras em ponto jarreteira e arrematar. Mangas: Com o fio azul e as agulhas de pontas duplas 3 mm montar 40-40-44 (44-48) ms/pts. Tricotar 3 cm de canelado/barra 2. Continuar com as agulhas de pontas duplas 3,5 mm, tricotar 2 carreiras em ponto jarreteira, depois, continuar em M3. Ao mesmo tempo, depois de 2 carreiras em ponto jarreteira, aumentar 2 ms/pts sob a manga: 4-6-7 (9-9) vezes a cada 5,5-4-4 (3-3,5) cm = 48-52-58 (62-66) ms/pts. A 25-28-31 (34-38) cm de altura total, arrematar 6 ms/pts sob a manga e, depois, continuar em idas e voltas, arrematando de cada lado da peça a cada 2 carreiras: 2-2-2 (1-2) vezes 2 ms/pts, 1-4-6 (11-9) vezes 1 m/p, 2-2-2 (1-2) vezes 2 ms/pts, 1-1-1 (1-1) vezes 3 ms/pts. Arrematar as ms/pts restantes. A manga mede cerca de 30-35-39 (44-48) cm de altura total. Montagem: Costurar os ombros. Orla frente: Com as agulhas 3,5 mm levantar ao longo da frente esquerda cerca de 84-108 ms/pts (a 1 m/p ourela dos rebordos). Tricotar 2,5 cm de canelado/barra 2, arrematar. Repetir a mesma orla ao longo da frente direita, mas a 1 cm de altura, distribuir 5-5-5 (6-6) casas (a de baixo fica a 5 cm do rebordo inferior, a de cima a 1 cm do rebordo superior). 1 casa = arrematar 2 ms/pts, montar 2 ms/pts na carreira seguinte. Gola: com a agulha 3 mm levantar pelo avesso do decote cerca de 60-72 ms/pts (número múltiplo de 4 ) - começar a 0,5 cm da orlada frente (se levantar as ms/pts a toda a volta, levantar 8 ms/pts a mais do que o indicado). Tricotar 2 carreiras em ponto jarreteira depois continuar em canelado/barra 2 com 1 m/p ourela em ponto jarreteira de cada lado da peça. A 2-2-3 (3-3) cm de altura, aumentar pelo direito (o lado que será visível quando a gola for dobrada): 1 m/p liga/tricô entre as 2 ms/pts liga/tricô do canelado/barra (= continua-se em canelado/barra 2 ms/pts meia / 3 ms/pts liga/tricô). A 4-4-5 (5-5) cm de altura total, aumentar pelo direito da seguinte maneira: 1 m/p liga/tricô em cada secção de 3 ms/pts liga/tricô (continua-se em canelado/barra 2 ms/pts meia, 4 ms/pts liga/tricô). A 6-6-7 (7-7) cm de altura, tricotar 2 carreiras em ponto jarreteira e arrematar. Unir as mangas, costurar os botões. |
||||||||||||||||||||||||||||
Explicações do diagrama |
||||||||||||||||||||||||||||
|
||||||||||||||||||||||||||||
 |
||||||||||||||||||||||||||||
 |
||||||||||||||||||||||||||||
Terminou este projecto?Então, identifique as suas fotos com as tags #dropspattern #blushingbluebelljacket ou mostre-as na galeria #dropsfan. Precisa de ajuda para este modelo?Encontrará 19 turotiais em vídeo, uma rubrica Comentários/Perguntas e muito mais ao visitar a página do modelo em www.garnstudio.com © 1982-2026 DROPS Design A/S. Todos os direitos reservados. Este documento, incluuindo as suas su-secções, tem copyrights. Saia mais o que pode fazer com os nossos modelos no fim de cada uma das páginas do nosso site. |
||||||||||||||||||||||||||||


Com mais de 40 anos no design de modelos de tricô e de croché, a DROPS Design oferece uma das mais vastas colecções demodelos gratuitos na Internet - traduzidos em 17 línguas. Neste dia de hoje, temos 324 catálogos e 12290 modelos - dos quais 12271 estão traduzidos em português.
Trabalhamos com muito empenho para lhe proporcionar o melhor que o tricô e o croché têm para oferecer, para lhe fornecer inspiração e conselhos bem como fios da mais elevada qualidade a preços incríveis! Gostaria de usar os nossos modelos para outros fins que não uso pessoal? Pode ler o que lhe é permitido fazer no Copyright texto que se encontra na parte de baixo de todos os nossos modelos. Bom tricô! Bom croché!
Deixe um comentário acerca do modelo DROPS Children 9-22
Gostaríamos muito de saber o que tem a dizer-nos acerca deste modelo!
Se deixar uma pergunta acerca do modelo, certifique-se de que escolhe a categoria adequada no formulário abaixo para acelerar o processo relativo à resposta. Os campos obrigatórios estão assinalados com um *.