
Categorias populares
Procura um fio?


Comentários / Perguntas (119)
![]() Carol Cooley escreveu:
Carol Cooley escreveu:
Thank for your helpful comments. Naturally I would consider ordering from yourselves as you make it very easy to find a substitute. I cannot say the same about Captcha which is always a struggle, with blurred small images and often using items a non-USA person would not necessarily recognize. At my time of life anything to m ake life easier helps. Have a nice day. Is that last image a store front or garage?
26.05.2019 - 09:01
![]() Carol Cooley escreveu:
Carol Cooley escreveu:
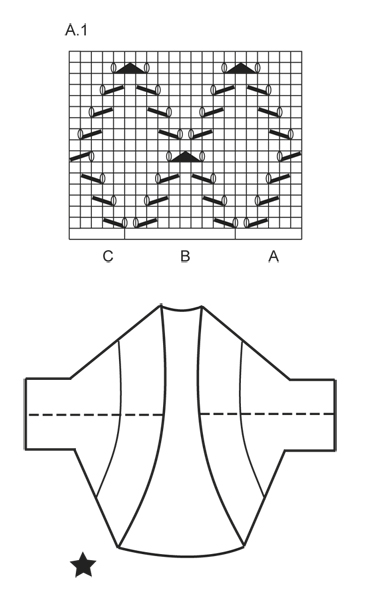
Is there either another similar pattern or has this one being rewritten please? *Cassie by DROPS Design Knitted DROPS bolero with lace pattern in ”Big Merino”. Size: S - XXXL* I use mainly acrylic as wool can irritate, alpaca-etc are ok. Any low cost substitutes for wool are welcomed for a practice piece. Maybe garter and st.st to start off then go ahead for lace. Thank you.
14.05.2019 - 13:29DROPS Design respondeu:
Dear Carol, you can find many patterns for bloeros on our site with the search word "bolero". https://www.garnstudio.com/search.php?action=search&w=bolero&c=0&k=0&y=0&lang=en You have to understand that these patterns are written to suppoirt DROPS yarns, we cannot make alterations or suggestions for other yarns, sorry. Happy Crafting!
25.05.2019 - 10:27
![]() Pam escreveu:
Pam escreveu:
I'm having trouble with row 15 could you please write it in full for me
10.05.2019 - 20:07DROPS Design respondeu:
Hi Pam, Row 15 reading from right to left, so from the right side, - K4, 1 yarn over, slip 1 stitch, knit 2 together and pass the slipped stitch over the knitted together stitches, 1 yarn over, K7, 1 yarn over, slip 1 stitch, K2 together and pass the slipped stitch over the knitted together stitches, 1 yarn over and finally K4. Happy knitting!
11.05.2019 - 11:47
![]() Ava Goei-Vujovich escreveu:
Ava Goei-Vujovich escreveu:
I have tried a sample swatch: using 21 stitches and interpreting A1. Its a total of 21 stitches but using your explanation above: first row in A: K3, K2 tog, YO - then B: YO, slip 1 as if to K, K1, psso, K5, K2 tog, YO, K1, and C: YO, slip 1 as if to K, K1, psso, K3. I end up with 23 sts and not 21 sts
07.03.2019 - 12:40DROPS Design respondeu:
Dear Mrs Goei-Vujovich, on first row A.1A is worked as follows: K3, K2 tog, YO, K1 (= 6 sts), then work B over the next 10 sts: YO, slip 1 as if to K, K1, psso, K5, K2 tog, YO, K1, then work C: YO, slip 1 as if to K, K1, psso, K3 (= 5 sts) = 21 sts in total. You can insert a marker between each repeat to make sure you always get the correct number of sts in each part of the diagram. Happy knitting!
07.03.2019 - 14:19
![]() Ava Goei-Vujovich escreveu:
Ava Goei-Vujovich escreveu:
I don't understand why a K1 is added at the end of section B - there isn't a K1 added at the end of section A if I am to read the diagram explanation as shown in A1 Row 1. I understand B is a 10 sts repeat: *YO, slip 1 as if to K, K1, psso, K5, K2 tog, YO, K1*, repeat from *-*.
07.03.2019 - 12:35
![]() Ava Goei-Vujovich escreveu:
Ava Goei-Vujovich escreveu:
First row in A: K3, K2 tog, YO = 6sts. then B: YO, slip 1 as if to K, K1, psso, K5, K2 tog, YO, K1 = 12 sts (repeat B), and work C: YO, slip 1 as if to K, K1, psso, K3 = 5sts. B should only be multiples of 10, not 12.
07.03.2019 - 11:35DROPS Design respondeu:
Dear Mrs Goei-Vujovich, when working B you decrease 1 stitch 2 times (slip 1, K1, psso + K2 tog) and increase with 2 YOs = number of sts is the same = 10 sts. See previous answer for whole repeats on the row. Happy knititng!
07.03.2019 - 12:19
![]() Ava Goei-Vujovich escreveu:
Ava Goei-Vujovich escreveu:
I believe your reply at 9:43 is incorrect. I have just tried in in a total of 21 stitches for a A,B,C section. It makes the entire section of section B : 12 stitches for a standard repeat when it should be 10! Standard repeat of 10 stitches and section C is 5.
07.03.2019 - 11:27DROPS Design respondeu:
Dear Mrs Goei-Vujovich, B is a 10 sts repeat: *YO, slip 1 as if to K, K1, psso, K5, K2 tog, YO, K1*, repeat from *-*. And you will work: 3 sts in garter st, A.1A (= 6 sts), repeat A.1B a total of 9-10-11-12 times (= over the 90-100-110-112 next sts), work A.1C (= 5 sts) and finish with 3 sts in garter st. Happy knitting!
07.03.2019 - 12:18
![]() Ava Goei-Vujovich escreveu:
Ava Goei-Vujovich escreveu:
In section B, row 1, I start off with a *1 YO, sl1, K1, psso, k5, k2tog, 2 YO*, and then repeat from* to * for the next 90-100-etc stitches, until the last 5 stitches of that row?
07.03.2019 - 06:16DROPS Design respondeu:
Hi Ava, You are right, apart from at the end of the sequence it is 1 YO, K1, 1 YO, not 2 YOs. This sequence is repeated until the last 8 stitches, finishing with A.1 C (5 stitches) and 3 stitches in garter stitch. Happy knitting!
07.03.2019 - 08:06
![]() Ava Goei-Vujovich escreveu:
Ava Goei-Vujovich escreveu:
Agree not a well worded pattern & diagram explanations. In section A, I K2tog (4 & 5th stitch together), then immediately following: do I do 2 times YO followed by a sl1, K1, psso?
07.03.2019 - 06:07DROPS Design respondeu:
Dear Mrs Goei-Vujovich, on first row in A.1, work A.1A as follows: K3, K2 tog, YO - then work B: YO, slip 1 as if to K, K1, psso, K5, K2 tog, YO, K1 (repeat B), and work C: YO, slip 1 as if to K, K1, psso, K3. On row 15, work the last 2 sts in A tog with the next st in B, then work the last 2 sts in B with next st in next B / in C. Happy knitting!
07.03.2019 - 09:43
![]() Marcia Ebert escreveu:
Marcia Ebert escreveu:
I have started knitting this pattern and realize that there are directions for knitting the RS but not for wrong side. Is this done in stockinette stitch except for pattern stitches? Garter stitch is the border stitches but what do you do on the wrong side in the middle. It looks like every other row of the pattern stitch on the diagram is plain so is it purl on the wrong side. Is this correct?
21.01.2019 - 04:51DROPS Design respondeu:
Hi Marcia, All the rows in the diagram show the stitches from the right side, so between the lace pattern you work stocking stitch (knit from the right side and purl from the wrong side). Happy knitting!
21.01.2019 - 07:01
|
|||||||||||||||||||
Cassie#cassiebolero |
|||||||||||||||||||
 |
 |
||||||||||||||||||
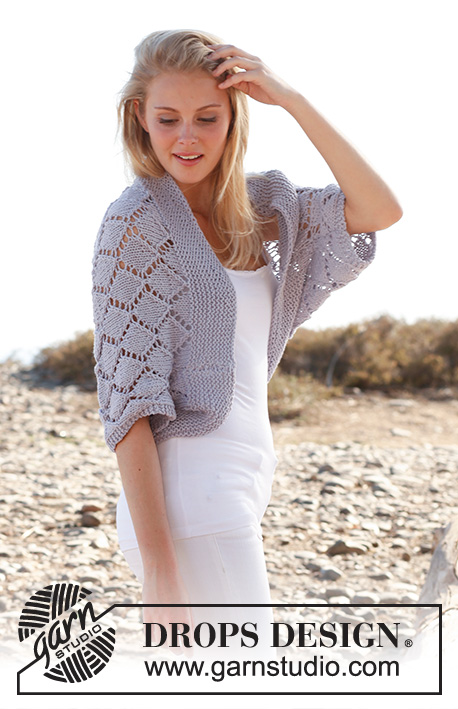
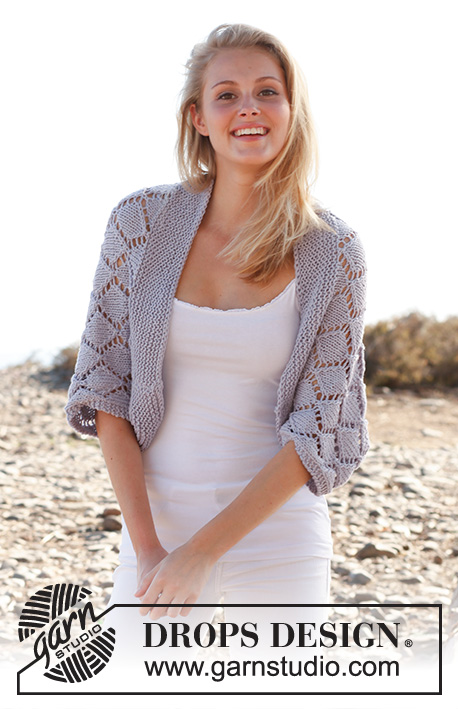
Bolero com ajours DROPS em ”Big Merino”. Do S ao XXXL.
DROPS 146-16 |
|||||||||||||||||||
|
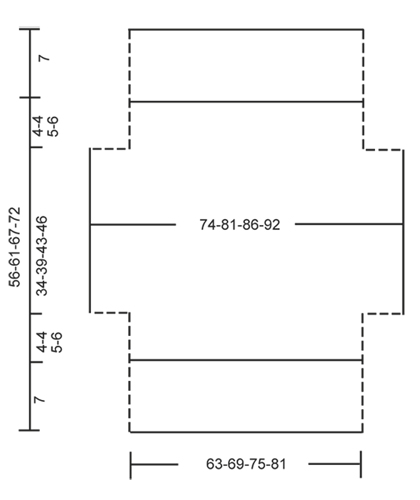
---------------------------------------------------------- NOTA: Existem termos diferentes de tricô e croché em português de Portugal e do Brasil. TRICÔ : Malha = Ponto Canelado = Barra Ponto Jarreteira = Cordões de Tricô Ponto Liga = Ponto Tricô CROCHÉ : mpa – meio ponto alto pa – ponto alto pad – ponto alto duplo pat – ponto alto triplo pb – ponto baixo pbx – ponto baixíssimo pc – ponto corrente ---------------------------------------------------------- PONTO JARRETEIRA (em idas e voltas) : Tricotar todas as carreiras em meia. 1 “barra” jarreteira = 2 carreiras meia. PONTO FANTASIA : Ver diagrama A.1, O diagrama mostra todas as carreiras do ponto fantasia, visto pelo direito. --------------------------------------------------------- BOLERO: Tricota-se em idas e voltas na agulha circular para que haja espaço suficiente para todas as ms/pts. Montar 107-117-127-137 ms/pts com a agulha circular 5 mm e o fio Big Merino. Tricotar em ponto jarreteira até a peça medir 7 cm. Tricotar então da seguinte maneira pelo direito: 3 ms/pts em PONTO JARRETEIRA - ver acima -, A.1A (= 6 ms/pts), A.1 B acima nas 90-100-110-120 ms/pts seguintes, terminar com A.1 C (= 5 ms/pts) e 3 ms/pts em PONTO JARRETEIRA. Continuar A.1 com 3 ms/pts em ponto jarreteira de cada lado da peça. NÃO ESQUECER DE MANTER A MESMA TENSÃO DA INDICADA PARA A AMOSTRA! A 11-11-12-13 cm de altura total, montar 10 ms/pts no fim das 2 carreiras seguintes para as mangas = 127-137-147-157 ms/pts. Tricotar da seguinte maneira: 3 ms/pts em ponto jarreteira, A.1A (= 6 ms/pts), A.1 B nas 110-120-130-140 ms/pts seguintes, terminar com A.1 C (= 5 ms/pts) e 3 ms/pts em PONTO JARRETEIRA. NOTA! Continuar A.1 logicamente para que o ponto fantasia continue depois dos aumentos para as mangas. A 45-50-55-59 cm de altura total, arrematar 10 ms/pts no princípio das 2 carreiras seguintes = 107-117-127-137 ms/pts. Tricotar da seguinte maneira: 3 ms/pts em ponto jarreteira, A.1A (= 6 ms/pts), A.1 B nas 90-100-110-120 ms/pts seguintes, terminar com A.1 C (= 5 ms/pts) e 3 ms/pts em ponto jarreteira. A 49-54-60-65 cm de altura total, tricotar em ponto jarreteira em todas as ms/pts. Arrematar a 56-61-67-72 cm de altura total. MONTAGEM : Fazer a costura dos lados e sob as mangas a 1 m/p ourela do rebordo – ver linha pontilhada no esquema. |
|||||||||||||||||||
Explicações do diagrama |
|||||||||||||||||||
|
|||||||||||||||||||
 |
|||||||||||||||||||
 |
|||||||||||||||||||
Terminou este projecto?Então, identifique as suas fotos com as tags #dropspattern #cassiebolero ou mostre-as na galeria #dropsfan. Precisa de ajuda para este modelo?Encontrará 15 turotiais em vídeo, uma rubrica Comentários/Perguntas e muito mais ao visitar a página do modelo em www.garnstudio.com © 1982-2026 DROPS Design A/S. Todos os direitos reservados. Este documento, incluuindo as suas su-secções, tem copyrights. Saia mais o que pode fazer com os nossos modelos no fim de cada uma das páginas do nosso site. |
|||||||||||||||||||


Com mais de 40 anos no design de modelos de tricô e de croché, a DROPS Design oferece uma das mais vastas colecções demodelos gratuitos na Internet - traduzidos em 17 línguas. Neste dia de hoje, temos 324 catálogos e 12290 modelos - dos quais 12271 estão traduzidos em português.
Trabalhamos com muito empenho para lhe proporcionar o melhor que o tricô e o croché têm para oferecer, para lhe fornecer inspiração e conselhos bem como fios da mais elevada qualidade a preços incríveis! Gostaria de usar os nossos modelos para outros fins que não uso pessoal? Pode ler o que lhe é permitido fazer no Copyright texto que se encontra na parte de baixo de todos os nossos modelos. Bom tricô! Bom croché!
Deixe um comentário acerca do modelo DROPS 146-16
Gostaríamos muito de saber o que tem a dizer-nos acerca deste modelo!
Se deixar uma pergunta acerca do modelo, certifique-se de que escolhe a categoria adequada no formulário abaixo para acelerar o processo relativo à resposta. Os campos obrigatórios estão assinalados com um *.