
Categorias populares
Procura um fio?


Comentários / Perguntas (123)
Lisa escreveu:
Hi, I am working on the sleeve for size S, and after the third increase I already have the total 57 tr/ch stitches , because increasing by 1tr+1ch at each end of the row means there is an increase of 4 stitches for the row, but the pattern only counts 2 to calculate the total. Is that correct, and if so should I end up with a total of 69 stitches? Or am I doing something wrong? thanks
30.04.2017 - 16:33DROPS Design respondeu:
Dear Lisa, number of sts after increase will be check, thank you. Happy crocheting!
02.05.2017 - 10:35
![]() Sylvia escreveu:
Sylvia escreveu:
What does, A.1B stands for. First time doing symbols. Thanks
02.04.2017 - 07:12DROPS Design respondeu:
Dear Sylvia, diagram A.1 is divided into 3 parts: A.1A = beg of row from RS (= row1: 3 ch, 1 ch, skip 1 st, 1 dc in next st) and end of row from WS, then A.1B to repeat until last 3 sts on row 1 (= *1 ch, skip 1 st, 1 dc in next ch*, repeat from *-* a total of 3 times for 1 repeat of A.1B, repeat these until 2 sts remain on row, and A.1C = end of row from RS, beg of row from WS (row 1 = 1 ch, 1 dc in last st). Your DROPS store will provide you any further invidivual assistance required for reading charts. Happy crocheting!
03.04.2017 - 10:39
![]() Tommie escreveu:
Tommie escreveu:
Can you send me the pattern for this. I would be happy to pay for a pdf or written out.
03.11.2016 - 02:33DROPS Design respondeu:
Dear Tommie, you will find the pattern for free scrolling down the page. Happy crocheting!
03.11.2016 - 09:45Eva escreveu:
Hello!!!Can you tell me the size of the jumper on picture?Thank you.
10.08.2016 - 00:13DROPS Design respondeu:
Dear Eva, our models are usually wearing size M - read more about sizing here. Happy crocheting!
10.08.2016 - 08:45
![]() Wendy escreveu:
Wendy escreveu:
I am on the back section starting A2 which seems to be a row of treble's. I've done that and I have 5 extra trebles which I don't know how to get rid of but also, because it has gone from a mesh pattern to all treble's, it is very curly. Am I reading the pattern correctly, is it a row of all treble's?
04.08.2016 - 23:51DROPS Design respondeu:
Dear Wendy, A.2 is all trebles - remember to check and keep gauge (17 tr = 10 cm) when working A.1, and do not work too tight the rows with ch and tr. Happy crocheting!
05.08.2016 - 09:45
![]() Wendy escreveu:
Wendy escreveu:
I really want to make this and looking at it, it appears easy, however, I don't understand the pattern at all. On the back piece, after the foundation row, I've done a treble in the 6th chain from the hook as instructed. It tells me that is A.1A, but the diagram shows it as two chains and a treble. Is it possible to get the written pattern instructions as opposed to looking at the diagram? If not, can you tell me what to do after the first treble in row 2.
31.07.2016 - 01:57DROPS Design respondeu:
Dear Wendy, when you work first row you skip first 5 ch (working in the 6th ch from hook), these first 5 ch are : 1st tr (= 3 ch), 1 ch before next tr + 1 ch skipped before crocheting next tr). At the beg of row 2 work A.1C: 3ch, 1 tr around next ch, then repeat A.1B and finish with A.1C. Happy crocheting!
01.08.2016 - 09:35
![]() Sarah escreveu:
Sarah escreveu:
I need further clarification on the sleeve increases, inadvertently I am acquiring an extra two stitches when increasing the sleeves leading to too many stitches. I have looked at the pattern to see how I can prevent the extra stitches from occurring but having great difficulty in figuring out how, can you advise further? The first increase stitch is placed at A.1 A and at the end however the extra stitches are occurring in every third row following this, hope this makes sense, Thanks Sarah
11.03.2016 - 23:30DROPS Design respondeu:
Dear Sarah, you inc for sleeve 1 st in each side, ie you will have a total of 2 tr more on every inc row - increase should be done by working 1 tr + 1 ch more in outermost tr in each side. On next row, work in A.1 as before, you will have same as before, but just 2 more tr per inc row. Happy crocheting!
12.03.2016 - 18:03Trishy escreveu:
I'm new to the Crotchet world. And was wondering, if I try to make a large size in this jumper, how do I know how many stitches do I need for the back, & front etc?
31.10.2015 - 04:23DROPS Design respondeu:
Dear Trishy, you will find at the bottom of the pattern a measurement chart, compare the measurements (in cm) to a similar garment you have and like the shape and find out the matching size - you can then follow this size in the pattern. Read more about sizing here. Happy crocheting!
31.10.2015 - 18:09
![]() Federica Piucci escreveu:
Federica Piucci escreveu:
Buon pomeriggio, io intendo confezionare questa maglia in con due colori diversi, uno per la parte superiore e uno per quella inferiore. Indicativamente quanti grammi potrebbero servire per le due parti prese separatamente?
12.10.2015 - 15:06DROPS Design respondeu:
Buongiorno Federica. Non riusciamo ad essere precisi sul quantitativo di filato necessario per lavorare con due colori. Lavorare un piccolo campione con i due diversi motivi potrebbe dare una prima indicazione. Il suo rivenditore di fiducia è a sua disposizione per consigliarla. Se possibile e non troppo oneroso, si informi anche sulla possibilità di restituire eventuali gomitoli di filato integri e non utilizzati. Buon lavoro!
16.10.2015 - 23:39Dalia escreveu:
When piece measures 53-54-55-56-57-58 cm / 21''-21¼''-21 5/8''-22''-22½''-22¾'', insert 1 marker in each side (marks where armhole beg). where exactly do I insert my markers?
14.07.2015 - 10:29DROPS Design respondeu:
Dear Dalia, see answer below. Happy crocheting!
27.07.2015 - 11:29
|
|||||||
Donna#donnasweater |
|||||||
 |
 |
||||||
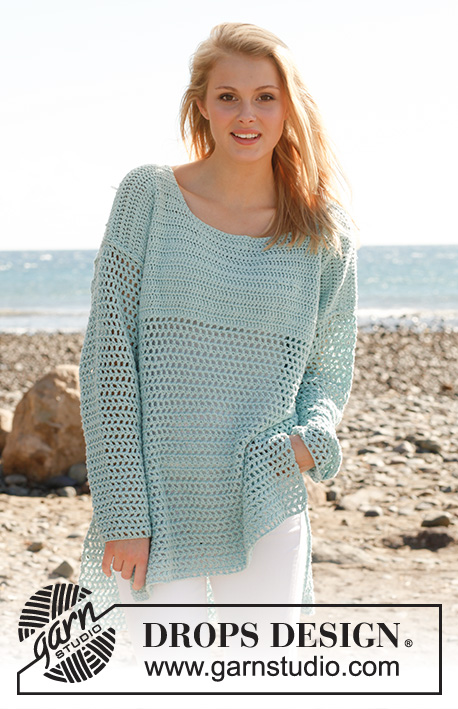
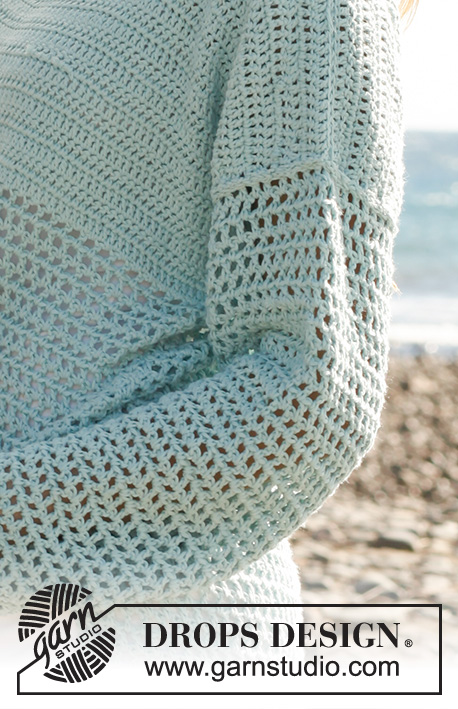
Pulôver DROPS em croché, em ”Cotton Light”. Do S ao XXXL.
DROPS 145-19 |
|||||||
|
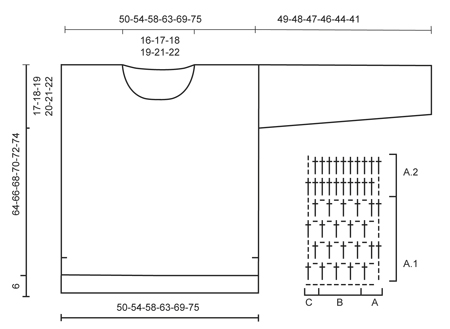
---------------------------------------------------------- NOTA: Existem termos diferentes de tricô e croché em português de Portugal e do Brasil. TRICÔ : Malha = Ponto Canelado = Barra Ponto Jarreteira = Cordões de Tricô Ponto Liga = Ponto Tricô CROCHÉ : mpa – meio ponto alto pa – ponto alto pad – ponto alto duplo pat – ponto alto triplo pb – ponto baixo pbx – ponto baixíssimo pc – ponto corrente ---------------------------------------------------------- PONTO FANTASIA : Ver diagramas A.1 e A.2. DIMINUIÇÕES: Virar quando restar 1 pa = 1 pa diminuído. AUMENTOS: Para aumentar, crochetar 1 pa + 1 pc a mais no 1.º/último pa de cada lado da peça. Crochetar os aumentos progressivamente no ponto fantasia A.1. ---------------------------------------------------------- COSTAS : Crocheta-se em idas e voltas. As costas medem 6 cm a mais em altura do que a frente. Montar FROUXAMENTE uma corrente de 88-94-102-110-120-130 pc (é importante que esta corrente seja frouxa para evitar um rebordo apertado) com a agulha de croché 4 mm e o fio Cotton Light. Virar e crochetar 1 pa no 6.º pc a partir da agulha de croché (A.1 A está agora feito – ver diagrama). Crochetar A.1 B acima dos 80-86-94-102-112-122 pc seguintes, e terminar com A.1 C nos 2 últimos pc. Continuar então com A.1. A 47-48-49-50-51-52 cm de altura total, crochetar da seguinte maneira : A.2 A, repetir A.2 B até restarem 2 pa/pc, terminar com A.2 C = 85-91-99-107-117-127 pa. Continuar no ponto fantasia A.2 até ao fim. A 53-54-55-56-57-58 cm de altura total, colocar 1 marcador de cada lado da peça (referência para o princípio das cavas). A 68-70-72-74-76-78 cm de altura total, deixar de crochetar acima dos 27-29-31-33-35-37 pa centrais = restam 29-31-34-37-41-45 pa para cada ombro. Terminar então cada ombro separadamente e continuar no ponto fantasia A.2, cortar e entretecer o fio a 70-72-74-76-78-80 cm de altura total. FRENTE : Começar e crochetar como para as costas até a peça medir 41-42-43-44-45-46 cm de altura total - NOTA: as costas medem 6 cm a mais do que a frente, e, por isso, as medidas serem diferentes. Continuar então da seguinte maneira: A.2 A, repetir A.2 B até restarem 2 pa/pc, terminar com A.2 C = 85-91-99-107-117-127 pa. Continuar no ponto fantasia A.2 até ao fim. A 47-48-49-50-51-52 cm de altura total, colocar 1 marcador de cada lado da peça (referências para o princípio das cavas). A 56-58-60-62-64-66 cm de altura total, deixar de crochetar acima dos 23-25-27-29-31-33 pa centrais e terminar então cada ombro separadamente e, ao mesmo tempo, diminuir no lado do decote 2 vezes 1 pa em todas as carreiras – ver DIMINUIÇÕES = restam 29-31-34-37-41-45 pa para cada ombro. Continuar no ponto fantasia A.2, cortar e entretecer o fio a 64-66-68-70-72-74 cm de altura total. MANGAS : Crochetam-se em idas e voltas. Montar FROUXAMENTE uma corrente de 48-48-50-52-54-56 pc (é importante que a corrente seja frouxa para evitar que o rebordo fique demasiado apertado) com a agulha de croché 4 mm e o fio Cotton Light. Virar e crochetar 1 pa no 6.º pc a partir da agulha de croché (A.1 A está agora feito), crochetar A.1 B acima dos 40-40-42-44-46-48 pc seguintes, e terminar com A.1 C nos 2 últimos pc = 45-45-47-49-51-53 pa/pc. Continuar no ponto fantasia A.1. A 8 cm de altura total, aumentar 1 m/p de cada lado da peça – ver AUMENTOS ! Repetir estes aumentos mais 5-7-8-9-9-10 vezes (6-8-9-10-10-11 aumentos ao todo) a cada 7-5-4½-3½-3½-3 cm = 57-61-65-69-71-75 pa/pc. Cortar e entretecer o fio a 49-48-47-46-44-41 cm de altura total (mais curto nos tamanhos maiores porque os ombros são mais largos). MONTAGEM : Fazer a costura dos ombros. Costurar as mangas – a partir do ombro até aos marcadores da frente e das costas. Fazer a costura sob as mangas e a dos lados, parar a 26 cm da parte de baixo das costas e a 20 cm da parte de baixo da frente = fendas laterais. |
|||||||
Explicações do diagrama |
|||||||
|
|||||||
 |
|||||||
Terminou este projecto?Então, identifique as suas fotos com as tags #dropspattern #donnasweater ou mostre-as na galeria #dropsfan. Precisa de ajuda para este modelo?Encontrará 5 turotiais em vídeo, uma rubrica Comentários/Perguntas e muito mais ao visitar a página do modelo em www.garnstudio.com © 1982-2026 DROPS Design A/S. Todos os direitos reservados. Este documento, incluuindo as suas su-secções, tem copyrights. Saia mais o que pode fazer com os nossos modelos no fim de cada uma das páginas do nosso site. |
|||||||


Com mais de 40 anos no design de modelos de tricô e de croché, a DROPS Design oferece uma das mais vastas colecções demodelos gratuitos na Internet - traduzidos em 17 línguas. Neste dia de hoje, temos 324 catálogos e 12290 modelos - dos quais 12271 estão traduzidos em português.
Trabalhamos com muito empenho para lhe proporcionar o melhor que o tricô e o croché têm para oferecer, para lhe fornecer inspiração e conselhos bem como fios da mais elevada qualidade a preços incríveis! Gostaria de usar os nossos modelos para outros fins que não uso pessoal? Pode ler o que lhe é permitido fazer no Copyright texto que se encontra na parte de baixo de todos os nossos modelos. Bom tricô! Bom croché!
Deixe um comentário acerca do modelo DROPS 145-19
Gostaríamos muito de saber o que tem a dizer-nos acerca deste modelo!
Se deixar uma pergunta acerca do modelo, certifique-se de que escolhe a categoria adequada no formulário abaixo para acelerar o processo relativo à resposta. Os campos obrigatórios estão assinalados com um *.