
Categorias populares
Procura um fio?


Comentários / Perguntas (190)
![]() Brigitte Laronze escreveu:
Brigitte Laronze escreveu:
Bonjour et merci beaucoup pour votre précédente réponse. J’ai toutefois encore une question. : j’ai commencé les manches mais en augmentant 14 fois 2 brides de chaque côté à tous les rangs, je ne suis pas à 24 cm de hauteur pour commencer les diminutions. Je ne suis qu’à 14 cm de hauteur. Dois je continuer sans augmenter jusqu’à 24 cm de hauteur ou alors faire autrement ? Merci encore pour votre aide précieuse.
01.09.2020 - 22:58DROPS Design respondeu:
Bonjour Mme Laronze, continuez jusqu'à ce que la manche mesure 24 cm mais n'augmentez plus si vous avez bien votre bon nombre de mailles maintenant. Bon crochet!
02.09.2020 - 08:36
![]() Brigitte Laronze escreveu:
Brigitte Laronze escreveu:
Bonjour, je commence les augmentations mais j’ai 2 problèmes :1/ j’ai en tout 220 mailles et je dois repartir 30 augmentations. J’ai calculé mais tous les 7 mailles c’est pas assez et toutes les 8 mailles c’est trop. Comment faire ? 2/ si on augmente alors le point ajouré va être décalé par rapport aux rangs précédents. Comment faire ? Merci pour votre réponse car je ne peux plus avancer dans mon travail.
01.09.2020 - 00:19DROPS Design respondeu:
Bonjour Mme Laronze, cette leçon explique comment répartir des diminutions/augmentations - continuez ensuite le point ajouré comme avant, il ne va pas s'aligner au-dessus du point ajouré des rangs précédents, c'est normal et ça ne se verra pas. Bon crochet!
01.09.2020 - 09:35
![]() Dawn Hand escreveu:
Dawn Hand escreveu:
Pattern 138-6, I have done the body and sleeves but am struggling to do the edging stitch from the diagram, it says to do it vertically, but I don’t understand how to do it, do I just do it as 2 rows round?
26.08.2020 - 02:32DROPS Design respondeu:
Dear Mrs Hand, at the botto mof sleeve as well as the bottom of edge piece, you work the 2 rows as shown in M.1 (read more about diagrams here. Happy crocheting!
26.08.2020 - 08:23
![]() Esther escreveu:
Esther escreveu:
Ik ben bij de mouw. 77 lossen daarna 60 stokjes.Nu moet ik tegelijkertijd ,17 keer, tegelijkertijd 1 stokje meerderen aan iedere kant, elke toer..moet ik dan telkens in het éerste én laatste stokje meerderen van een toer? Of telkens alleen in het eerste stokje van de toer meerderen..help.
09.07.2020 - 20:09DROPS Design respondeu:
Dag Esther,
Je meerdert inderdaad in de eerste en de laatste steek van de toer, dus steeds aan beide kanten, door 2 stokjes in 1 stokje te haken.
04.08.2020 - 13:21
![]() Beverly Lerch escreveu:
Beverly Lerch escreveu:
If you are ch3 and putting a tr in 4th ch from hook and tr in next ch you have only used 5 ch. your count in the first size is 59 not 58 and at the end of the first row pattern you end with 1 tr not 2.
05.06.2020 - 20:54
![]() Caroline escreveu:
Caroline escreveu:
I'm very new to crochet, and don't understand what I'm doing on the chain going into the tr crochet on the second row. Your notes say chain 3 for first tr and then tr into 4th ch stitch which I've done, then tr 3 more mis chain and carry on till 2 sts remain, I have 3 tr at this end and one chain space remaining, my count of tr stitches is 59 if i include the first chain 3, I've taken it out 3 times, and am carfully counting as i go, I don't understand where it is going wrong.
19.04.2020 - 18:28DROPS Design respondeu:
Dear Caroline, in first size you have 78 chains, then crochet 1 tr in 4th ch from hook (= 2 trebles, 6 chains), then repeat (1 tr in each of the next 3 ch, skip 1 ch) a total of 18 times ((= 3 tr, 4 chains)x 18 = 54 tr, 72 chains), finish with 1 tr in each of the last 2 ch (2 tr, 2 ch) you have now: 2+54+2 tr over 6+72+2 chains. Hope this helps, happy crocheting!
20.04.2020 - 10:41
![]() Pipit Fitri escreveu:
Pipit Fitri escreveu:
Hello, i'd like to try making this, is there a possibility if i work the sleeve in round? Thank you
18.03.2020 - 06:41DROPS Design respondeu:
Dear Mrs Fitri, you could start to work the sleeve in the round but to get the same texture for sleeve cap remember to work alternately from RS and from WS - when working sleeve cap you will have then to work in rows decreasing on each side. Happy crocheting!
18.03.2020 - 08:49
![]() Linda escreveu:
Linda escreveu:
I a m so confused. The edge piece says you should have 56+56+44+44=196 but then directions says 204. Am I missing something?
06.03.2020 - 21:26DROPS Design respondeu:
Dear Linda, you work 1 st in each st in the top of back piece = 62 sts + 42 sts in the 56 chains + 1 st in each st in the bottom of back piece = 58 sts + 42 sts in the 56 chains = 62+42+58+42=204 sts. Happy crocheting!
09.03.2020 - 09:40
![]() Namrata escreveu:
Namrata escreveu:
The pattern is very nice n have completed making the body and edging . In sleeve part , what will be the count of stitch in the last line? Is it possible to send pics of just the sleeve to see the shape that v achieve afterall the decreases.
01.02.2020 - 22:12DROPS Design respondeu:
Dear Mrs Namrata, the number of stitches at the end of the sleeve (sleeve cap) will depends on your tension in height. Just make sure that you decrease the same number of stitches on each side and that the measurements are right. Happy crocheting!
03.02.2020 - 09:54
![]() Zhell escreveu:
Zhell escreveu:
I was confused with the edge piece, if i ch 58 and in each ch loop ill do 44 tr, how will get the total of 220 tr?
01.11.2019 - 17:44DROPS Design respondeu:
Dear Zhell, you crochet 44 tr in the 58 ch (skipping chains evenly) = 44 tr; then 1 tr in each of the 64 tr from the bottom of piece, then 44 tr in the 58 ch = 44 tr and 1 tr in each of the 68 tr on top of back piece = 44+64+44+68= 220 tr. Happy crocheting!
04.11.2019 - 15:28
|
||||||||||
Country Rose#countryrosebolero |
||||||||||
 |
 |
|||||||||
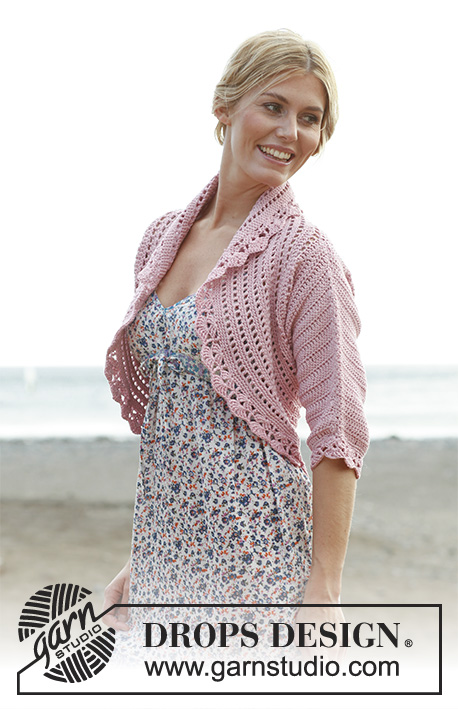
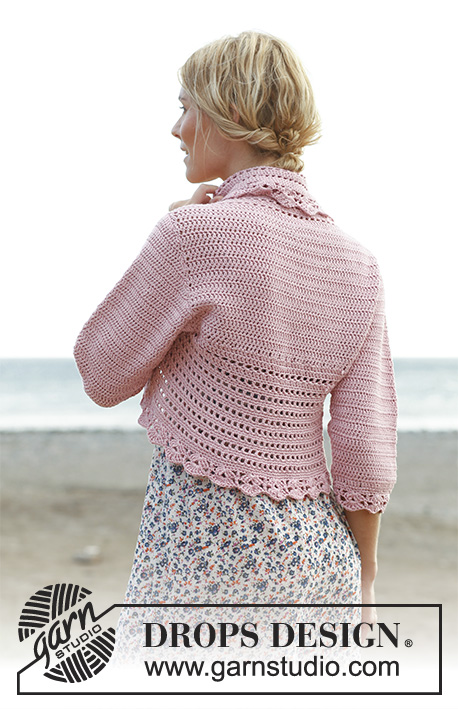
Casaco DROPS em croché, em "Cotton Light" e "Glitter". Do S ao XXXL
DROPS 138-6 |
||||||||||
|
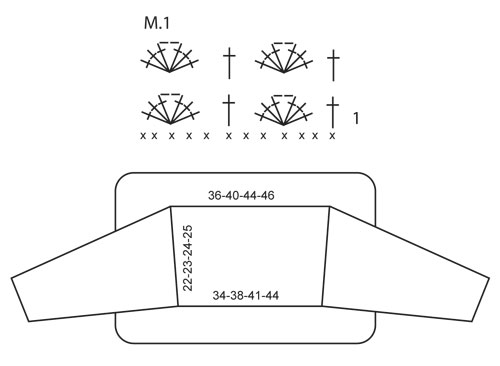
---------------------------------------------------------- NOTA: Existem termos diferentes de tricô e croché em português de Portugal e do Brasil. TRICÔ : Malha = Ponto Canelado = Barra Ponto Jarreteira = Cordões de Tricô Ponto Liga = Ponto Tricô CROCHÉ : mpa – meio ponto alto pa – ponto alto pad – ponto alto duplo pat – ponto alto triplo pb – ponto baixo pbx – ponto baixíssimo pc – ponto corrente ---------------------------------------------------------- DICA CROCHÉ : Substituir o 1.º pa de cada carreira com 3 pc. Substituir o 1.º pb de cada carreira com 1 pc. Terminar cada carreira de pb com 1 pbx no 1.º pc do princípio da carreira. Substituir o 1.º pa de cada carreira com 3 pc. Terminar cada carreira de pa com 1 pbx no 3.º pc do princípio da carreira. AUMENTOS : Aumentar crochetando 2 pa respectivamente no 1.º e no último pa da carreira. DIMINUIÇÕES : Diminuir no princípio da carreira : Crochetar pbx acima do número de pa a diminuir. Diminuir no fim da carreira : Quando resta o número de pa a diminuir, virar. -------------------------------------------------------- COSTAS : Montar frouxamente uma corrente de 78-86-94-99 pc com a agulha de croché 4 mm e 1 fio Cotton Light + 1 fio Glitter (= 2 fios). Crochetar 1 pa no 4.º pc a partir da agulha de croché, * 1 pa em cada um dos 3 pc seguintes, saltar 1 pc *, repetir de * a *, e terminar com 1 pa em cada um dos 2-2-2-3 últimos pc = 58-64-70-74 pa. Continuar em pa (= 1 pa em cada pa )- VER DICA CROCHÉ. A 7 cm de altura total, aumentar 1 pa de cada lado da peça – ver AUMENTOS, repetir estes aumentos a 15 cm de altura total = 62-68-74-78 pa. Continuar até a peça medir 22-23-24-25 cm. ORLA : Crochetar 1 pa em cada pa ao longo da parte de cima das costas, crochetar então 56-58-60-64 pc, depois, 1 pa em cada pa ao longo da parte de baixo das costas, crochetar 56-58-60-64 pc e terminar com 1 pbx no 1.º pa da parte de cima das costas. Crochetar 1 pa em cada pa das costas, nas correntes, crochetar 42-44-46-48 pa = 204-220-236-248 pa. Continuar em redondo da seguinte maneira : CARREIRA 1 : 1 pa no 1.º pa, *1 pc, saltar 1 pa, 1 pa no pa seguinte *, repetir de * a * e terminar com 1 pc, saltar 1 pa e 1 pbx no princípio da carreira. CARREIRA 2 : 1 pb em cada pa e 1 pb em cada pc. CARREIRA 3 : 1 pb em cada pb. Repetir estas 3 carreiras e, AO MESMO TEMPO, quando a orla medir 5, 10 e 15 cm (ajustar a altura para uma carreira de pb), aumentar 30-30-30-32 pb a intervalos regulares – VER AUMENTOS = 294-310-326-344 pb. Quando a orla medir 17-18-19-20 cm (ajustar a altura para uma carreira de pb), crochetar 1 carreira de pb e, AO MESMO TEMPO, aumentar 0-2-4-4 pb a intervalos regulares = 294-312-330-348 pb. Continuar então com o diagrama M.1. NOTA ! Começar na carreira 1 do diagrama. Crochetar 1 vez M.1 em altura, cortar e entrar o fio. MANGAS : Montar frouxamente uma corrente de 67-72-72-77 pc com a agulha de croché 4 mm e 1 fio Cotton Light + 1 fio Glitter (= 2 fios). Crochetar 1 pa no 4.º pc a partir da agulha de croché (= 2 pa), * saltar 1 pc, 1 pa em cada um dos 4 pc seguintes *, repetir de * a * e terminar saltando 1 pc e 1 pa em cada um dos 2 últimos pc = 52-56-56-60 pa. Continuar em pa (= 1 pa em cada pa), em idas e voltas e, AO MESMO TEMPO, aumentar 1 pa de cada lado da peça, em todas as carreiras, num total de 13-14-16-17 vezes a cada 2 carreiras, ver AUMENTOS = 78-84-88-94 pa. A 24-24-22-20 cm de altura total (menos alto para os tamanhos maiores porque o arredondado da manga é mais comprido e os ombros mais largos), diminuir de cada lado da peça a cada carreira – ver DIMINUIÇÕES : 1 vez 4 pa, depois, 3-3-2-2 pa de cada lado da peça até a manga medir 31-33-33-34 cm, e, por fim, diminuir 1 vez 4 pa de cada lado da peça. Cortar e entrar o fio. Fazer a costura sob a manga com pequenos pontos cuidados. Fazer a seguinte orla na parte de baixo da manga : 1 carreira de 1 pb (= 1 pb em cada pa) e, ao mesmo tempo, aumentar 2-4-4-0 pb a intervalos regulares = 54-60-60-60 pb. Crochetar então 1 vez M.1 em altura. Cortar e entrar o fio. MONTAGEM : Montar as mangas. |
||||||||||
Explicações do diagrama |
||||||||||
|
||||||||||
 |
||||||||||
Terminou este projecto?Então, identifique as suas fotos com as tags #dropspattern #countryrosebolero ou mostre-as na galeria #dropsfan. Precisa de ajuda para este modelo?Encontrará 8 turotiais em vídeo, uma rubrica Comentários/Perguntas e muito mais ao visitar a página do modelo em www.garnstudio.com © 1982-2026 DROPS Design A/S. Todos os direitos reservados. Este documento, incluuindo as suas su-secções, tem copyrights. Saia mais o que pode fazer com os nossos modelos no fim de cada uma das páginas do nosso site. |
||||||||||


Com mais de 40 anos no design de modelos de tricô e de croché, a DROPS Design oferece uma das mais vastas colecções demodelos gratuitos na Internet - traduzidos em 17 línguas. Neste dia de hoje, temos 324 catálogos e 12290 modelos - dos quais 12271 estão traduzidos em português.
Trabalhamos com muito empenho para lhe proporcionar o melhor que o tricô e o croché têm para oferecer, para lhe fornecer inspiração e conselhos bem como fios da mais elevada qualidade a preços incríveis! Gostaria de usar os nossos modelos para outros fins que não uso pessoal? Pode ler o que lhe é permitido fazer no Copyright texto que se encontra na parte de baixo de todos os nossos modelos. Bom tricô! Bom croché!
Deixe um comentário acerca do modelo DROPS 138-6
Gostaríamos muito de saber o que tem a dizer-nos acerca deste modelo!
Se deixar uma pergunta acerca do modelo, certifique-se de que escolhe a categoria adequada no formulário abaixo para acelerar o processo relativo à resposta. Os campos obrigatórios estão assinalados com um *.