
Categorias populares
Procura um fio?


Comentários / Perguntas (59)
![]() Gilardi Claudette escreveu:
Gilardi Claudette escreveu:
Je ne comprends pas l'explication des manches.que veut dire "avec les rangs raccourcis comme avant,aux mêmes endroits" Merci
31.01.2022 - 09:02DROPS Design respondeu:
Bonjour Mme Gilardi, vous avez auparavant tricoté des rangs raccourcis sur toute la longueur, lorsque vous tricotez les manches, vous allez tourner aux mêmes endroit qu'avant (moins de fois car moins de marqueurs), et continuer ainsi les rangs raccourcis comme avant. Bon tricot!
31.01.2022 - 10:23
![]() Martens escreveu:
Martens escreveu:
Ik ben deze Eden vest aan het breien. Ik ben nu de libkermouw aan het breien. Deze moeten in verkorte toeren gebreid worden. De eerste en de tweede toer van de verkorte toeren moeten gewoon volledig heen en terug gebreid worden. Blijft dit ook gelden in de mouw? Want er zijn maar 2 verkorte toeren in de mouw ipv 3. Ik begrijp tevens niet hoe je 35 cm meet (aan de onderkant op het breedste deel) in de uitleg van de linkermouw. Kan u mij daarmee helpen, please?
09.01.2021 - 20:24DROPS Design respondeu:
Dag Martens,
De lengte van de mouw meet je aan de onderkant van de mouw op het breedste deel. Als je verkorte toeren maakt op de mouw, keer je het werk op het zelfde punt als bij de panden, dus het aantal steken vanaf de hals tot het keerpunt voor de verkorte toeren moet hetzelfde zijn. Hoe de verkorte toeren herhaald worden is verder precies hetzelfde als op de panden.
10.01.2021 - 12:15
![]() Bobby Garland escreveu:
Bobby Garland escreveu:
OK, I think I get it. I need to do 1 more row on the LF (row 1 for me) in order to end at the top. Then, I need to attach a new yarn to stitch #64 on the WS and knit the side piece. Then I will end up with the last row on the RS. Then I will cut that yarn. Then I will go back to the top edge on the LF and pick up yarn and turn to the WS to start the sleeve on those 51 sts. It would have been nice if the instructions had been more specific, instead of saying "work approximately..."
08.01.2021 - 19:57
![]() Bobby Garland escreveu:
Bobby Garland escreveu:
I get what you are saying, but I am not asking about the sleeve, as I am not there yet. I need to know if I am to cut the yarn at the lower edge of the left front piece and reattach it to the WS at stitch #64 to start the first row of the side piece so as to end on the RS of the side piece as instructed. There is no other way to end up on the RS unless you start the side piece on the WS in the middle of the work.
08.01.2021 - 17:21DROPS Design respondeu:
Dear Mrs Garland, after left front piece measures 23 cm, adjust so that next row will be worked from RS and now work this 1 cm starting from RS = from the bottom edge over the first 64 cm - adjust this 1 cm so that last row is worked from RS, then cut the yarn and join it to work sleeve (starting from RS) over the 51 sts left unworked on needle (starting from RS). Happy knitting!
11.01.2021 - 06:57
![]() Bobby Garland escreveu:
Bobby Garland escreveu:
OK, so you also cut the yarn at the end of the left front, which for me is at the lower edge, and reattach to stitch # 64 (for small size) in order to start the side piece on the WS, so as to finish last row of side piece on the RS?
08.01.2021 - 15:15DROPS Design respondeu:
Dear Mrs Garland, the last row on left front piece is worked from RS, but when you turn and work sleeve, first row on sleve is worked from WS = this means you don't need to cut the yarn between left front piece and sleeve, then after sleeve, just work the 64 sts on side at the end of a WS row. - no need to cut the yarn neither between sleeve and back piece. Happy knitting!
08.01.2021 - 16:19
![]() Bobby Garland escreveu:
Bobby Garland escreveu:
Thank you for your response. Another question....I finished the left front and ended on row 8 of short row sequence, which means the next row would be a right side row. In order to finish the side piece on the RS as instructed and have the side pieces be the same number of rows and have a marker in the middle, I would have to start the side piece on the WS. Do I cut the yarn and start at stitch number 64 at the other end from the WS?
08.01.2021 - 14:08DROPS Design respondeu:
Dear Mrs Garland, last row worked for side on front piece is worked from the right side, then cut the yarn and work sleeve. Last row worked on sleeve is from WS, after you have worked this last row on sleeve, work the stitches of the side at the end of this row = from WS, all stitches are now back on needle, turn and start short rows at the beg of next row from RS. Happy knitting!
08.01.2021 - 15:02
![]() Bobby Garland escreveu:
Bobby Garland escreveu:
For short rows, when moving from left front to sleeve to back to sleeve to right front, do you continue in the same numerical sequence from the previous section, or do you start again at row 1 or do you reverse the short row sequence, work rows 8-1? You start with row 1 at the left front border and end up with row 8 at the right front....the pieces would not be "mirrored." Even if you have the same number of rows, the short rows would not be in the same place. Does it matter?
04.01.2021 - 14:50DROPS Design respondeu:
Dear Mrs Garland, after you have worked the sleeve, work the short rows on back piece starting from row 1 of short rows. Happy knitting!
05.01.2021 - 10:43
![]() LISA RENBARGER escreveu:
LISA RENBARGER escreveu:
A friend and I are about to cast on Eden to knit at the same time. My bust measurement is between size M & L. Is there positive ease built in to the pattern?
13.01.2020 - 16:49DROPS Design respondeu:
Dear Mrs Renbarger, measure a similar garment you have and like the shape and compare these measurements to the one in the measurement chart (taken flat from side to side, in cm) to find out the matching size. You can then either decide if you want it rather tight or rather loose (with negative or positive ease). Read more here. Happy knitting!
14.01.2020 - 07:17
![]() Kironieke escreveu:
Kironieke escreveu:
If i cast on 120 stitches for size M with 23st/cm (tension) how do i get to the total height of 75cm? It only adds up to the 52cm of the body, not the yoke/sleeve part.
21.05.2019 - 20:53DROPS Design respondeu:
Dear Kironieke, the 120 stitches will measure 52 cm = whole length of jacket as shown in measurement chart (= 23 cm yoke + 29 cm body). Happy knitting!
22.05.2019 - 09:14
![]() Rosie FRANCIS escreveu:
Rosie FRANCIS escreveu:
When knitting the left sleeve, you will have between 51 and 62 stitches, how many do you work before turning on the short rows? The short row instructions work for the whole garment (between 115 and 138 stitches)
06.08.2018 - 22:35DROPS Design respondeu:
Dear Mrs Francis, you should work the short rows on the left sleeve on the same places you worked the short rows on the top of front piece before, ithe "turns" should continue and be aligned from the beg of piece. Happy knitting!
07.08.2018 - 09:38
|
||||
Eden#edencardigan |
||||
|
|
||||
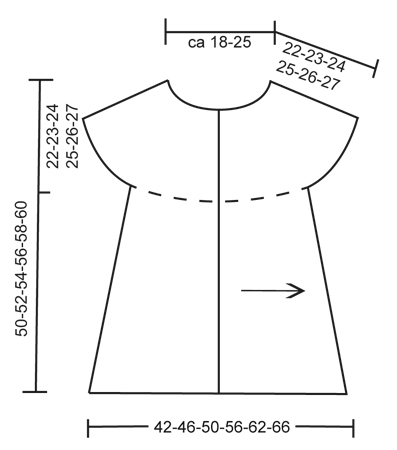
Colete DROPS em ponto jarreteira, tricotado no sentido do comprimento com carreiras encurtadas, em ”Fabel”. Do S ao XXXL.
DROPS 134-4 |
||||
|
-------------------------------------------------------- NOTA: Existem termos diferentes de tricô e croché em português de Portugal e do Brasil. TRICÔ : Malha = Ponto Canelado = Barra Ponto Jarreteira = Cordões de Tricô Ponto Liga = Ponto Tricô CROCHÉ : mpa – meio ponto alto pa – ponto alto pad – ponto alto duplo pat – ponto alto triplo pb – ponto baixo pbx – ponto baixíssimo pc – ponto corrente -------------------------------------------------------- DICA TRICÔ : Sempre que se vira a peça a meio de uma carreira, deslizar a 1,ª m/p em meia, puxar o fio e tricotar a carreira seguinte. Isto evita buracos quando se tricotam carreiras encurtadas. CARREIRAS ENCURTADAS : Tricotar carreiras encurtadas a meio da peça para dar ao colete uma forma ampla de trapézio. Começar a partir da parte de baixo e tricotar da seguinte maneira subindo em direção ao decote : * tricotar todas as ms/pts, virar e tricotar a carreira seguinte. Tricotar 103-108-112-115-119-122 ms/pts, virar e tricotar a carreira seguinte. VER DICA TRICÔ ! Tricotar 89-94-97-99-103-105 ms/pts, virar e tricotar a carreira seguinte. Tricotar 71-75-77-79-81-83 ms/pts, virar e tricotar a carreira seguinte *. Repetir de * a *, ou seja 1 série de carreiras encurtadas = 2 carreiras na parte de cima e 8 carreiras na parte de baixo. DICA DE MEDIÇÃO : Colocar a peça na horizontal para a medir. É importante não estender a peça quando a medir. -------------------------------------------------------- COLETE : Tricota-se no sentido do comprimento, em idas e voltas, começando pelo meio da frente esquerda para terminar pelo meio da frente direita. NOTA : a foto do colete foi invertida. FRENTE ESQUERDA : Tricota-se totalmente em ponto jarreteira, ou seja, tricotar todas as carreiras em meia. Montar frouxamente 115-120-125-129-134-138 ms/pts com as agulhas 3.5 mm e o fio Fabel « vista sobre o oceano ». A 1.ª carreira tricota-se pelo direito (= a partir da parte de baixo em direção ao decote). Tricotar 3 cm em todas as ms/pts (= orla da frente), parar depois de 1 carreira pelo avesso. NÃO ESQUECER DE MANTER A MESMA TENSÃO DA INDICADA PARA A AMOSTRA ! Continuar em CARREIRAS ENCURTADAS - ver acima! Continuar desta maneira até a peça medir cerca de 23-25-27-30-33-35 cm a partir da carreira de montagem (medir na parte de baixo, no lado mais largo) – VER DICA DE MEDIÇÃO ! Tricotar, depois, no lado da costura da seguinte maneira : tricotar 1 cm em idas e voltas unicamente nas 64-67-70-72-74-76 ms/pts a partir da parte de baixo. Colocar 1 marcador (= meio do lado). Tricotar 1 cm em idas e voltas nas mesmas ms/pts, e colocar essas ms/pts em espera num alfinete de ms/pts (parar depois de 1 carreira pelo direito. As ms/pts serão tricotadas para as costas mais tarde). Tricotar, então, a manga. MANGA ESQUERDA : = as 51-53-55-57-60-62 ms/pts na agulha. Tricotar em idas e voltas com as carreiras encurtadas como antes, nos mesmos locais, até a peça medir cerca de 30-31-32-33-34-35 cm (medir na parte de baixo, no lado mais largo), parar depois de 1 carreira pelo avesso. COSTAS : Tricotar as 64-67-70-72-74-76 ms/pts em espera (pelo avesso) = 115-120-125-129-134-138 ms/pts. Continuar em carreiras encurtadas como antes. A cerca de 21-23-25-28-31-33 cm a partir do marcador no lado (medir na parte de baixo do lado mais largo), colocar um novo marcador (= meio das costas). Continuar em carreiras encurtadas até a peça medir cerca de 20-22-24-27-30-32 cm a partir do marcador a meio das costas (medir na parte de baixo, do lado mais largo). Tricotar, depois, o lado da seguinte maneira : tricotar 1 cm em idas e voltas apenas nas 64-67-70-72-74-76 ms/pts a partir da parte de baixo. Colocar um novo marcador (= meio do lado). Tricotar 1 cm em idas e voltas nas mesmas ms/pts (parar depois de 1 carreira pelo direito), e, depois, colocar estas ms/pts em espera num alfinete de ms/pts. Tricotar a manga direita. MANCHE DIREITA : Tricota-se como a manga esquerda. FRENTE DIREITA : Tricotar as 64-67-70-72-74-76 ms/pts em espera (pelo avesso) = 115-120-125-129-134-138 ms/pts. Continuar em carreiras encurtadas como se fez para as costas. Quando se tricotou o mesmo número de carreiras para a frente direita que para a frente esquerda (menos a orla da frente = 3 cm), tricotar a orla da frente direita da seguinte maneira : tricotar 1½ cm em idas e voltas em todas as ms/pts. Na carreira seguinte, pelo direito, formar as casas da seguinte maneira (= a partir da parte de baixo) : tricotar 12 ms/pts para todos os tamanhos, arrematar as 2 ms/pts seguintes, * tricotar 12-13-14-14-15-15 ms/pts, arrematar as 2 ms/pts seguintes *, repetir de * a * num total de 4 vezes, tricotar as restantes ms/pts da carreira. Na carreira seguinte, montar 2 ms/pts acima das ms/pts arrematadas. Tricotar em todas as ms/pts até a orla medir 3 cm ao todo. Arrematar frouxamente. MONTAGEM : Crochetar a orla seguinte com 2 fios castanho e a agulha de croché 4 mm da seguinte maneira : começar na parte de baixo da frente direita com 1 pb, * 2 pc, saltar cerca de 1 cm, 1 pb *, repetir de * a * subindo ao longo da frente direita, da gola, do decote das costas e descer ao longo da frente esquerda. Cortar e arrematar os fios. Pregar os botões. |
||||
Explicações do diagrama |
||||
|
||||
 |
||||
Terminou este projecto?Então, identifique as suas fotos com as tags #dropspattern #edencardigan ou mostre-as na galeria #dropsfan. Precisa de ajuda para este modelo?Encontrará 6 turotiais em vídeo, uma rubrica Comentários/Perguntas e muito mais ao visitar a página do modelo em www.garnstudio.com © 1982-2026 DROPS Design A/S. Todos os direitos reservados. Este documento, incluuindo as suas su-secções, tem copyrights. Saia mais o que pode fazer com os nossos modelos no fim de cada uma das páginas do nosso site. |
||||


Com mais de 40 anos no design de modelos de tricô e de croché, a DROPS Design oferece uma das mais vastas colecções demodelos gratuitos na Internet - traduzidos em 17 línguas. Neste dia de hoje, temos 324 catálogos e 12290 modelos - dos quais 12271 estão traduzidos em português.
Trabalhamos com muito empenho para lhe proporcionar o melhor que o tricô e o croché têm para oferecer, para lhe fornecer inspiração e conselhos bem como fios da mais elevada qualidade a preços incríveis! Gostaria de usar os nossos modelos para outros fins que não uso pessoal? Pode ler o que lhe é permitido fazer no Copyright texto que se encontra na parte de baixo de todos os nossos modelos. Bom tricô! Bom croché!
Deixe um comentário acerca do modelo DROPS 134-4
Gostaríamos muito de saber o que tem a dizer-nos acerca deste modelo!
Se deixar uma pergunta acerca do modelo, certifique-se de que escolhe a categoria adequada no formulário abaixo para acelerar o processo relativo à resposta. Os campos obrigatórios estão assinalados com um *.