
Categorias populares
Procura um fio?


Comentários / Perguntas (59)
![]() Lara escreveu:
Lara escreveu:
Muss ich den Zopf dann auch erst links und danach rechts sricken? Weil bei mir flicht sich das Muster nicht.
19.01.2013 - 20:44DROPS Design respondeu:
Hallo Lara, in der Legende zum Diagramm finden Sie beschrieben, wie die Verzopfung entsteht (die M abwechselnd VOR und HINTER die Arbeit legen).
20.01.2013 - 19:08
![]() Saar escreveu:
Saar escreveu:
Er ontstaat geen gat in het breiwerk zelf maar onderin de kabel ontstaat er een soort van hol
18.01.2013 - 14:38DROPS Design respondeu:
Dat is ook wat ik bedoelde in mijn vorige antwoord ;o) Ik denk dat jij de kabel wat strakker moet breien. Zie video of ga naar de winkel voor persoonlijke ondersteuning.
18.01.2013 - 16:07
![]() Lara escreveu:
Lara escreveu:
Hallo! Muss ich während dem Muster auch abwechselnd re. li. stricken oder nur am Ende? LG
17.01.2013 - 18:50DROPS Design respondeu:
Hallo Lara, es wird in den Hin-R rechts gestrickt und in den Rück-R links. Viel Erfolg!
18.01.2013 - 07:54
![]() Saar escreveu:
Saar escreveu:
Aan het begin van het patroon als ik een naald heb gemaakt, begin ik met de kabel maar er ontstaat na de eerste naald een gat in het breiwerk.
17.01.2013 - 18:32DROPS Design respondeu:
Er ontstaat een gat in de kabel zelf? Dan moet je het kabeltje een beetje strakker breien. Zie evt de instructievideo hoe u het kan breien.
18.01.2013 - 13:37
![]() Sofie escreveu:
Sofie escreveu:
Je n'arrive pas à faire la torsade :( Pourtant je sais les tricoter mais je crois que je ne comprends pas bien les explications. Faut-il d'abord tricoter 5 mailles endroit et ensuite en passer 5 sur aiguilles auxiliaire ??? Merci par avance !
27.11.2012 - 21:05DROPS Design respondeu:
Bonjour Sofie, dans les diagrammes 1 case= 1mx1 rang. Au rang 5 de M.2, vous tricotez : 5 m end, puis la torsade : glissez 5 m sur l'aiguille auxiliaire devant l'ouvrage, tricotez 5 m end, reprenez les 5 m en attente et tricotez les à l'end. Au rang 11, vous commencez par la torsade : glissez 5 m sur l'aiguille auxiliaire derrière l'ouvrage, tricotez 5 m end, reprenez les 5 m en attente et tricotez les à l'end, terminez par 5 m end. Bon tricot !
28.11.2012 - 09:27
![]() Ulla escreveu:
Ulla escreveu:
Meget flot og smart
22.10.2012 - 10:59
![]() Steffi escreveu:
Steffi escreveu:
Was für eine Randmasche muss ich denn stricken? vielen dank!
21.06.2012 - 18:03DROPS Design respondeu:
Am besten sticken Sie die Randmasche immer rechts.
25.06.2012 - 22:11Anastasia escreveu:
I wanna knit this lovely scarf , but can't understand how to read the diagram: from what side and what corner? Thanks!
08.06.2012 - 13:55DROPS Design respondeu:
Dear Anastasia, the diagrams are read begninng in the lower right-hand corner and work towards the left (1st row = RS). On return row, work from the left to the right. Happy Knitting !
06.12.2012 - 11:20
![]() Wallry escreveu:
Wallry escreveu:
Il est indique sur les explications qu'il faut 300g de laine pour le tour du cou.
02.02.2012 - 12:19
![]() Drops Design France escreveu:
Drops Design France escreveu:
Bonjour Lange et merci. Cliquez en haut sur "détaillants" puis choisissez votre pays pour accéder à la liste des détaillants. La quantité nécessaire est toujours indiquée au poids, cliquez sur "voir le nuancier" pour voir les couleurs et en savoir plus sur la laine, en l’occurrence, Polaris se présente sous forme de pelote de 100 g. Bon tricot !
03.01.2012 - 09:18
|
||||||||||||||||
Braidy#braidyset |
||||||||||||||||
 |
 |
|||||||||||||||
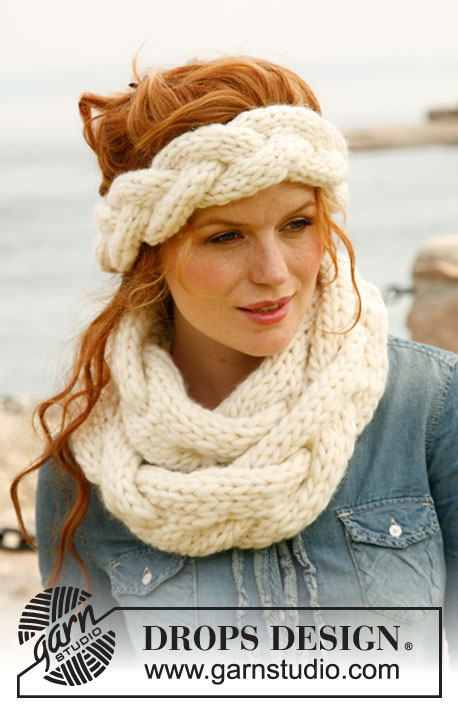
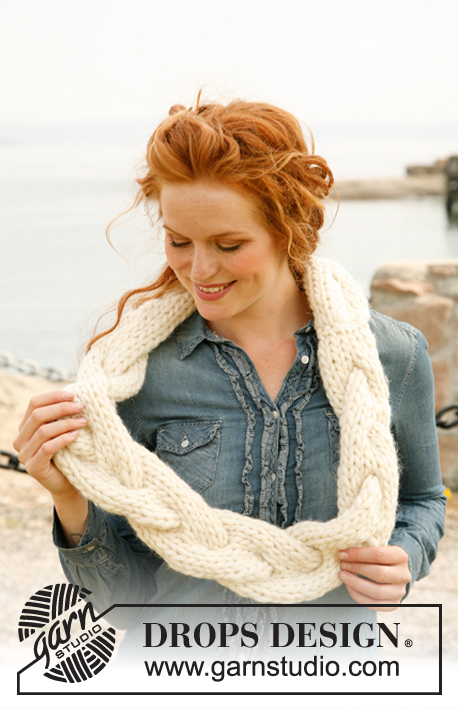
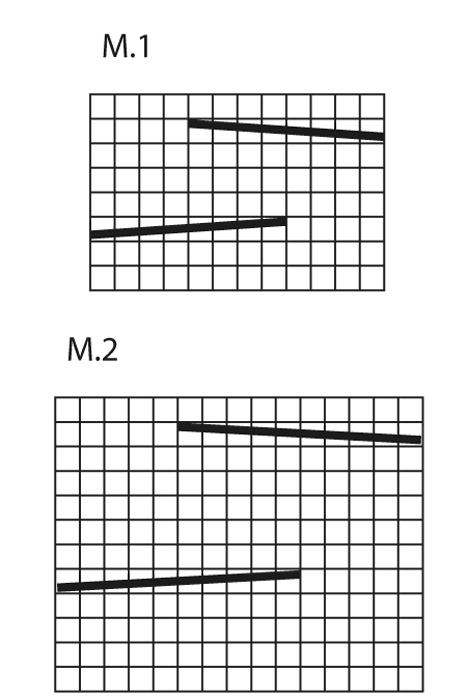
Fita de cabelo e gola DROPS com trança larga, em ”Polaris”.
DROPS 134-7 |
||||||||||||||||
|
-------------------------------------------------------- NOTA: Existem termos diferentes de tricô e croché em português de Portugal e do Brasil. TRICÔ : Malha = Ponto Canelado = Barra Ponto Jarreteira = Cordões de Tricô Ponto Liga = Ponto Tricô CROCHÉ : mpa – meio ponto alto pa – ponto alto pad – ponto alto duplo pat – ponto alto triplo pb – ponto baixo pbx – ponto baixíssimo pc – ponto corrente -------------------------------------------------------- PONTO FANTASIA : Ver o diagrama M.1 para a fita de cabelo e o diagrama M.2 para a gola. Os diagramas mostram o ponto fantasia pelo direito da peça. DICA MUDANÇA DE NOVELO : Para mudar de novelo com o fio Polaris, dividir o fio do fim do novelo em 2 nos 15 últimos cm – cortar uma das 2 partes e fazer o mesmo no princípio do novo novelo. Colocar os 15 primeiros e os 15 últimos cm em cima uns dos outros, para que o fio tenha a espessura normal e continuar a tricotar – esta dica permite obter uma mudança de fios (novelos) invisível. -------------------------------------------------------- -------------------------------------------------------- FITA DE CABELO : Tricota-se em idas e voltas numa longa faixa unida, no fim, em redondo. Montar 12 ms/pts com as agulhas 12 mm e o fio Polaris. Tricotar o diagrama M.1 até a peça medir cerca de 50 cm – ajustar a altura para depois de 1 repetição completa do ponto fantasia. Tricotar 1 carreira em ponto meia antes de arrematar frouxamente. Unir a carreira de montagem às ms/pts arrematadas, orla com orla, para evitar que a costura seja demasiado grossa. -------------------------------------------------------- GOLA : Tricota-se em idas e voltas numa longa faixa unida, no fim, em redondo. Montar 15 ms/pts com as agulhas 15 mm e o fio Polaris. Tricotar o diagrama M.2 até a peça medir cerca de 120 cm – ajustar a altura para depois de 1 repetição completa do ponto fantasia. Tricotar 4 carreiras em ponto meia antes de arrematar frouxamente. Unir a carreira de montagem às ms/pts arrematadas, orla com orla, para evitar que a costura seja demasiado grossa. Dobrar a gola em duas (como a forma de um « 8 ») para a usar. |
||||||||||||||||
Explicações do diagrama |
||||||||||||||||
|
||||||||||||||||
 |
||||||||||||||||
Terminou este projecto?Então, identifique as suas fotos com as tags #dropspattern #braidyset ou mostre-as na galeria #dropsfan. Precisa de ajuda para este modelo?Encontrará 5 turotiais em vídeo, uma rubrica Comentários/Perguntas e muito mais ao visitar a página do modelo em www.garnstudio.com © 1982-2026 DROPS Design A/S. Todos os direitos reservados. Este documento, incluuindo as suas su-secções, tem copyrights. Saia mais o que pode fazer com os nossos modelos no fim de cada uma das páginas do nosso site. |
||||||||||||||||


Com mais de 40 anos no design de modelos de tricô e de croché, a DROPS Design oferece uma das mais vastas colecções demodelos gratuitos na Internet - traduzidos em 17 línguas. Neste dia de hoje, temos 324 catálogos e 12290 modelos - dos quais 12271 estão traduzidos em português.
Trabalhamos com muito empenho para lhe proporcionar o melhor que o tricô e o croché têm para oferecer, para lhe fornecer inspiração e conselhos bem como fios da mais elevada qualidade a preços incríveis! Gostaria de usar os nossos modelos para outros fins que não uso pessoal? Pode ler o que lhe é permitido fazer no Copyright texto que se encontra na parte de baixo de todos os nossos modelos. Bom tricô! Bom croché!
Deixe um comentário acerca do modelo DROPS 134-7
Gostaríamos muito de saber o que tem a dizer-nos acerca deste modelo!
Se deixar uma pergunta acerca do modelo, certifique-se de que escolhe a categoria adequada no formulário abaixo para acelerar o processo relativo à resposta. Os campos obrigatórios estão assinalados com um *.