
Categorias populares
Procura um fio?


Comentários / Perguntas (59)
![]() Camilla escreveu:
Camilla escreveu:
Jeg er ved at lave pandebåndet. I diagrammet står der man skal strikke ret over ret og vrang over vrang. Når jeg har slået de 12 masker op er 1. pind på vrang-siden, den næste pind på ret-siden. Dvs. snoninger bliver lavet fra vrang siden? Hvorfor skal jeg så strikke ret på hjælpepinden og de resterende masker?
02.11.2014 - 23:31DROPS Design respondeu:
Hej Camilla. 1. pind er retsiden. Snoningerne laves paa retsiden.
06.11.2014 - 13:42
![]() Carla escreveu:
Carla escreveu:
Il modello è bellissimo, ma devo mettere il doppio dei punti. Come costruire lo schema? Devo farlo speculare? Grazie per la risposta
07.09.2014 - 10:29DROPS Design respondeu:
Deve mettere il doppio dei punti perché utilizza un filato più sottile? Nel caso in cui dovesse fare così potrebbe lavorare la treccia più larga (con più maglie ogni fascia della treccia) per esempio. Se deve fare la fascia deve fare prima un campione per capire quanto rende con il filato che utilizzerà.
11.09.2014 - 16:31
![]() Klára S escreveu:
Klára S escreveu:
Dobrý den, v českém návodu neodpovídá popis vzorku originálu. Hezký den Klára S
01.02.2014 - 20:23DROPS Design respondeu:
Dobrý den, děkuji za upozornění - opraveno!
08.02.2014 - 01:06
![]() Isabel escreveu:
Isabel escreveu:
Hallo, Maakt het nog uit wat voor maat kabelnaald ik gebruik voor de hoofdband? Bedankt
26.10.2013 - 14:06DROPS Design respondeu:
Hoi Isabel. De kabelnld moet niet te dun zijn. Heb je niet een hele dikke kabelnld, dan kan je eventueel een sokkenbreinld gebruiken.
28.10.2013 - 19:13
![]() Jan escreveu:
Jan escreveu:
Got it - thank you - sorry to be so dense :)
30.01.2013 - 00:43
![]() Jan escreveu:
Jan escreveu:
Yes, I have checked your video which is great for a cable stitch in the middle of a row, not as the first stitch in the row. The difference is that the skein side of the wrapping yarn is on the cable needle not the right hand needle so i am not sure if that yarn should go behind the cable needle or infront of the cable needle prior to knitting the next/6th stitch.
29.01.2013 - 18:49DROPS Design respondeu:
In front, because stitches you have to knit next are in front of slipped sts.
29.01.2013 - 21:49
![]() Jan escreveu:
Jan escreveu:
Another source of my confustion -the wrap over yarn is on the cable needle since it is the first 5 stiches being slipped, when a cable is worked in the middle of a piece, the wrap over yarn is on the right hand knitting needle. Thank you again.
29.01.2013 - 13:41DROPS Design respondeu:
Have you checked out our Video tutorials for cable knitting?
29.01.2013 - 14:58
![]() Jan escreveu:
Jan escreveu:
Thank you for your response and clarification. One more question - does the wrapping yarn for the 11th row go behind the cable needle and slipped stiches or in front? Thank you
29.01.2013 - 13:35DROPS Design respondeu:
The yarn should not run over stitches in front and should not be visible. When you slip first 5 sts to cable needle behind piece, keep yarn front to knit next st from left needle.
29.01.2013 - 14:48
![]() Jan escreveu:
Jan escreveu:
I am making the neckwarmer and have a question regarding the 11th row. If I read the pattern correctly, this row starts with the 5 stitches slipped off to the cable needle. I find this awkward since the first stitch has the wrapping yarn (for lack of a better term). Am I reading the pattern correctly? I hope I am explaining myself properly.
28.01.2013 - 23:43DROPS Design respondeu:
Dear Jan, you are correct, on row 11 the first 5 sts are slipped on cable needle behind piece for the cable. Happy knitting!
29.01.2013 - 09:02
![]() Isabel Hicks escreveu:
Isabel Hicks escreveu:
Would be grateful for some help! Am doing this lovely headband but- cast on 12 stitches K1 then cabled 4 back knitted 4 . Three stitches left - please tell me how do I get the braiding as no stitches left to do the other half of the chart - where am I going wrong?.. Many thanks
20.01.2013 - 00:32DROPS Design respondeu:
Dear Mrs Hicks, diagram is read from bottom right towards the left (RS) and left towards right side (WS), and M1 =12 sts, row 3 is : K4, cable on the next 8 sts. R7 : cable on the first 8 sts, K4. Happy knitting!
21.01.2013 - 18:21
|
||||||||||||||||
Braidy#braidyset |
||||||||||||||||
 |
 |
|||||||||||||||
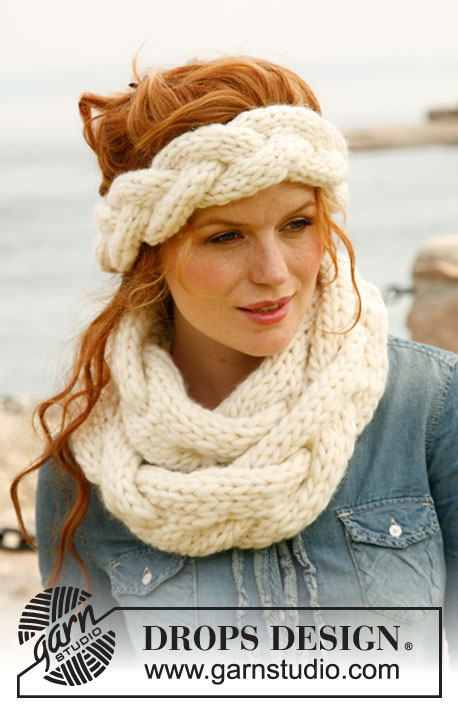
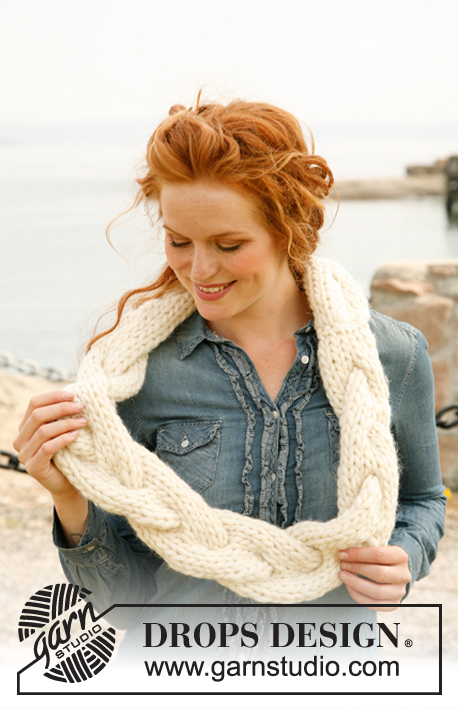
Fita de cabelo e gola DROPS com trança larga, em ”Polaris”.
DROPS 134-7 |
||||||||||||||||
|
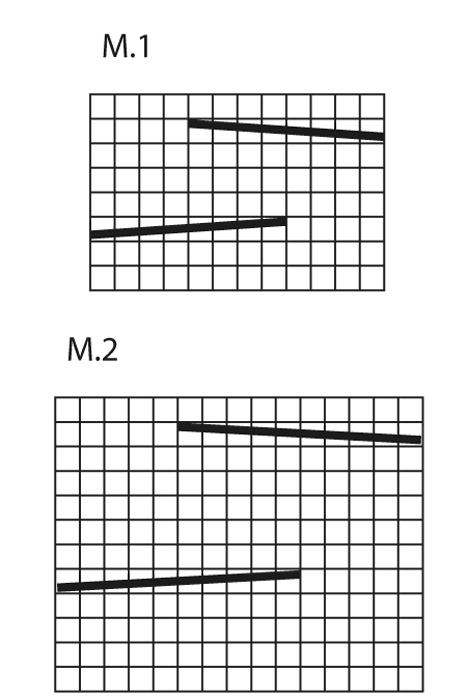
-------------------------------------------------------- NOTA: Existem termos diferentes de tricô e croché em português de Portugal e do Brasil. TRICÔ : Malha = Ponto Canelado = Barra Ponto Jarreteira = Cordões de Tricô Ponto Liga = Ponto Tricô CROCHÉ : mpa – meio ponto alto pa – ponto alto pad – ponto alto duplo pat – ponto alto triplo pb – ponto baixo pbx – ponto baixíssimo pc – ponto corrente -------------------------------------------------------- PONTO FANTASIA : Ver o diagrama M.1 para a fita de cabelo e o diagrama M.2 para a gola. Os diagramas mostram o ponto fantasia pelo direito da peça. DICA MUDANÇA DE NOVELO : Para mudar de novelo com o fio Polaris, dividir o fio do fim do novelo em 2 nos 15 últimos cm – cortar uma das 2 partes e fazer o mesmo no princípio do novo novelo. Colocar os 15 primeiros e os 15 últimos cm em cima uns dos outros, para que o fio tenha a espessura normal e continuar a tricotar – esta dica permite obter uma mudança de fios (novelos) invisível. -------------------------------------------------------- -------------------------------------------------------- FITA DE CABELO : Tricota-se em idas e voltas numa longa faixa unida, no fim, em redondo. Montar 12 ms/pts com as agulhas 12 mm e o fio Polaris. Tricotar o diagrama M.1 até a peça medir cerca de 50 cm – ajustar a altura para depois de 1 repetição completa do ponto fantasia. Tricotar 1 carreira em ponto meia antes de arrematar frouxamente. Unir a carreira de montagem às ms/pts arrematadas, orla com orla, para evitar que a costura seja demasiado grossa. -------------------------------------------------------- GOLA : Tricota-se em idas e voltas numa longa faixa unida, no fim, em redondo. Montar 15 ms/pts com as agulhas 15 mm e o fio Polaris. Tricotar o diagrama M.2 até a peça medir cerca de 120 cm – ajustar a altura para depois de 1 repetição completa do ponto fantasia. Tricotar 4 carreiras em ponto meia antes de arrematar frouxamente. Unir a carreira de montagem às ms/pts arrematadas, orla com orla, para evitar que a costura seja demasiado grossa. Dobrar a gola em duas (como a forma de um « 8 ») para a usar. |
||||||||||||||||
Explicações do diagrama |
||||||||||||||||
|
||||||||||||||||
 |
||||||||||||||||
Terminou este projecto?Então, identifique as suas fotos com as tags #dropspattern #braidyset ou mostre-as na galeria #dropsfan. Precisa de ajuda para este modelo?Encontrará 5 turotiais em vídeo, uma rubrica Comentários/Perguntas e muito mais ao visitar a página do modelo em www.garnstudio.com © 1982-2026 DROPS Design A/S. Todos os direitos reservados. Este documento, incluuindo as suas su-secções, tem copyrights. Saia mais o que pode fazer com os nossos modelos no fim de cada uma das páginas do nosso site. |
||||||||||||||||


Com mais de 40 anos no design de modelos de tricô e de croché, a DROPS Design oferece uma das mais vastas colecções demodelos gratuitos na Internet - traduzidos em 17 línguas. Neste dia de hoje, temos 324 catálogos e 12290 modelos - dos quais 12271 estão traduzidos em português.
Trabalhamos com muito empenho para lhe proporcionar o melhor que o tricô e o croché têm para oferecer, para lhe fornecer inspiração e conselhos bem como fios da mais elevada qualidade a preços incríveis! Gostaria de usar os nossos modelos para outros fins que não uso pessoal? Pode ler o que lhe é permitido fazer no Copyright texto que se encontra na parte de baixo de todos os nossos modelos. Bom tricô! Bom croché!
Deixe um comentário acerca do modelo DROPS 134-7
Gostaríamos muito de saber o que tem a dizer-nos acerca deste modelo!
Se deixar uma pergunta acerca do modelo, certifique-se de que escolhe a categoria adequada no formulário abaixo para acelerar o processo relativo à resposta. Os campos obrigatórios estão assinalados com um *.