
Categorias populares
Procura um fio?


Comentários / Perguntas (131)
![]() Yvonne escreveu:
Yvonne escreveu:
Ik vind het patroon echt erg moeilijk. Bijvoorbeeld hoeveel keer M1, M2 enz. enz. Ik heb het werk nu al drie keer uitgetrokken terwijl ik in 1 kleur brei. Als ik naar de instructievideo kijk wordt ik niet veel wijzer. Heeft u dit patroon niet in Jip en Janneke taal? Ik hoop dat u kunt helpen.
03.11.2017 - 21:30DROPS Design respondeu:
Hallo Yvonne, We hebben het patroon zo geschreven, zodat het voor iedereen begrijpelijk zou moeten zijn. Je kunt altijd hier terrecht voor vragen, maar je kunt ook bij je verkooppunt vragen om hulp, zodat iemand met je mee kan kijken. Na het opzetten brei je een aantal herhalingen (hoeveel is afhankijlijk van je maat) in de breedte van A.1 en A.1 brei je één keer in de hoogte. De getallen waar streepjes tussen staan corresponderen met de maten, dus als er bijv. staat 168-180-192-216-240-264 steken op de naald is dat 168 voor S, 180 voor M en zo verder.
04.11.2017 - 13:41Sandra Martins escreveu:
Hello again! I realised that on my phone the box with description of the diagram often doesn't have the symbols in it, that's why it all looked the same. I got to the bit on size S-L, and now it says to work M6 over the next 8 repetitions, but M6 is an increase and if increased once, you cannot repeat it. can you help? Many thanks, Sandra
09.04.2017 - 19:29DROPS Design respondeu:
Dear Mrs Martins, in size L, you will work M.5 over the first 4 repeats (= as before), but now work M.6 over the next 8 repeats (= you will inc over the next 8 repeats), work M.5 over the 4 next repeats as before. When you have worked M.6 1 time in height, work M.3 over M.6 but work M.5 as before over the repeats of M.5. Happy knitting!
12.04.2017 - 11:41
![]() Sandra Martins escreveu:
Sandra Martins escreveu:
Hi, I'm looking forward to do this project but cannot work out why knit and purl are both represented in the diagram the same way (white box), nor can I understand how the pattern is worked out. Many thanks for your help, Sandra
06.03.2017 - 23:55DROPS Design respondeu:
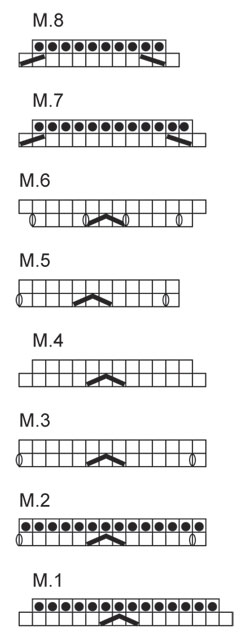
Dear Mrs Martins, the white box in diagram will be worked K from RS and the dot will be worked P, so that in M1 for example you work 1 round K (with dec on 1st round), 1 round P and in M.3, you will work 2 rounds (with dec/inc on 1st row). Happy knitting!
07.03.2017 - 09:06
![]() Lucie escreveu:
Lucie escreveu:
Dobrý den, vzor M1 má kolik řad ? aby byla sekvence dokončená ? a chápu dobře, že se ve vzoru M1 plete hladce 7ok a poté se dle schéma splétá ? děkuji za radu.
19.06.2016 - 22:28DROPS Design respondeu:
Dobrý den, Lucie, vzor M.1 je tvořen 2 řadami (lícovou a rubovou). V lícové řadě upleteme 7 ok hladce, pak 3 oka spleteme - přetažením, tj. 1 oko sejmeme hladce, 2 oka spleteme hladce a to sejmuté přes ně přetáhneme - pak upleteme 6 ok hladce a začneme zase od začátku. V následující řadě (rubové) upleteme všechna oka obrace. Tím je dokončena celá sekvence vzoru M.1. Hodně zdaru! Hana
20.06.2016 - 07:04
![]() Øygunn escreveu:
Øygunn escreveu:
Ang. høyre stolpe :etter at jeg har strikket 3 rette og snudd: skal jeg strikke helt frem til der jeg strikket tre rette eller blir det 6 masker til sammen der jeg skal øke?
16.09.2015 - 10:04DROPS Design respondeu:
Hej Øygunn, Du vender og strikker helt fram til før de 3 m midt bak, legg deretter opp 6 nye m på slutten av p midt bak til høyre stolpe. Det er altså nye m du legger op (så det overlapper den anden side. God fornøjelse!
16.09.2015 - 15:06
![]() Andrea Jacobsen escreveu:
Andrea Jacobsen escreveu:
Når jeg afprøver strikkefastheden følgetr jeg diagrammet, så jeg kan lave sik-sakmønster. Men jeg øger maskeantallet ved at følge mønstret, og dermed ikke i stand til at måle mon strikkefasthed, hvad gør jeg forkert ? mvh Andrea
05.09.2015 - 18:32DROPS Design respondeu:
Hej Andrea. Pröv at strikke din pröve efter M.2, M.3 eller M.5, der aendres antallet af masker ikke.
08.09.2015 - 15:47
![]() Dianne escreveu:
Dianne escreveu:
What does the guage directions mean? - "US 6 - or size needed to get 24 sts with zigzag pattern=width 4" ; I'm used to the pattern giving me the amount of stitches horizontally and vertically to make a 4" swatch. Please help! Thanks, Diannw
05.07.2015 - 01:05DROPS Design respondeu:
Dear Dianne, in zigzag pattern tension should be 24 sts = 4" in width with larger needle, height can be adjusted with the measurements, but you should get a tension of 22 sts x 46 rows in garter sts = 4"x4" with smaller needdle. Happy knitting!
06.07.2015 - 10:03
![]() Ann escreveu:
Ann escreveu:
Hi You helped a lot with the rows ie M1 M2 etc, it would be so good if the pattern had said that, but now I want to ask about the colour changes. Can you simplify that for me. The stripes in ridges and stripes in stocking stitch is confusing me. Do you mean follow the ridge colours on the decreasing rows (which form the ridge) and the colours in stocking stich when you are not decreasing? Thanks.
31.05.2015 - 19:54DROPS Design respondeu:
Dear Ann, 1 ridge = 2 rounds in garter st (= K 1 round, P 1 round), M2 is worked in garter st ie you will work M2 in garter st a total of 22 rounds - 11 ridges), then continue working the other diagrams following the stripes in stocking st. Happy knitting!
01.06.2015 - 10:42
![]() Ann escreveu:
Ann escreveu:
I love the pattern but its so complicated. You do M1 for row 1 then do you do M2 for 1 row then M3 for 1 row then repeat these 3 rows over and over, or do you do M1 in 1 colour then M2 in next colour then M3 in next and so on. I've knitted lots of things but never seen a pattern which gives lots of different things to do but no clear instructions. Very very disappointed after I bought all the materials then found the pattern so baffling. Can anyone help?
28.05.2015 - 19:49DROPS Design respondeu:
Dear Ann, you first work the 2 rows in M.1, then the 2 rows in M2 while working the stripes in garter st, then repeat the 2 rows in M3 with the stripes in stocking st until piece measures 18 cm, then work the 2 rows in M4 and repeat the 2 rows in M5 until piece measures 23 cm while continuing stripes in st st in M4 and M5. Then continue as stated in pattern. Happy knitting!
29.05.2015 - 09:32
![]() Lise escreveu:
Lise escreveu:
Har nå endelig knekt koden på denne toppen etter mang en gang å ha rekt opp, men hadde bestemt meg på at denne skulle jeg klare. Synes det er vanskelig å lese og forstå denne oppskriften men strikker nå min andre topp av dette mønsteret men lager den litt lengre enn oppskriften sier.
23.05.2015 - 13:42
|
|||||||||||||||||||
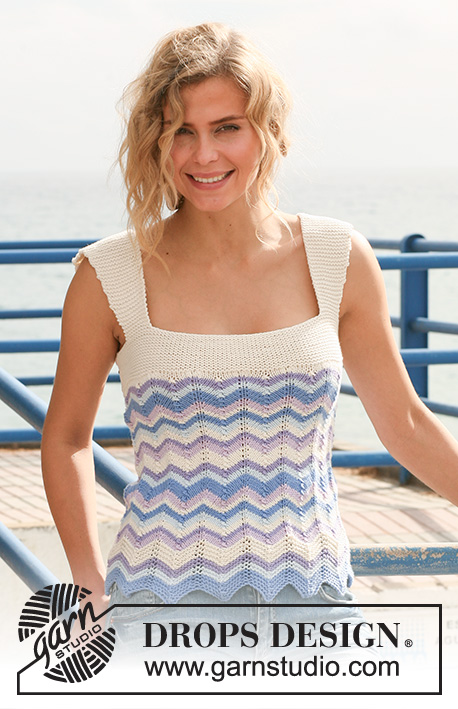
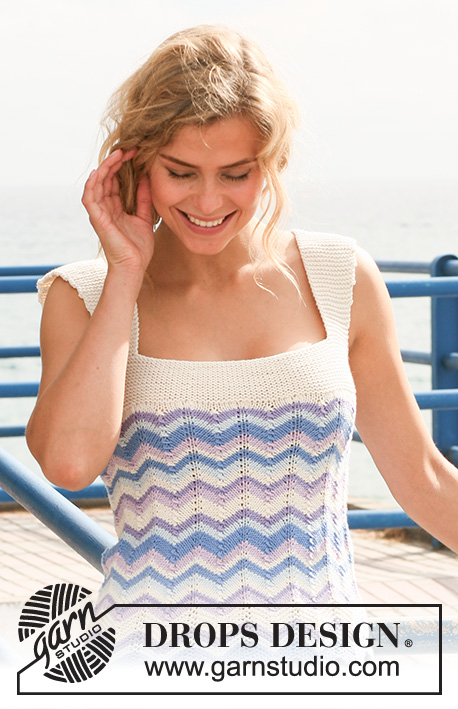
Breaking Waves Top#breakingwavestop |
|||||||||||||||||||
 |
 |
||||||||||||||||||
Top DROPS em ponto de ziguezague e riscas, em ”Muskat”. Do S ao XXXL.
DROPS 128-3 |
|||||||||||||||||||
|
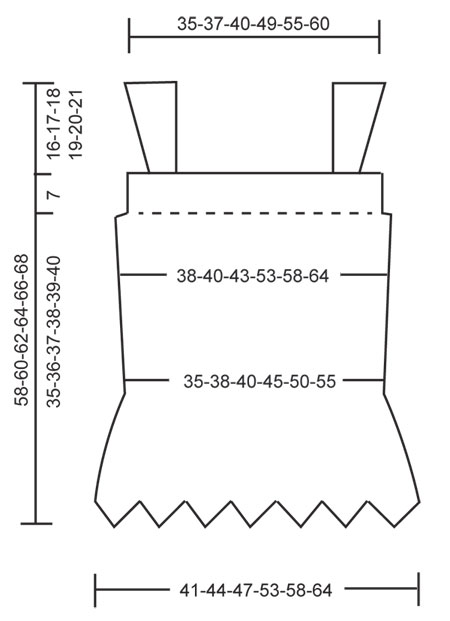
NOTA: Existem termos diferentes de tricô e croché em português de Portugal e do Brasil. TRICÔ : Malha = Ponto Canelado = Barra Ponto Jarreteira = Cordões de Tricô Ponto Liga = Ponto Tricô CROCHÉ : mpa – meio ponto alto pa – ponto alto pad – ponto alto duplo pat – ponto alto triplo pb – ponto baixo pbx – ponto baixíssimo pc – ponto corrente -------------------------------------------------------- PONTO JARRETEIRA (em redondo na agulha circular) : * 1 carreira meia, 1 carreira liga/tricô *, repetir de * a *. PONTO JARRETEIRA (em idas e voltas) : Tricotar todas as carreiras em meia. PONTO FANTASIA : Ver diagramas M.1 - M.8. RISCAS EM PONTO JARRETEIRA: (1 repetiÇÃO de M.2 em altura = 1 "barra" (2 carreiras em ponto jarreteira) 3 barras em azul claro 2 barras em azul glaciar 2 barras en azul lilás claro 4 barras em natural RISCAS EM PONTO MEIA: 3 carreiras em lilás 2 carreiras em azul lilás claro 3 carreiras em natural 3 carreiras em azul glaciar 3 carreiras em azul claro 2 carreiras em natural 3 carreiras em lilás 5 carreiras em azul claro 3 carreiras em azul glaciar 3 carreiras em azul lilás claro 5 carreiras em natural Repetir as sequências das riscas até indicação em contrário. CASAS : Fazer as casas na orla de abotoamento da direita. 1 casa = tricotar juntamente em meia a 2.ª e a 3.ª m/p a partir do rebordo, pelo direito, 1 laçada. -------------------------------------------------------- TOP : Tricota-se em redondo na agulha circular. Montar 224-240-256-288-320-352 ms/pts com a agulha circular 4 mm e o fio azul claro. Tricotar M.1 em todas as ms/pts - ver PONTO FANTASIA (= 14-15-16-18-20-22 vez M.1). Quando M.1 tiver sido tricotado 1 vez em altura, temos 196-210-224-252-280-308 ms/pts. NÃO ESQUECER DE MANTER A MESMA TENSÃO DA INDICADA PARA A AMOSTRA ! Continuar seguindo M.2 acima de M.1 AO MESMO TEMPO, tricotar as RISCAS em PONTO JARRETEIRA - ver acima ! Continuar em M.3 em todas as ms/pts. AO MESMO TEMPO, tricotar as RISCAS EM PONTO MEIA - ver acima ! A 18 cm de altura total, (parar depois de um motivo inteiro de M.3 em altura), tricotar M.4 acima de M.3. Quando M.4 tiver sido tricotado 1 vez em altura, temos 168-180-192-216-240-264 ms/pts. Continuar com M.5 acima de M.4. A 23 cm de altura total, tricotar da seguinte maneira nos tamanhos diferentes (princípio da carreira = meio das costas) : TAMANHOS S-L : Continuar em M.5 nos 4-4-4 primeiros motivos como antes, tricotar M.6 acima dos 6-7-8 motivos seguintes, continuar M.5 acima dos 4-4-4 motivos restantes como antes (= 2 carreiras) = 180-194-208 ms/pts. Tricotar M.3 acima de M.6, tricotar os outros motivos de M.5 como antes (= 2 carreiras). Continuar, depois, repetindo as 2 últimas carreiras do ponto fantasia. TAMANHOS XL-XXXL : Tricotar M.6 acima de M.5. Quando M.6 tiver sido tricotado 1 vez em altura (= 2 carreiras), temos 252-280-308 ms/pts na agulha. Tricotar, depois, M.3 acima de M.6 (= 2 carreiras). Continuar, depois, a repetir as 2 últimas carreiras do ponto fantasia. TODOS OS TAMANHOS : A 35-36-37-38-39-40 cm de altura total, terminar a última risca e o ponto ziguezague (depois de um motivo inteiro em altura). Continuar com a agulha circular 2.5 mm e a cor natural. Tricotar, então, da seguinte maneira a partir do princípio da carreira (= meio das costas) : M.7 acima de todos os motivos M.3, e M.8 acima de todos os motivos M.5 = 152-164-176-216-240-264 ms/pts. Tricotar, depois, a seguinte carreira : 3 ms/pts meia, virar, e tricotar 1 carreira meia pelo avesso até 3 ms/pts a meio das costas e, depois, montar 6 ms/pts no fim da carreira, a meio das costas para a orla de abotoamento = 158-170-182-222-246-270 ms/pts. Continuar em PONTO JARRETEIRA em idas e voltas em todas as ms/pts - ver acima ! A 2 cm de altura do ponto jarreteira, fazer a 1.ª CASA - ver acima ! Fazer uma outra casa a 5 cm de altura do ponto jarreteira. A 7 cm de altura do ponto jarreteira (o top mede, agora, 42-43-44-45-46-47 cm de altura total), tricotar a seguinte carreira pelo direito : arrematar as 24-25-26-27-28-29 primeiras ms/pts. Tricotar, depois, uma metade da alça em idas e voltas, acima das ms/pts seguintes, da seguinte maneira : 12-13-14-15-16-17 ms/pts meia, virar e tricotar a carreira seguinte acima das 12-13-14-15-16-17 ms/pts, continuar em meia, em idas e voltas, nessas ms/pts e. AO MESMO TEMPO, depois de 4 carreiras em ponto jarreteira em altura, aumentar 1 m/p tricotando 2 vezes em meia a última m/p pelo direito. Repetir estes aumentos, a cada 8 carreiras, num total de 9-9-9-10-10-10 vezes = 21-22-23-25-26-27 ms/pts. Arrematar em meia quando a alça medir 16-17-18-19-20-21 cm. Arrematar as 10-12-14-30-38-46 ms/pts (1.ª CAVA) seguintes do top. Tricotar a metade da alça acima das 12-13-14-15-16-17 ms/pts seguintes e, AO MESMO TEMPO, aumentar, tricotando 2 vezes em meia a última m/p pelo avesso. Arrematar quando a alça medir 16-17-18-19-20-21 cm. Arrematar as 42-44-46-48-50-52 ms/pts seguintes do meio da frente do top. Tricotar uma metade da alça nas 12-13-14-15-16-17 ms/pts seguintes (aumentar no lado, tricotando 2 vezes em meia a última m/p pelo direito). Arrematar, quando a alça medir 16-17-18-19-20-21 cm. Arrematar as seguintes 10-12-14-30-38-46 ms/pts (2.ª cava) do top. Tricotar uma metade da alça acima das 12-13-14-15-16-17 ms/pts seguintes (aumentar no lado tricotando 2 vezes a última m/p pelo avesso). Arrematar quando a alça medir 16-17-18-19-20-21 cm. Arrematar as restantes 24-25-26-27-28-29 ms/pts. A peça mede, agora, cerca de 58-60-62-64-66-68 cm. MONTAGEM : Fazer a costura dos ombros (alças). Costurar com alguns pontos o rebordo de montagem da orla de abotoamento em frente da parte de baixo da orla da esquerda. Pregar os botões na orla da frente esquerda. |
|||||||||||||||||||
Explicações do diagrama |
|||||||||||||||||||
|
|||||||||||||||||||
 |
|||||||||||||||||||
 |
|||||||||||||||||||
Terminou este projecto?Então, identifique as suas fotos com as tags #dropspattern #breakingwavestop ou mostre-as na galeria #dropsfan. Precisa de ajuda para este modelo?Encontrará 19 turotiais em vídeo, uma rubrica Comentários/Perguntas e muito mais ao visitar a página do modelo em www.garnstudio.com © 1982-2026 DROPS Design A/S. Todos os direitos reservados. Este documento, incluuindo as suas su-secções, tem copyrights. Saia mais o que pode fazer com os nossos modelos no fim de cada uma das páginas do nosso site. |
|||||||||||||||||||


Com mais de 40 anos no design de modelos de tricô e de croché, a DROPS Design oferece uma das mais vastas colecções demodelos gratuitos na Internet - traduzidos em 17 línguas. Neste dia de hoje, temos 324 catálogos e 12290 modelos - dos quais 12271 estão traduzidos em português.
Trabalhamos com muito empenho para lhe proporcionar o melhor que o tricô e o croché têm para oferecer, para lhe fornecer inspiração e conselhos bem como fios da mais elevada qualidade a preços incríveis! Gostaria de usar os nossos modelos para outros fins que não uso pessoal? Pode ler o que lhe é permitido fazer no Copyright texto que se encontra na parte de baixo de todos os nossos modelos. Bom tricô! Bom croché!
Deixe um comentário acerca do modelo DROPS 128-3
Gostaríamos muito de saber o que tem a dizer-nos acerca deste modelo!
Se deixar uma pergunta acerca do modelo, certifique-se de que escolhe a categoria adequada no formulário abaixo para acelerar o processo relativo à resposta. Os campos obrigatórios estão assinalados com um *.