
Categorias populares
Procura um fio?


Comentários / Perguntas (37)
![]() Labiche Odette escreveu:
Labiche Odette escreveu:
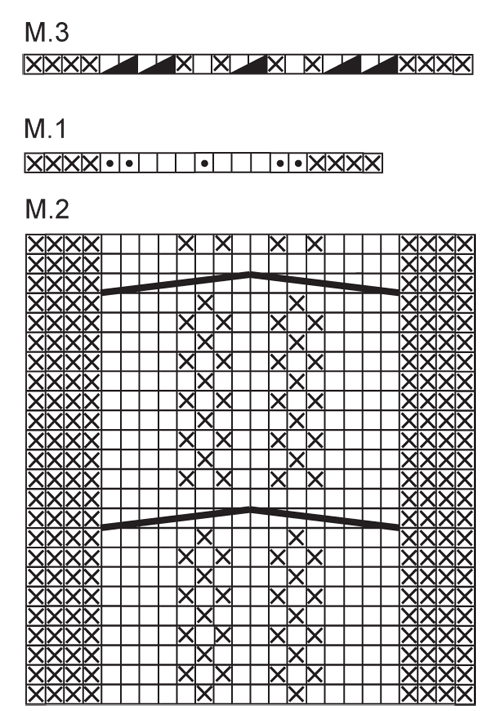
Bonjour, pourriez vous me dire si le diagramme n°2 je fais un rang endroit et un rang envers donc le total est de 22 rangs ? Pour la torsade je la fais avant le diagramme n°3 ou après ? En attendant votre réponse je vous souhaite une bonne journée.
17.09.2025 - 17:02DROPS Design respondeu:
Bonjour Mme Labiche, vous tricotez dle diagramme M.2 en commençant sur l'envers (car M.1 se tricote sur l'endroit et ainsi les torsades de M.2 sont sur l'endroit) et vous répétez la totalité des rangs de M.2: sur l'endroit lisez de droite à gauche et sur l'envers, de gauche à droite; quand le diagramme est terminé en hauteur, reprenez-le au 1er rang. Quand vous aurez atteint la hauteur souhaitée, tricotez M.3. Bon tricot!
18.09.2025 - 18:12
![]() Diane Songer escreveu:
Diane Songer escreveu:
I don’t understand why with this headband, you only cast on 27 sets. Isn’t that too little?
19.11.2024 - 22:24DROPS Design respondeu:
Dear Mrs Songer, if your tension is right you should get the correct finished measurements - note that you will increase on the first row in M.1 to compensate the number of stitches required for the cable. Happy knitting!
20.11.2024 - 08:13
![]() Gladys Freer escreveu:
Gladys Freer escreveu:
What is the yardage needed to make this head band? Thank you.
14.11.2022 - 21:39DROPS Design respondeu:
Hi Gladys, The Drops yarn has approx. 82 yards per ball and you need 2 balls. Happy knitting!
15.11.2022 - 07:00
![]() Nicole Rivard escreveu:
Nicole Rivard escreveu:
Comment fait-on pour ajuster au 11 e ou 23e rang du M2? Et le M3, est-ce qu\'il se tricote quand on a finit au complet le diagramme M2? Merci
02.11.2021 - 16:53
![]() Marie escreveu:
Marie escreveu:
Danke für die schnelle Antwort !
09.10.2019 - 13:50
![]() Marie escreveu:
Marie escreveu:
Muß die 1. Reihe von M2 eine Rückreihe nach der Reihe M1 sein?
09.10.2019 - 10:48DROPS Design respondeu:
Liebe Marie, ja genau, M.1 wird eine Hin-Reihe, so daß M.2 beginnt mit einer Rückreihe, so daß die Zöpfe bei Hinreihen gestrickt werden. Viel Spaß beim stricken!
09.10.2019 - 11:17
![]() Luisa escreveu:
Luisa escreveu:
Sorry one question how do I work the wrong side or it is on the diagrams for both sides wrong and right sides thanks much
25.08.2019 - 13:04DROPS Design respondeu:
Dear Luisa, this pattern is worked flat, back and forth on needles. The diagram shows both right and wrong rows: start to read it from bottom right corner to left for right side rows and from left to right for wrong side rows. Happy knitting!
25.08.2019 - 15:32
![]() Tammy escreveu:
Tammy escreveu:
This ear warmer looks soooo cute. Is there a written pattern or only the chart? I’ve tried to do charts but I just haven’t been able to do them successfully.
18.11.2018 - 22:53DROPS Design respondeu:
Dear Tammy, there are only diagrams to this pattern - 1 square in diagram = 1 row - both RS and WS rows are shown in diagram. Start M.1 from the right side reading from the right towards the left (= you increase 5 sts) then work M.2 starting on the bottom corner on the left sdie from WS towards the right - and work RS rows from the right towards the left. See diagram key to know how to work each stitch. Happy knitting!
19.11.2018 - 09:19
![]() Patty escreveu:
Patty escreveu:
I actually figured it out how to get 30 stitches. Please clarify which direction to read the different rows on the chart. Thanks much!
18.09.2018 - 19:14DROPS Design respondeu:
Dear Patty, M.1 is worked from RS = from the right towards the left. M.2 is worked beginning from WS = start on the bottom corner on the left side and read WS rows from the left towards the right and the RS rows from the right towards the left. M.3 will be then worked from RS = from the right towards the left. Happy knitting!
19.09.2018 - 09:28
![]() Patty escreveu:
Patty escreveu:
I have read over this several times. After M1, I am not sure how you get 30 stitches?? the 3 garter stitches, M1 (19 stitches) and 3 garter stitches = 19 + 6 = 25. So after M1 I end up with 25 stitches. Please clarify. It seems like many people have had the same question. Thank you
18.09.2018 - 19:02DROPS Design respondeu:
Hi Patty. It is correct that M.1 is worked across 19 stitches, but in 5 of those stitches you'll work 2 stitches in one = 5 stitches increased. So after M.1 is worked once, you'll have 30 stitches on the needle: 3 garter + 24 M.1 (including 5 increased) + 3 garter. Happy knitting.
01.10.2018 - 15:47
|
|||||||||||||||||||
Hot Line#hotlineheadband |
|||||||||||||||||||
|
|
|||||||||||||||||||
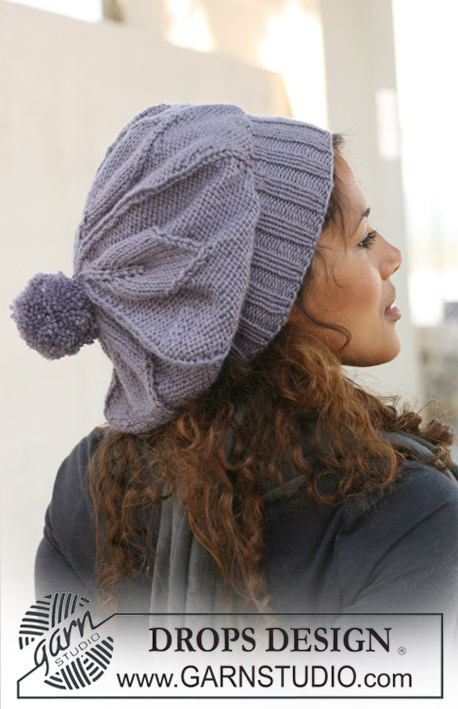
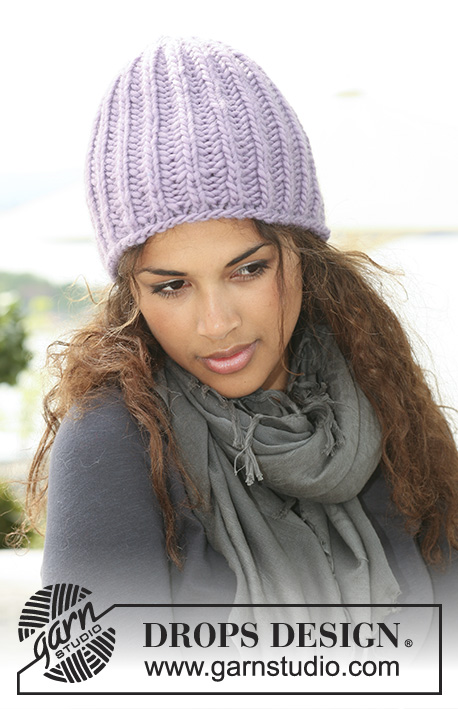
Fita cabelo DROPS em ponto de tranças em "Nepal". DROPS design : Modelo n° NE-012
DROPS 126-24 |
|||||||||||||||||||
|
NOTA: Existem termos diferentes de tricô e croché em português de Portugal e do Brasil. TRICÔ : Malha = Ponto Canelado = Barra Ponto Jarreteira = Cordões de Tricô Ponto Liga = Ponto Tricô CROCHÉ : mpa – meio ponto alto pa – ponto alto pad – ponto alto duplo pat – ponto alto triplo pb – ponto baixo pbx – ponto baixíssimo pc – ponto corrente --------------------------------------------------- PONTO JARRETEIRA (em idas e voltas) : Tricotar todas as carreiras em meia PONTO FANTASIA : Ver diagramas M.1, M.2 e M.3. Os diagramas mostram o ponto fantasia pelo direito. -------------------------------------------------------- FITA DE CABELO : Tricota-se em idas e voltas. Montar 25 ms/pts com as agulhas 4.5 mm e o fio Nepal e tricotar 2 carreiras em PONTO JARRETEIRA – ver acima. Tricotar, depois, a seguinte carreira pelo direito : 3 ms/pts ponto jarreteira, M.1 (= 19 ms/pts), 3 ms/pts ponto jarreteira. Depois de M.1, temos 30 ms/pts na agulha. Tricotar, então, M.2 com 3 ms/pts em ponto jarreteira de cada lado até cerca de 52 a 57 cm de altura total – ajustar a altura para depois da carreira 11 ou 23 de M.2. Tricotar então M.3 com 3 ms/pts em ponto jarreteira de cada lado = 25 ms/pts na agulha. Depois de M.3, tricotar 2 carreiras em ponto jarreteira e arrematar. Unir a fita de cabelo a meio da parte de trás, com as 2 carreiras em ponto jarreteira uma contra a outra |
|||||||||||||||||||
Explicações do diagrama |
|||||||||||||||||||
|
|||||||||||||||||||
 |
|||||||||||||||||||
Terminou este projecto?Então, identifique as suas fotos com as tags #dropspattern #hotlineheadband ou mostre-as na galeria #dropsfan. Precisa de ajuda para este modelo?Encontrará 11 turotiais em vídeo, uma rubrica Comentários/Perguntas e muito mais ao visitar a página do modelo em www.garnstudio.com © 1982-2026 DROPS Design A/S. Todos os direitos reservados. Este documento, incluuindo as suas su-secções, tem copyrights. Saia mais o que pode fazer com os nossos modelos no fim de cada uma das páginas do nosso site. |
|||||||||||||||||||


Com mais de 40 anos no design de modelos de tricô e de croché, a DROPS Design oferece uma das mais vastas colecções demodelos gratuitos na Internet - traduzidos em 17 línguas. Neste dia de hoje, temos 324 catálogos e 12290 modelos - dos quais 12271 estão traduzidos em português.
Trabalhamos com muito empenho para lhe proporcionar o melhor que o tricô e o croché têm para oferecer, para lhe fornecer inspiração e conselhos bem como fios da mais elevada qualidade a preços incríveis! Gostaria de usar os nossos modelos para outros fins que não uso pessoal? Pode ler o que lhe é permitido fazer no Copyright texto que se encontra na parte de baixo de todos os nossos modelos. Bom tricô! Bom croché!
Deixe um comentário acerca do modelo DROPS 126-24
Gostaríamos muito de saber o que tem a dizer-nos acerca deste modelo!
Se deixar uma pergunta acerca do modelo, certifique-se de que escolhe a categoria adequada no formulário abaixo para acelerar o processo relativo à resposta. Os campos obrigatórios estão assinalados com um *.