
Categorias populares
Procura um fio?


Comentários / Perguntas (89)
![]() Sybille escreveu:
Sybille escreveu:
Bei dem Stück, wo immer 10 Maschen mehr gestrickt werden, damit die Hose hinten höher wird als vorn, sind Löcher entstanden. Sie sind dort, wo jeweils gewendet wurde. Was habe ich hier denn falsch gemacht?
29.05.2022 - 16:29DROPS Design respondeu:
Liebe Sybille, wenn Sie die nächste Runde über alle Maschen stricken, dann können Sie den Faden zwischen 2 verkürzten Reihen auffassen, und diesen Faden verschränkt mit der nächsten Masche stricken - wie bei diesem Video (Timecode 4:00 z.B.) gezeigt wird. Viel Spaß beim stricken!
30.05.2022 - 08:08
![]() Sybille escreveu:
Sybille escreveu:
Wie verhält sich die Wolle/das Material nach dem Waschen? Ist die Hose dann noch genauso in Form?
21.04.2022 - 12:04DROPS Design respondeu:
Liebe Sybille, ja sicher, folgen Sie einfach die Pfelgehinweise - beachten Sie nur, daß Alpaca nicht Superwash (wie Fabel) ist, dh die Hose soll dann gewaschen werden, wie unter Alpaca beschrieben wird. Viel Spaß beim stricken!
21.04.2022 - 13:29
![]() Katrine escreveu:
Katrine escreveu:
Hei! Er det slik at de to garnene i ullbuksrmønsteret skal strikkes samtidig på pinne nr 4?
10.02.2022 - 22:04
![]() Ingunn Kjørholt Wolline escreveu:
Ingunn Kjørholt Wolline escreveu:
See previous post, answer was not helpful. I have tried binding of according to the pattern, but the finish looks sloppy with 2/3 of the leg being stockinette stitch which will naturally roll up. Would have been nice to see in the pictures how it is supposed to look. Any suggestions, other than rib finish?
03.02.2022 - 22:52DROPS Design respondeu:
Dear Mrs Kjørholt Wolline, sorry that the previous answer didn't help, the tights on the pictures have been worked/cast off as explained, ie with stitches in stocking stitch and rib as worked before. Make sure to avoid casting off too loosely to avoid a wavy edge and not too tight neither. You can then block bottom of tights/legs if necessary. Some knitters have worked ribbing edge at the bottom of leg, you can see their projects on Ravelry - if it can help. Happy knitting!
04.02.2022 - 09:00
![]() Ingunn Kjørholt Wolline escreveu:
Ingunn Kjørholt Wolline escreveu:
I am about to cast off first leg and it says to bind off in pattern, but I worry about it being too roomy at the ankles. I could of course finish in rib, but that is not the look I'm going for. The pictures are no help since the model are wearing boots, so what type of fit is this?
01.02.2022 - 18:33DROPS Design respondeu:
Dear Mrs Kjørholt Wolline, the tights on the picture ends at the bottom of leg with pattern as before, ie stocking stitch with the rib on the outer side of leg. Feel free to add some cm ribbing edge at the very bottom if you feel it necessary. Happy knitting!
02.02.2022 - 07:42
![]() Darren Paterson escreveu:
Darren Paterson escreveu:
Thank you for the previous answers. I have another question (sorry!): I seem to be doing something wrong in the transition from the initial ribbing to the stockinette + rib where the ribbing doesn't line up. I'm doing size S, and I'm starting the 19 stockinette stitches at the cast on stitch (1 before the MT). Am I starting this in the wrong place? Also: when knitting to make it longer in the back, do I knit in pattern the whole time? I.e., stockinette + sections of K2, P5?
26.01.2022 - 00:10DROPS Design respondeu:
Dear Mrs Paterson, start with the stitch with the marker: P3, K2, P5, K2, P5, K2 = 19 sts worked in stocking stitch, 33 sts in rib as before (= (P5, K2)*4 (= 28 sts) + P5, then work 37 sts in stocking st (= previously (K2,P5)x5 (= 35 sts) + K2), then work the next 33 sts in rib as before (= (P5, K2)*4 (= 28 sts) and work stocking stitch to the end of the round. Happy knitting!
26.01.2022 - 09:03
![]() Arabella escreveu:
Arabella escreveu:
Hi! I have made the tights following your pattern and they turned out great. However, as my waist is considerably smaller than my hips, they are not staying put. Any tips on how to put an inconspicuous elastic so they don't gap/fall down. Thank you!
23.01.2022 - 01:40DROPS Design respondeu:
Dear Arabella, You could try to turn the top 2 cm down sew it and add the elastic there, but if you want to keel the waistline, try sewing the elastic to the line between the ribbed and the knit part at the waist. Also, you might try to thread elastic thread into the top few rows of ribbing. Happy Stitching!
24.01.2022 - 00:46
![]() Darren Paterson escreveu:
Darren Paterson escreveu:
Another question: the first row calls for P3, *K2, P5*, repeat from *, finish with P2, but that leaves me with 2 extra stitches at the end. Is it actually P3, *K2, P5*, repeat from *, finish with K2, P2?
21.01.2022 - 19:59DROPS Design respondeu:
Correct, see also below. Happy knitting!
24.01.2022 - 08:20
![]() Darren Paterson escreveu:
Darren Paterson escreveu:
I'm really excited about trying this pattern, but I just don't understand how to get started with the placement of the marking threads. I'm doing size Small. Do I P3 before placing the first MT? Or do I place a MT and then Purl? And do I do 70 or 71 stitches before placing another MT? (Does the MT go between stitches 70 & 71, or after stitch 71?) And does "finish with P2" mean that on the last repeat of *K2, P5* I'm actually doing K2, P7? I'm hopelessly confused by that first row... :(
21.01.2022 - 19:45DROPS Design respondeu:
Dear Mrs Paterson, set the first marker in the first stitch of the round (the first of the P3), and insert the 2nd marker in the 71st stitch of the round. You work in rib starting with P3, then repeat (K2, P5) until 4 sts remain, work K2 and end with P5 (you will then have P5 all the round). Happy knitting!
24.01.2022 - 08:20
![]() Maria escreveu:
Maria escreveu:
Not really find your comment useful (see below). I want to make these specific leggings but would need some advise as per below. Many thanks.
11.01.2022 - 11:51DROPS Design respondeu:
Dear Maria, you can use both Nepal or Big Merino - calculate new amount of yarn here - Using Big Merino (Superwash yarn), you don't need to go one size down, but make sure in both cases that tension will match (and read extra tips for washing superwash yarn linked below). Happy knitting!
12.01.2022 - 09:12
|
|
Rhoda |
|
 |
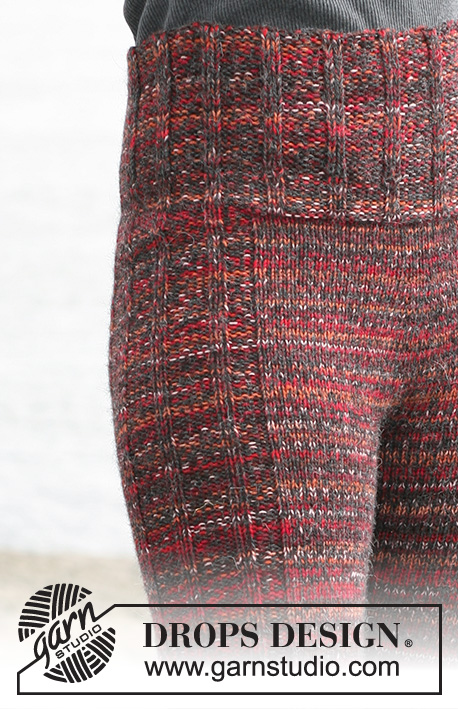 |
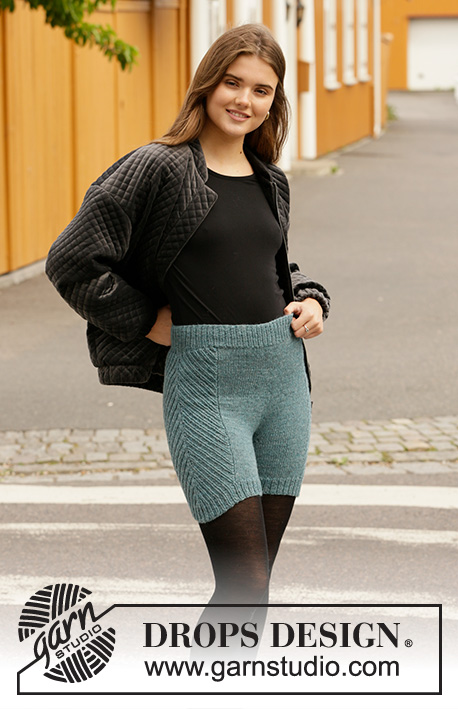
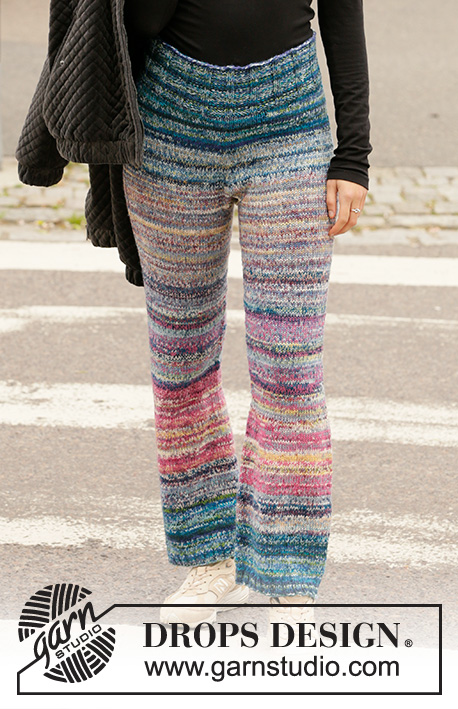
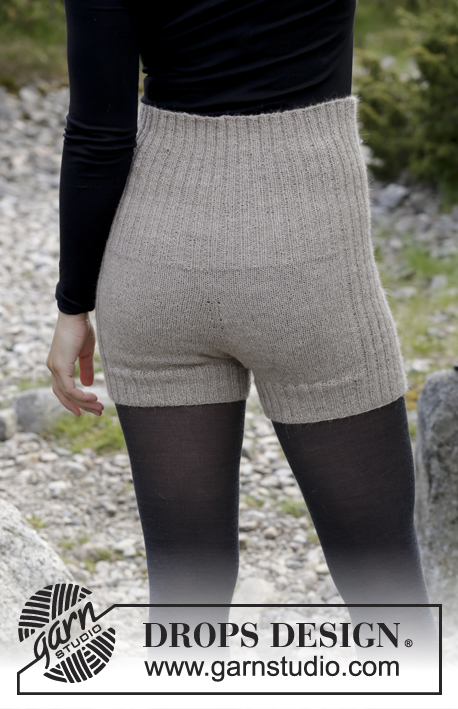
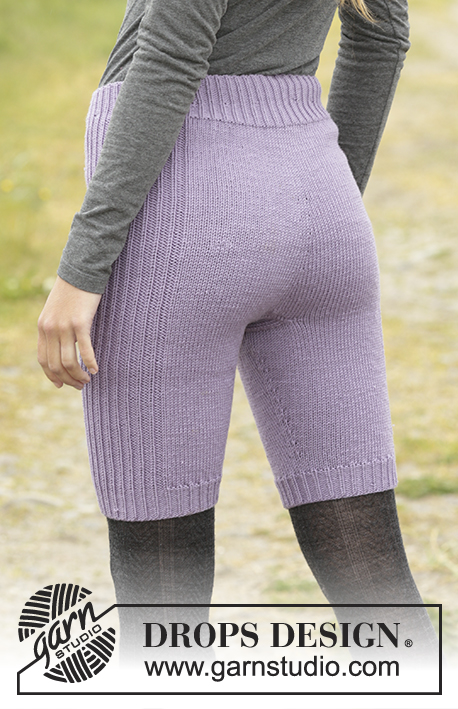
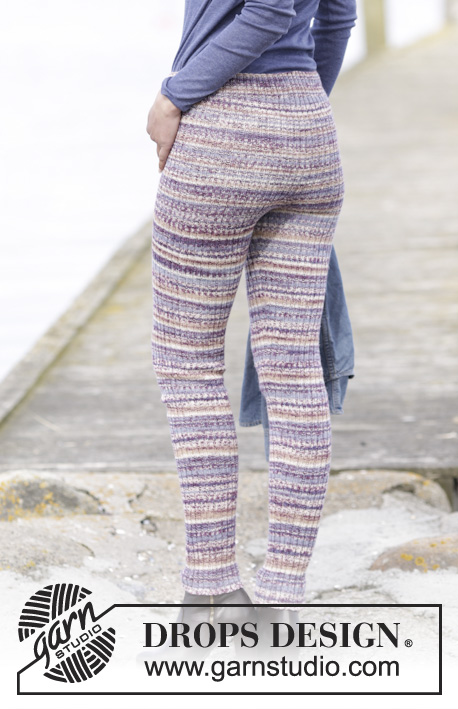
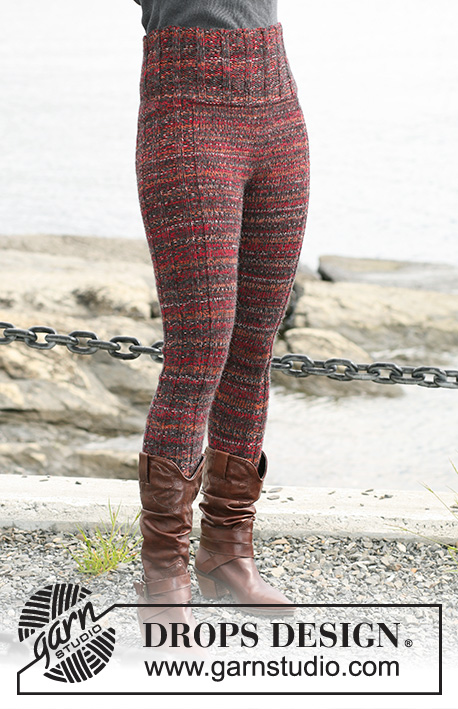
Collants sem pés DROPS em « Fabel » e « Alpaca »
DROPS 103-23 |
|
|
---------------------------------------------------------- NOTA: Existem termos diferentes de tricô e croché em português de Portugal e do Brasil. TRICÔ : Malha = Ponto Canelado = Barra Ponto Jarreteira = Cordões de Tricô Ponto Liga = Ponto Tricô CROCHÉ : mpa – meio ponto alto pa – ponto alto pad – ponto alto duplo pat – ponto alto triplo pb – ponto baixo pbx – ponto baixíssimo pc – ponto corrente ---------------------------------------------------------- AMOSTRA : 19 ms/pts x 25 carreiras = 10 x 10 cm com 1 fio de cada qualidade em ponto meia DIMINUIÇÕES para as pernas : Diminuir de cada lado do marcador Antes do marcador : 2 ms/pts tricotadas juntamente em meia Depois do marcador : deslizar 1 m/p em meia, 1 m/p meia, passar a m/p deslizada por cima da m/p tricotada AUMENTOS : Tamanhos S, L e XXL : aumentar de cada lado das 3 ms/pts meia do meio da frente e do meio das costas Números M e XL : aumentar de cada lado das 2 ms/pts meia do meio da frente e do meio das costas Aumentar da seguinte maneira : levantar 1 m/p da carreira precedente e tricotá-la em meia COLLANTS : Tricotam-se em redondo na agulha circular de cima para baixo. Com 1 fio de cada qualidade e a agulha circular 4 mm montar 140-154-168-182-196 ms/pts. Tricotar 10 cm em canelado/barra da seguinte maneira : Tamanhos S, L e XXL : 3 ms/pts liga/tricô, colocar um marcador na 1.ª m/p = meio das costas, *2 ms/pts meia, 5 ms/pts liga/tricô * repetir de * a * e terminar com 2 ms/pts liga/tricô – colocar um marcador na 71-85-99.ª m/p da carreira (a meio das 5 ms/pts liga/tricô) = meio da frente Tamanhos M e XL : colocar um marcador no princípio da carreira (= marca o meio das costas), 1 m/p meia, *5 ms/pts liga/tricô, 2 ms/pts meia * repetir de * a * e terminar com 5 ms/pts liga/tricô, 1 m/p meia – colocar um marcador depois de 77-91 ms/pts (a meio de 2 ms/pts meia) = marca o meio da frente. Continuar da seguinte maneira : 19-22-26-29-33 ms/pts em ponto meia, 33 ms/pts em canelado/barra como antes, 37-44-51-58-65 ms/pts em ponto meia, 33 ms/pts em canelado/barra como antes, e 18-22-25-29-32 ms/pts em ponto meia. A 11 cm de altura total, tricotar as costas dos collants de maneira a que seja mais comprido do que a frente. Proceder da seguinte maneira : Tricotar 10 ms/pts depois do marcador das costas, virar, deslizar a 1.ª m/p (para evitar um buraco) e tricotar 10 ms/pts depois do outro lado do marcador, virar, * deslizar a 1.ª m/p depois do marcador e tricotar 10 ms/pts a mais do que na carreira precedente * repetir de * a * até restarem 20-14-28-22-16 ms/pts a partir do meio da frente. Virar uma última vez para começar, então, pelo direito. Continuar a tricotar em todas as ms/pts. A 13-14-14-15-15 cm de altura total a partir do meio da frente (ou seja, a cerca de 18-20-20-21-22 cm do meio das costas) aumentar na frente e nas costas – ver aumentos acima : aumentar 2 ms/pts na frente e nas costas 7 vezes a cada 5-5-6-6-7 carreiras = 168-182-196-210-224 ms/pts. A 27-29-31-33-35 cm de altura do meio da frente, arrematar as 6-6-7-7-8 primeiras ms/pts, colocar em espera num fio ou num alfinete de ms/pts as 73-79-85-91-97 ms/pts seguintes (= 1 perna), deixar as 11-12-13-14-15 ms/pts seguintes na agulha (reforço), colocar em espera as 73-79-85-91-97 ms/pts seguintes num fio ou num alfinete de ms/pts (= 1 perna) e arrematar as 5-6-6-7-7 restantes ms/pts. Tricotar então 9-10-11-12-13 cm em ponto meia nas 11-12-13-14-15 ms/pts do reforço. Arrematar e costurar o reforço às 11-12-13-14-15 ms/pts do meio das costas. PERNAS : Colocar 73-79-85-91-97 ms/pts de um dos alfinetes de ms/pts ou fios na agulha circular (40 cm) e, além disso, levantar 18-20-20-22-24 ms/pts ao longo de um dos lados do reforço = 91-99-105-113-121 ms/pts. Continuar em canelado/barra nas 33 ms/pts dos lados e em ponto meia nas restantes 58-66-72-80-88 ms/pts. Colocar um marcador no lado interior da perna (nas ms/pts levantadas ao longo do reforço). A 8 cm de altura de perna, diminuir 1 m/p de cada lado do marcador - ver diminuições acima : 17-20-22-25-28 vezes a cada 4-3,5-3-2,5-2,5 cm = 57-59-61-63-65 ms/pts – Mudar para as agulhas de pontas duplas quando restarem poucas ms/pts para serem tricotadas na agulha circular. Continuar até cerca de 78-79-80-81-82 cm de altura das pernas – experimentar para verificar o comprimento. Arrematar as ms/pts como elas se apresentam. Retomar as ms/pts em espera da outra perna, colocá-las na agulha circular 4 mm e tricotar a outra perna. |
|
Terminou este projecto?Então, identifique as suas fotos com as tags #dropspattern ou mostre-as na galeria #dropsfan. Precisa de ajuda para este modelo?Encontrará 17 turotiais em vídeo, uma rubrica Comentários/Perguntas e muito mais ao visitar a página do modelo em www.garnstudio.com © 1982-2026 DROPS Design A/S. Todos os direitos reservados. Este documento, incluuindo as suas su-secções, tem copyrights. Saia mais o que pode fazer com os nossos modelos no fim de cada uma das páginas do nosso site. |
|


Com mais de 40 anos no design de modelos de tricô e de croché, a DROPS Design oferece uma das mais vastas colecções demodelos gratuitos na Internet - traduzidos em 17 línguas. Neste dia de hoje, temos 324 catálogos e 12290 modelos - dos quais 12271 estão traduzidos em português.
Trabalhamos com muito empenho para lhe proporcionar o melhor que o tricô e o croché têm para oferecer, para lhe fornecer inspiração e conselhos bem como fios da mais elevada qualidade a preços incríveis! Gostaria de usar os nossos modelos para outros fins que não uso pessoal? Pode ler o que lhe é permitido fazer no Copyright texto que se encontra na parte de baixo de todos os nossos modelos. Bom tricô! Bom croché!
Deixe um comentário acerca do modelo DROPS 103-23
Gostaríamos muito de saber o que tem a dizer-nos acerca deste modelo!
Se deixar uma pergunta acerca do modelo, certifique-se de que escolhe a categoria adequada no formulário abaixo para acelerar o processo relativo à resposta. Os campos obrigatórios estão assinalados com um *.