
Categorias populares
Procura um fio?


Comentários / Perguntas (9)
![]() Greet escreveu:
Greet escreveu:
Ik zou niet in het rond breien. Dus alles met 2 naalden. Hoe brei ik dan de even naalden?
11.03.2026 - 09:49DROPS Design respondeu:
Dag Greet,
Naald 1 en alle andere oneven naalden in het telpatroon brei je aan de goede kant, alle even naalden in het telpatroon brei je aan de verkeerde kant. De steken die je recht aan de goede kant breit brei je averecht aan de verkeerde kant en de steken die je averecht aan de goede kant breit brei je recht aan de verkeerde kant. Je breit de omslag en afgehaalde steek averecht samen (in plaats van recht).
11.03.2026 - 19:38
![]() Anuka escreveu:
Anuka escreveu:
Hi, thanks so much for answering my question! I am doing exactly as suggested [from WS then work (P1, K2, Purl together YO + slipped stitch (so that they look as K tog as before), K2, P5, K2, Purl together YO + slipped stitch, K2, P1] but still where I P5 it looks flatter - when knitting in the round and instead doing K5 the stitches look more horizontal, now they are more like V's. Maybe I need to somehow twist them?
19.05.2022 - 16:54DROPS Design respondeu:
Dear Anuka, it might be a matter of difference in the tension, when working in the round or flat - show your work to your store (send them a picture per mail for ex.) or show it in a forum such as our DROPS Workshop, it might be easier for other knitters to help you seing your work. Hope it can help. Happy knitting!
20.05.2022 - 07:57
![]() Anuka escreveu:
Anuka escreveu:
Hi, I'm making this at the moment and have reached the point where I switch from in the round to flat. So from the right side I'm following the chart (odd number rows) and on the wrong side I am purling instead of knitting, and so forth. However, my middle section is looking a little flatter than when I did it in the round. [Slip 1 st as if to knit, K1, psso, yo, knit1, yo, K2 tog] - this looks wrong. What should I do differently? I'm purling this on the WS.
19.05.2022 - 15:21DROPS Design respondeu:
Dear Anuka, make sure that the odd rows will be worked from RS - from WS then work (P1, K2, Purl together YO + slipped stitch (so that they look as K tog as before), K2, P5, K2, Purl together YO + slipped stitch, K2, P1). Happy knitting!
19.05.2022 - 16:38
![]() Lies escreveu:
Lies escreveu:
Hallo......vraagje...als ik rondbrei snap ik dat je het patroon moet volgen.....als je bij het gedeelte komt dat je het voor en achterkant apart verder moet breien dan brei je dus niet in de rondte maar heen en weer.....hoe brei je dan de teruggaande naalden....want daar is dan geen teltekening voor.....gr lies
30.06.2020 - 13:00DROPS Design respondeu:
Dag Lies,
Bij de teruggaande naalden brei je dan averecht waar je recht op de goede kant breit, en recht waar je averecht op de goede kant breit. Zorg ervoor dat je steeds de even naalden van het patroon aan de verkeerde kant breit.
30.06.2020 - 15:56
![]() Anne Loveday escreveu:
Anne Loveday escreveu:
Can you explain the decrease for armhole on front/back? is this worked in the round? only 8 stitches are involved and these seem to end up all being on one armhole (right or left). Thank you
07.08.2017 - 19:14DROPS Design respondeu:
Dear Mrs Loveday, you are casting off for armhole at the beginning of each row in each side 2 sts 1-2 times and 1 st 1 time, so that you will cast off 3-5 sts on each side = 6-10 sts in total. Happy knitting!
08.08.2017 - 08:42
![]() Carmella escreveu:
Carmella escreveu:
Bedankt voor de snelle reactie. Super!
13.01.2017 - 11:31
![]() Carmella escreveu:
Carmella escreveu:
Is het mogelijk om de telpatroon en het patroon toe te voegen ze staan er niet op.
11.01.2017 - 19:00DROPS Design respondeu:
Hoi Carmella. Probeer opnieuw nu, het telpatroon is aangepast.
12.01.2017 - 14:49
![]() T.Melchior escreveu:
T.Melchior escreveu:
De teltekening wordt bij dit patroon niet aangegeven. Staat alleen een klein vierkantje
30.01.2015 - 17:32
![]() Heidrun Bitsch escreveu:
Heidrun Bitsch escreveu:
Wie werden die abnahmen bei Modell 46 -19 gegen das armloch die 4 Maschen beidseitig abgenommen?bitte dringend um Antwort lg
01.10.2014 - 14:40DROPS Design respondeu:
Liebe Heidrun, die Anleitung ist etwas älteren Datums und wird gleich noch mal sprachlich überarbeitet, dann wird es hoffentlich klar, wie es gemeint ist. Sie können dann natürlich gerne noch mal fragen, falls noch etwas unklar geblieben ist.
01.10.2014 - 17:04
|
||||||||||||||||||||||
Pink Profusion |
||||||||||||||||||||||
|
|
||||||||||||||||||||||
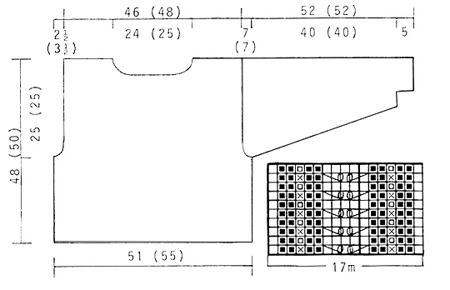
Pulôver DROPS em Muskat, em ponto texturado. Do S ao L.
DROPS 46-19 |
||||||||||||||||||||||
|
Explicações Amostra: 20 malhas x 26 carreiras = 10 x 10 cm em ponto meia com as agulhas 4 mm. Usar agulhas mais grossas ou mais finas se necessário para obter a amostra. Ponto fantasia: Ver diagrama abaixo. O diagrama mostra o motivo pelo direito. Ponto jarreteira (em redondo): 1 carreira meia, 1 carreira liga Costas e frente: Tricota-se em redondo na agulha circular. Com o fio rosa e a agulha circular 4 mm montar 204-221 malhas. Tricotar no ponto fantasia. MANTER A MESMA TENSÃO DA INDICADA PARA A AMOSTRA! A 23-25 cm de altura total, arrematar 4 malhas de cada lado da peça para as cavas ou seja 98-106 malhas para a frente e 98-107 malhas para as costas. - centrar 2 malhas meia a meio da frente. Terminar cada parte separadamente. Frente: = 98-106 malhas. Arrematar para as cavas de cada lado da peça a cada 2 carreiras: 1-2 vezes 2 malhas e 1 vez 1 malha = 92-96 malhas. A 42-44 cm de altura total, arrematar para o decote as 26-28 malhas centrais depois no lado do decote a cada 2 carreiras: 1 vez 4 malhas, 1 vez 3 malhas, 1 vez 2 malhas e 2 vezes 1 malha. A 48-50 cm de altura total, arrematar todas as malhas. Costas: = 98-107 malhas. Formar as cavas como se fez para as costas = 92-97 malhas. A 46-48 cm de altura total, arrematar para o decote as 44-47 malhas centrais depois 2 malhas no lado do decote na carreira seguinte. A 48-50 cm de altura total, arrematar todas as malhas. Mangas: Com o fio rosa e as agulhas de pontas duplas 4 mm montar 43 malhas para os 2 tamanhos. Tricotar no ponto fantasia (centrar um motivo na manga). AO MESMO TEMPO, a 5 cm de altura total, aumentar 2 malhas sob a manga 29 vezes a cada 3 carreiras = 101 malhas. A 45 cm de altura total, arrematar 4 malhas sob a manga e continuar em idas e voltas arrematando de cada lado da peça a cada 2 carreiras 8 vezes 4 malhas. Arrematar as restantes malhas. A manga mede cerca de 52 cm de altura total. Montagem: Costurar os ombros. Com o fio rosa e as agulhas de pontas duplas 3 mm levantar à volta do decote cerca de 100-106 malhas e tricotar 2 carreiras em ponto jarreteira, arrematar. Costurar as mangas. |
||||||||||||||||||||||
Explicações do diagrama |
||||||||||||||||||||||
|
||||||||||||||||||||||
 |
||||||||||||||||||||||
Terminou este projecto?Então, identifique as suas fotos com as tags #dropspattern ou mostre-as na galeria #dropsfan. Precisa de ajuda para este modelo?Encontrará 20 turotiais em vídeo, uma rubrica Comentários/Perguntas e muito mais ao visitar a página do modelo em www.garnstudio.com © 1982-2026 DROPS Design A/S. Todos os direitos reservados. Este documento, incluuindo as suas su-secções, tem copyrights. Saia mais o que pode fazer com os nossos modelos no fim de cada uma das páginas do nosso site. |
||||||||||||||||||||||


Com mais de 40 anos no design de modelos de tricô e de croché, a DROPS Design oferece uma das mais vastas colecções demodelos gratuitos na Internet - traduzidos em 17 línguas. Neste dia de hoje, temos 324 catálogos e 12290 modelos - dos quais 12271 estão traduzidos em português.
Trabalhamos com muito empenho para lhe proporcionar o melhor que o tricô e o croché têm para oferecer, para lhe fornecer inspiração e conselhos bem como fios da mais elevada qualidade a preços incríveis! Gostaria de usar os nossos modelos para outros fins que não uso pessoal? Pode ler o que lhe é permitido fazer no Copyright texto que se encontra na parte de baixo de todos os nossos modelos. Bom tricô! Bom croché!
Deixe um comentário acerca do modelo DROPS 46-19
Gostaríamos muito de saber o que tem a dizer-nos acerca deste modelo!
Se deixar uma pergunta acerca do modelo, certifique-se de que escolhe a categoria adequada no formulário abaixo para acelerar o processo relativo à resposta. Os campos obrigatórios estão assinalados com um *.