
Categorias populares
Procura um fio?


Comentários / Perguntas (49)
![]() Fina escreveu:
Fina escreveu:
Por un problema en mis manos no puedo tejer con aguja circular como se podría convertir este patrón para dos agujas? Gracias
13.01.2026 - 10:38DROPS Design respondeu:
Hola Fina, puedes leer esta lección para transformar este patrón. Pero el raglán tendría que trabajarse en circular, mientras que el delantero y la espalda se pueden trabajar con agujas rectas. El raglán solo podría trabajarse con agujas rectas si trabajas de abajo arriba la labor, con una abertura en una de las líneas de raglán en la espalda, pero el número de puntos para trabajar en el raglán sería muy elevado para las agujas rectas.
23.02.2026 - 01:27
![]() Cate escreveu:
Cate escreveu:
Hello. I love this pattern. I'm at the bottom bavk (ribbing) and don't understand something on row 1. It says "... on the wrong side... work 1 garter stitch, stocking stitch..." Is a wrong side garter stitch a purl and the stocking stitch a knit?? Or the other way around?
13.12.2025 - 02:14DROPS Design respondeu:
Hi Cate, Garter stitch is knitted from both the right and wrong side, stocking stitch is knitted from the right side and purled from the wrong side. So from the wrong side you knit the garter stitch and purl the stocking stitches. Regards, Drops Team.
15.12.2025 - 07:43
![]() Elisa escreveu:
Elisa escreveu:
Sono riuscita a proseguire nel lavoro,sono a 3 cm dopo aver diviso il corpo dalle maniche :) ma ho ancora un dubbio: quando dovrò fare gli ultimi 6 cm con i ferri 3,x separare il lavoro devo lavorare con i ferri dritti? ( Sto lavorando con i circolari) Grazie
17.10.2025 - 16:39DROPS Design respondeu:
Buonasera Elisa, dopo aver diviso le parti si prosegue in piano in ferri di andata e ritorno. Può utilizzare sia i ferri dritti che quelli circolari. Buon lavoro!
17.10.2025 - 23:37
![]() Elisa escreveu:
Elisa escreveu:
Ho letto la vostra risposta,sí lo so che ai margini di A2 ci sono due maglie a rov e che i gettati vanno fatti prima e dopo queste maglie a rov ma ho provato a lavorare i gettati come indicato e quello prima di A2 non viene =a quello dopo A2 (viene perfetto) ho anche provato a lavorarli entrambi a drt ritorto ,vengono meglio ma non = ,quello prima di A2 viene sempre + molle di quello dopo A2,Se prima e dopo A2 facessi una sola maglia a rov e i gettati prima e dopo il rov potrebbe venir?
12.10.2025 - 13:05
![]() Elisa escreveu:
Elisa escreveu:
Ho letto le risposte fornite riguardo ai gettati ma io sto lavorando in circolare,per me il rovescio non esiste. Ho fatto molti tentativi,ho provato a lavorare il gettato prima di A1 facendo un aumento intercalare,poi preso a rov e lavorato a dritto e invece il gettato dopo A2 normalmente a dritto ritorto ma non veniva bene così ho provato a lavorare entrambi con aumento intercalare e poi a dr ritorto e viene meglio ma non bene. Il gettato dopo A2 è perfetto, l' altro ancora un po' mollo :(
11.10.2025 - 23:41DROPS Design respondeu:
Buongiorno Elisa, gli aumenti per il raglan si lavorano prima del diagramma A.2 e le prime maglie dei due ferri di A.2 sono lavorate a rovescio. Buon lavoro!
12.10.2025 - 09:35
![]() Daniela escreveu:
Daniela escreveu:
Ho provato a lavorare i gettati come indicato ma quelli prima di A2 seppur io li passo sul ferro destro,poi li metto ritorti sul ferro sinistro per poi lavorarli a dritto con il ferro di destra,non vengono bene come quelli dopo A2( perfetti) ma mi viene un buchino più grande e come una riga in diagonale che copre il buco sotto.Ho provato anche a fare un aumento intercalare prima di A2 (poi lavorato come indicato nel pattern),viene un po' meglio ma il problema resta cosa fare?
10.10.2025 - 23:56DROPS Design respondeu:
Buonasera Elisa, provi a vedere se questo videole può essere di aiuto per lavorare i gettati prima di una maglia a rovescio. Buon lavoro!
11.10.2025 - 19:36
![]() Elisa escreveu:
Elisa escreveu:
Mi dica se ho capito bene: dal primo giro di aumenti subito dopo aver finito il collo a coste,si lavora il giro dopo con i gettati ritorti ,poi si ripetono gli 8 aumenti,nel giro dopo si fanno ritorti,si continua così fino a 16 volte in cui si è aumentato e poi si alternano 4 e 8 au ogni tot ferri giusto? Posso lavorare i gettati con aumenti intercalari ?iniziando da una maglia prima del marker (prima di A3) e una maglia dopo il marker ( dopo A3)?
10.10.2025 - 01:10DROPS Design respondeu:
Buonasera Elisa, si, gli aumenti sono corretti. Buon lavoro!
11.10.2025 - 19:34
![]() Elisa escreveu:
Elisa escreveu:
Non riesco a fare i gettati prima di A2,li ho fatti come indicato eppure vengono buchi non capisco perché. Non è che essendo nel punto in cui la maglia successiva va lavorata a rov ci sono delle modifiche? Prendo il gettato ritorto e lo lavoro a dritto poi 2 rov poi A2 ma viene con i buchi,invece i gettati dopo A2 mi vengono bene,precisi come devo fare? Attento risposta
09.10.2025 - 23:20DROPS Design respondeu:
Buonasera Elisa, provi a vedere se questo video la può aiutare a lavorare i gettati prima della maglia rovescio. Buon lavoro!
11.10.2025 - 19:32
![]() Elisa escreveu:
Elisa escreveu:
Ho ancora un dubbio sugli aumenti: c'è scritto che si devono fare gli aumenti prima sul davanti e sul dietro (+4) e poi dopo tot ferri altri 4 aumenti nelle linee raglan delle maniche (+4) ho capito bene? Poi non mi è chiaro come alternare gli aumenti, dopo aver fatto il 1 giro di au (+8 tutti insieme nei raglan),il ferro dopo è con i gettati ritorti senza su e ok,quello dopo si devono ripetere gli au nel davanti e nel dietro (+4) e nel ferro dopo ancora si fanno gli altri 4 nelle maniche?
09.10.2025 - 02:10DROPS Design respondeu:
Buonasera Elisa, deve continuare con gli aumenti indicati fino al numero di maglie riportato nel modello, poi continuare con gli aumenti diversificati tra corpo e maniche. Buon lavoro!
09.10.2025 - 23:49
![]() Daniela escreveu:
Daniela escreveu:
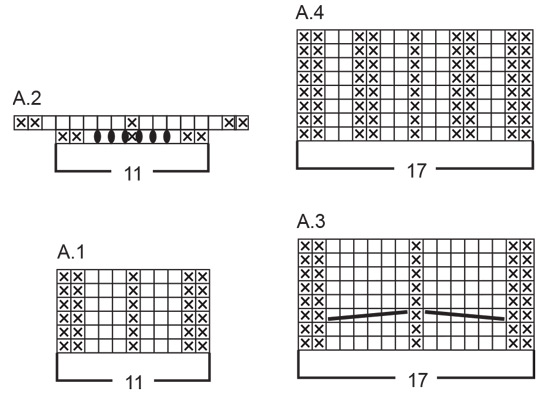
Non mi è chiaro il diagramma A1,se lo seguo a me viene una lavorazione a grana di riso su quelle 11 maglie,ho provato e mi vengono 4 sezioni di 11 maglie a grana di riso intervallate dal resto delle maglie tutte a 2 a 2 ma così non credo abbia senso. Dopo aver avviato le maglie,dovrei iniziare il ferro sul dritto del lavoro giusto? Può dirmi come dovrebbero essere lavorate sul dritto le 11 maglie di A1? Io ho fatto 2 rov,3d,1r,3dr,2rov ma credo di aver sbagliato, attendo risposta
07.10.2025 - 21:41DROPS Design respondeu:
Buonasera Daniela, il modello è lavorato in tondo, per cui non c'è diritto e rovescio del lavoro. Il primo giro è: 2 maglie rovescio, 3 maglie diritto, 1 maglia rovescio, 3 maglie diritto, 2 maglie rovescio. Buon lavoro!
09.10.2025 - 23:46
|
||||||||||||||||
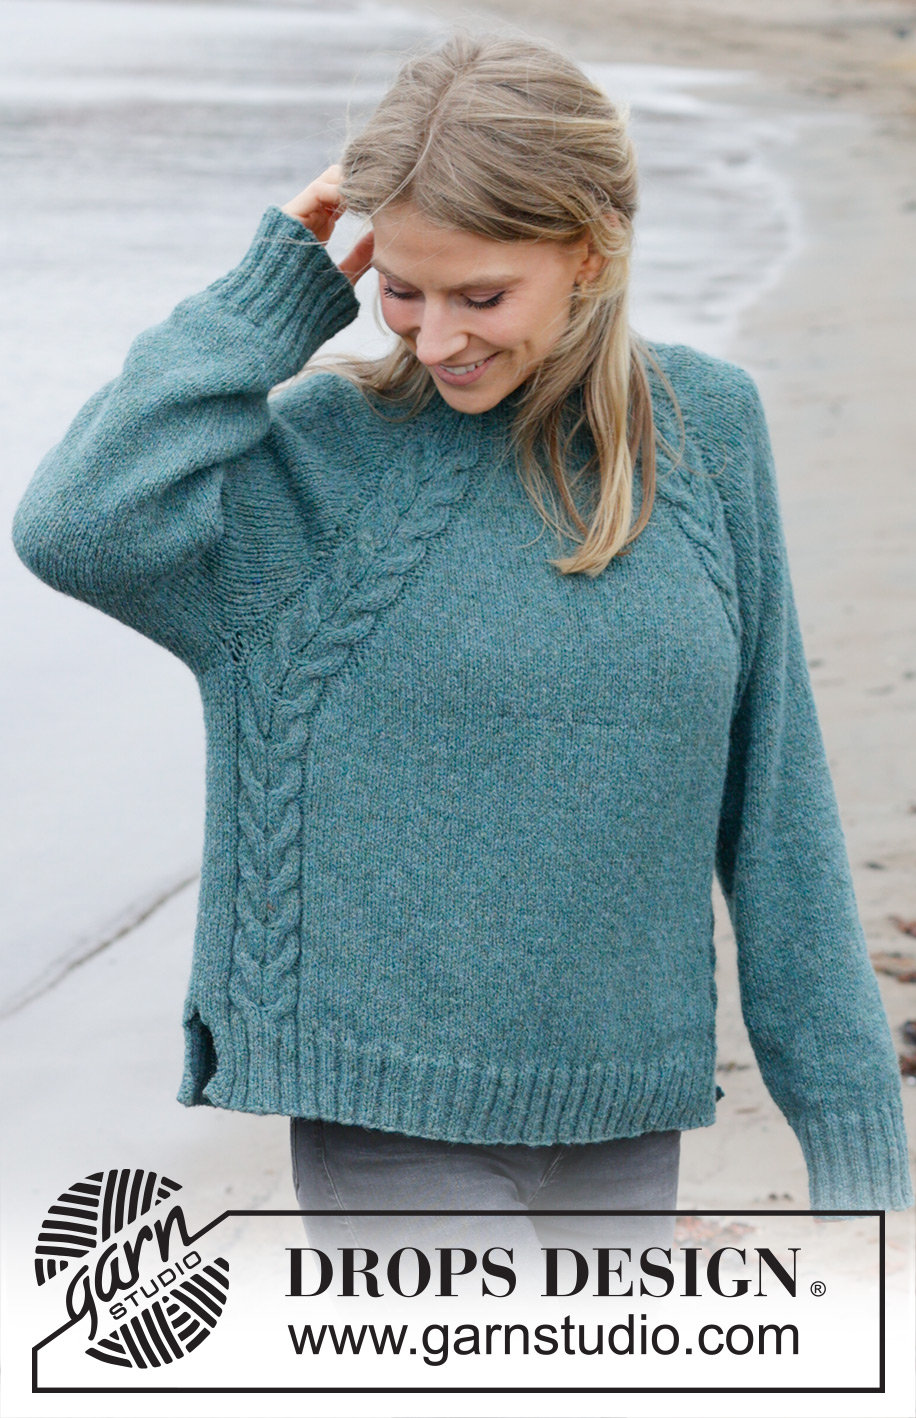
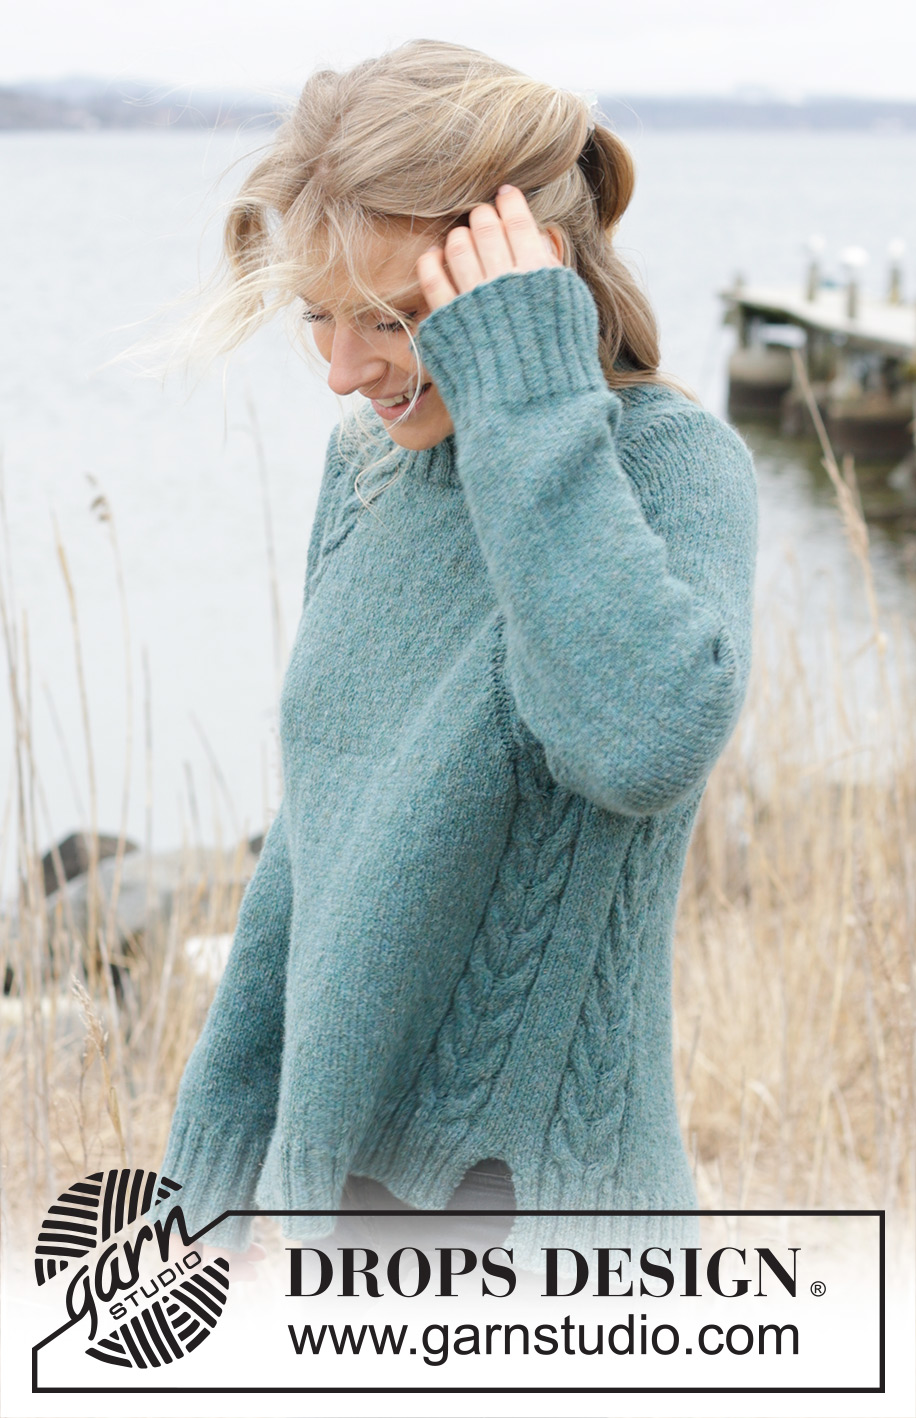
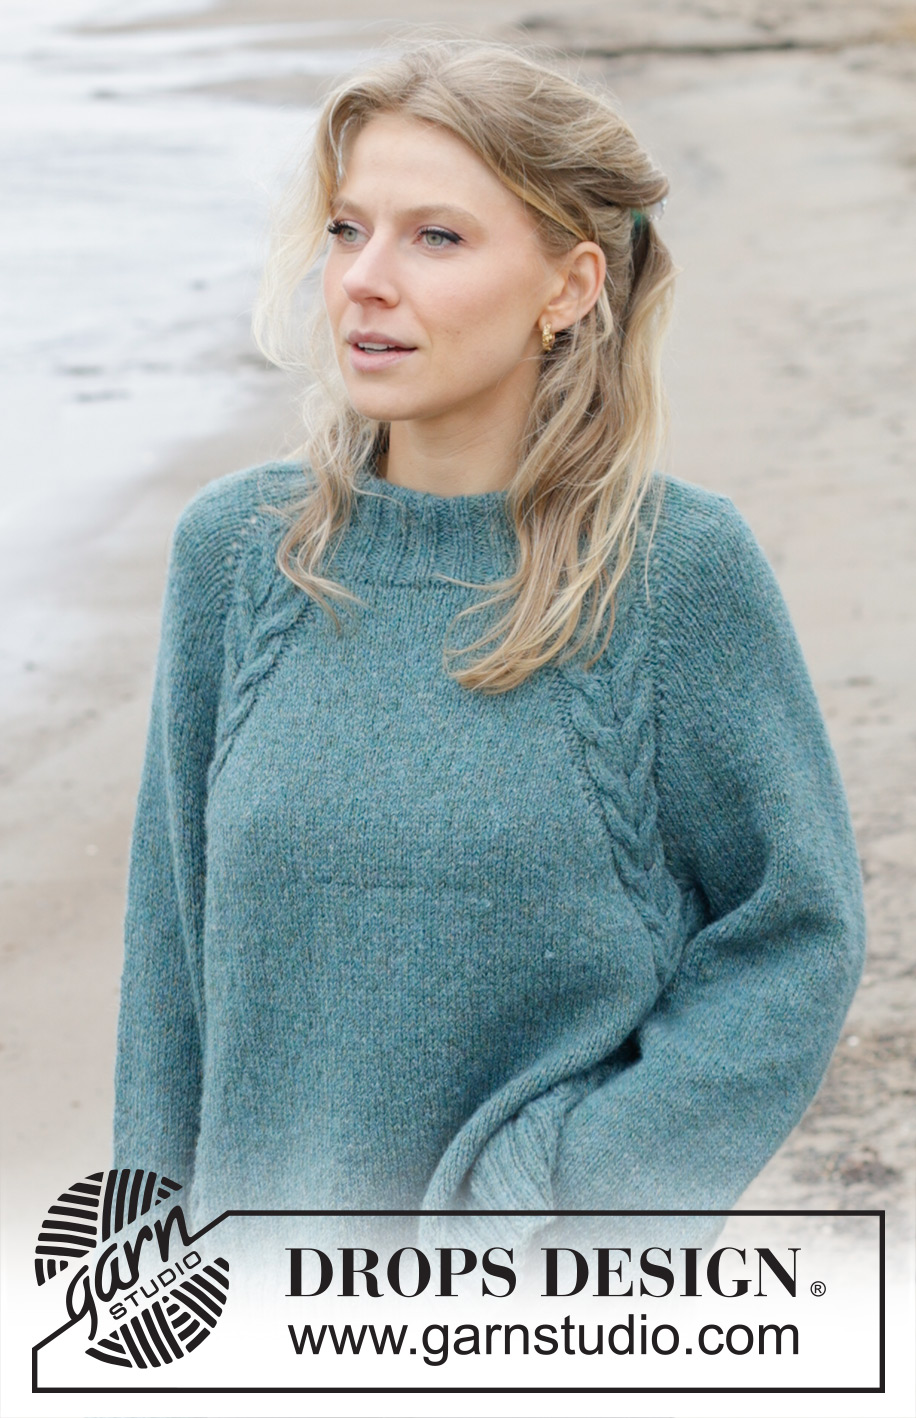
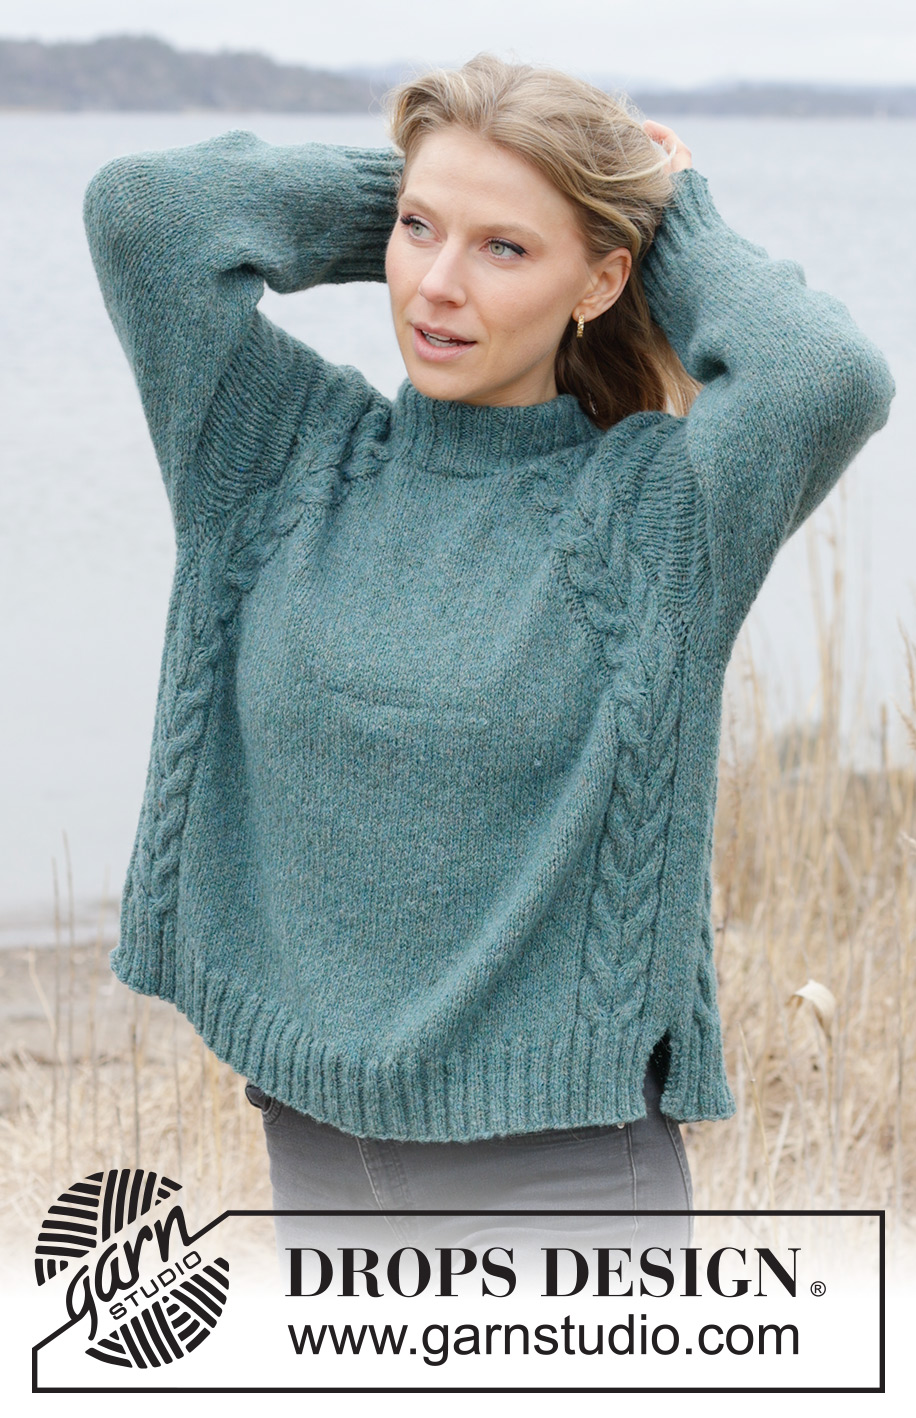
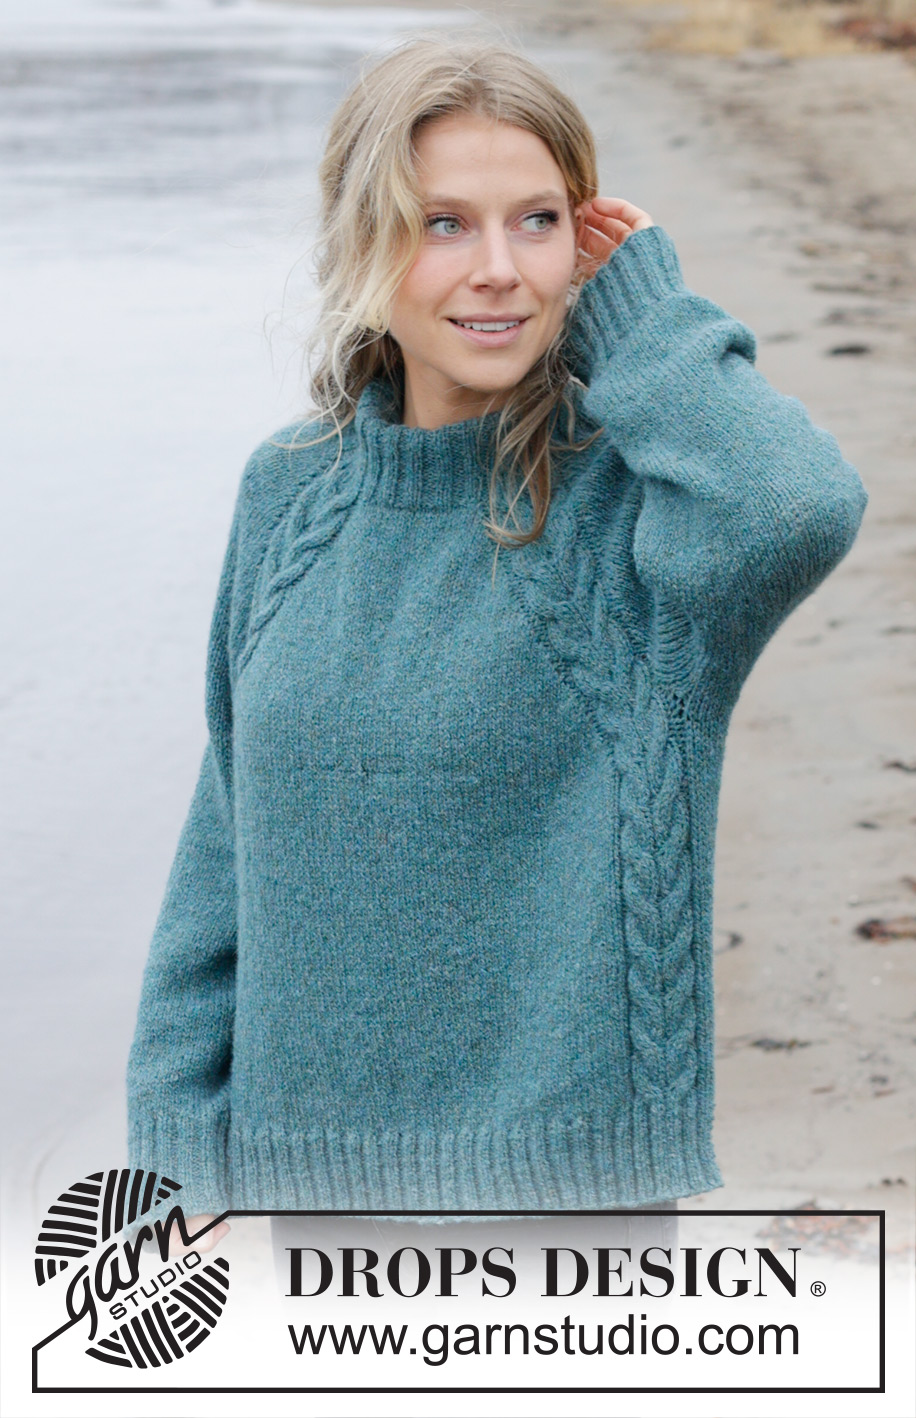
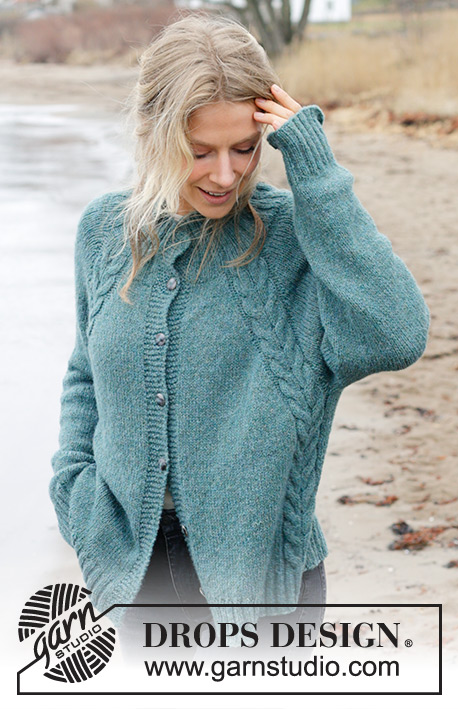
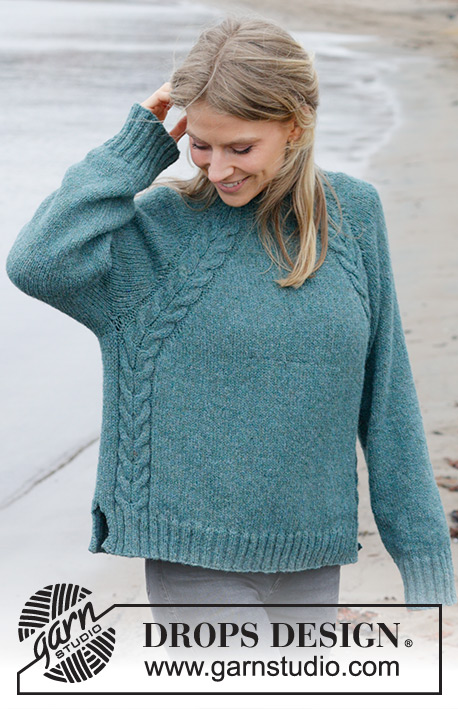
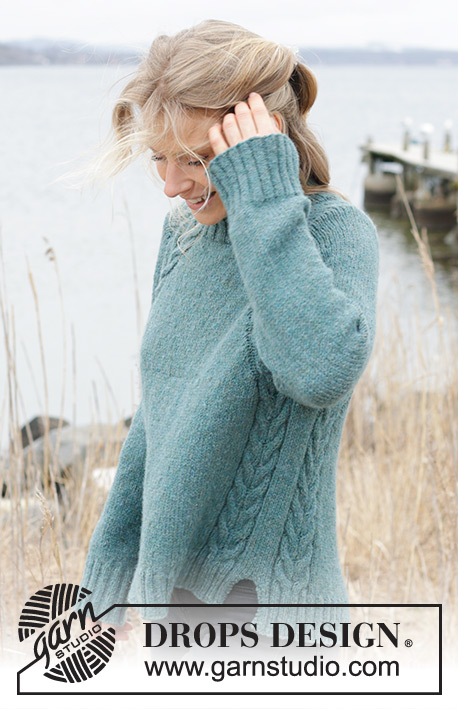
Emerald Lake Sweater#emeraldlakesweater |
||||||||||||||||
 |
 |
|||||||||||||||
Pulôver tricotado de cima para baixo em DROPS Sky. Tricota-se com gola subida, cavas raglan, torcidos e fendas nos lados. Do XS ao XXL.
DROPS 244-12 |
||||||||||||||||
|
------------------------------------------------------- TÉCNICAS USADAS: ------------------------------------------------------- PONTO JARRETEIRA (em idas e voltas): Tricotar todas as carreiras em meia. 1 barra jarreteira = 2 carreiras meia. PONTO FANTASIA: Ver diagramas A.1 a A.4. RAGLAN: Aumentar 1 malha depois de/antes de A.2/A.3. Para aumentar 1 malha, fazer 1 laçada. Tricotar então as laçadas da seguinte maneira na carreira seguinte: DEPOIS DE A.2/A.3: Tricotar a laçada torcida em meia – não deve formar um buraco. ANTES DE A.2/A.3: Tirar a laçada como se fosse para a tricotar em meia, recolocá-la na agulha esquerda pegando-lhe de trás para a frente e tricotar a laçada em meia - não deve formar um buraco. AUMENTOS: Para aumentar 1 malha, fazer 1 laçada; tricotar esta laçada torcida na carreira seguinte, para evitar um buraco. DIMINUIÇÕES (mangas): Diminuir 1 malha de cada lado do fio marcador da seguinte maneira: Tricotar até restarem 3 malhas antes do fio marcador, tricotar 2 malhas juntamente em meia, 2 malhas meia (o fio marcador fica entre estas 2 malhas), passar 1 malha como se fosse para a tricotar em meia, tricotar 1 malha meia e passar a malha que se passou por cima da malha tricotada. ------------------------------------------------------- A PEÇA COMEÇA AQUI: ------------------------------------------------------- PULÔVER – SUMÁRIO: A gola e o encaixe tricotam-se de cima para baixo, em redondo na agulha circular, a partir do ombro direito, no lado das costas. Divide-se o encaixe para as costas/a frente e as mangas e continua-se as costas/a frente em redondo na agulha circular até às fendas de cada lado da peça. Termina-se então a frente e as costas separadamente, em idas e voltas na agulha circular. As mangas tricotam-se em redondo com a pequena agulha circular/as agulhas de pontas duplas. GOLA SUBIDA: Montar 116-116-116-124-124-124 malhas com a agulha circular 4,5 mm em DROPS Sky. Continuar com a agulha circular 3 mm e tricotar a primeira carreira da seguinte maneira: * 2 malhas meia, 2 malhas liga*, tricotar de * a * 5 vezes ao todo, tricotar 2 malhas meia, A.1, * 2 malhas meia, 2 malhas liga*, tricotar 3-3-3-4-4-4 vezes ao todo de * a *, tricotar 2 malhas meia, A.1, * 2 malhas meia, 2 malhas liga*, tricotar 5 vezes ao todo de * a *, tricotar 2 malhas meia, A.1, * 2 malhas meia, 2 malhas liga*, tricotar 3-3-3-4-4-4 vezes ao todo de * a *, tricotar 2 malhas meia e A.1. Continuar em canelado desta maneira em redondo durante 10-10-10-11-11-11 cm. ENCAIXE: Continuar com a agulha circular 4,5 mm. Colocar 1 marcador em a carreira - vai-se medir o encaixe a partir do marcador. Tricotar a carreira seguinte da seguinte maneira: Aumentar 1 malha para o RAGLAN – ver acima -, tricotar 22 malhas meia diminuindo 2 malhas a intervalos regulares (manga), aumentar 1 malha para o raglan, tricotar A.2 por cima de A.1, aumentar 1 malha para o raglan, tricotar 14-14-14-18-18-18 malhas meia diminuindo 2-0-0-2-0-0 malhas a intervalos regulares (frente), aumentar 1 malha para o raglan, tricotar A.2 por cima de A.1, aumentar 1 malha para o raglan, tricotar 22 malhas meia diminuindo 2 malhas a intervalos regulares (manga), aumentar 1 malha para o raglan, tricotar A.2 por cima de A.1, aumentar 1 malha para o raglan, tricotar 14-14-14-18-18-18 malhas meia diminuindo 2-0-0-2-0-0 malhas a intervalos regulares (costas), aumentar 1 malha para o raglan, tricotar A.2 por cima de A.1. Aumentou-se 8 malhas para o raglan e temos 140-144-144-148-152-152 malhas ao todo. Na carreira seguinte, tricotar em ponto meia (sem aumentar para o raglan) e a última carreira de A.2 a cada transição entre as costas/a frente e as mangas – não esquecer de tricotar as laçadas como explicado acima. Continuar em ponto meia mas tricotar, então, A.3 por cima de cada A.2 a cada transição entre as costas/a frente e as mangas. Repetir então A.3 em altura. MANTER A MESMA TENSÃO DA INDICADA PARA A AMOSTRA! Além disso, vai-se aumentar para o RAGLAN 9-13-16-16-14-10 vezes ao todo a cada 2 carreiras (incluindo os aumentos da primeira carreira, depois do canelado) = 204-240-264-268-256-224 malhas. Continuar a aumentar para o raglan a cada 2 carreiras mas numa em cada 2 vezes, só se vai aumentar para a frente e as costas, ou seja, vai-se aumentar a cada 2 carreiras para a frente e as costas e a cada 4 carreiras para as mangas (aumenta-se alternadamente 4 e 8 malhas). Aumentar desta maneira 18-16-16-16-20-28 vezes para a frente e as costas, quer 9-8-8-8-10-14 vezes para as mangas. Os aumentos das mangas estão terminados. Nos tamanhos XS, S e M os aumentos da frente e das costas estão também terminados. Nos tamanhos L, XL e XXL, aumentar mais 1 vez para a frente e as costas. TODOS OS TAMANHOS: Temos 312-336-360-368-380-396 malhas e a peça mede cerca de 21-22-25-25-27-30 cm a partir do marcador depois da gola. Dividir para as costas/a frente e as mangas na carreira seguinte, da seguinte maneira: Colocar as 56-62-68-68-68-68 primeiras malhas em espera num fio para a manga, montar 8-10-12-16-20-24 malhas (lado, sob a manga), tricotar as 100-106-112-116-122-130 malhas seguintes como antes (A.3 + 66-72-78-82-88-96 malhas em ponto meia + A.3 = frente), colocar as 56-62-68-68-68-68 malhas seguintes em espera num fio para a manga, montar 8-10-12-16-20-24 malhas (lado, sob a manga) e tricotar as 100-106-112-116-122-130 últimas malhas (A.3 + 66-72-78-82-88-96 malhas em ponto meia + A.3 = costas). Terminar as costas/a frente e as mangas separadamente. Medir a peça a partir daqui! COSTAS & FRENTE: = 216-232-248-264-284-308 malhas. Colocar 1 fio marcador de cada lado da peça, a meio das 8-10-12-16-20-24 malhas montadas sob cada manga. Fazer seguir os fios à medida que for tricotando – servem para marcar as fendas de cada lado da peça. Continuar em redondo, em ponto meia com A.3 como antes (tricotar em ponto meia as 8-10-12-16-20-24 malhas montadas sob cada manga). Quando a peça medir 22-23-22-24-24-23 cm a partir da divisão, - ajustar a altura para depois de 2 ou 4 carreiras depois de uma carreira de torcidos em A.3 -, dividir a peça nos fios marcadores e terminar cada parte separadamente. COSTAS: = 108-116-124-132-142-154 malhas. Tricotar 1 carreira pelo avesso aumentando - ver AUMENTOS - da seguinte maneira: Tricotar 1 malha em ponto jarreteira, 3-4-5-7-9-11 malhas em ponto meia aumentando 0-3-2-4-2-4 malhas a intervalos regulares, tricotar A.4 por cima de A.3, 66-72-78-82-88-96 malhas em ponto meia aumentando 8-10-12-12-14-14 malhas a intervalos regulares, tricotar A.4 por cima de A.3, 3-4-5-7-9-11 malhas em ponto meia aumentando 0-3-2-4-2-4 malhas a intervalos regulares, e terminar com 1 malha em ponto jarreteira = 116-132-140-152-160-176 malhas. Continuar com a agulha circular 3 mm e tricotar da seguinte maneira pelo direito: TAMANHO XS: 2 malhas em ponto jarreteira, 2 malhas meia, A.4, * 2 malhas meia, 2 malhas liga*, tricotar 18 vezes ao todo de * a *, tricotar 2 malhas meia, A.4, 2 malhas meia e 2 malhas em ponto jarreteira. Continuar em canelado desta maneira em idas e voltas durante 6 cm. Arrematar frouxamente. O pulôver mede cerca de 54 cm a partir do ombro. TAMANHOS S, M, L, XL e XXL: 2 malhas em ponto jarreteira, * 2 malhas meia, 2 malhas liga*, tricotar 1-1-2-2-3 vezes ao todo de * a *, tricotar 2 malhas meia, A.4, * 2 malhas meia, 2 malhas liga*, tricotar 20-22-23-25-27 vezes ao todo de * a *, tricotar 2 malhas meia, A.4, * 2 malhas meia, 2 malhas liga*, tricotar 1-1-2-2-3 vezes ao todo de * a *, tricotar 2 malhas meia e 2 malhas em ponto jarreteira. Continuar em canelado desta maneira em idas e voltas durante 6 cm. Arrematar frouxamente. O pulôver mede cerca de 54-56-58-60-62-64 cm a partir do ombro. FRENTE: Tricotar como se fez para as costas. MANGAS: Colocar as 56-62-68-68-68-68 malhas em espera num dos lados da peça na pequena agulha circular/nas agulhas de pontas duplas 4,5 mm e levantar 1 malha em cada uma das novas malhas montadas sob a manga = 64-72-80-84-88-92 malhas. Colocar um fio marcador a meio das novas malhas sob a manga. Começando no fio marcador, tricotar em redondo, em ponto meia. Quando a manga medir 4-4-3-3-2-2 cm, diminuir 1 malha de cada lado do fio marcador – ver DIMINUIÇÕES. Diminuir desta maneira 4-7-10-11-12-13 vezes ao todo a cada 8½-4½-3-2½-2½-2 cm = 56-58-60-62-64-66 malhas. Continuar a tricotar até a manga medir 35-35-33-33-32-30 cm a partir da divisão. Tricotar 1 volta meia aumentando 12-14-16-18-16-18 malhas a intervalos regulares - ver AUMENTOS = 68-72-76-80-80-84 malhas. Continuar com as agulhas de pontas duplas 3 mm e tricotar em canelado (2 malhas meia, 2 malhas liga) durante 8 cm. Arrematar frouxamente. A manga mede cerca de 43-43-41-41-40-38 cm a partir da divisão. Tricotar a outra manga da mesma maneira. MONTAGEM: Para uma gola dobrada, dobrar a gola ao meio pelo lado de dentro e costurar com alguns pontos a cada raglan. |
||||||||||||||||
Explicações do diagrama |
||||||||||||||||
|
||||||||||||||||
 |
||||||||||||||||
 |
||||||||||||||||
Terminou este projecto?Então, identifique as suas fotos com as tags #dropspattern #emeraldlakesweater ou mostre-as na galeria #dropsfan. Precisa de ajuda para este modelo?Encontrará 32 turotiais em vídeo, uma rubrica Comentários/Perguntas e muito mais ao visitar a página do modelo em www.garnstudio.com © 1982-2026 DROPS Design A/S. Todos os direitos reservados. Este documento, incluuindo as suas su-secções, tem copyrights. Saia mais o que pode fazer com os nossos modelos no fim de cada uma das páginas do nosso site. |
||||||||||||||||


Com mais de 40 anos no design de modelos de tricô e de croché, a DROPS Design oferece uma das mais vastas colecções demodelos gratuitos na Internet - traduzidos em 17 línguas. Neste dia de hoje, temos 324 catálogos e 12290 modelos - dos quais 12271 estão traduzidos em português.
Trabalhamos com muito empenho para lhe proporcionar o melhor que o tricô e o croché têm para oferecer, para lhe fornecer inspiração e conselhos bem como fios da mais elevada qualidade a preços incríveis! Gostaria de usar os nossos modelos para outros fins que não uso pessoal? Pode ler o que lhe é permitido fazer no Copyright texto que se encontra na parte de baixo de todos os nossos modelos. Bom tricô! Bom croché!
Deixe um comentário acerca do modelo DROPS 244-12
Gostaríamos muito de saber o que tem a dizer-nos acerca deste modelo!
Se deixar uma pergunta acerca do modelo, certifique-se de que escolhe a categoria adequada no formulário abaixo para acelerar o processo relativo à resposta. Os campos obrigatórios estão assinalados com um *.