
Oblíbené kategorie
Hledáte přízi?


Komentáře / Otázky (51)
Margaret Black napsala:
Hi again when i have done the pick ups and 2cm how do I knowcwhich is the right side to start stocking st.this is the first boot.would the right side start from 5 garter st side or curved edge,thank you.
23.02.2015 - 12:07Margaret Black napsala:
Where do I put the markers...ie mid toe and heel?help
23.02.2015 - 08:16Odpověď DROPS Design :
Dear Mrs Black, that's correct, put 1 marker on mid toe (= towards the sts worked back and forth before) and 1 mid back - make sure there is the same number between markers. Happy knitting!
23.02.2015 - 10:57
![]() Maureen napsala:
Maureen napsala:
Would appreciate some help. In the foot section, where the 11/13/13 stitches (middle piece) are worked, does this end on a right or wrong sided row? and then do you break off yarn? and start again at the picking up the stitches off the stitch holder? When you're picking up the side stitches, are you picking up and knitting, then continuing in the round with seed stitch? I am using a circular needle. I hope you understand my questions. Thanks for your time.
12.02.2015 - 18:44Odpověď DROPS Design :
Dear Maureen, adjust last row over the 11-13 sts for upper foot to required measurements, cut the yarn and start again from RS: slip sts from st holder back to needle, pick up sts sts along side of middle piece, slip sts from middle piece, pick up sts along other side of middle piece. Happy knitting!
13.02.2015 - 09:23
![]() Iliane napsala:
Iliane napsala:
Ich habe diese Schuhe gestrickt, weil sie so schön aussahen. Leider ist der Schaft viel zu weit und auch wenn ich ihn enger nähe, sitzen die Schuhe überhaupt nicht gut. Ich werde soe wohl auftrennen und normale Socken draus machen. Schade!
23.10.2014 - 10:57Odpověď DROPS Design :
Stimmt denn Ihre Maschenprobe? Das ist ganz wichtig für eine richtige Passform. Wenn Sie nicht die kleinste Größe gestrickt haben, können Sie versuchen, die M-Zahl dieser Größe zu verwenden, aber die Fußrücken-Länge einer größeren Größe zu stricken (und entsprechend die M-Zahl aus dem Rand auffassen), wenn Sie sehr schmale Beine und Füße haben.
23.10.2014 - 13:23
![]() Maria Teresa napsala:
Maria Teresa napsala:
En la traducción del patron he comprobado que hay un error en el número de puntos que hay que montar para la pierna en la talla 35/37: pone 32 puntos, cuando en realidad deben ser 42
02.03.2014 - 12:59
![]() Andie Midbon napsala:
Andie Midbon napsala:
Thank You for the msg. I understand what you recommend for the 2nd slipper but it is not possible to bind off stiches at the end as you end up with 1 stitch left on your needle and the yarn at that end. Please help. Thank You. The slippers are adorable but I want to finish them.
07.02.2014 - 00:48Odpověď DROPS Design :
If you don't want to cut the yarn at the end of row, you can also bind off in the beg of the row from WS instead, work over the middle sts, and put last sts on a holder.
07.02.2014 - 01:28
![]() Andie Midbon napsala:
Andie Midbon napsala:
Please help me with the second slipper. Obviously the buttons go on the outside of the left slipper, but I can't figure out how to reverse the pattern. Thank You.
06.02.2014 - 02:34Odpověď DROPS Design :
Dear Mrs Midbon, on 1st slipper, you cast off first 5 sts, keep then on needle the next 9-11 sts and put on a st holder the remaining 28-30 sts. On 2nd slipper, you will put on a st holder the first 28-30 sts, keep the 9-11 next sts for upper foot on needle and cast off the last 5 sts, and then continue as for 1st slipper. Happy knitting!
06.02.2014 - 08:58
![]() Andie Midbon napsala:
Andie Midbon napsala:
The instructions for the second slipper are too vague....it has taken me a whole day to figure out what you mean and am not even sure I have it right. The keep the last 9 and slip the remaining 28 should be reversed in the instructions....soooo confusing
05.02.2014 - 19:38
![]() Laurel napsala:
Laurel napsala:
Started this pattern but don't see any instructions for the slipper. How many stitches are cast on, etc.
03.12.2013 - 03:50Odpověď Laurel :
Please disregard my question. I have figured out the pattern. Thanks.
03.12.2013 - 03:52
![]() BOURDET napsala:
BOURDET napsala:
Bonsoir, Concernant le Modèle 142-36 Je ne comprends pas bien où mettre les marqueurs. 1 Marqueur milieu devant = milieu des 11 m? Pointe ? et 1 Marqueur milieu dos ? sur les 28 mailles ? où? Car ça fait 2 fois que je recommence Merci
24.10.2013 - 19:46Odpověď DROPS Design :
Bonjour Mme Bourdet, à la fin du chausson, les marqueurs se placent, 1 au milieu devant (côté pointe du pied= dans la 6ème des 11 m du milieu devant) et l'autre au milieu dos (côté talon). Vous diminuez ensuite 1 m de chaque côté des m avec les marqueurs. Bon tricot!
24.10.2013 - 21:29
|
|
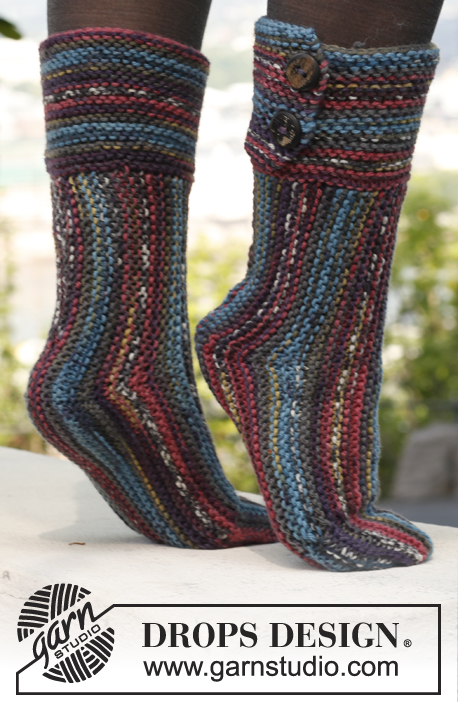
St Louis Boots#stlouisbootsslippers |
|
|
|
|
Papučky pletené perličkovým vzorem z příze DROPS Snow. Velikost: 35-42.
DROPS 142-36 |
|
|
VROUBKOVÝ VZOR: Pleteme stále hladce, lícové i rubové řady. 1 vroubek = 2 řady hladce. PERLIČKOVÝ (HRÁŠKOVÝ) VZOR: 1. ŘADA: *1 oko hladce, 1 oko obrace*, *-* opakujeme. 2. ŘADA: oka pleteme opačně, než se jeví - nad okem hladce tedy pleteme obrace, nad okem obrace pleteme hladce; tuto řadu stále opakujeme. ---------------------------------------------------------- PAPUČKY: Pleteme nejprve v řadách na rovných jehlicích, pak v kruhových řadách na ponožkových jehlicích. HOLEŇ: Na jehlice č.6 nahodíme přízí Snow 42-44-46 ok a upleteme 2 vroubky VROUBKOVÝM VZOREM – viz výše. Pak pleteme PERLIČKOVÝM VZOREM s 5 oky vroubkovým vzorem na každé straně – viz výše. Pleteme v řadách až do výše 15 cm. Pak uzavřeme prvních 5 ok = 37-39-41 ok. CHODIDLO: Nyní ponecháme prvních 9-11-11 ok na jehlicích (= nárt), zbylých 28-28-30 ok odložíme na pomocnou jehlici. Pleteme v řadách perličkovým vzorem nad 9-11-11 oky nártu a SOUČASNĚ v 1. řadě nahodíme na každé straně 1 nové oko (= krajová oka) = 11-13-13 ok. Když upleteme 7-8,5-10 cm výšky, uzavřeme na každé straně 1 krajové oko = 9-11-11 ok. Pak vrátíme odložená oka z pomocné jehlice zpět na ponožkové jehlice č.6 a nabereme 12-14-16 ok na každé straně nártu (vedle krajových ok, oka nabíráme mimo 5 vroubkových ok, která jsme uzavřeli – tuto část vynecháme) = na jehlicích máme 61-67-73 ok. NYNÍ MĚŘÍME DÍL OD TOHOTO MÍSTA a pokračujeme v kruhových řadách na ponožkových jehlicích. Označíme si střed špičky a střed paty. Pleteme v kruhových řadách perličkovým vzorem do výše 2 cm. Pak pokračujeme lícovým žerzejem a SOUČASNĚ spleteme v každé 2. kruhové řadě na obou stranách obou značek vždy 2 oka hladce (= v kruhové řadě tak ujmeme vždy 4 oka). Takto ujímáme až do chvíle, kdy část pletená lícovým žerzejem měří 3-3-4 cm. Pak všechna zbylá oka uzavřeme. Papučku na chodidle sešijeme – dbáme na to, aby šev byl měkký a plochý. Obdobně upleteme i druhou papučku, ale tentokrát uzavřeme posledních 5 ok a na jehlici ponecháme posledních 9-11-11 ok, zbylých 28-28-30 ok odložíme na pomocnou jehlici. DOKONČENÍ: Légy z 5 vroubkových ok položíme přes sebe a přišijeme na ně 3 ozdobné knoflíky – prošijeme přitom obě vrstvy. |
|
Dokončili jste tento model?Pak označte své fotky tagem #dropspattern #stlouisbootsslippers nebo je pošlete do galerie #dropsfan. Potřebujete s tímto návodem poradit?Otevřete-li si návod na stránce garnstudio.com, najdete tam 8 výukových video-ukázek, Komentáře/Dotazy a další užitečné informace. © 1982-2026 DROPS Design A/S. Vyhrazujeme si veškerá práva. Tento dokument, včetně všech jeho dílčích částí, podléhá autorským právům. Podrobnější komentář k možnostem užití našich návodů najdete dole pod každým návodem na našich stránkách. |


V oblasti pletené a háčkované módy působí DROPS Design více než 40 let. Díky tomu vám můžeme nabídnout jednu z nejrozsáhlejších kolekcí modelů s bezplatnými návody dostupnými na internetu - navíc v 17 jazycích. K dnešnímu dni máme na 324 katalogů a 12290 návodů celkem - z nich je už 7602 dostupných v [češtině].
Přidejte komentář k návodu DROPS 142-36
Rádi bychom věděli, co si o tomto modelu myslíte!
Pokud se chcete na něco zeptat, dbejte prosím na to, abyste ve formuláři níže vybrali správnou kategorii - díky tomu se dříve dozvíte, co potřebujete vědět. Povinná pole jsou označena *.