
Oblíbené kategorie
Hledáte přízi?


Komentáře / Otázky (7)
![]() Mercedes Cuadra napsala:
Mercedes Cuadra napsala:
Thanks, this is my first knitting with a diagram. Now I understand well. Another thing that confuses me is if the "knit" symbol in the diagram means the same thing for the right side and the wrong side. The instruction says "knit from the right side, knit from the wrong side". In other words, you don't do a purl on the wrong side, on this 9 stitches. Is that correct? Cheers, Mercedes
20.07.2023 - 22:00Odpověď DROPS Design :
Hi Mercedes, there is 1 purl, second yarn over is purled. Happy knitting!
20.07.2023 - 22:27
![]() Mercedes Cuadra napsala:
Mercedes Cuadra napsala:
Hello, my question is about how to knit the wrong side of diagram A1. The pattern says that diagram A1 shows all rows from the right side. So, for example, in row 1, how should I knit those 9 stitches from the wrong side? Thank you. Mercedes
20.07.2023 - 17:27Odpověď DROPS Design :
Hi Mercedes, 1st row (on the right side; read the diagram from right to left): knit 3, yarn over, purl 2 together, between 2 stitches make 2 yarn overs, knit 2. 2nd row (on the wrong side; read the diagram from left to right): knit 2, knit 1 in the first yarn over, purl 1 in the 2nd yarn over, knit 2, yarn over, knit 2 twisted together, knit 1 twisted. More about how to read knitting diagrams you will find HERE. Happy knitting!
20.07.2023 - 19:42
![]() Mercedes Cuadra napsala:
Mercedes Cuadra napsala:
Hello, thank you for your previous answer. I am a beginner in knitting, so I appreciate your help with another question, When I finish the first row I have 86 stitches in total, I understand that there are 9, A1 stitches, (instead of 7), 76 stockinette and 1 garter. I understand that I am going to knit these 9 stitches like this: 3 garter stitch, 1 purl (2nd YO), and 5 garter stitches. Let me know is that's right. Have a nice day. Mercedes
19.07.2023 - 19:37Odpověď DROPS Design :
Dear Mercedes, the first row is correct. Now we work as follows: knit 3, purl 1 in the 2nd yo, knit 2, 1 yarn over, knit 2 stitches twisted together and knit 1 stitch twisted. Now work over the stockinette stitches and the garter stitch as before. Happy knitting!
20.07.2023 - 12:18
![]() Mercedes Cuadra napsala:
Mercedes Cuadra napsala:
Hi, its a pleasure to greet you! Thank you for your help. 1. When you say that I have to do 76 stockinette stitches on the first row, do you mean knit 76 stitches on the right side, and make purl stitches (84) on the back or 2nd row? 2. The diagram shows 7 stitches on the first row and 9 stitches on the next 3 rows. Does this mean that every four rows on the RS, I am going to repeat those stitches after knitting 76 or 74 stitches? Thank you again. Mercedes
09.07.2023 - 22:10Odpověď DROPS Design :
Hi Mercedes, Yes, stockinette is knitted on the right side and purled on the wrong side. You work 1 garter stitch at the beginning of the row, stockinette over the middle 76 stitches and A.1 over the last 7 stitches on the right side. This will be reversed from the wrong side, with A.1 first, then 76 stockinette (purl) and finish with 1 garter stitch. Happy knitting!
10.07.2023 - 07:41
![]() Cornelia napsala:
Cornelia napsala:
Hallo.Kann ein Fehler in der Strickschrift sein?In der 4.Reihe (Hinreihe) nach den zwei M rechts abketten ist es nicht möglich 4 M rechts zu Stricken, es ist eine zu viel angegeben. Zum abketten von 2 M am Rundenbeginn benötigt man 3 M nicht zwei. Zählt man das Muster kommt man auf 8 nicht auf 7 LG
12.05.2022 - 08:01Odpověď DROPS Design :
Liebe Cornelia, ja richtig, bei der 4. Reihe (= Rückreihe), ketten Sie 2 Maschen ab, dann stricken Sie insgesamt 4 Maschen links, aber die erste ist schon auf der Nadel nach der Abketten, so stricken Sie nur 3 Maschen links (es sind 4 glatt rechte Maschen auf der rechten Nadel). Viel Spaß beim stricken!
12.05.2022 - 09:16
![]() Agnes napsala:
Agnes napsala:
Hej Skulle ni vilja lägga upp en video på hur man stickar diagrammet. Får ingen rätsida på det
14.12.2021 - 09:20
![]() Hannelore Goormans napsala:
Hannelore Goormans napsala:
Wie kann ich eine Anleitung per PDF runter laden
16.07.2021 - 10:26Odpověď DROPS Design :
Liebe Frau Goormans, unsere Anleitungen können nur ausgedruckt werden, aber wenn Sie eine virtuelle Drucker wählen, dann können Sie als .PDF speichern. Viel Spaß beim stricken!
16.07.2021 - 11:42
|
|||||||||||||||||||||||||
Warm Delights#warmdelightsbag |
|||||||||||||||||||||||||
 |
 |
||||||||||||||||||||||||
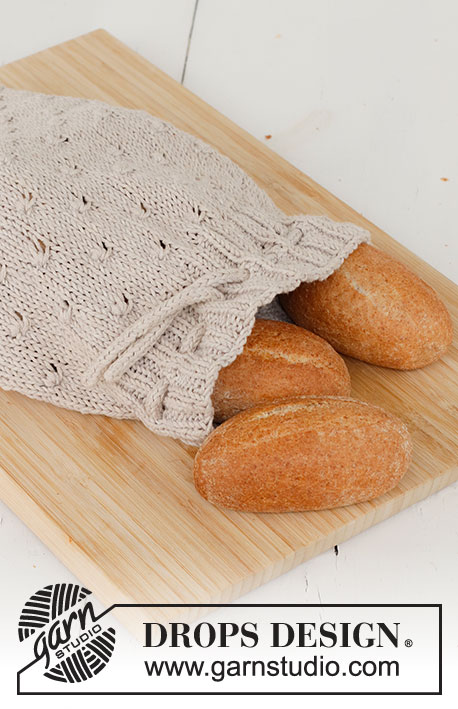
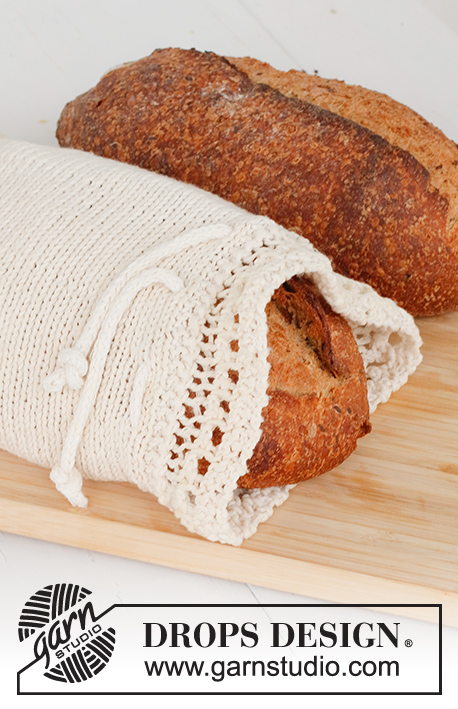
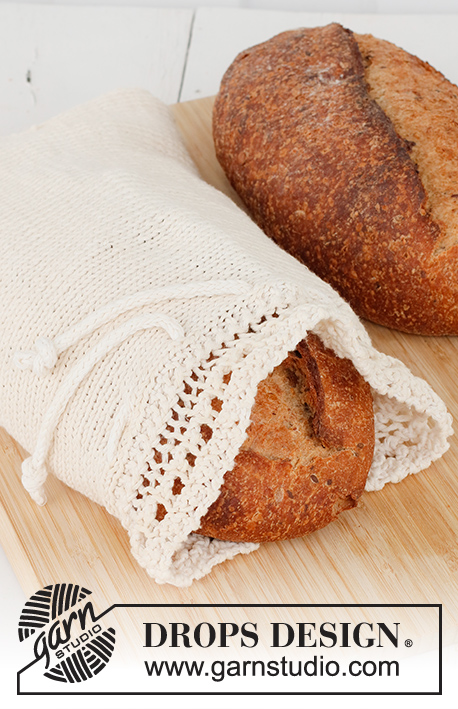
Sáček na chleba a pečivo s volánky pletený z příze DROPS Cotton Light.
DROPS 221-53 |
|||||||||||||||||||||||||
|
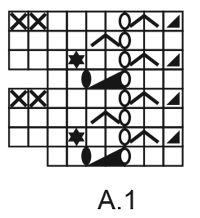
------------------------------------------------------- VYSVĚTLIVKY: ------------------------------------------------------- VROUBKOVÝ VZOR: Pleteme stále hladce, lícové i rubové řady. 1 vroubek = 2 řady hladce. VZOR: Viz schéma A.1. Zobrazeny jsou všechny řady vzoru nahlížené z lícové strany. ------------------------------------------------------- POPIS PRÁCE: ---------------------------------------------------------- SÁČEK - JAK BUDEME POSTUPOVAT: Pleteme v řadách kolmo, napříč a nakonec sešijeme po straně i dno. SÁČEK NA PEČIVO: Na jehlici č.4,5 nahodíme přízí DROPS Cotton Light 84 ok a upleteme 2 VROUBKY – viz výše. Vložíme značku – NYNÍ MĚŘÍME DÍL OD TOHOTO MÍSTA. Následující lícovou řadu pleteme takto: 1 krajové oko vroubkovým vzorem, 76 ok lícovým žerzejem a 7 ok vzorem A.1. V tomto rozvržení vzorů pokračujeme až do výše asi 48 cm od značky – končíme 4. nebo 8. řadou vzoru A.1. Pak upleteme 2 vroubky nad všemi oky a všechna oka volně uzavřeme. Přízi odstřihneme. VÁZAČKA: Pleteme v řadách na kruhové jehlici. Na krátkou kruhovou jehlici č.3,5 nahodíme přízí DROPS Cotton Light 3 oka a dál postupujeme takto: upleteme 3 oka hladce, *práci NEotáčíme, ale posuneme oka k opačnému konci jehlice (tj. zpět na začátek), přízi vedeme za oky, utáhneme ji a opět upleteme oka z lícové strany hladce*, *-* opakujeme až do chvíle, kdy pletená dutinka měří asi 60 cm; pak oka uzavřeme a přízi zapošijeme. DOKONČENÍ: Díl přeložíme podélně napolovic tak, aby na sebe volánky navazovaly; toto je otevírací strana sáčku. Sešijeme boční podélný šev. Teď rozložíme díl tak, aby boční šev ležel uprostřed. Sešijeme dno. Vázačku provlečeme horním okrajem sáčku, řadou hladkých ok pár cm pod vzorem A.1 – viz foto. Na každém konci vázačky uvážeme uzel. |
|||||||||||||||||||||||||
Vysvětlivky ke schématu |
|||||||||||||||||||||||||
|
|||||||||||||||||||||||||
 |
|||||||||||||||||||||||||
Dokončili jste tento model?Pak označte své fotky tagem #dropspattern #warmdelightsbag nebo je pošlete do galerie #dropsfan. Potřebujete s tímto návodem poradit?Otevřete-li si návod na stránce garnstudio.com, najdete tam 16 výukových video-ukázek, Komentáře/Dotazy a další užitečné informace. © 1982-2026 DROPS Design A/S. Vyhrazujeme si veškerá práva. Tento dokument, včetně všech jeho dílčích částí, podléhá autorským právům. Podrobnější komentář k možnostem užití našich návodů najdete dole pod každým návodem na našich stránkách. |
|||||||||||||||||||||||||


V oblasti pletené a háčkované módy působí DROPS Design více než 40 let. Díky tomu vám můžeme nabídnout jednu z nejrozsáhlejších kolekcí modelů s bezplatnými návody dostupnými na internetu - navíc v 17 jazycích. K dnešnímu dni máme na 324 katalogů a 12290 návodů celkem - z nich je už 7603 dostupných v [češtině].
Přidejte komentář k návodu DROPS 221-53
Rádi bychom věděli, co si o tomto modelu myslíte!
Pokud se chcete na něco zeptat, dbejte prosím na to, abyste ve formuláři níže vybrali správnou kategorii - díky tomu se dříve dozvíte, co potřebujete vědět. Povinná pole jsou označena *.