
Oblíbené kategorie
Hledáte přízi?


Komentáře / Otázky (13)
![]() Kath napsala:
Kath napsala:
Bonjour! Je ne suis pas certaine de bien saisir pourquoi en tricotant une housse de coussin carré, nous devons faire des augmentations suite au montage initial et des diminutions vers la fin du tricot avant le rabattage. S'il est carré, ne devrait-il pas y avoir un nombre de mailles constant. Merci beaucoup pour les précisions.
30.11.2025 - 22:29Odpověď DROPS Design :
Bonjour Kath, il faut plus de mailles pour tricoter des torsades que pour du jersey, ainsi, lorsque l'on monte le nombre de mailles requis, on va avoir la bonne largeur pour du jersey, mais il faudra ensuite augmenter pour conserver la même largeur quand on va faire les torsades, et, à la fin, il faudra donc diminuer les mailles augmentées pour éviter que le bord ne gondole/ne soit plus large que la partie torsades. Bon tricot!
01.12.2025 - 10:57
![]() Annabelle Garcia Y Vallejo napsala:
Annabelle Garcia Y Vallejo napsala:
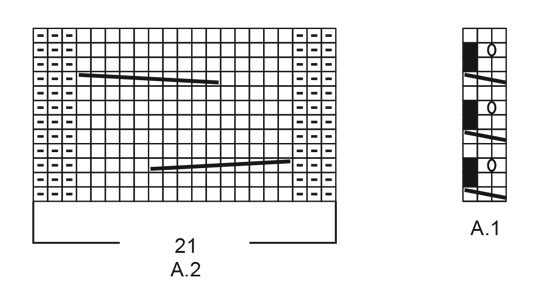
Bonjour, Concernant le diagramme A1 ligne 1 : faut il tricoter les mailles sur lesquelles on fait passer la maille? Ligne 2 sur la torsade ,tricote-t-on à l'endroit où à l'envers? Merci pour votre réponse
18.02.2025 - 11:02Odpověď DROPS Design :
Bonjour Mme Garcia Y Vallejo, notez que la housse se tricote en rond = tous les tours à l'endroit; au 1er rang de A.1, tricotez les 3 mailles de A.1à l'endroit puis passez la 1ère de ces 3 mailles par-dessus les 2 autres, ainsi, il ne reste plus que 2 mailles. Au tour suivant, tricotez ces 2 mailles à l'endroit, puis au3ème tour, tricotez: 1 m end, 1 jeté, 1 m end = vous avez de nouveau 3 mailles, tricotez ces 3 mailles à l'endroit au rang suivant. Répétez ces 4 rangs. Retrouvez ici, en vidéo comment tricoter ce type de petite torsade. Bon tricot!
18.02.2025 - 17:17
![]() Rachel napsala:
Rachel napsala:
Hi. Am knitting Pillars of Valhalla . Am struggling with the no stitch squares. My reading about it seems to indicate that it balances out decreases, however there are no decreases only increases and I end up with extra stitches at the end of each row! Would love some help!!
18.01.2025 - 01:13Odpověď DROPS Design :
Dear Rachel, the A.1 pattern have differents stitchcount in different rows. In the first row, you have 3 stitches, from which you decrease 1, thus in the 2-3. row you ill have 2 stitches there, but in the 3rd row, you make a YO (the little O sign between the two stitches on the diagram) between the two stitches so you will have 3 stitches again. Happy Knitting!
18.01.2025 - 01:54
![]() Rose napsala:
Rose napsala:
Hi, How do we follow the A.1 and A.2 pattern? From top to bottom? How do we follow A.1? Would it be for example: 1st A.1: K3 2nd A.1: K3 3rd A.1: skip and KYOK or 1st A.1: K3 2nd A.1: skip KYOK 3rd A.1: skip and K2 Thank you!
22.09.2024 - 11:44Odpověď DROPS Design :
Dear Rose, you can read our lesson on knitting charts here: https://www.garnstudio.com/lesson.php?id=68&cid=19. The charts are read from the bottom up. Since it's worked in the round all rows of the chart are read from left to right. In the 1st row of A.1 you have: knit 3, pass the first stitch knitted over the other 2, so it lies around them (= 1 stitch decreased). On the next round, knit 2 (the black square is ignored, don't skip stitches). Happy knitting!
23.09.2024 - 01:11
![]() Genise Huey napsala:
Genise Huey napsala:
I am getting more decreases when I do as pattern says: I knit 2 stitches and then knit two together and then knit 3 and then knit two together. K2, k2tg k3, k2tg…..
17.09.2024 - 22:09Odpověď DROPS Design :
Dear Mrs Huey, adjust the number of stitches worked between each decrease so that you decrease the correct number of stitches - read more here. Happy knitting!
18.09.2024 - 08:26
![]() Maureen Gillespie napsala:
Maureen Gillespie napsala:
For the pattern repeat, on the wrong side (even) rows, should I reverse the stokinette stitch to be p1, k1? [Original instructions show "11-20 stitches in stockinette stitch (*k1, p1*)"] Thank you!
08.11.2023 - 21:58Odpověď DROPS Design :
Dear Mrs Gillepsie, there is no wrong side rows as the piece is worked in the round, diagrams are showing all the rows, so work all rows in diagram reading from right towards the left and knit all stitches in stocking stitch. Happy knitting!
09.11.2023 - 08:26
![]() Maureen napsala:
Maureen napsala:
NO STITCH: What do I do with the first stitch? K together with 2nd stitch? transfer to the right needle? drop? Thank you!
12.10.2023 - 22:05Odpověď DROPS Design :
Dear Maureen, after you have worked 1st row in A.1 (= knit 3 and pass the first of these 3 sts over the 2 sts), there are only 2 sts left, just knit these 2 sts . On next round, you will then work K1, YO, K1 (there are 3 sts again). Happy knitting!
13.10.2023 - 08:45
![]() Maureen napsala:
Maureen napsala:
Pattern repeat *A1, A2* If A1 is hold 3 sticthes on cable needle, k3, then k3 from cable needle = 28 stitches (not 25)
12.10.2023 - 19:46Odpověď DROPS Design :
Dear Maureen, A.1 is first worked over 3 stitches but on the first row you will decrease 1 stitch (knit 3, pass the first of these 3 sts over the next 2), and on row 2 you will make 1 yarn over to get 3 sts again - so that A.1 is counted over 3 sts. You will then work: A.1, A.2, A.1, A.2, A.1, A.2, A.1. = 3+21+3+21+3+21+3=75 sts in total. Happy knitting!
13.10.2023 - 08:35
![]() Judy napsala:
Judy napsala:
This pillow comes in two sizes which are accounted for in the two numbers of sts to cast on and work. However, when you get to the length of the pillow, there is only one number. Doesn't the larger pillow need to be made a little longer in order to make it square? I am assuming the 38 cm is for the smaller pillow. How long should I make it for the larger pillow?
06.10.2022 - 19:36Odpověď DROPS Design :
Hi Judy, for the larger pillow you should work until work measures 43 cm - added on pattern,thanks for nociting. Happy knitting!
18.11.2022 - 14:26
![]() UteEspunkt napsala:
UteEspunkt napsala:
Tolle Anleitung! Perfekt beschrieben u einfach zum Nacharbeiten! Und ein wunderbares Garn (Nepal) .. meine Freundinnen sind ganz neidisch auf mein Kissen 😁
03.02.2021 - 18:34
|
||||||||||||||||||||||
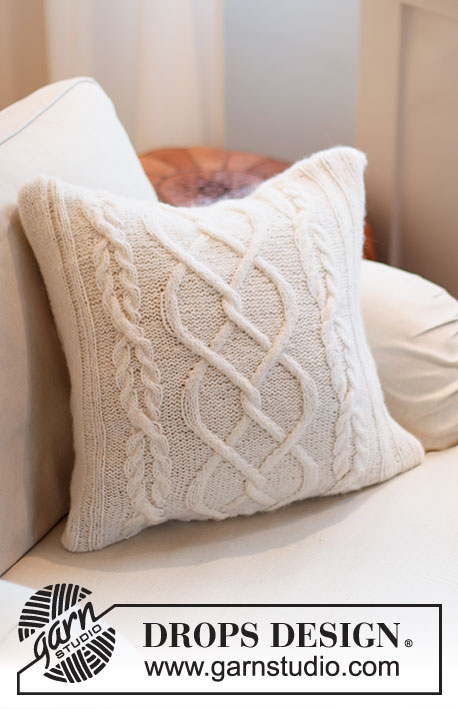
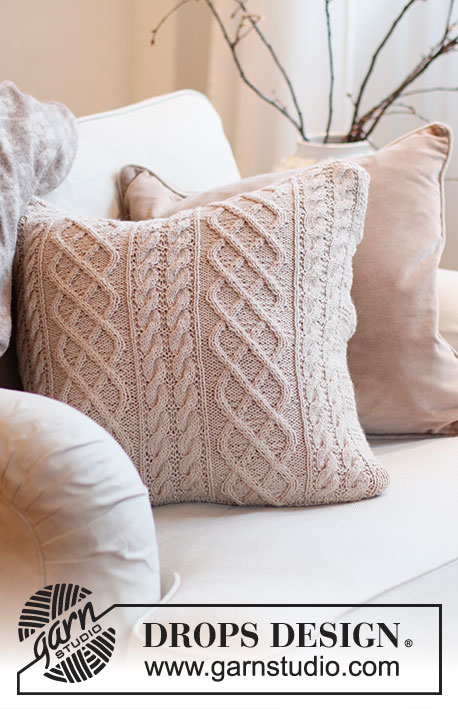
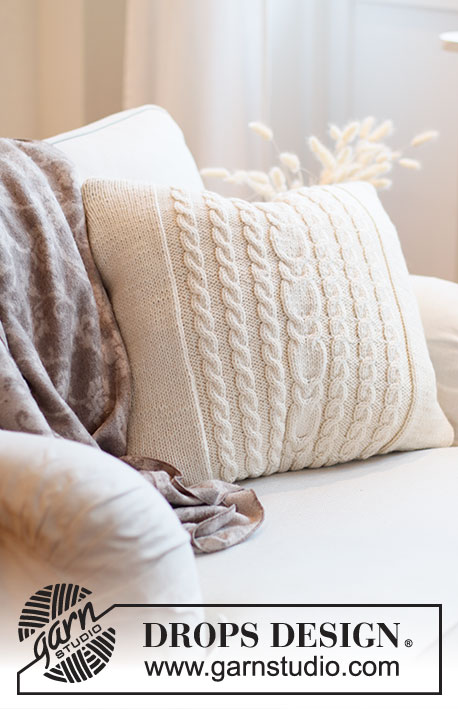
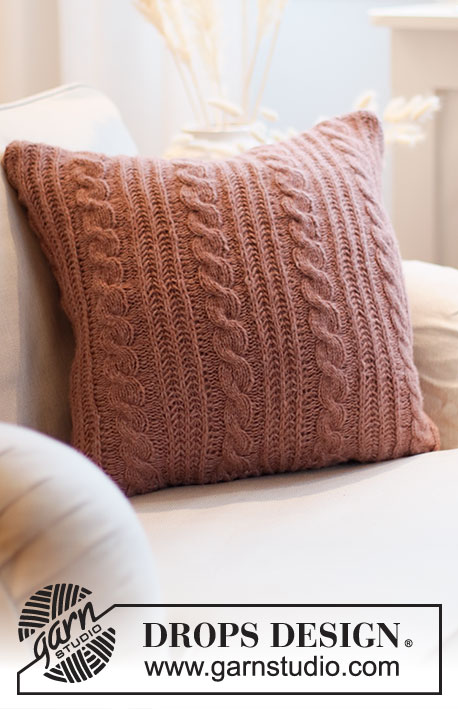
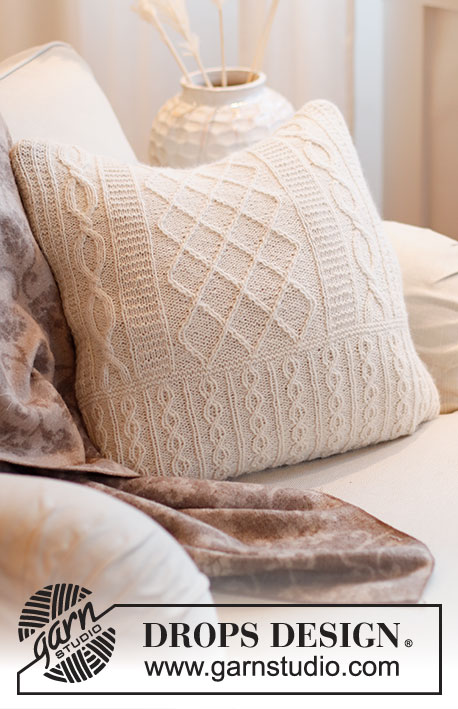
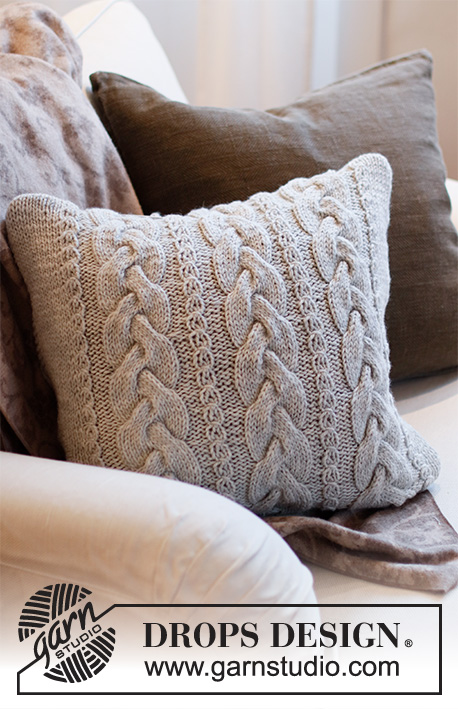
Columns of Valhalla Pillow#columnsofvalhallapillow |
||||||||||||||||||||||
 |
 |
|||||||||||||||||||||
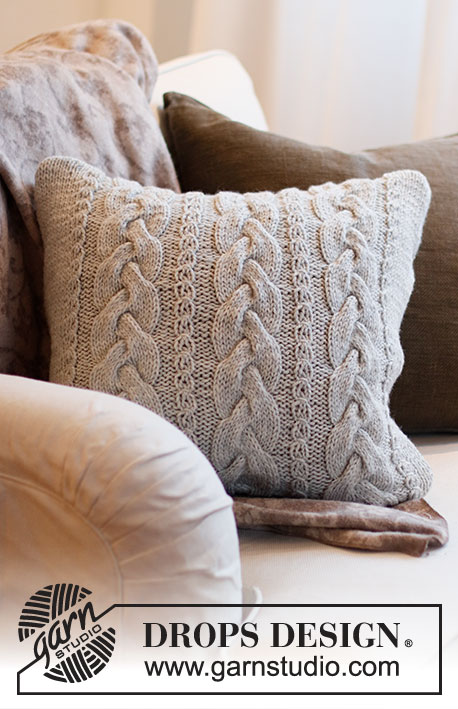
Povlak na polštář s copánky pletený z příze DROPS Nepal.
DROPS 215-42 |
||||||||||||||||||||||
|
------------------------------------------------------- VYSVĚTLIVKY: ------------------------------------------------------- VROUBEK A (v kruhových řadách): 1 vroubek = 1 kruhová řada obrace a 1 kruhová řada hladce. VROUBEK B (v kruhových řadách): 1 vroubek = 1 kruhová řada hladce a 1 kruhová řada obrace. TIP – PŘIDÁVÁNÍ/UJÍMÁNÍ: Abychom vypočítali, v jakých rozestupech máme přidávat/ujímat, vydělíme celkový počet ok na jehlici (např. 61 ok) počtem ok, která potřebujeme přidat/ujmout (tj. 14), takže 61 : 14 = 4,3. V tomto případě tedy 1x nahodíme střídavě za každým 4. a každým 5. okem. V následující řadě pleteme nahození za zadní nit, aby se v pletenině netvořily dírky. Pokud ujímáme, pak spleteme hladce dohromady střídavě každé 3. a 4. oko a každé 4. a 5. oko. STŘÍDÁNÍ VZORU: Viz schémata A.1 a A.2 – následujících 75 ok pleteme takto: A.1, A.2, A.1, A.2, A.1, A.2, A.1. ------------------------------------------------------- POPIS PRÁCE: ------------------------------------------------------- POVLAK - JAK BUDEME POSTUPOVAT: Pleteme v kruhových řadách na kruhové jehlici, zdola nahoru. Nakonec sešijeme horní i dolní okraj. Copánky zdobí jak přední, tak i zadní stranu polštáře. POVLAK: Na kruhovou jehlici č.4,5 nahodíme přízí Nepal 144-162 ok a upleteme 2 VROUBKY A – viz výše. Pak pleteme 1 kruhovou řadu hladce a SOUČASNĚ přidáváme, takto: nad prvními 61 oky přidáme rovnoměrně 14 ok – viz TIP – PŘIDÁVÁNÍ/UJÍMÁNÍ (= 75 ok), 11-20 ok upleteme hladce, nad následujícími 61 oky přidáme rovnoměrně 14 ok (= 75 ok) a posledních 11-20 ok upleteme hladce = 172-190 ok. Pokračujeme takto: upleteme 75 ok podle rozpisu v odstavci STŘÍDÁNÍ VZORU – viz výše, pak 11-20 ok lícovým žerzejem, 75 ok podle střídání vzoru a končíme 11-20 oky lícovým žerzejem. V tomto rozvržení pokračujeme až do výše 38 cm – končíme 4. nebo 12. kruhovou řadou podle rozpisu v odstavci STŘÍDÁNÍ VZORU. V následující kruhové řadě ujímáme, takto: nad prvními 75 oky ujmeme rovnoměrně 14 ok – viz TIP – PŘIDÁVÁNÍ/UJÍMÁNÍ (= 61 ok), 11-20 ok upleteme hladce, nad následujícími 75 oky ujmeme rovnoměrně 14 ok (= 61 ok) a končíme 11-20 oky hladce = 144-162 ok. Upleteme 2 VROUBKY B – viz výše – a poté všechna oka volně uzavřeme. DOKONČENÍ: Díl volně rozložíme tak, aby copánky ležely uprostřed přední i uprostřed zadní strany povlaku. Sešijeme počáteční okraj – šev vedeme vnější částí krajních ok, aby zůstal měkký a pružný. Vložíme polštář a stejným způsobem sešijeme druhý okraj. |
||||||||||||||||||||||
Vysvětlivky ke schématu |
||||||||||||||||||||||
|
||||||||||||||||||||||
 |
||||||||||||||||||||||
Dokončili jste tento model?Pak označte své fotky tagem #dropspattern #columnsofvalhallapillow nebo je pošlete do galerie #dropsfan. Potřebujete s tímto návodem poradit?Otevřete-li si návod na stránce garnstudio.com, najdete tam 16 výukových video-ukázek, Komentáře/Dotazy a další užitečné informace. © 1982-2026 DROPS Design A/S. Vyhrazujeme si veškerá práva. Tento dokument, včetně všech jeho dílčích částí, podléhá autorským právům. Podrobnější komentář k možnostem užití našich návodů najdete dole pod každým návodem na našich stránkách. |
||||||||||||||||||||||


V oblasti pletené a háčkované módy působí DROPS Design více než 40 let. Díky tomu vám můžeme nabídnout jednu z nejrozsáhlejších kolekcí modelů s bezplatnými návody dostupnými na internetu - navíc v 17 jazycích. K dnešnímu dni máme na 324 katalogů a 12290 návodů celkem - z nich je už 7602 dostupných v [češtině].
Přidejte komentář k návodu DROPS 215-42
Rádi bychom věděli, co si o tomto modelu myslíte!
Pokud se chcete na něco zeptat, dbejte prosím na to, abyste ve formuláři níže vybrali správnou kategorii - díky tomu se dříve dozvíte, co potřebujete vědět. Povinná pole jsou označena *.