
Populære kategorier
Ser du etter et garn?


Kommentarer / Spørsmål (11)
![]() Claudine skrev:
Claudine skrev:
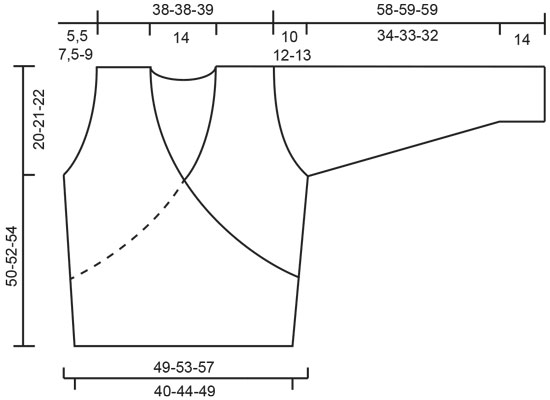
I have issues with the top right & left front with extra stitches and cannot do the assembly correctly. Reading the comments below I agree the increases should be decreases. I am about to frog both tops of the front pieces.
03.01.2025 - 18:32DROPS Design answered:
Dear Claudine, the pattern is correct; these increases are only for the neck which is raised kind of like a lapel, as seen in the picture. If you have a different thread or gauge than that of the pattern the resulting effect may be too loose and it will fall instead of staying straight. Happy knitting!
05.01.2025 - 19:33
![]() DROPS Design skrev:
DROPS Design skrev:
Molly, your are right that the shawl collar piece that goes around the neck will have a height measure of approx 5 inch. This drapes up along your neck, and you fold the upper edge only. Depending on which yarn you are using the collar might drape differently. In SilkeTweed which is very drapey and crisp this works beautifully. SilkeTweed used in this design holds it's shape and doesn't "fall" down.
17.04.2009 - 18:10
![]() Molly skrev:
Molly skrev:
Correction to my last comment: The gauge for this project is more like 6 sts per inch (which is what I'm getting) so that 32-34 stitch collar is over 5 inches in width (height).
17.04.2009 - 08:31
![]() Molly skrev:
Molly skrev:
If 9 stitches is 1 inch in Silke-Tweed (and that is what I'm getting) then the collar, which is 33 stitches, is over 3.5 inches before the 2 thread part. This does seem quite tall-- does it scrunch up behind under the more rigid 2 thread detail? Is it possible there is a detail picture of the back of the collar? Or perhaps a clearer close-up of the collar on the existing picture? I've done the front right panel and, other than my back collar questions, it looks like the picture.
17.04.2009 - 05:56
![]() DROPS Design skrev:
DROPS Design skrev:
The inc for collar is also made at the center front edge. Pattern is edited.
14.04.2009 - 19:27
![]() Molly skrev:
Molly skrev:
Could you clarify this: "At the same time when the piece measures 32-33-34 cm [12-5/8" - 13" - 13-3/8"] inc 1 st at the center front 8-9-10 times every 7-6-6 rows = 60-61-63 sts." Elsewhere in the pattern it says specifically "center front edge" yet the instruction above says only "center front." Does that mean the increases should no longer be on the edge? That I should put them in the middle, like a bust dart?
14.04.2009 - 18:05
![]() Karen skrev:
Karen skrev:
We did post a reply on the 11 November 2006, please check further down this page. As we said in our reply, 66-11 is a 5-year-old pattern and no errors have been found to date. Also we have double checked the translation and this follows the original pattern. It may be that the photo doesn't reflect the true shape/design of the cardigan, and if you want a different look, your suggestions seem a good idea. Again if the instructions
05.01.2007 - 10:16
![]() MKelly skrev:
MKelly skrev:
Hi this is the 2nd time that I've written to you regarding 66-11 but noone has emailed me back and I don't see any corrections posted. I have knit this pattern and found numerous errors in it. A novice knitter or even an intermediate knitter would not be able to maneuver this pattern. The front has errors where it says" When piece measures 13" inc.1 st. at the center front 9 times. This should be a decrease not an increas as by the time you get to the collar you have a big lapel shape. It needs to be consistently decreasing at the front to give the v shaping needed. Not increasing and getting larger. The way the collar is described makes absolutely no sense whatso ever if the instructions for the front are not changed. It only will work if the front decreases to end with only the 28 st at the shoulder. As well knitting 2.75 " for the collar is too long and will not stand up as shown in the picture on the website. 35 stitches is not enough for the collar either. I used 95 sts.on a smaller (2.25) needle and double yarn and it then had the length and weith needed to stand up. I also made it 1.5 " instead of 2.75.There is no shaping included in this pattern to allow for the gradual sloping from the front edge to the stand up collar so that it is incorporated smoothly. The sleeves work fine until the underarm decrease of 3 st. either side of marker, but then it says to just knit back and forthe which is not adequate instruction because it doesn't say for how long. also it moves directly to the cap shaping and if I had not knit before I would end up with a 6" arm opening when a 9" arm opening to fit the body is needed. I ended up at the underarm decrease shaping it myself aas for the arm shaping on the body and then added 6 extra rows and then the cap shaping then it worked out a novice would be unable to figure all this out. In the end this is going to be fine but it is a painful pattern and I think there needs to be corrections made.
30.12.2006 - 19:54
![]() karen skrev:
karen skrev:
Hi Ya Ya, The Scandinavian version of this pattern is 5 years old and no errors have been found or noted to date. I've checked the translation against the original pattern and Frederikka's translation is word perfect and the instructions in full accordance with the original pattern. The jacket is meant to have a collar/lapel. You increase 9 sts for the collar which in Silketweed amounts to just over 1 inch (the width of the collar on front pieces) and continue over 33 sts for the collar to be sewn tog at the back. Silketweed is a rather rugged quality and the collar will "stand" rather than fall when you have completed the edge in 2 threads and folded it double. I hope this helps. If you don't get the desired look by following the pattern, your alternative sounds a good idea. Kind regards Karen
19.11.2006 - 23:34
![]() Ya Ya skrev:
Ya Ya skrev:
I am writing regarding pattern 66-11 the wrap around cardigan in Silke Tweed. There is an error in the pattern for the left and right fronts. Where the pattern reads,"At the same time when the piece measures 13 " inc. 1 st. at the centre front 9 times every 6 rows. This adds far too much material which then actually crosses over at the top instead of angling back towards the shoulder as it shows in the picture and the diagram.As well the next section tells us to leave 33 st on the needle for the collar and knit it an additional 2.75 " When the project is knit in this exact fashion it ends up being huge at the front with a lapel effect. I have since ripped it out and am now doing dec. every 6 rows instead of increases and will continue this until I reach 28 st. and will then put the front and back together and do a 3 needle bind off of the 28sts. to form the shoulder instead of casting off and then sewing it together. I then plan to pick up the cast off 28 sts. on the back for the neck and pick up enough stitches to begin making a collar that looks like the picture using short rows to achieve this. Then I will pick up the stitches all the way around the front and knit in reverse stockinette stitch the last 5 rows. If You have already found the errors and have a correction sheet for this would you please send it to me. I would appreciate hearing back from you either way regarding this pattern. Thanks so much have a good day....Ya Ya
17.11.2006 - 05:42
|
|
Kathmandu |
|
|
|
|
DROPS jakke i "Silke-Tweed" med omslags-lukning og belte
DROPS 66-11 |
|
|
Strikkefasthet: 23 m x 30 p på p 3,5 og glstrikk = 10 x 10 cm. Husk pinnenr er kun veiledende! Vrbord: * 1 r, 1 vr *. Gjenta fra *-*. Mønster: Mønsteret går over 6 p i høyden. * Strikk 3 p glstrikk med 1 tråd grønn på p 2,5, bytt til p 3,5 og strikk 3 p glstrikk med vrangen ut med 1 tråd grønn og 1 tråd gressgrønn *, gjenta fra *-*. Strikketips: Når det henvises til høyre og venstre side i oppskriften, menes den siden som er høyre/venstre når plagget taes på. Høyre Forstk: Legg opp 94-104-114 m (inkl 1 kantm i hver side) på p 2,5 med grønn. Strikk vrbord i 7 cm - se forkl over - med 1 m rille i hver side. Bytt til p 3,5 og strikk glstrikk oppover samtidig som det økes i høyre side - se Strikketips: 1 m x 10-10-10 på hver 7.-7.-8.p og i venstre side: 1 m x 2-2-2 på hver 7.-7.-8.p. Husk på strikkefastheten. Når arb måler ca 13,5 cm (det er nå 98-108-118 m på p) felles det i venstre side (økningen fortsettes i høyre side) på hver 2.p: 8 m x 2-2-2, 2 m x 6-9-12, 1 m x 11-10-9 og deretter på hver 4.p: 1 m x 2-2-2 = 65-70-75 m. Når arb måler 30-31-32 cm felles det til ermhull i siden på hver 2.p: 3 m x 1-2-3, 2 m x 3-3-4 og 1 m x 4-6-5. Samtidig når arb måler 32-33-34 cm økes det mot midt foran: 1 m x 8-9-10 på hver 7.-6.-6. p = 60-61-63 m. Når arb måler 50-52-54 cm felles det i siden (fra skulderen og innover mot halsen): 28-28-29 m = 32-33-34 m tilbake på p. Disse strikkes videre i glstrikk til krave. Når kraven måler 7 cm felles det av. Venstre forstk: Legg opp og strikk som høyre, men motsatt. Bakstk: Legg opp 94-104-114 m (inkl 1 kantm i hver side) på p 2,5 med grønn. Strikk 7 cm vrbord med 1 m rille i hver side. Bytt til p 3,5 og strikk glstrikk oppover samtidig som det økes i hver side: 1 m x 10-10-10 på hver 7.-7.-8. p = 114-124-134 m. Husk på strikkefastheten. Når arb måler 30-31-32 cm felles til ermhull i hver side som på forstk = 88-88-90 m. Når arb måler 49-51-53 cm felles de midterste 28-28-28 m av til hals. Videre felles det 2 m på neste p mot halsen = 28-28-29 m tilbake på hver skulder. Fell av når arb måler 50-52-54 cm. Erme: Legg opp 58-60-62 m på ermp 2,5 med grønn, strikk 2 riller. Fortsett med Mønster - se forkl over - til arb måler ca 14-14-14 cm. Bytt til ermp 3,5, og strikk glstrikk til ferdig mål - samtidig etter Mønsteret økes det midt under ermet: 2 m x 13-15-16 på Str S: Hver 8.omg, Str M: Vekselvis hver 6. og 7.omg, Str L: Hver 6.omg = 84-90-94 m. Når arb måler 48-47-46 cm felles det 6-6-6 m midt under og ermet strikkes ferdig frem og tilbake på p. Videre felles det til ermtopp i hver side på hver 2.p: 3 m x 1-1-1, 2 m x 2-2-2, 1 m x 7-10-12, 2 m x 2-2-2 og 3 m x 2-2-2. Fell av, arb måler ca 58-59-59 cm. Montering: Sy skuldersømmene. Plukk opp fra retten på p 3,5 med grønn: ca 140-160 m langs høyre forstk til midt bak. Bytt til 1 tråd grønn + 1 tråd gressgrønn, strikk 5 p glstrikk med vrangen ut, fell av. Gjenta langs venstre forstk. Brett stolpekantene dobbelt mot vrangen og sy fast. Sy sammen kragen midt bak og sy den til halskanten bak. Montering: Sy sidesømmene på bolen, men i høyre sidesøm lages et hull på 4 cm rett over vrborden (til å tre knytebåndet igjennom), sy med knapphullsting rundt hullet. Sy ermene til bolen. Knytebånd: Plukk opp 19 m på p 2,5 med grønn langs høyre forstk-side (ikke plukk opp m langs vrborden). Strikk vrbord med 1 m i hver side i riller. Samtidig når båndet måler 3, 6 og 9 cm felles det 1 m i hver side (innenfor 1 kantm) = 13 m. Strikk til knytebåndet måler ca 70 cm, fell av med rett over rett og vrang over vrang. Plukk opp og strikk et tilsvarende bånd på venstre forstk. |
|
 |
|
Har du fullført dette mønsteret?Tagg bildene dine med #dropspattern eller send dem til #dropsfan-galleriet. Trenger du hjelp med denne oppskriften?Du finner 19 instruksjonsvideoer, kommentarer/spørsmål og mer i oppskriften på www.garnstudio.com © 1982-2026 DROPS Design A/S. Alle rettigheter er reservert. Dette dokumentet med sine underdokumenter har copyright. Les mer om hva du er tillatt å gjøre med våre oppskrifter nederst i alle våre oppskrifter på vår nettside. |


Med over 40 år i strikke- og heklebransjen, tilbyr DROPS Design en av de mest omfattende samlingene av gratis oppskrifter på internett - oversatt til 17 språk. Per i dag har vi 324 kataloger og 12290 oppskrifter på Norsk.
Vi jobber hardt for å tilby det beste innen strikking og hekling, inspirasjon og gode råd, men også kvalitetsgarn til fantastiske priser! Vil du bruke våre oppskrifter til annet enn personlig bruk? Du kan lese om hvilke regler som gjelder i teksten Copyright nederst på siden i alle våre oppskrifter. God fornøyelse!
Kommenter oppskrift DROPS 66-11
Vi vil gjerne høre din mening om denne modellen!
Hvis du ønsker å stille et spørsmål, husk å velge riktig kategori i menyen under - det vil sørge for at du får svar raskere. Obligatoriske felt er markert med *.