DROPS Super Sale - SAVE 30% on 6 yarns all June!

How to work a jumper top down

Several of our jumpers are worked top-down, and this is primarily because it provides more flexibility in terms of adjusting the jumper to personal measurements or preferences. It is easier to adjust the length of sleeves, body and especially the yoke. Working top-down also makes it easier to try the piece on while working.

In this lesson we show you how to work a jumper with a simple raglan increase. Start by picking the pattern you want to knit and use this lesson to guide you. If you want to work on a pattern with a different kind of raglan just follow the instructions for increases in you pattern - you’ll notice that the principle of top-down is the same as in this example. Similarly, this technique can also be used when working a round yoke, just follow the increase instructions for the round yoke instead of the raglan showed here.

Additionally, If you’re working a jacket top-down the technique will be the same, but you’ll work the piece back and forth on needle, starting mid front (a marker at the back will not be necessary).

Let’s get started

1) We have started this example by casting on 48 stitches and working 3 cm rib (knit 2, purl 2), before starting the raglan increases.

After the rib edge, continue in stocking stitch and place a marker mid-back. Continue by placing 4 marker threads for raglan in the transition between body and sleeves (from 1. mark to 1. marker thread = half back piece. From 1. to 2. marker thread = 1. sleeve. From 2. to 3. marker thread = front piece. From 3. to 4. marker thread = 2. sleeve. The remaining stitches between 4. marker thread and 1. mark = half back piece).
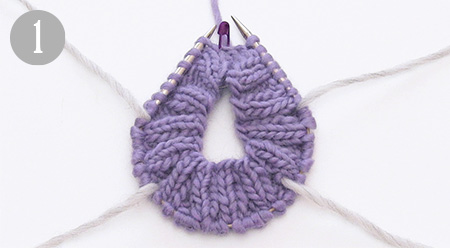
2) Start increasing for raglan on each side of the 4 marker threads.

3) Increase as follows: start 1 stitches before marker thread, make 1 yarn over on right needle.

4) Work 2 stitches (marker thread sits between these stitches), make 1 yarn over on right needle.

5) First increases (yarn overs) before and after 1. marker thread is now complete. Repeat increases at each marker thread (=8 stitches increased on round).

6) On next round, knit the yarn overs twisted (work in the back loop of stitch) to avoid holes.
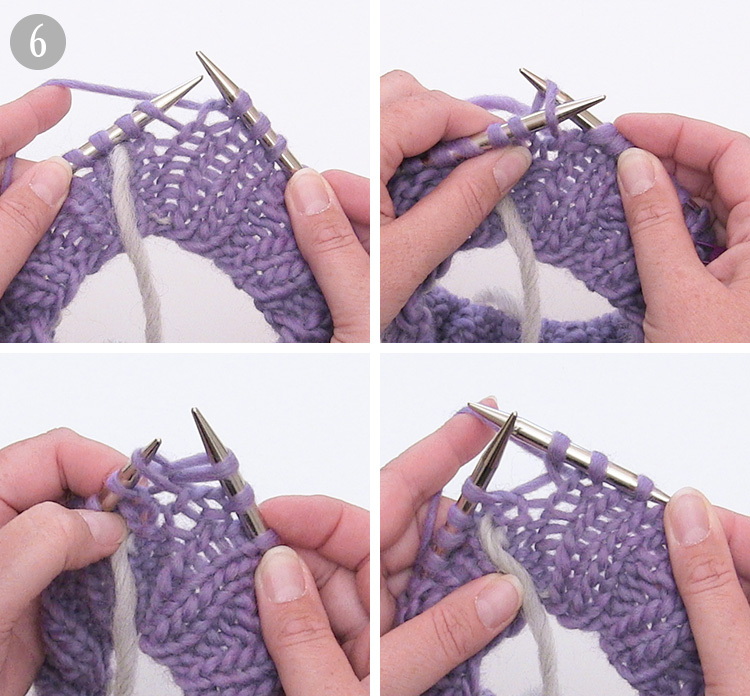
7) Continue with pattern, and increase for raglan as explained.

8) When all increases for raglan are complete, continue working until you reach the measurements for where piece is divided for body and sleeves.

9) Divide piece for sleeves and front/back piece, and finish each part separately. Work until 1. marker thread (=half back piece).

10) Place stitches between 1. and 2. marker thread on a thread/stitch holder (= 1. sleeve).

11) Cast on new stitches under sleeve.
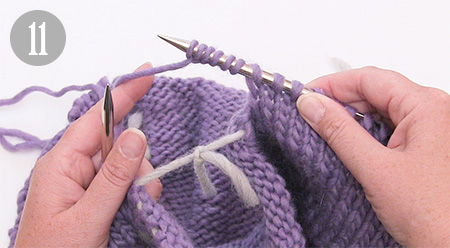
12) Work stitches between 2. and 3. marker thread (=front piece).
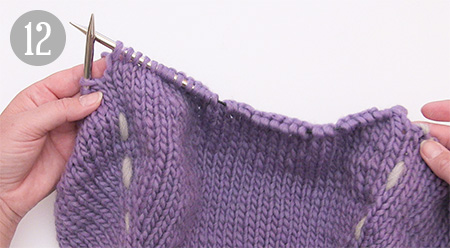
13) Place stitches between 3. and 4. marker thread on a thread/stitch holder (= 2. sleeve).

14) Cast on new stitches under sleeve (same number of stitches as cast on under 1. sleeve).
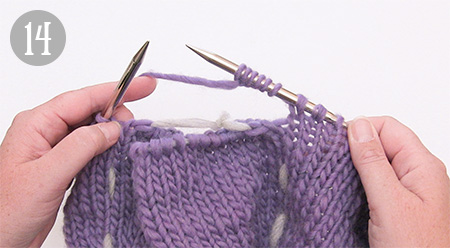
15) Work remaining stitches on back piece (until 1. marker).

16) Work the body in the round, follow instructions for increases, decreases, length and rib edge in your pattern. If you’re unsure about the length of piece, or considering shortening/lengthening it, you can easily try the jumper on while working (TIP: when trying the piece on, distribute stitches over several circular needles to minimise the risk of losing any stitches).

17) Work sleeves: place stitches from one of the threads/stitch holders back on the needle.

18) Cast on new stitches under sleeve, see picture A) or pick up 1 stitch in each stitch of the stitches cast on under the sleeve, see picture B) - see pattern for exact number and place a marker. The piece is now measured from here.

19) Work the length stated in the pattern, place a new marker in the middle of the new stitches cast on. Decrease 1 stitch on each side of the marker.

20) Work until 2 stitches remain before the stitch with marker, slip 1 stitch onto right needle, knit 1, pass the slipped stitch over (= 1 stitch decreased).

21) Work stitch with marker.

22) Knit 2 stitches together (=1 stitch decreased).

You have now decreased 1 stitch before and 1 stitch after marker (= 2 stitches decreased).

23) Follow instructions in pattern regarding the number of decreases and cm/rounds in-between each decrease.

24) When both sleeves have been completed, sew the hole under sleeves.
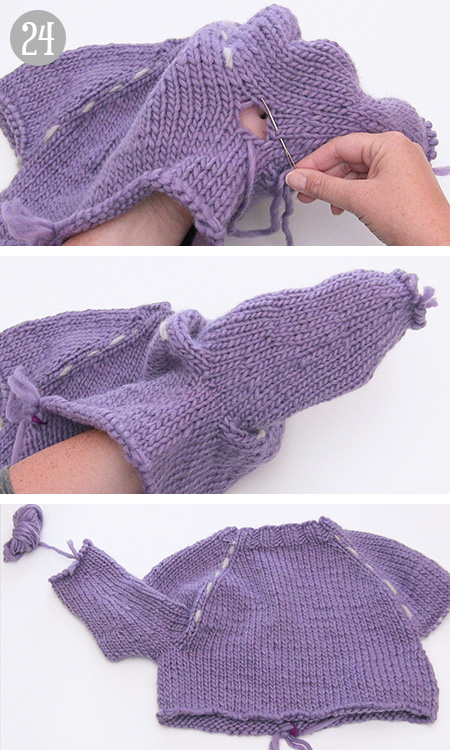
When the body and sleeves are completed according to the pattern, remove all markers and marker threads, and fasten all strands. The jumper is now finished!

Still haven’t chosen a top down pattern? Find some inspiration below:

Comments (159)

Country flag Julie wrote:

Bonjour, Comment faire le changement de pelote en tricot circulaire ?

18.11.2022 - 10:48

DROPS Design answered:

Bonjour Julie, cette vidéo montre comment changer de pelote de façon invisible, vous pourrez ainsi l'utiliser aussi pour les tricots circulaires. Bon tricot!

18.11.2022 - 15:48

Country flag Stefania Bontorin wrote:

Sapevo iniziate con la maglia tubolare ma la chiusura non mi era mai riuscita, ora ho capito, mille grazie

07.11.2022 - 08:54

Country flag Marina wrote:

Salve, non capisco una cosa: all’inizio la lunghezza del filo dei ferri circolari è di un tot di cm ma poi con tutti gli aumenti che si fanno nello sprone, è necessario cambiarlo con uno più lungo ? Nelle spiegazioni non se ne parla \\r\\nGrazie

03.11.2022 - 15:06

DROPS Design answered:

Buonasera Marina, sì, durante la lavorazione del maglione, quando le maglie saranno troppe per la circonferenza del cavo, si deve passare ad un cavo più lungo. Buon lavoro!

03.11.2022 - 18:04

Country flag Inge Schmidt wrote:

Die Anleitung ist super, woher weiß die man Einteilung.

14.08.2022 - 13:47

Country flag Renata Del Sal wrote:

Buongiorno. Il mio è solo un suggerimento. Vedo che in tutti i modelli suggerite di cominciare il bordo a coste con un giro diritto e anche le chiusure sono semplici. Non sarebbe meglio iniziare e finire col tubolare e magari fare un tutorial per questo? Molte grazie.

10.07.2022 - 08:51

DROPS Design answered:

Buonasera Renata, la lavorazione che in Italia si chiama tubolare, è molto diffusa in Italia, ma non all'estero.

11.07.2022 - 21:56

Country flag Anja wrote:

Hallo Moet je bij dit patroon alleen meerderen voor de raglan? Of elke heen gaande naald steken meerderen?

20.06.2022 - 18:59

Country flag Saccardo Mary wrote:

Dove posso trovare la spiegazione per fare lo scollo più ampio solo sul davanti? Grazie

12.06.2022 - 15:10

DROPS Design answered:

Buonasera Mary, può cercare tra i nostri modelli per vedere se ne trova uno di suo gradimento oppure può rivolgersi direttamente al suo rivenditore DROPS di fiducia per un'assistenza personalizzata. Buon lavoro!

15.06.2022 - 18:39

Country flag Irena wrote:

Comment faire les diminution pour un decolté en V Merci

03.06.2022 - 08:25

DROPS Design answered:

Bonjour Irina, tout va dépendre de votre échantillon, de la forme de votre pull/gilet, de la profondeur du décolleté, etc..; retrouvez ici tous nos modèles d'encolure-V tricotés soit de bas en haut, soit de haut en bas, n'hésitez pas à ajouter des filtres pour affiner votre recherche. Bon tricot!

03.06.2022 - 16:12

Country flag Irena wrote:

Bonjour, j'apprécie votre manière d'expliquer accompagnée de photos mais pour une débutante comme moi il manque beaucoup comme : un exemple de combien de mails monté en function de tel ou tel taille et combien d'augmentations pour le raglan toujours en function de la taille choisie. Si je n'ai pas ces information je patoge 😢alors que je ne demande que apprendre. Merci

03.06.2022 - 08:22

DROPS Design answered:

Bonjour Irena, cette leçon illustre simplement la technique utilisée pour un modèle tricoté de haut en bas, il vous faut ensuite choisir votre modèle et suivre les indications pas à pas (en commençant par l'échantillon etc...). Retrouvez par exemple tous nos pulls femme tricotés de haut en bas ici. Bon tricot!

03.06.2022 - 16:14

Country flag Silvia wrote:

Ich arbeite mit DROPS 217-1 Ich habe A.1 gestrickt und have jetzt 140 Maschen auf der Rundnadel. A.2 (size S) gibt keine Anleitung im Diagram zum Zunehmen con Maschen, aber es sollten 240-264 Maschen in der Runde sein. Wo kommen die zusätzlichen 140 Maschen her? Ich verstehe nicht die Anleitung in Diagram A.1 dann A.2 und dann A.3. Werden die nacheinander gearbeitet? Danke für eine genauere Erklärung des Arbeitssblaufes!

01.06.2022 - 03:10

DROPS Design answered:

Liebe Silvia, wenn sie A.2 stricken sollen Sie Maschen zunehmen (= siehe 9. Symbol): 1 Umschlag bei der 4. Runde, 2 Umschläge bei der 13. Runde und 2 Umschläge bei der 21. Runde= so haben Sie 7 + 1+2+2=12 Maschen in jedem A.2 = 240 Maschen auf der Nadel. Viel Spaß beim stricken!

01.06.2022 - 08:42

Country flag Jacqueline Genne wrote:

Ou trouve t on les explications (nombre de mailles à augmenter combien de fois ) ??? Merci je ne les vois PAS.

22.05.2022 - 21:03

DROPS Design answered:

Bonjour Mme Genne, elles n'y sont pas car ce n'est qu'une exemple illustrant la façon de tricoter un pull de haut en bas; vous devez vous suivre les explications du modèle où vous retrouvez toutes les indications relatives à ce modèle: échantillon, nombre de mailles à monter, à augmenter etc... Retrouvez par exemple tous nos modèles de pulls femme tricotés de haut en bas ici. Bon tricot!

23.05.2022 - 09:11

Country flag Lillian Andersen wrote:

Jakke 232-15 str m\r\nJeg får ikke bærestykke til å stemme med oppskriften . 7 stolpemasker, a1 over 18 masker, ,a2a3over 9masker,,a2a3over 37masker,a2a3 over 9masker.Hva nå? får det ikke til å stemme med resten av maskene

09.05.2022 - 20:35

Country flag Lorna wrote:

I am confused on pattern no z-816.. the patter starts out with all stitches in garter stitch, then increases are made after the first seven rounds.. which stitches are knit in stocking stitches and which stitches are knit in garter stitch ? The picture looks like the body is all garter stitch.\r\nThanks for your help

18.04.2022 - 07:03

DROPS Design answered:

Dear Lorna, in this pattern you will work the 16 stitches for the raglan line in garter stitch, feel free to add a marker before/after these stitches if it can help you to visualize them since all stitches will be knitted on first round, and then increase on either side of these 16 sts that will be alternately knitted and purled. Happy knitting!

21.04.2022 - 07:51

Country flag Hilde wrote:

Ich bringe den Übergang von Rundstricknadel 3,5zu5 nicht zustande da ich die Maschen nich über den Übergang bringe modell 232-4 Wechsel zur Passe

05.04.2022 - 16:55

DROPS Design answered:

Liebe Hilde, bei der Jacke 232-4 stricken Sie die erste Reihe der Passe mit der Rundnadel 5 wie beschrieben (mit A.1 und die Umschläge), und dann stricken Sie weiter mit der Rundnadel 5. Viel Spaß beim stricken!

06.04.2022 - 08:05

Country flag AEtske wrote:

Ik kom nog even terug op het antwoord aan Sabine: Een vest brei je heen en weer op de rondbreinaald van midden voor naar midden voor. Nu is mijn vraag: Kun je het vest ook op gewone pennen breien: met of zonder knop?

22.02.2022 - 19:56

DROPS Design answered:

Dag AEtske,

Vanwege de techniek kan dat inderdaad op rechte naalden. Vaak worden echter wel rondbreinaalden aanbevolen om dat je dan een groot aantal steken op de naalden hebt, met name bij de grote maten en bij oversized modellen.

26.02.2022 - 16:29

Country flag Sabina wrote:

Hoe brei ik een vest met een rondbreinaald? Een vest moet toch open blijven tussen het linker-en rechtervoorpand

09.02.2022 - 07:41

DROPS Design answered:

Dag Sabina,

Dat klopt, een vest brei je heen en weer op de rondbreinaald van midden voor naar midden voor. Op deze manier heb je geen zijnaden.

13.02.2022 - 10:34

Country flag Arta wrote:

Jeg har strikket ret og vrang. Nu skal jeg starte Raglan. Jeg har 56 masker som opskriften siger til str. L ind jeg starter Raglan.. Jeg skal sætte 1. Mærke efter 18 masker, 2. Mærke efter 8, den 3. Mærke efter 18 og opskriften siger jeg har 8 masker tilbage til den andet ærme. Det passer ikke... Da 56 masker i alt. minus 18 og minus 8 og minus 18 og minus 8 så har jeg 4 mesker tilbage eller formeget.

05.02.2022 - 16:23

DROPS Design answered:

Hei Arta. Litt vanskelig å gi deg et 100% korrekt svar, da det ikke er opplyst hvilken genser og str. du strikker. Men sjekk i oppskriften du strikker om det står at du skal sette merket i en maske. Da får du nemlig 18 masker + 1. maske med merke + 8 merke + 2. maske med merke + 18 masker + 3. maske med merke + 8 masker + 4. maske med merke =18+1+8+1+18+1+8+1=56 masker. mvh DROPS Design

07.02.2022 - 08:04

Country flag Marlen wrote:

Hei, på oppskrift smell the rain, og ved øking av maskene, jeg har strikket kastene vridd rett, men hvordan får jeg de nye maskene inn i mønsteret riktig? skjønner ikke helt hvor jeg skal putte de nye maskene

02.02.2022 - 20:09

DROPS Design answered:

Hei Marlen. Kastene gjøres på hver side av A.2 (8 steder pr økeomgang) og disse maskene strikkes inn i mønstret. F.eks ved første økning strikkes det på neste omgang vridd slik at det ikke blir hull, og da på neste omgang strikkes denne masken etter mønster som da er 4. maske i A.1 (rettmaske). DROPS Design

07.02.2022 - 07:57

Country flag Linda wrote:

Hej! Jag har tänkt sticka en Bee Season Jumper. Nu har jag försökt och repat tre gånger. Fattar bara inte detta med A1 och A2. Dessutom blir det ju ett väldigt stort hål för huvudet med 104 maskor som upplägg för halsbanden. Stämmer det verkligen? Fattar inget! Det är inte lätt att förstå era mönster tyvärr. Med vänlig hälsning, Linda

30.01.2022 - 23:12

Country flag Julie wrote:

I am knitting the "dear to my heart" Drops 199-7 pattern. I have finished the yoke and am now stymied. I knit the 42 stiches then placed the 59 on a stich holder. Do I cut the wool strand from the 42 and then attach again after the 59 stitches so I can then cast on the 8 new stiches? Do I need more needles then or do those stiches just end up joining the other ones. Is there a video? I am more of a visual learner to be honest.

27.01.2022 - 00:47

DROPS Design answered:

Dear Julie, picture 9 shows how to work to first sleeve (= your 42 sts for half back piece), then picture 10 shows how to slip the 59 sts on a thread for sleeve, then picture 11 shows how to cast on the 8 new stitches for mid under sleeve, without cutting the yarn and how to continue then working front piece, etc. See in this video<.a> from time code approx. 06:58 how to divide piece, slipping sts on a thread and casting on new sts under sleeve. Happy knitting!

27.01.2022 - 09:08

Leave a comment or question to this lesson

Your email address will not be published. Required fields are marked *.