DROPS Children 49 · Lots of new kid designs!

How to read knitting diagrams

A knitting diagram consists of squares. 1 square = 1 stitch - the symbol definition provide information on how the stitch is worked. The diagram shows all stitches seen from the right side (unless otherwise specified).

A diagram looks like this:
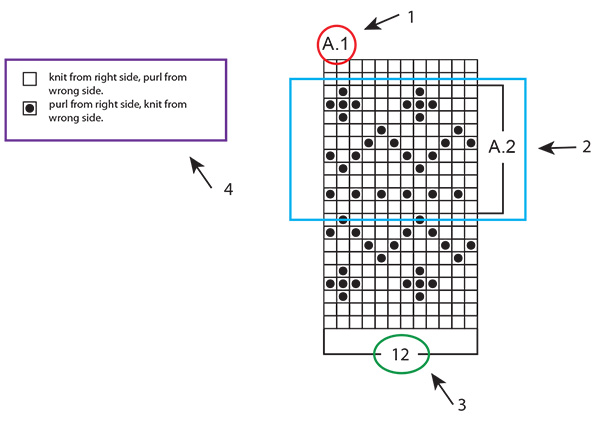
  1. A.1 is the name of the diagram, and refer to the entire diagram.
  2. A.2 is only the part of the diagram within the square brackets.
  3. This number refers to the number of stitches on the 1st row of the diagram.
  4. This is the symbol definition: it explains how each stitch is worked, or in what colour (in multicoloured patterns).

You read a knitting diagram completely opposite to how you would normally read: from right to left, from bottom to top. In other words: you start with the symbol in the bottom right corner, and work your way leftwards and upwards (see RED in diagram below). If you are supposed to start at a different point/with a different stitch, will this be specified - for example: the different sizes can start at different places in the same diagram (see BLUE box below).

If you are supposed to work several repeats of a diagram (ie: work the same diagram several times in width) you’ll work until the end of the diagram row, and start again with the first stitch for the next repeat.

Back and forth:

When working back and forth, every other row will be worked from the right side and every other row will be worked from the wrong side. Since the diagram shows all stitches seen from the right side, you’ll have to work it in opposite way when working from the wrong side (see BLUE arrows in diagram below): you read the row from left to right, knit stitches are purled, and purl stitches are knit etc (this will often be specified in symbol definition: “knit from right side, purl from wrong side”).

In the round:

When working in the round all rounds are worked from the right side, and the diagram is read solely from right to left. When starting a new round, simply start working the first symbol on the next row in diagram.

Several different diagrams worked consecutively on the row/round:

If you’re working several different diagrams after each other on the same row/round, work as follows: Work 1st row in diagram 1, continue with 1st row in diagram 2, then 1st row in diagram 3 etc. REMEMBER: if you’re working back and forth, the diagram will have to be worked in the opposite order from the wrong side - ie: start with diagram 3, then diagram 2 and lastly diagram 1. They are also worked in opposite way as usual.

In the pattern this can be written as follows: “work A.1, A.2, A.3 a total of 1-1-2-3-4 times”. This means that you first work A.1, then A.2 and finally you repeat A.3 a total of 1-1-2-3-4 times (depending on your size). It is ONLY A.3 that is repeated, A.1 and A.2 are worked 1 time each.

When stitch count doesn’t match whole repeats of diagram:

Sometimes the stitch count is not divisible with full/whole repeats of the diagram in width. For example: A.1 covers 12 stitches and is to be repeated over 40 stitches. In this case you will work 3 full repeats of A.1 (=36 stitches), and then work the first 4 stitches in the diagram over the remaining stitches (see RED line below). This is usually the case where the diagram is a repetitive pattern, so that regardless of working full repeats, the pattern will still be consistent.

Comments (678)

Country flag Patricia wrote:

Ich habe gerade ein Verständnisproblem.... Muster A1 stricke ich zunächst 27x (Größe XXL) und dann mache ich erst die Zunahme von 64 Maschen. Sehe ich das so richtig? Modell Christmas Time Cardigan

19.10.2024 - 14:58

DROPS Design answered:

Liebe Patricia, konnte die Antwort an Ihrer Frage bei der Anleitung helfen? Sonnst sagen Sie uns gerne bescheid, damit wird noch weiterhelfen können. Viel Spaß beim Stricken!

21.10.2024 - 09:59

Country flag MG wrote:

Can you please explain this pattern desing? I am knitting a baby blanket using baby merino wool and 3mm circular needles. Work next row as follows from right side: 5 stitches in garter stitch, A.1 (= 4 stitches), work A.2 over the next 144 stitches (= 18 repetitions of 8 stitches), A.3 (= 5 stitches) and finish with 5 stitches in garter stitch. Thanks so much.

17.10.2024 - 02:11

DROPS Design answered:

Dear MG, could you please tell us which pattern you are working on (pattern name and/or pattern number); but as you are writing you should work from RS: 5 sts in garter stitch, then work the 4 sts as shown in diagram A.1, then repeat the 8 sts A.2 over the next 144 sts (a total of 18 times), then work the 5 sts in A.3 and finish with 5 sts in garter stitch. From wrong side read the diagrams from the left towards the right: A.3, repeat A.2 and finish with A.1 (between the 5 sts in garter stitch). Happy knitting!

17.10.2024 - 10:05

Country flag Cherton wrote:

Bonjour voilà J’ai 79 mailles et le graphique et de 106 mailles comment faire ? Merci pour votre réponse

15.10.2024 - 20:34

DROPS Design answered:

Bonjour Mme Cherton, pouvez-vous nous indiquer quel modèle/quelle taille vous tricotez? Nous pourrons ainsi mieux vous répondre. Merci d'avance pour votre compréhension.

16.10.2024 - 09:14

Country flag Karen wrote:

Hej, jeg er igang med at strikke Sun Wreath og jeg har brug for lidt hjælp. Jeg er nået til at skulle starte mønsteret og jeg kan se, at den første om gang er i hvede, men i opskriften siger den at jeg skal strikke med gul samt lave udtagninger. Det er mit første mønster strik. Mange tak på forhånd.

15.10.2024 - 14:14

DROPS Design answered:

Hei Karen. Du legger opp med gult og strikker 4-5 cm, disse 4-5 cm blir på innsiden av halskanten (genseren har dobbelt halskant) og viser kun litt fra retten (en omgang vrang = brettekanten). Nå byttes det til hvete og det strikkes med hvete fargen helt til MØNSTER A.1 starter (1. omgang av A.1 strikkes med hvete). mvh DROPS Design

21.10.2024 - 07:59

Country flag Bonnie Cherny wrote:

I’m making Snow Drift and am confused about the chart and the directions they follow for the neck edge . When it says A1 or A2 I realize I am to do cables but are there 6 knitted stitches before the cable and 12 after? It doesn’t seem to line up with the written directions when it says to purl 1 knit 2 after the A1.

13.10.2024 - 00:33

DROPS Design answered:

Dear Bonnie, excluding the rounds with the actual cables (rounds 3 and 7 of the charts) you will knit over all stitches when the chart is mentioned. You won't have 6 straight knitted stitches, because you will alternate between working one type of rib ( knit 1, purl 1) or the second type (purl 1, knit 2). So in the first 2 rounds of the neck edge with the charts you will knit over all 4 stitches when the charts are mentioned. On the third round, you will actually work the cable. Happy knitting!

13.10.2024 - 19:57

Country flag Conniei wrote:

Hello. I am working on the Drops Design Running Circles Cardigan size 9-10. It is a beautiful pattern but I don't understand what the charts are telling me to do. Is there anywhere I can find the written instructions please. I have never knitted off of charts before. Thank you in advance.

07.10.2024 - 21:30

DROPS Design answered:

Dear Conniei, there are only diagrams to this pattern; read the lesson above and check symbols and their description, then read diagrams from the right towards the left from right side (see how to work the symbols "from the right side" under diagram key) and from the left towards the right from the wrong side (see how to work the symbols "from the wrong side" under diagram key). Hope it can help. Happy knitting!

08.10.2024 - 07:52

Country flag Anne wrote:

Is there a video to show how the pattern in Lazy Sunday afternoon jumper is worked? I am struggling to understand the instructions. Thanks

01.10.2024 - 14:01

DROPS Design answered:

Dear Anne, there is no specific video to this pattern but feel free to ask your question using the form at the bottom of the written pattern/diagrams so that we can try to help you. Happy knitting!

01.10.2024 - 16:37

Country flag Susanne wrote:

Hej Är nybörjare på mönsterstickning och förstår inte hur jag ska sticka när det är inte är några rutor i diagrammet. Så här ser det ut: Färg A (=en ruta) Färg B (= en ruta) ingen ruta, ingen ruta, Färg A (= en ruta) Färg B. ( = en ruta) Vad ska jag sticka där det är tomma rutor? Svårt att förklara i ord men hoppas ni förstår. Stickar Anne Wentzel Super Selene Vänligen Susanne

27.09.2024 - 11:10

DROPS Design answered:

Hei Susanne. Om du oppgir hvilken DROPS oppskrift du strikker etter, så skal vi hjelpe deg så godt vi kan med å forklare. Er det andre oppskrifter / designere, må du nesten kontakte de som har skrevet den. Vi har dessverre ikke mulighet til å svare på andre sine design og vite at vi gir et riktig svar. mvh DROPS Design

30.09.2024 - 07:05

Country flag Barbara wrote:

On pattern Billowing Rose #188-22 - I am new to diagrams - I seem to understand them but I don't understand the written instructions on A1 - is the instruction for just one row? Or do I do 6 rows i.e. R1 K, R2 K, R3 K2tog 4x, yo (6x) K2tog 4x, R4 K, R5 K, R6K? When I do just one row with the 2 edge stitches my count is 17 st short -- 132 vs 149. I have tried everything. If you could help me here, I am sure I could get on with the rest of this lovely bolero. Thank you for any help.

21.09.2024 - 05:15

DROPS Design answered:

Dear Barbara, the first row of each chart for the yoke is as follows: A.1 (= 1 yarn over, knit 2 together, 1 yarn over), A.2 (= knit 1, 1 yarn over, slip 1 stitch knitwise, knit 1, pass slipped stitch over stitch worked, knit 1, knit 2 together, 1 yarn over) A.3 (= knit 1, 1 yarn over, slip 1 stitch knitwise, knit 1, pass slipped stitch over stitch worked, 1 yarn over). Work these charts as stated in the pattern, repeating the charts as many times as necessary for your size. On the next round, continue with the next round of the charts (in this case, you knit all stitches, since that is what you have in all charts). Happy knitting!

22.09.2024 - 23:19

Country flag June wrote:

Hei. Jeg strikker en genser hvor str M begynner mitt i diagrammet, strikker jeg da fra M’en og ut til venste for så å starte helt i starten av diagrammet? Eller skal man kun strikke fra M’en og til enden og starte ved M’en igjen ? På forhånd takk Mvh June

20.09.2024 - 22:55

DROPS Design answered:

Hei June. Mest sannsynnlig er det slik du først skriver (fra M’en og ut til venste for så å starte helt i starten av diagrammet). Men siden det ikke er oppgitt hvilken oppskrift det gjelder, får jeg ikke dobbeltsjekke med hva / og om det står noe spesielt i den oppskriften. mvh DROPS Design

23.09.2024 - 08:54

Country flag Tim wrote:

I am working the Lucky Wish pattern and have reached the 114 stitches stage of the yoke, but can\'t figure out the next stage to reach 304 stitches. Apologies if I am not understanding something obvious.

12.09.2024 - 11:12

Country flag Tim wrote:

I am working the Lucky Wish pattern and have reached the 114 stitches stage of the yoke, but can\'t figure out the next stage to reach 304 stitches. Apologies if I am not understanding something obvious.

12.09.2024 - 11:12

DROPS Design answered:

Dear Tim, you will work following the diagram A.1 a total of 19 times (6 stitches in each A.1 x 19 repeats in the round = 114 sts); increase in each A.1 just as shown in diagram so that you get 16 sts in each A.1 when diagram is done, so that you have 16 stitches in each A.1 x 19 repeats in the round = 304 stitches. Happy knitting!

13.09.2024 - 09:41

Country flag Anna Melnick wrote:

Hi, I am working the Snow Baby pattern and have just started the jacket. For some reason I’m not figuring out the M.1 pattern. I keep increasing with every yo row. On the 4th row it says to knit 2 together 3x -yo 6 times- knit 2 together 3x. By the next row I have added a ton of stitches…. What am I missing? Don’t the two actions cancel each other out? Can you help me on this? Thank you!!

24.08.2024 - 06:19

DROPS Design answered:

Dear Anna, in the first row of M.1, since you work the charts from the bottom up, you have 6 decreases and 6 yarn overs/increases, so they should be cancelling each other out. The number of stitches remains the same, as you can see on the next rows, rows 2 to 4, working upwards. Check as you work M.1 each time in the row to see if you have worked all necessary decreases and increases each time. Happy knitting!

26.08.2024 - 00:02

Country flag Yvonne wrote:

I'm looking to knit pattern Diamond Delight no. 196-15. On reaching the end of neck edge with 88 stitches on needle. I then get to yoke but am stuck when it says work A1 in the round (=22 repetitions of 4 stitches). I don't understand this. Continue with A1 once worked I should have 264 stitches - how is that when it doesn't say increase anywhere? Can you explain this please

21.08.2024 - 19:24

DROPS Design answered:

Dear Yvonne, read diagrams from bottom up, so that you start working A.1 over 4 sts (increasing 1 st on first round in each A.1) a total of 22 times in the round (22 times 4 sts = 88 sts), at the end of first round you get 5 sts in each A.1 (22x5=110 sts); continue working A.1 increasing as shown in diagram; when all increases are done you get 12 sts in each A.1 x 22 repeats = 264 sts; continue diagram as shown to the end. Happy knitting!

22.08.2024 - 08:48

Country flag Sheila Hartley wrote:

Thanks so much for your help and the quick response.

16.08.2024 - 00:28

Country flag Lore Hewson wrote:

I would like to knit the Running Circle cardigan. As I read it, A.1 and A.2 charts are for the button/buttonhole bands. I am assuming that the swiggly line on row 8 is indicating a button hole row. However, I do not see any instructions on how to make a button hole here. Can you help me?

11.08.2024 - 22:27

DROPS Design answered:

Dear Lore, in the pattern it explains that you don't work buttonholes. In the SHORT OVERVIEW OF THE PIECE, it indicates: "Buttonholes are not worked, as the buttons are buttoned in the lace pattern on the band." There is no "swiggly line"; it's actually a sequence of yarn over + k2tog. You can see in the picture that you will have 3 yarn overs in specific rows of the lace pattern, through which you will be able to pass a button. Happy knitting!

11.08.2024 - 23:47

Country flag Sheila Hartley wrote:

I need some help with your knit cloth with lace pattern in Paris pattern w-486 . Are the 3 chart diagrams worked together over the 17 sts and repeated? What happens with A.1B where you say work over the next 24 sts? As there are 8 sts in A.1B does this mean to repeat 3 times for the whole chart. Are all rows read from left to right? All wrong side rows are purl? Do you knit 3 sts at the beginning and end of all right side rows? That's so much for any help on this?

06.08.2024 - 13:34

DROPS Design answered:

Dear Mrs Hartley, you should only repeat A.1B part, this means work from RS: 3 sts in garter stitch, A.1A (-= 4 times), repeat A.1B until 8 sts remain (see number of repeats depending on number of sts), work the 5 last stitches A.1C and finish with 3 sts in garter stitch; from WS knit 3, purl until 3 sts remain and knit 3. Happy knitting!

07.08.2024 - 08:22

Country flag Marie Granhagen wrote:

I diagrammet jag stickar efter står det att jag ska börja fyra maskor in för min storlek. Ska jag göra det vid varje mönstersekvens/-rapport på varvet eller bara vid början av varje varv?

21.07.2024 - 19:04

DROPS Design answered:

Hei Marie. Står det noe spesifisert om 1. omgang / når du starter på diagrammet i den oppskriften du strikker etter? Som regl er det bare første gang. mvh DROPS Design

12.08.2024 - 08:21

Country flag Kaja Iversen wrote:

Skal jeg lese motsatt retning om jeg strikker venstrehendt?🥲😅

18.07.2024 - 23:34

DROPS Design answered:

Hei Kaja. Da følger du diagrammet fra fra venstre til høyre :) mvh DROPS Design

12.08.2024 - 08:18

Country flag Guillotin wrote:

Bonjour,\r\nJe commence le modèle Agnès en 11/12 ans.Je ne comprends pas le diagramme n°1: tricoter une maille A.1 au dessus de la maille suivante .Merci pour votre réponse . Cordialement

11.07.2024 - 15:43

DROPS Design answered:

Bonjour Mme Guillotin, le diagramme A.1 se tricote sur 1 maille (pour permettre au motif d'être symétrique), ainsi, vous allez simplement tricoter cette maille comme indiqué dans le diagramme A.1.. Bon tricot!

30.07.2024 - 09:09

Leave a comment or question to this lesson

Your email address will not be published. Required fields are marked *.