
Categorías populares
¿Buscas un hilo?


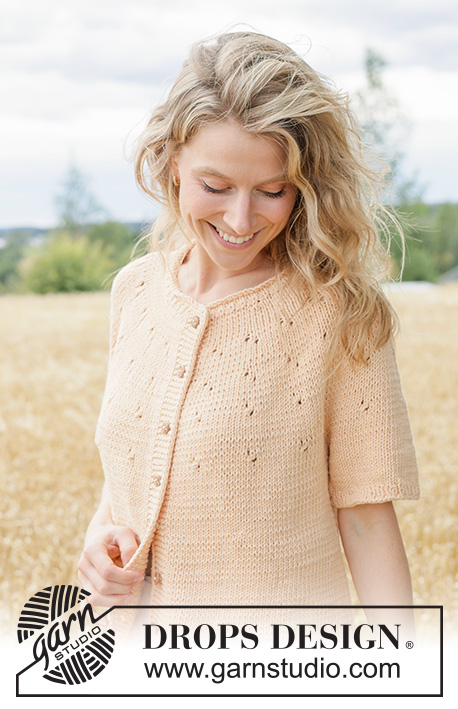
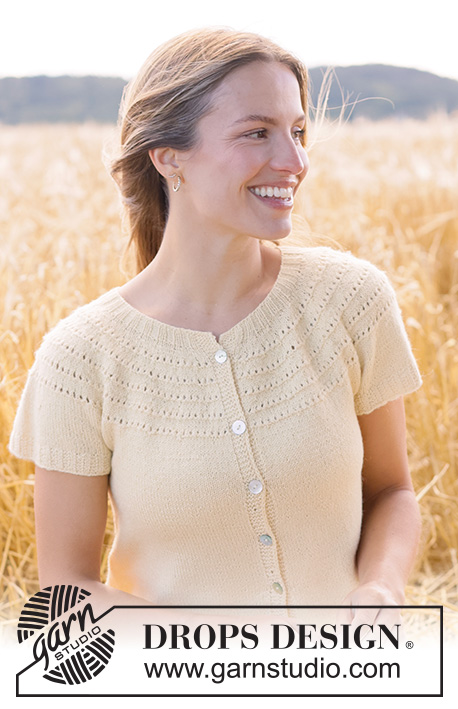
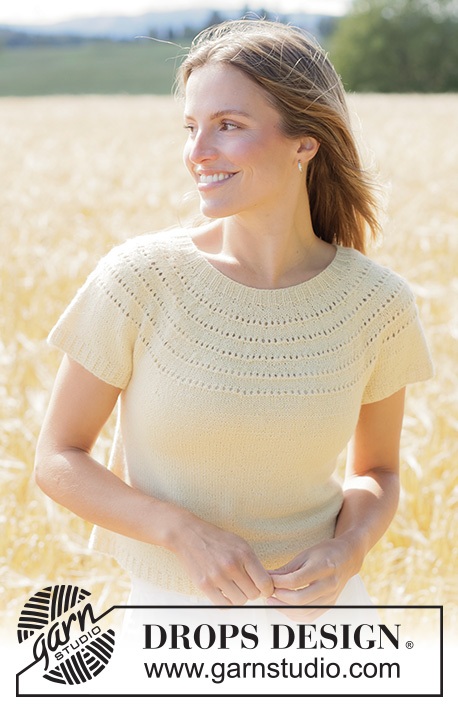
Pulóver: Tejido de arriba para abajo

Mostramos cómo aumentar para el raglán haciendo una HEB (lazada) 2 puntos antes del marcapuntos y 2 puntos después del marcapuntos, y en la vuelta siguiente, tejemos las HEB retorcidas de derecho para evitar que se forme un agujero. Ya hemos tejido el cuello (resorte) y comenzamos el video con la 1ª vuelta donde hacemos los aumentos. Recuerda que también debes leer el patrón en adición a ver el video, un patrón contiene más instrucciones a seguir / número de puntos entre los marcapuntos / el motivo / elevación, etc. El hilo marcador rosado sirve de referencia para señalar el inicio de la vuelta. Recuerda, este es solo un video general.
También mostramos cómo colocar los puntos de la manga en espera en un hilo, cómo montamos nuevos puntos bajo el brazo y tejemos la manga. Pero RECUERDA que DEBES leer un PATRÓN en adición a ver el video.
Patrones que utilizan esta técnica
Video #592, listado en: Aprende a hacer punto, Raglán, Raglán de arriba hacia abajo
Nuestros videos no tienen sonido. Somos una empresa internacional y nuestros videos son vistos por personas que hablan diferentes idiomas y muchas de ellas no comprenden el español. Consecuentemente, como no hay un idioma determinado a usar por nosotros, hemos escrito las instrucciones que acompañan el video, y no hay ningún sonido que interfiera mientras se ve el video.
Puedes ajustar la velocidad de este video haciendo clic en el ícono en la barra de reproducción.
Dejar un comentario o pregunta acerca de este video
Tu dirección de email no será publicada. Los campos obligatorios están marcados con un *.
También te podría gustar...


Con más de 40 años en el diseño de modelos de punto y de ganchillo, DROPS Design ofrece una de las más vastas colecciones de patrones gratuitos en el internet - traducidos en 17 idiomas. Al día de hoy, contamos con 324 catálogos y 12291 patrones - de los cuales 11689 están traducidos en español.
Nosotros trabajamos con mucho esmero para brindarte lo mejor que las labores de punto y ganchillo tienen para ofrecer,inspiración y consejos, así como hilos de magnífica calidad a precios increíbles! Te gustaría usar nuestros patrones para otro fin además del uso personal? Puedes leer acerca de lo que estás permitida a hacer en el texto de Copyright en la parte de abajo de todos nuestros patrones. Felices labores!
Hello, I have a question regarding raglan (the raglan itself is 2purls, 2 knits, 2 purls) after the increase is done. I mean, i have already enough stitches but I need to continue with knitting before dividing the sweater for front/back and arms until I reach certain length. So the question is do I still maintain the 2P, 2K, 2P raglan till the divide moment even though I'm not increasing anymore? Or do I do only knits over the raglan since the increase is done?
27.04.2024 - 19:21DROPS Design :
Dear Paulina, which pattern are you working? Could you indicate the pattern number? Unless otherwise specified, you should maintain the established pattern, even if you have finished the increases. For example, you should keep the rib pattern as before. The raglan stitches should now be integrated in the rib pattern. However, some models may have a separate pattern for the raglan stitches to obtain a different texture, so we can't help you unless we know the exact model. Happy knitting!
29.04.2024 - 00:34Ik ben 64 en heb geen zin om een hele nieuwe manier van breien te leren. Hebben jullie ook patronen voor een simpele, op rechte naalden gebreide, trui met raglan mouwen en een kleine col? Door een schouderprobleem kan ik onmogelijk zo'n hele trui aan mijn naalden hebben hangen. In losse onderdelen lukt het nog wel. Maar ik kan nergens meer een gewoon, simpel patroon in tricotsteek vinden.
25.04.2024 - 16:25DROPS Design :
Dag Jacqueline,
Veel patronen worden inderdaad met de rondbreinaald en van boven naar beneden gemaakt. Als je op de site filtert op constructie van onder naar boven en wat terug scrolt naar de wat oudere patronen, dan vindt je wel patronen met losse panden die je aan elkaar naait.
Verder hebben we een instructie gemaakt om een patroon aan te passen om op rechte naalden te breien. Dit kun je niet voor ieder patroon gebruiken, maar misschien heb je er toch wat aan. Deze instructie vind je hier.
10.05.2024 - 09:40Dear Drops Team, thank you very much for this lovely pattern. It's gorgeous and I have tryed about 8 Times to knit this pattern, but always fallen. Is it maybe possible to do a video to show how this leave-pattern is knitted. It would be so helpful. And it's always very helpful to hear an explaination. Many thanks and best regards
23.04.2024 - 21:18DROPS Design :
Dear Angie, maybe you should tell us which pattern you are working on? That would be easier to have a look on the pattern to help you, please remember to tell us which size you are working on and which part is tricky for you. You will also find some lessons that could help you here. Happy knitting!
24.04.2024 - 08:33It would be nice if the video tutorials were slower to follow and explaining what you are doing in the video would help a lot. I was going to try this pattern but after watching the tutorials I am just more confused.
06.03.2024 - 15:11Hei kan jeg strikke Denne genseren fra nede og opp? Har aldri strikket fra oppe og ned før
18.02.2024 - 18:12Waarom steek je in de 1e meerder naald ineens achter in de rechte steek?
15.02.2024 - 15:56Hello, I am working on this pattern (Drops 227-33), I am trying to start the markers to form the yoke and the math is not equal. Is it supposed to be equal stitches for the back and front? Thank you
29.01.2024 - 02:34DROPS Design :
Dear Jen, the math is correct. When inserting the markers in the first round of the yoke work as follows (for size S): start at the transition between the sleeve and the back piece, insert marker in the first stitch, 16 sts (= back piece), insert marker in next stitch, 8 sts (= sleeve), insert marker in next stitch, 16 sts (= front piece), insert marker in next stitch, 8 sts (= sleeve). Afterwards you will increase 1 stitch on each side of each marker, so the number of stitches will increase in the same amount in each section. Happy knitting!
29.01.2024 - 23:10Videoen er på ingen måde til hjælp. Der er ingen lyd med forklaring på hvad der foregår. Hun strikker alt for hurtigt og man kommer ind midt i videoen og har ikke været med fra start, så det er fuldstændig umuligt at finde hoved og hale i hvor man er i processen,hvad det er hun laver, og det er slet ikke til at gennemskue hvilke masker der strikkes eller udtag/indtag. Det er overhovedet ikke til hjælp.. tværtimod er det komplet ubrugelig.
24.01.2024 - 17:21This is the first top down jumper I have attempted. I am sorry but I find the video unhelpful and confusing
18.01.2024 - 19:53This is the first top down jumper I have attempted and I thought the video instructions would clarify the printed ones. I have found the video very confusing. It doesn't reflect the pattern it was associated with and the printed pattern was equally confusing. I love the wool and will persist but sorry, I am not happy with the instructions.
18.01.2024 - 19:51