
Popular categories
Looking for a yarn?


|
|||||||||||||||||||||||||||||||||||||
Blue Helix |
|||||||||||||||||||||||||||||||||||||
 |
 |
||||||||||||||||||||||||||||||||||||
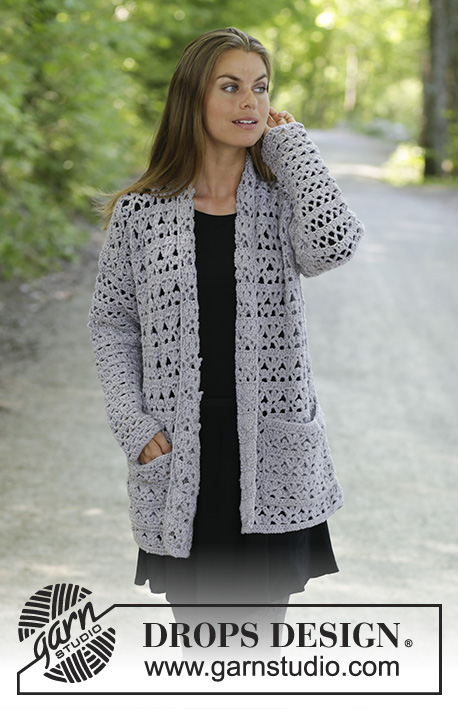
Circle crocheted jacket in 1 strand DROPS Nord + 1 strand DROPS Kid-Silk. Piece is worked with lace pattern. Size: S – XXXL
DROPS 194-36 |
|||||||||||||||||||||||||||||||||||||
|
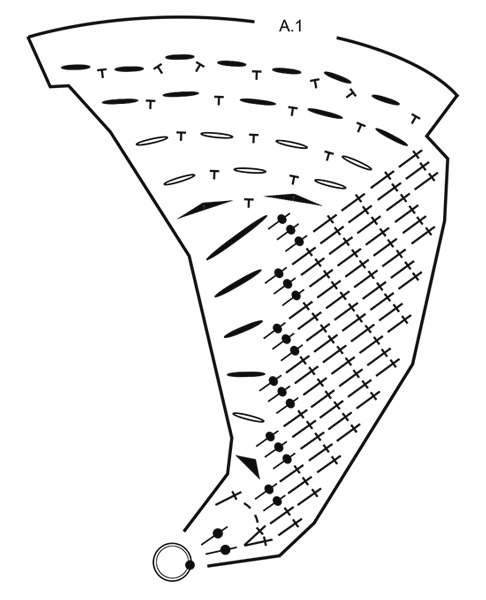
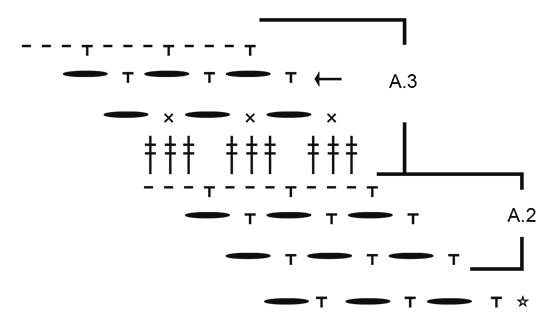
EXPLANATION FOR THE PATTERN: ---------------------------------------------------------- PATTERN: See diagrams A.1 to A.3. CROCHET INFO-1: Replace first single crochet at beginning of round with 1 chain stitch, finish round with 1 slip stitch in 1st chain stitch at beginning of round. Replace first double crochet at beginning of round with 3 chain stitches, finish round with 1 slip stitch in 3rd chain stitch at beginning of round. Replace first treble crochet at beginning of round with 4 chain stitches, finish round with 1 slip stitch in 4th chain stitch at beginning of round. CROCHET INFO-2 (transition to next round): Work slip stitches to first stitch on next round. If there is a chain space on last round work chain stitches until middle of first chain space on round. NOTE: Applies from the end of 3rd round in A.1 and until finished measurements. INCREASE TIP: Increase 1 chain space as follows: Work * 1 single crochet + 1 chain space *, work from *-* 2 times in total around same chain space. DECREASE TIP (applies to sleeves): NOTE: Pattern displaces the beginning of round, therefore adjust so that the 2 decreases are done mid under sleeve. Decrease 1 chain space as follows: Work 1 single crochet around chain space, 1 single crochet around next chain space, 6 chain stitches. ---------------------------------------------------------- START THE PIECE HERE: ---------------------------------------------------------- JACKET - SHORT OVERVIEW OF THE PIECE: Work piece in the round in a circle from mid back of back and outwards. Work armholes on the circle. Work front pieces back and forth and then work a finishing edge around the entire circle. Work sleeves in the round, top down. CIRCLE: Work 4 chain stitches on hook size 5 mm = US H/8 with 1 strand Nord + 1 strand Kid-Silk (= 2 strands) and form a ring with 1 slip stitch in first chain stitch made. Then work pattern in the round according to diagram A.1 7 times in total on round - read CROCHET INFO-1 and CROCHET INFO-2. REMEMBER THE CROCHET GAUGE! When A.1 has been worked vertically, there are 49 chain spaces on last round. The circle measures approx. 34 cm = 13⅜" in diameter. Cut the yarn, and begin next round in 4th chain space = mid back/neck. Now continue in the different sizes as follows: SIZE S-M: = 49 chain spaces. Work first round in A.2 - AT THE SAME TIME work armholes as follows: Work around each of the first 7 chain spaces, work 35 loose chain stitches (= armhole), skip 8 chain spaces, work around each of the next 19 chain spaces, work 35 loose chain stitches (= armhole), skip 8 chain spaces, work around each of the last 7 chain spaces. Repeat 2nd round in A.2 - AT THE SAME TIME increase - read INCREASE TIP, as follows: Work around each of the first 7 chain spaces - increase 2 chain spaces over these chain spaces, work 10 chain spaces/single crochets around armhole (= 2 increases), work around each of the next 19 chain spaces - increase 7 chain spaces over these chain spaces, work 10 chain spaces/single crochets around armhole (= 2 increases), work around each of the last 7 chain spaces - increase 2 chain spaces over these chain spaces (= 15 increases in total on round) = 64 chain spaces. Then work 3rd round in A.2 without increasing. The circle measures approx. 45 cm = 17¾" in diameter. SIZE L/XL - XXL/XXXL: = 49 chain spaces. Work first round in A.2 - AT THE SAME TIME increase 15 chain spaces evenly (i.e. increase 1 chain space over approx. every 3rd chain space) - read INCREASE TIP = 64 chain spaces. Work second round in A.2 - AT THE SAME TIME work armholes as follows: Work around each of the first 8 chain spaces, work 38-41 loose chain stitches (= armhole), skip 9 chain spaces, work around each of the next 30 chain spaces, work 38-41 loose chain stitches (= armhole), skip 9 chain spaces, work around each of the last 8 chain spaces. Then work 3rd round in A.2 without increasing. The circle measures approx. 45 cm = 17¾" in diameter. ALL SIZES: = 64 chain spaces for all sizes Then work diagram A.3 in the round, work A.3 5-6-7 times in total vertically - AT THE SAME TIME increase on round marked with arrow in diagram - remember INCREASE TIP, as follows: Increase 16 chain spaces on every round with increase, i.e. 1ST TIME: Increase 1 chain space around every 4th chain space = 80 chain spaces. 2ND TIME: Increase 1 chain space around every 5th chain space = 96 chain spaces. 3RD TIME: Increase 1 chain space around every 6th chain space = 112 chain spaces. 4TH TIME: Increase 1 chain space around every 7th chain space = 128 chain spaces. 5TH TIME: Increase 1 chain space around every 8th chain space = 144 chain spaces. Now continue in the different sizes as follows: SIZE S-M: Fasten off. The circle measures approx. 100 cm = 39⅜" in diameter. SIZE L/XL: 6TH TIME: Increase 1 chain space around every 9th chain space = 160 chain spaces. Fasten off. The circle measures approx. 111 cm = 43¾" in diameter. SIZE XXL/XXXL 6TH TIME: Increase 1 chain space around every 9th chain space = 160 chain spaces. 7TH TIME: Increase 1 chain space around every 10th chain space = 176 chain spaces. Fasten off. The circle measures approx. 122 cm = 48" in diameter. ALL SIZES: = 144-160-176 chain spaces. Continue working only over 40-44-47 chain spaces in each side – i.e. do not work over 32-36-40 chain spaces at the top by neck and 32-36-42 chain spaces at bottom of back. Continue with explanation under left front piece. LEFT FRONT PIECE: = 40-44-47 chain spaces. Continue back and forth as follows: ROW 1: Work slip stitches until middle of the first chain space, 1 single crochet, * work 6 chain stitches, 1 single crochet around next chain space *, repeat from *-* and finish with 1 single crochet around last chain space = 39-43-46 chain spaces. Repeat 1st row 3-3-7 more times. There are 36-40-39 chain spaces at the edge of front piece. Cut the yarn. RIGHT FRONT PIECE: Work same way as on left front piece over 40-44-47 chain spaces in the right side. Fasten off. FINISHING EDGE: Work an edge around the entire circle as follows: Work last round in A.3, i.e. over every chain space work 1 single crochet and 3 chain stitches. Then work 1st round in A.3, i.e. work 3 treble crochet around every chain space. Fasten off. Piece measures approx. 104-115-126 cm = 41"-45¼"-49½" in diameter vertically and approx. 114-126-146 cm = 45"-49½"-57⅜" in diameter in width. SLEEVE: Work sleeve in the round from armhole. Begin mid under sleeve and work 57-63-66 treble crochets evenly around armhole (= approx. 3 treble crochets around every chain space) = 1st round in A.3. Continue in the round on A.3 to and with last round. Then repeat A.3 vertically - AT THE SAME TIME decrease 2 chain spaces mid under sleeve, decrease on round marked with arrow in diagram - read DECREASE TIP. Decrease like this on every round marked with arrow 4-5-5 times in total = 11-11-12 chain spaces. Continue without decrease until sleeve measures approx. 42-44-46 cm = 16½"-17¼"-18" - adjust to finish after a round with treble crochets. Fasten off. Work the other sleeve the same way. |
|||||||||||||||||||||||||||||||||||||
Diagram explanations |
|||||||||||||||||||||||||||||||||||||
|
|||||||||||||||||||||||||||||||||||||
|
|||||||||||||||||||||||||||||||||||||
|
|||||||||||||||||||||||||||||||||||||

|
|||||||||||||||||||||||||||||||||||||
|
Have you made this or any other of our designs? Tag your pictures in social media with #dropsdesign so we can see them! Do you need help with this pattern?You'll find tutorial videos, a Comments/Questions area and more by visiting the pattern on garnstudio.com. © 1982-2024 DROPS Design A/S. We reserve all rights. This document, including all its sub-sections, has copyrights. Read more about what you can do with our patterns at the bottom of each pattern on our site. |
|||||||||||||||||||||||||||||||||||||


With over 40 years in knitting and crochet design, DROPS Design offers one of the most extensive collections of free patterns on the internet - translated to 17 languages. As of today we count 304 catalogs and 11422 patterns - 11417 of which are translated into English (US/in).
We work hard to bring you the best knitting and crochet have to offer, inspiration and advice as well as great quality yarns at incredible prices! Would you like to use our patterns for other than personal use? You can read what you are allowed to do in the Copyright text at the bottom of all our patterns. Happy crafting!
Comments / Questions (79)
Hi, I'm asking same question as Lorraine from Canada 4/9/2019, I didn't understand your explanation on what to do when you get to the chain on the sleeve hole. Do you connect a new yarn here and do it seperate or put the 2 together? If continuing in the round does that mean it continues on the back. Just very confused but loving the look so far and would love to finish it. Thanks and looking forward to your answer, from a relatively new crocheter.
17.10.2019 - 10:43DROPS Design answered:
Dear Mrs Ward, to make the armhole on the circle and continue then working the circle in the round as before, you will have to skip some stitches (7 or 9 ch-spaces) and replace them with chains (= 35-38 or 41 ch-sts depending on your size), just skip the next ch-spaces and continue as before to create first armhole then repeat for the 2nd armhole and join at the end of the round as before. On next round, you will continue in pattern as explained working both in last round (between armholes/chains) and in the both chains cast on over the skipped ch-spaces. Happy crocheting!
17.10.2019 - 11:41Hallo,Ich komme bei der zweiten Runde A2 nicht weiter.Die erste Runde A2 endet mit 49 Lfmbg.Die zweite Runde soll über 7Lfmbg zwei Zunahme gehäkelt werden... Bei mir sind es aber nur 6Lfmbg bis zur Luftmaschenkette!?Dann ist mir nicht ganz klar, was mit 10 Lfmbg/Fm um den Armausschnitt (=2 Zunahme) gemeint ist. Wird dann über die Luftmaschenkette,, (35 Lfm) gehäkelt oder über die zuvor 8 ausgelassenen Lfmbg?Freue mich schon auf eine Antwort, damit ich weiterhäkeln kann :o)
05.10.2019 - 22:06DROPS Design answered:
Liebe Mette, wenn Sie bei der größe S-M die 1. Runde A.2 häkeln (= mit Armlöcher), sollen Sie 49 LmB haben: 7 LmB, 8 LmB überspringen (= 35 Lm häkeln), 19 LmB häkeln, 8 LmB überspringen (= 35 Lm häkeln) und 7 LmB häkeln = 7+8+19+8+7=49 LmBogen. Bei der 2. Runde häkeln Sie 9 LmB über die 7 ersten LmB (= 2 Zunahmen), 10 LmB über die 35 Lm, 26 LmB über die 19 LmB, 10 LmB über die 35 Lm, 9 LmB über die 7LmB = 9+10+26+10+9= 64 LmB. Viel Spaß beim häkeln!
07.10.2019 - 10:43Bonjour,je ne comprends pas " INFO CROCHET-2"si on lit le diagramme de droite à gauche ,à partir du troisième rang l 'arceau se trouve à la fin du tour pas au début pourriez vous m 'expliquer? Merci
28.09.2019 - 09:05DROPS Design answered:
Bonjour Mme Eberhart, le début du 4ème tour de A.1 ne se crochète pas dans la 1ère bride du 3ème tour tour mais dans la 2ème bride, ainsi, à la fin du 3ème tour, terminez par 1 mc dans la 3ème ml du début du tour (= 1ère bride du tour), 1 maille coulée dans la bride suivante, 3 mailles en l'air (= 1ère bride = début du 4ème tour). Au début du 9ème tour de A.1, on doit commencer le tour dans la 3ème bride, on ira donc en mc jusqu'à cette bride pour commencer le 1er A.1 du tour. Bon crochet!
30.09.2019 - 08:36When one has finished the second row of A2, I assume one crochets the third row of A3 over all of the 6 chain spaces of the previous row, leaving the chain for the sleeve opening just dangling. I am having trouble picturing this part. If that is the case, does one crochet in front of the sleeve opening (leaving the chain on the back of the work) or crochet behind the sleeve opening (leaving the chain on the front of the work)?
04.09.2019 - 06:22DROPS Design answered:
Dear Lorraine, you have to work the third row of A.3 over all the stitches of the round, ie in the stitches from A.2 as well in in the chain stitches of the armhole, skipping stitches replaced by chain create a "hole" in the round and this hole will be for the sleeve, on next round after the armhole, you just continue in the round as explained, over chain stitches as they would have been worked as the other to continue the pattern/circle. Happy crocheting!
04.09.2019 - 09:05I've been crocheting for nearly 55 years, but I find your patterns impossible to navigate. But thanks for the thought. There are a few I would like to try, but hey! c'est la vie.
31.05.2019 - 11:28DROPS Design answered:
Dear Denise Meredith, The DROPS patterns are knitted and crocheted by thousands and thousands of people around the world. We understand however that in certain countries, with different knitting/crochet traditions than Scandinavia, our patterns might be written in a way that differs from what some are used to. But of course we want everyone to understand our patterns, so that’s why we have created an extensive library of tutorial videos as well as step by step lessons that explain how to follow the techniques we use and how to read the diagrams in our patterns. Give them a try!
03.06.2019 - 11:21Findes der ikke en opskrift og ikke bare et diagram
20.05.2019 - 15:16DROPS Design answered:
Hei Alice. Det finnes ingen skriftlig beskrivelse på diagrammet, dessverre. Det er laget diagram nettopp fordi det er mer oversiktlig. Om du er usikker på hvordan å lese et heklediagram har vi en leksjon på nettopp dette her. God fornøyelse
21.05.2019 - 12:55Hi, love your patterns, thank you. I'm not sure about the two strands here, so you crochet the whole piece with two strands? Can it be done with one strand instead?
28.04.2019 - 09:49DROPS Design answered:
Dear Sigal, yes, whole piece is made with 2 strands, 1 of each quality. If you want to work with just 1 strand instead, you should choose thicker yarn (so your gauge will stay the same), some of Yarn Group C - see this tab . Happy crocheting!
28.04.2019 - 15:52Hej. Jeg er lidt i tvivl om hvordan jeg laver 3. Omgang i a2. Når jeg kommer til ærmegabet (lavet på sidste runde) hvordan forsætter Jeg runden her fra ? Er det hen over den store luftmaskebue (ærmegabet) eller ved de 9 små luftmaskebuer ? Mvh Louise
10.04.2019 - 22:07DROPS Design answered:
Hei Louise. Du strikker over den stor luftmaskeraden, og ikke over de 9 luftmaskebuene du hoppet over forrige rad. Du skal ha 64 luftmaskebuer etter omgangen er ferdig. God fornøyelse
11.04.2019 - 14:39En saanut selvää miten piirroksen A1 uloin kerros täytyy tehdä. Mitä tarkoittivat ne vinot kiinteät silmukat?
10.04.2019 - 21:24DROPS Design answered:
Hei, viimeisellä kerroksella virkataan vuorotellen 1 kiinteä silmukka ketjusilmukkakaaren ympäri ja 6 ketjusilmukan ketju.
11.04.2019 - 17:11Mir ist überhaupt nicht klar, wie ich mit den Armausschnitten weiterhäkeln soll. Die 3. Runde von A2, häkle ich die schon an den 41Maschen (Armausschnitten) entlang und wenn ja, wieviele Luftmaschenbögen mache ich dann, um in der nächsten Reihe bei A3 dann weiterzumachen?
22.03.2019 - 10:23DROPS Design answered:
Liebe Nadine, bei der 3. Reihe in A.3 häkeln Sie wie zuvor, dh Sie sollen dieselben Luftmaschenbogenanzahl für die Armausschnitten haben wie bei der vorrigen Runde. Viel Spaß beim häklen!
22.03.2019 - 13:26