


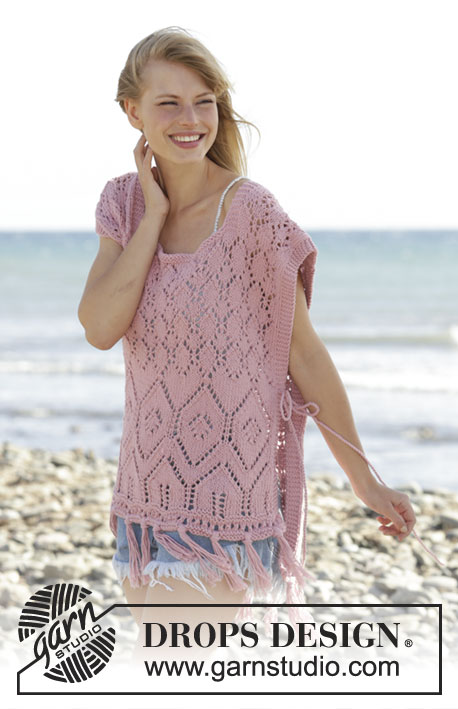
Creme Caramel
DROPS krajkové pončo pletené z příze "Cloud". Velikost: S-XXXL.


DROPS design: model č. co-031
Skupina přízí: E nebo C + C
-----------------------------------------------------------
Velikost: S/M – L/XL - XXL/XXXL
Rozměry:
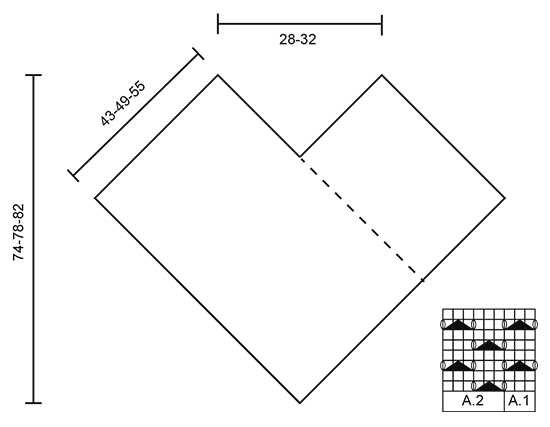
Délka před sešitím: 112-121-130 cm
Obvod průkrčníku: 70-73-76 cm
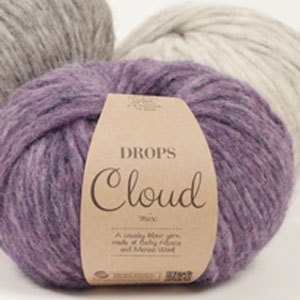
Materiál: DROPS CLOUD firmy Garnstudio
200-250-250 g, barva č.02, světlá béžová
DROPS KRUHOVÁ JEHLICE (60 nebo 80 cm) č. 9 – nebo velikosti potřebné k upletení zkušebního vzorku o rozměrech 10 ok x 14 řad lícovým žerzejem = 10 x 10 cm.
-------------------------------------------------------
Náhradní příze – Podívejte se, jak změnit přízi
Skupina přízí A až F – Neměňte návod, změňte přízi
Spotřeba příze při použití náhradní příze – Využijte náš převodník
-------------------------------------------------------
- Česky
- Dansk
- Deutsch
- Eesti keel
- English (UK/cm)
- English (US/in)
- Español
- Français
- Íslenska
- Italiano
- Magyar
- Nederlands
- Norsk
- Polski
- Português
- Suomi
- Svenska
- English (UK/cm), Bulgaria
- English (UK/cm), Croatia
- English (UK/cm), Greece
- English (UK/cm), Latvia
- English (UK/cm), Lithuania
- English (UK/cm), Romania
- English (UK/cm), Slovenia
- Česky, Slovakia
Návod
Pleteme stále hladce, lícové i rubové řady. 1 vroubek = 2 řady hladce.
VZOR:
viz schémata A.1 a A.2; zobrazeny jsou všechny řady vzoru nahlížené z lícové strany.
----------------------------------------------------------
PONČO:
Pleteme v řadách.
Na kruhovou jehlici č.9 nahodíme přízí Cloud 43-49-55 ok a upleteme 2 vroubky vroubkovým vzorem – viz výše. Pokračujeme takto – začínáme lícovou řadou: 2 oka vroubkovým vzorem, vzor A.1, vzor A.2 nad následujícími 36-42-48 oky, končíme 2 oky vroubkovým vzorem.
Takto pokračujeme až do výše 45-51-57 cm. Na bok dílu vložíme značku – označuje místo, kde sešijeme uzavřený okraj s bočné stranou. Pleteme dál vzorem a vroubkovým vzorem až do výše 112-121-130 cm, pak všechna ok uzavřeme.
DOKONČENÍ:
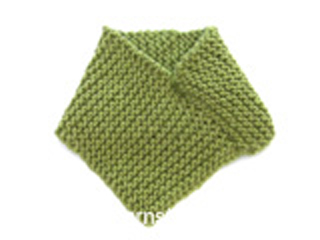
Sešijeme krátkou stranu (= uzavřený okraj) s postranní dlouhou stranou – okraj přiložíme u značky a sešíváme směrem k počátečnímu, nahozenému okraji. Protější strana vytvoří cíp uprostřed přední strany ponča.
Schéma

|
= lícový žerzej (líc hladce, rub obrace) |

|
= 1x nahodíme mezi 2 oky |

|
= 1 oko sejmeme hladce, 2 oka spleteme hladce a sejmuté přes ně přetáhneme |
Jak můžete zacházet s našimi návody? Můžete sdílet DROPS návody online, s použitím původní fotky, uvedením originální příze, jména a čísla modelu. Ale JE ZAKÁZÁNO jakkoli reprodukovat či kopírovat celé návody v digitální podobě. Obchody s přízí mohou využívat databázi DROPS návodů k podpoře prodeje našich produktů. Návody si můžete vytisknout v libovolném počtu kopií. Žádáme vás o jedinou věc: nedělejte žádné úpravy a změny v tištěném originálu, ani původní návod v tištěné podobě nijak nedoplňujte. A také respektujte pravidlo DROPS a návody poskytujte klientům zdarma. Vydavatele, kteří by rádi zveřejnili naše návody v tištěných knihách nebo časopisech, prosíme, aby nás kontaktovali - rádi jim poskytneme podrobnější informace. Prodej výrobků vytvořených podle návodů DROPS je povolen pouze v případě, že jde o prodej jednotlivých kusů nebo výrobu na zakázku. Větší komerční využití návodů dovoleno není. U každého výrobku musí být rovněž jasně a zřetelně uvedeno, že jde o výrobek podle modelu z kolekce DROPS DESIGN. Opatřit nášivkami či visačkami oděvy, které využívají DROPS DESIGN je podmíněno uvedením následujícího textu: "Model DROPS DESIGN vytvořil/a...(doplňte jméno člověka, který oděv vyrobil)". Použití fotografií DROPS pro marketingové účely/prodej je povoleno výhradně v přímé souvislosti s použitím/prodejem přízí, pomůcek a doplňků DROPS. Fotografie nesmí být vystřižené, ořezané ani jinak upravené a logo na nich musí zůstat zřetelně viditelné.
Vyhrazujeme si právo kdykoli stáhnout povolení k užívání, a to bez udání důvodu.
Každý náš návod je doprovázen speciálními video-ukázkami, které vás navedou.


Tyto podrobné video-návody vás povedou "krok za krokem":


Proč je napětí příze u pletení/ háčkování tak důležité?
Napětí příze (hustota úpletu) určuje konečné míry vaší práce a obvykle se měří na vzorku 10 x 10 cm. Spočítáme takto: počet ok na šířku x počet řad na výšku - např.: 19 ok x 26 řad = 10 x 10 cm.
Napětí příze je velmi individuální; někteří lidé pletou/ háčkují volně, zatímco jiní značně utahují. Napětí příze přizpůsobíte změnou velikosti jehlic, proto doporučenou velikost jehlic berte pouze jako vodítko! Je důležité, abyste zajistili, že VAŠE napětí příze odpovídá napětí uvedenému ve vzoru. Pokud budete pracovat s jiným napětím příze než je uvedeno ve vzoru, vaše spotřeba příze a konečné rozměry vaší práce se budou lišit.
Napětí příze také určuje, které příze je možné vzájemně zaměňovat. Pokud dosáhnete stejného napětí příze, můžete snadno zaměnit jednu přízi za druhou.
Viz lekce DROPS: Jak změřit napětí příze/ zkušební vzorek
Viz video DROPS: Jak vypracovat zkušební vzorek napětí příze
Jak zjistím, kolik klubek příze potřebuji?
Požadované množství příze je uvedeno v gramech, např.: 450 g. Pro výpočet potřebného množství klubek musíte nejdříve vědět, kolik gramů je v 1 klubku (25 g, 50 g nebo 100 g). Tyto informace jsou dostupné po kliknutí na jednotlivé druhy přízí na našich stránkách. Vydělte požadované množství množstvím každého klubka. Pokud má například klubko 50 g (nejběžnější množství), výpočet bude následující: 450 / 50 = 9 klubek.
Mohu použít jinou přízi než jaká je doporučena u vybraného vzoru?
Při záměně jedné příze za druhou je důležité, aby napětí příze (hustota úpletu) při pletení/ háčkování zůstala stejná. To proto, aby rozměry hotového oděvu odpovídaly poskytnutému náčrtu. Stejného napětí příze je snazší dosáhnout pomocí přízí ze stejné skupiny. Je také možné pracovat s vícero vlákny tenčí příze najednou, a tak dosáhnout stejného napětí jako při práci se silnější přízí. Vyzkoušejte náš převodník přízí. Doporučujeme vám si vždy vypracovat zkušební vzorek (swatch).
POZNÁMKA: při záměně přízí se může oděv výrazně lišit od oděvu na fotografii, to díky rozdílným vlastnostem a složení každé příze.
Viz lekce DROPS: Mohu použít jinou přízi než je uvedena ve vzoru?
Co to jsou skupiny přízí DROPS?
Všechny naše příze jsou rozděleny do skupin přízí (od A do F) podle síly a napětí příze – skupina A zahrnuje nejtenčí příze a skupina F ty nejsilnější. Toto vám usnadní hledání alternativních přízí k našim vzorům, pokud byste chtěli přízi vyměnit. Všechny příze stejné skupiny mají podobné napětí příze (hustotu úpletu) a můžete je tak snadno vzájemně nahrazovat. Jednotlivé druhy přízí se nicméně liší složením a vlastnostmi, hotové dílo tak získá na jedinečnosti jak na pohled tak na omak.
Kliknutím zde zobrazíte přehled přízí v jednotlivých skupinách.
Jak použít převodník přízí (yarn calculator)?
V horní části všech našich vzorů najdete odkaz na náš převodník přízí (yarn calculator), což je užitečný nástroj, pokud byste chtěli použít jinou než doporučenou přízi. Vyplněním druhu příze, kterou si přejete vyměnit, množství (ve vaší velikosti) a počtu vláken, vám převodník nabídne vhodné alternativní příze se stejným napětím příze (hustotou úpletu). Dále vám prozradí, kolik alternativní příze budete potřebovat a zda budete muset pracovat s vícero vlákny najednou. Většina klubek má hmotnost 50 g (některá 25 g nebo 100 g).
Pokud je vzor vypracován ve vícero barvách najednou, bude nutné každou barvu vypočítat samostatně. Stejně tak, pokud je vzor vypracován s několika vlákny různých přízí (například 1 vlákno alpaky a 1 vlákno Kid-Silk), budete muset najít alternativy jednotlivě, tedy pro každou zvlášť.
Kliknutím zde zobrazíte náš převodník přízí
Proč u vzorů stále uvádíte příze, které se již nevyrábí?
Protože různé příze mají různé vlastnosti a textury, rozhodli jsme se původní přízi v našich vzorech zachovat. Můžete však snadno najít dostupné alternativy mezi našimi ostatními druhy přízí pomocí našeho převodníku nebo si jednoduše vybrat přízi ze stejné skupiny přízí.
Je možné, že někteří prodejci mají přízi stále na skladě, nebo že někdo má doma pár klubek, pro která by rád našel vzory.
Převodník přízí vám nabídne jak alternativní přízi, tak i její požadované množství.
Jakou mám zvolit velikost?
Pokud si nejste jistí jakou velikost vypracovat, můžete například změřit oděv, který již vlastníte a jehož velikost se vám líbí. Následně si zvolte velikost porovnáním těchto mír s těmi v tabulce velikostí vybraného vzoru.
Tabulku velikostí najdete ve spodní části vzoru.
Viz lekce DROPS: Jak číst tabulku velikostí
Proč mi nevychází velikost zkušebního vzorku na doporučené síle jehlic?
Velikost jehlic uvedená ve vzoru slouží pouze jako vodítko, důležité je dodržet napětí příze (hustotu úpletu). A protože napětí příze je velmi individuální, budete muset upravit velikost jehlic tak, abyste zajistili stejné napětí jaké je uvedené ve vzoru – možná budete muset přizpůsobit sílu jehlic o 1 či dokonce 2 velikosti abyste dosáhli správného napětí. Za tímto účelem vám doporučujeme vypracovat zkušební vzorky.
Pokud byste pracovali s jiným napětím příze než je uvedeno, rozměry hotového oděvu se mohou od rozměrů uvedených na náčrtu lišit.
Viz lekce DROPS: Jak změřit napětí příze/ zkušební vzorek
Viz video DROPS: Jak vypracovat zkušební vzorek
Proč je vzor vypracován shora dolů?
Práce s oděvem shora dolů poskytuje větší flexibilitu a prostor pro individuální úpravy. Například je snazší si oděv v průběhu práce vyzkoušet a také upravit délku sedla a průramků.
Návody vše pečlivě vysvětlují krok za krokem, ve správném pořadí. Schémata jsou přizpůsobena směru pletení a vypracována jako obvykle.
Jak správně číst schéma u pletení?
Schéma zobrazuje všechny řady/ kruhové řady, a každé oko jak se jeví při pohledu z lícové strany. Čte se zdola nahoru, zprava doleva. 1 čtvereček = 1 oko.
Při práci v řadách (tam a zpět) je každá lichá řada řadou lícovou a každá sudá řada je řadou rubovou. Při práci v rubových řadách je nutné vypracovávat schéma obráceně: zleva doprava, hladká oka pleteme obrace, oka pletená obrace vypleteme hladce atd.
Při práci v kruhových řadách je každá řada řadou lícovou a schéma je tedy ve všech řadách vypracováno zprava doleva.
Viz lekce DROPS: Jak číst schémata u pletení
Jak správně číst schéma u háčkování?
Schéma zobrazuje všechny řady/ kruhové řady, a každé oko jak se jeví při pohledu z lícové strany. Vypracovává se zdola nahoru, zprava doleva.
Při práci v řadách (tam a zpět) je každá lichá řada řadou lícovou a každá sudá řada je řadou rubovou. Při práci v rubových řadách je nutné vypracovávat schéma obráceně: zleva doprava.
Při práci v kruhových řadách je každá řada řadou lícovou a schéma je tedy ve všech řadách vypracováno zprava doleva.
Při práci s kruhovým schématem začínáme uprostřed a postupujeme směrem proti směru hodinových ručiček, řadu po řadě.
Řady obvykle začínají daným počtem řetízkových ok (ekvivalentní výšce následujícího oka), což bude buď znázorněno ve schématu nebo vysvětleno ve vzoru.
Viz lekce DROPS: Jak číst schémata u háčkování
Jak vypracovat několik schémat zároveň v jedné řadě/ kruhové řadě?
Pokyny pro práci s vícero schématy zároveň ve stejné řadě/kruhové řadě budou často popsány takto: „háčkujeme vzor A.1, A.2, A.3 celkem 0-0-2-3-4x". To znamená, že A.1 vypracujete jednou, následně A.2 vypracujete jednou a A.3 opakujete (na šířku) tolikrát, kolikrát je pro vaši velikost stanoveno – v tomto případě takto: S = 0 krát, M = 0 krát, L=2 krát, XL= 3 krát a XXL = 4 krát.
Se schématy se pracuje jako obvykle: začněte první řadou v A.1, poté vypracujte první řadu v A.2 atd.
Viz lekce DROPS: Jak číst schémata u pletení
Viz lekci DROPS: Jak číst schémata u háčkování
Proč jsou rukávy u větších velikostí kratší?
Celková šířka oděvu (od zápěstí k zápěstí) bude u větších velikostí větší, přestože rukávy jsou kratší. Větší velikosti mají delší průramky a širší náramenice, aby dobře seděly pro všechny velikostech.
Odkud měřím délku oděvu?
Rozměry na náčrtu/ schématu poskytují informace k celkové délce oděvu. Pokud se jedná o svetr nebo kabátek, délka se měří od nejvyššího bodu na náramenici nejblíže výstřihu směrem dolů ke spodní části oděvu. NENÍ měřeno od vrcholu ramene. Stejně se měří i délka sedla, od nejvyššího bodu náramenice dolů k místu, kde se sedlo dělí na trup a rukávy.
U kabátků, pokud není výslovně uvedeno jinak, se nikdy neměří délka na vnější straně légy. Vždy měřte délku na vnitřní straně.
Viz lekce DROPS: Jak číst schéma
Co znamená opakování?
Schémata se často opakují dokola nebo na výšku. 1 opakování na schématu tak, jak se jeví ve vzoru. Pokud je uvedeno vypracujte 5 opakování A.1 v řadě, pak vypracujete A.1 celkem 5 krát po sobě/ vedle sebe v jedné řadě. Pokud je uvedeno vypracujte 2 opakování A.1 svisle/ na výšku, vypracujte celé schéma jednou, následně začněte znovu od počátku následující řady a vypracujte celé schéma ještě jednou.
Proč je počet počátečních nahozených ok vyšší než počet, s kterým dále pracujeme?
Řetízková oka jsou o něco užší než sloupky. Abyste předešli příliš staženým okům nahozeného okraje, jednoduše uháčkujte více ok řetízku. Počet ok bude v následující řádě upraven tak, aby odpovídal vzoru a náčrtu.
Proč při práci shora dolů přidáváme oka pro pružný lem?
Pružný lem se oproti například lícovému žerzeji jeví mnohem staženější. Přidáním ok před vypracováním lemu se vyhnete viditelnému rozdílu v šířce přechodu mezi pružným lemem a zbytkem trupu.
Proč před uzavíráním lemu přidáváme oka?
Je snadné uzavřít lem příliš pevně. Nahazováním ok při uzavírání lemu (a současným uzavíráním těchto nahození) předejdete příliš utaženému okraji.
Viz video DROPS: Jak uzavřít pomocí nahození (yo)
Jak střídavě ujmout/ přidat v každé 3. a 4. řadě/ kruhové řadě?
Pro dosažení rovnoměrného přidání (nebo ujmutí) můžete přidat např.: každou 3. a 4. řadu střídavě takto: vypracujte 2 řady a přidejte v 3. řadě, vypracujte 3 řady a přidejte ve 4. Takto opakujte až po poslední přidávání..
Viz lekce DROPS: Přidávání či ujímání 1 oka střídavě v každé 3. a 4. řadě
Jak vypracuji kabátek v kruhových řadách namísto v řadách (tam a zpět)?
Pokud dáváte přednost práci v kruhových řadách namísto v řadách (tam a zpět), můžete samozřejmě vzor přizpůsobit a to tak, že přidáte můstky doprostřed přední části (obvykle 5 ok). Dále pak postupujete podle pokynů. Kde byste normálně otočili práci a pracovali z rubové strany, jednoduše pokračujete dál přes můstek v kruhových řadách. Nakonec kabátek rozstřihnete, naberete stehy pro vypracování légy a zakryjete rozstřižené okraje.
Viz video DROPS: Jak uplést a rozstřihnout můstek
Mohu vypracovat svetr v řadách (tam a zpět) namísto v kruhových řadách?
Pokud dáváte přednost práci v řadách (tam a zpět) namísto v kruhových řadách, můžete samozřejmě vzor přizpůsobit a to tak, že jednotlivé díly vypracujete samostatně a na konci je sešijete dohromady. Rozdělte počet ok trupu na polovinu, přidejte na každé straně 1 krajové oko (pro sešití) a vypracujte přední a zadní díl odděleně.
Viz lekce DROPS: Mohu vzor na kruhových jehlicích přizpůsobit rovným jehlicím?
Proč se popis vzoru mírně liší od modelu na fotografii?
Aby se zachovaly správné proporce, opakování vzoru se může v různých velikostech mírně lišit. Pokud nepracujete se stejnou velikostí v jaké je i oděv na fotografii, může se ten váš mírně lišit. Vzor byl pečlivě navržen a upraven tak, aby celkový dojem z oděvu zůstal stejný ve všech velikostech.
Dodržujte proto pokyny a schémata pro vaši velikost!
Jak změním oděv z dámské velikosti na pánskou?
Pokud jste našli vzor, který se vám líbí a který je k dispozici v dámské velikosti, není příliš těžké jej přizpůsobit velikosti pánské. Největší rozdíl bude v délce rukávů a trupu. Začněte pracovat na dámské velikosti o které si myslíte, že by seděla přes hrudník. Dodatečná délka bude vypracována těsně před uzavřením pro průramky. Pokud je vzor vypracován shora dolů, můžete přidat délku hned za průramky nebo před prvním ujmutím na rukávu.
Pokud jde o dodatečné množství příze, bude záležet na přidané délce, ale je lepší mít více klubek než-li méně.
Jak předejít línání u chlupatého oděvu?
Všechny příze mají přebytečná vlákna (z výroby), která mohou žmolkovat či odpadat. Česané příze (tj. chlupatější příze) mají více těchto volných, nadbytečných vláken, což způsobuje větší línání.
Línání také závisí na tom, co nosíme pod nebo přes oděv a zda to táhne vlákna příze. Není proto možné zaručit, že nedojde k žádnému línání
Níže je několik tipů, jak dosáhnout nejlepších výsledků při práci s chlupatější přízí:
1. Když je oděv hotový (než ho vyperete), silně s ním protřepejte, aby se volnější chloupky uvolnily. POZNÁMKA: NEPOUŽÍVEJTE čistící váleček na textil, kartáč ani jinou metodu, která tahá za přízi.
2. Oděv vložte do plastového sáčku a vložte jej do mrazáku – nízká teplota způsobí, že se vlákna k sobě méně přichytí a přebytečná vlákna se snadněji odloučí.
3. Ponechte několik hodin v mrazáku, než jej vyjmete a znovu protřepete.
4. Oděv perte podle pokynů na štítku příze.
Proč se na mé pletenině tvoří žmolky?
Žmolkování je přirozený proces, ke kterému dochází i u těch nejexkluzivnějších vláken. Je to přirozená známka opotřebení, kterému jde jen těžko předejít. Opotřebení je nejviditelnější v místech s vysokým třením, jako je podpaží či lemy.
Váš oděv může vypadat opět jako nový, když žmolky odstraníte pomocí kartáče na šaty nebo speciálního strojku - odžmolkovače.
Mezitím si můžete pročíst otázky a odpovědi, které k tomuto modelu položili ostatní, nebo navštívit skupinu DROPS Workshop na Facebooku, kde vám může poradit některá spřízněná duše!
Mohly by se vám líbit...

|
||||||||||
Creme Caramel |
||||||||||
|
|
||||||||||
DROPS krajkové pončo pletené z příze "Cloud". Velikost: S-XXXL.
DROPS 167-26 |
||||||||||
|
VROUBKOVÝ VZOR: Pleteme stále hladce, lícové i rubové řady. 1 vroubek = 2 řady hladce. VZOR: viz schémata A.1 a A.2; zobrazeny jsou všechny řady vzoru nahlížené z lícové strany. ---------------------------------------------------------- PONČO: Pleteme v řadách. Na kruhovou jehlici č.9 nahodíme přízí Cloud 43-49-55 ok a upleteme 2 vroubky vroubkovým vzorem – viz výše. Pokračujeme takto – začínáme lícovou řadou: 2 oka vroubkovým vzorem, vzor A.1, vzor A.2 nad následujícími 36-42-48 oky, končíme 2 oky vroubkovým vzorem. Takto pokračujeme až do výše 45-51-57 cm. Na bok dílu vložíme značku – označuje místo, kde sešijeme uzavřený okraj s bočné stranou. Pleteme dál vzorem a vroubkovým vzorem až do výše 112-121-130 cm, pak všechna ok uzavřeme. DOKONČENÍ: Sešijeme krátkou stranu (= uzavřený okraj) s postranní dlouhou stranou – okraj přiložíme u značky a sešíváme směrem k počátečnímu, nahozenému okraji. Protější strana vytvoří cíp uprostřed přední strany ponča. |
||||||||||
Vysvětlivky ke schématu |
||||||||||
|
||||||||||
|
|
||||||||||
|
Vyrobili jste si tento nebo nějaký jiný z našich modelů? Přidejte ke svým fotkám na sociálních sítích tag #dropsdesign - díky tomu je uvidíme i my! Potřebujete s tímto návodem poradit?Otevřete-li si návod na stránce garnstudio.com, najdete tam výukových video-ukázek, Komentáře/Dotazy a další užitečné informace. © 1982-2024 DROPS Design A/S. Vyhrazujeme si veškerá práva. Tento dokument, včetně všech jeho dílčích částí, podléhá autorským právům. Podrobnější komentář k možnostem užití našich návodů najdete dole pod každým návodem na našich stránkách. |
||||||||||


V oblasti pletené a háčkované módy působí DROPS Design více než 40 let. Díky tomu vám můžeme nabídnout jednu z nejrozsáhlejších kolekcí modelů s bezplatnými návody dostupnými na internetu - navíc v 17 jazycích. K dnešnímu dni máme na 304 katalogů a 11422 návodů celkem - z nich je už 6304 dostupných v češtině.
Komentáře / Otázky (42)
Sarebbe interessante leggere la traduzione dei commenti. Inoltre nello schema avrei preferito le misure in cm anziché il numero delle maglie.
26.04.2024 - 09:10Sarebbe interessante leggere la traduzione dei commenti. Inoltre nello schema avrei preferito le misure in cm anziché il numero delle maglie.
26.04.2024 - 09:07Har lige et spørgsmål mere til poncho opskrift Creme Caramel by drops, Der står slå 49 masker op, strik 2 masker retstrik, stik mønster over 42 masker og slut af med to ret. Det giver jo kun 46 masker, hvad skal der så ske med de sidste 3 masker ? Kan jeg skifte garnet ud med garnet bomull-lin ?
23.02.2023 - 11:50DROPS Design answered:
Hej Susanne, 2 m retstrik + A.1=3masker + A.2=42m+ 2 m retstrik = 49 masker. Du skal nok bruge 3 tråde DROPS Bomull-Lin for at få samme strikkefasthed som 2 tråde DROPS Air - men prøv gerne :)
24.02.2023 - 15:45Modell nr co-031 Garngrupp E eller C + C Jag har garnet drops soft tweed. Kan jag sticka med det? Lägga till en tråd eller ett till annat garn?
03.10.2022 - 23:53DROPS Design answered:
Hei Marina. Du kan bruke garnet DROPS Soft-Tweed i oppskrifter som er skrevet i andre kvaliteter i garngruppe B, eller garngruppe D (men da med 2 tråder DROPS Soft-Tweed). Les mer om trådbytte her: Slik byttes til et annet garn og garnmengde mvh DROPS Design
09.10.2022 - 13:27Det verkar inte som om man får svar längre? Föröker ändä... En fråga om mönstret. Om man lägger upp 43 maskor och räknar bort de fyra kantmaskorna och sedan stickar mönstret över 36 maskor som det står i beskrivningen .... ja, då blir det 3 maskor över. 43-40 = 3 . Fattar inte. Måste vara därför jag inte får mönstret att stämma.
14.06.2022 - 12:52DROPS Design answered:
Hej, husk at markere din kommentar som et spørgsmål :) Lidt længere nede har vi svaret på samme spørgsmål. Du strikker 2 ret, A.1=3m, A.2=36m, 2ret = 43 masker.
14.06.2022 - 15:34Garnet DROPS cloud har utgått och man kan ”ersätta 200 g DROPS cloud(1 tråd) med 214 g DROPS Air (2 trådar) ” enligt er. Jag förstår inte riktigt. Om man ska sticka med två trådar borde det ju gå åt dubbelt så mycket garn, alltså ca 430 g?
18.05.2022 - 19:44Bonjour, De quelle façon tricotte-t-on les jetés et les mailles glissées de ce modèle, à l'endroit ou à l'envers? merci
20.02.2022 - 15:43DROPS Design answered:
Bonjour Mme Picard, sur l'envers toutes les mailles sont tricotees a l'envers, sauf 2 mailles de bord qui sont tricotees a l'endroit. Bon tricot!
20.02.2022 - 18:58What is A.1 & A.2?
01.02.2022 - 00:59DROPS Design answered:
Dear Mrs Meyer, A.1 shows how to start the rows from RS and A.2 shows how to repeat the lace pattern to the end of the row. Happy knitting!
01.02.2022 - 09:16Hej. Hvordan kan antal masker på en række passe? Jeg slår 43 m op. Jeg strikker 2 m ret, 36 m mønster og 2 m ret. Det bliver kun 40 m Hvad med de resterende 3 masker? Håber på hurtigst svar - jeg vil gerne i gang hurtigst muligt. På forhånd tak.
22.01.2020 - 08:36DROPS Design answered:
Hej Sanne, du strikker 2 ret, A.1=3m, A.2=36m, 2ret = 43 masker. God fornøjelse!
30.01.2020 - 08:21Hei. Har også probl. med å forstå str. av 3.pinne med mønster A1A2. Om man skal strikke mønster A1og A2 gjentatte ganger bortetter pinnen, så er det vanskelig å skjønne annet enn at det må bli to kast etter hverandre ifølge mønsteret; A1 begynner med ett kast og A2 slutter med et kast - og det kan jo ikke være riktig. Det må jo være noe i mellom.\r\nHåper på et forklarende, og lett forståelig, svar :)\r\nTakk:)
16.03.2019 - 13:12