Miss Fox by DROPS Design

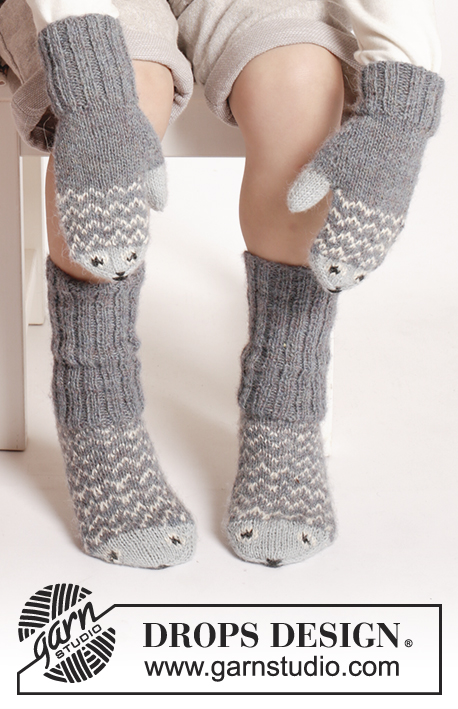
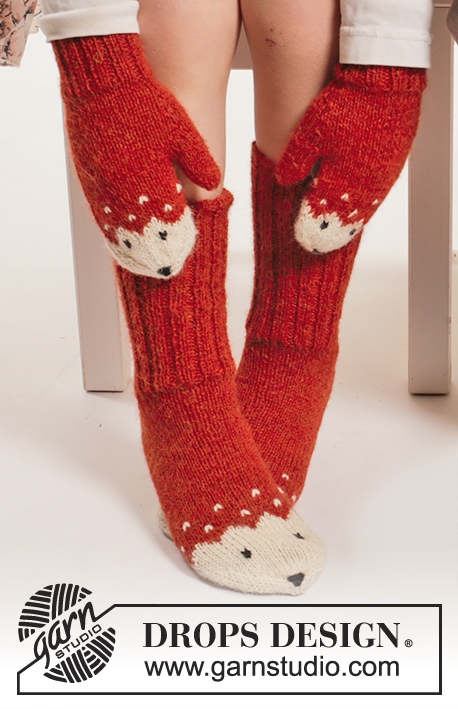
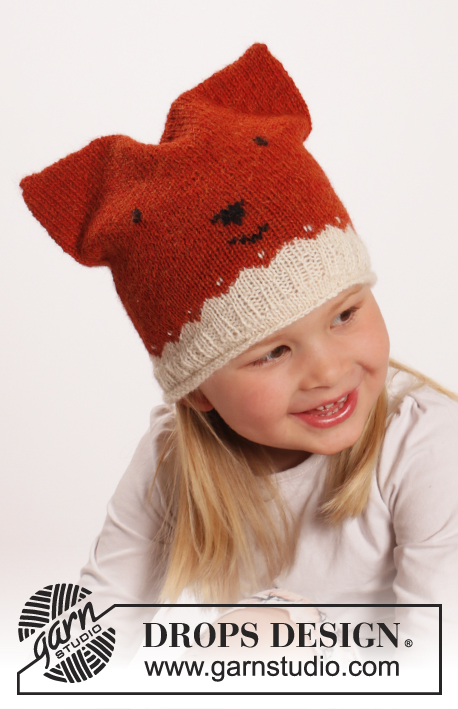
DROPS souprava: rukavice – palčáky, čepice a ponožky s liščím vzorem pletené z příze "Alpaca". Velikost: 0 měsíců – 14 let.

DROPS Extra 0-1217
DROPS design: model č. z-039-bn
Skupina přízí: A
-----------------------------------------------------------

RUKAVICE – PALČÁKY:

Velikost: 0/6 - 12/24 měsíců (3/5 - 6/9 – 10/14 let)

Materiál: DROPS ALPACA firmy Garnstudio
50 g pro všechny velikosti, barva č.2925, rezavá
50 g pro všechny velikosti, barva č.100, smetanová
+ zbytek černé na oči a tlamičku

DROPS PONOŽKOVÉ JEHLICE č. 2,5 – nebo velikosti potřebné k upletení zkušebního vzorku o rozměrech 26 ok x 34 řad lícovým žerzejem = 10 x 10 cm.
-----------------------------------
ČEPICE:

Velikost: 0/6 - 12/24 měsíců (3/5 - 6/9 – 10/14 let)

Materiál: DROPS ALPACA firmy Garnstudio
50 g pro všechny velikosti, barva č.2925, rezavá
50 g pro všechny velikosti, barva č.100, smetanová
+ zbytek černé na oči a tlamičku

DROPS PONOŽKOVÉ JEHLICE nebo krátká KRUHOVÁ JEHLICE (40 cm) č. 3 – nebo velikosti potřebné k upletení zkušebního vzorku o rozměrech 24 ok x 32 řad lícovým žerzejem = 10 x 10 cm.
-------------------------------------------
PONOŽKY:

Velikost: (15/17-18/19-20/21) 22/23-24/25-26/28 (29/31-32/34-35/37)
Délka chodidla: (10-11-12) 13-15-17 (18-20-22) cm

Materiál: DROPS ALPACA firmy Garnstudio
(50-50-50) 50-50-50 (100-100-100) g, barva č.2925, rezavá
50 g pro všechny velikosti, barva č.100, smetanová
+ zbytek černé na oči a tlamičku

DROPS PONOŽKOVÉ JEHLICE č. 2,5 – nebo velikosti potřebné k upletení zkušebního vzorku o rozměrech 26 ok x 34 řad lícovým žerzejem = 10 x 10 cm.

-------------------------------------------------------

Zkušební vzorek – Podívejte se, jak ho měřit a proč
Náhradní příze – Podívejte se, jak změnit přízi
Skupina přízí A až F – Neměňte návod, změňte přízi
Spotřeba příze při použití náhradní příze – Využijte náš převodník

-------------------------------------------------------


100% alpaka
od 102.00 Kč /50g
DROPS Alpaca uni colour DROPS Alpaca uni colour 102.00 Kč /50g
Knitka-galanterie
Objednat
DROPS Alpaca mix DROPS Alpaca mix 107.00 Kč /50g
Knitka-galanterie
Objednat
needles Jehlice a háčky Objednat
Přízi na tento model můžete mít už za 612Kč. Více zde.

Návod

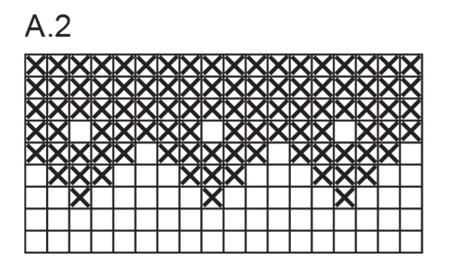
TIP - PŘIDÁVÁNÍ:
Přidáváme nahozením; v následující kruhové řadě pleteme nahození hladce za zadní nit, aby se v pletenině netvořily dírky.

VZOR:
Viz schémata A.1 a A.2; celý vzor pleteme lícovým žerzejem.

TIP - UJÍMÁNÍ:
Pleteme po poslední 3 oka před značkou – pak spleteme 2 oka hladce, 2 oka upleteme hladce (značka leží mezi nimi), 1 oko sejmeme hladce, 1 upleteme hladce a sejmuté přes ně přetáhneme.

TVAROVÁNÍ PATY:
1. řada (= lícová): pleteme hladce po posledních (5-5-7) 7-7-7 (7-7-7) ok v řadě, následující oko sejmeme hladce, 1 oko upleteme hladce a sejmuté přes ně přetáhneme, práci otočíme.
2. řada (= rubová): pleteme obrace po posledních (5-5-7) 7-7-7 (7-7-7) ok v řadě, následující oko sejmeme obrace, 1 oko upleteme obrace a sejmuté přes ně přetáhneme, práci otočíme.
3. řada (= lícová): pleteme hladce po posledních (4-4-6) 6-6-6 (6-6-6) ok v řadě, následující oko sejmeme hladce, 1 oko upleteme hladce a sejmuté přes ně přetáhneme, práci otočíme.
4. řada (= rubová): pleteme obrace po posledních (4-4-6) 6-6-6 (6-6-6) ok v řadě, následující oko sejmeme obrace, 1 oko upleteme obrace a sejmuté přes ně přetáhneme, práci otočíme.
Tímto způsobem pokračujeme v ujímání (vždy o 1 oko snížíme počet ok zbylých v řadě) dokud nám na jehlicích nezůstane (10-10-10) 10-10-10 (14-14-14) ok.
--------------------------------------------------------

RUKAVICE - PALČÁKY:
Pleteme v kruhových řadách na ponožkových jehlicích.
Na ponožkové jehlice č.2,5 nahodíme rezavou přízí 36-40 (44-52-56) ok a pleteme pružným vzorem 2/2 (= střídáme 2 oka hladce, 2 oka obrace) do výše 5-6 (7-8-9) cm. Pak pleteme 1 kruhovou řadu hladce a SOUČASNĚ ujmeme rovnoměrně 12-10 (8-10-8) ok = 24-30 (36-42-48) ok. Upleteme 1 cm výšky lícovým žerzejem. V následující kruhové řadě začneme tvarovat klín pro palec – přidáme 1 oko na každé straně 2. oka v kruhové řadě – viz TIP - PŘIDÁVÁNÍ (= přidali jsme 2 oka). Toto přidávání opakujeme v každé 3. kruhové řadě, celkem 3-4 (5-6-7)x = 7-9 (11-13-15) ok palce. Ve výši 8,5-10 (11,5-13-14,5) cm odložíme 7-9 (11-13-15) ok palce na pomocnou jehlici. Za těmito odloženými oky nahodíme 1 oko nové = na jehlicích máme 24-30 (36-42-48) ok. Pokračujeme lícovým žerzejem v kruhových řadách. Ve výši 10-13 (14-15-17) cm pleteme vzor A.1 – POZN.: oko, které je ve schématu označené šipkou, by mělo ležet přibližně uprostřed horní strany (hřbetu) rukavice. Po dokončení celé sekvence vzoru A.1 (na výšku) pleteme smetanovou přízí až do ukončení práce. Ve výši 13-16 (17-19-21) cm vložíme na každou stranu rukavice 1 značku (= mezi značkami leží 12-15 (18-21-24) ok horní strany, hřbetu rukavice a stejný počet ok dlaně). V následující kruhové řadě ujmeme 1 oko na každé straně obou značek – viz TIP - UJÍMÁNÍ (= 4 oka jsme ujmuli). Toto ujímání opakujeme v každé 2. kruhové řadě, celkem 2-2 (1-3-2)x a poté ujmeme ještě v každé kruhové řadě, celkem 2-2 (4-4-6)x = na jehlicích zbývá 8-14 (16-14-16) ok. V následující kruhové řadě spleteme každá 2 oka hladce. Přízi odstřihneme, protáhneme zbylými oky, utáhneme a zapošijeme.
Celá rukavice měří asi 15-18 (19-22-24) cm.

PALEC:
Odložených 7-9 (11-13-15) ok palce vrátíme na ponožkové jehlice č. 2,5 a navíc nabereme 5 ok z okraje za nimi = 12-14 (16-18-20) ok. Pleteme lícovým žerzejem v kruhových řadách do výše asi 2,5-3 (3,5-4-5) cm; v následující kruhové řadě spleteme každá 2 oka hladce = 6-7 (8-9-10) ok. Přízi odstřihneme, protáhneme zbylými oky, stáhneme a zapošijeme.
Černou přízí vyšijeme oči a tlamičku – viz foto.
Druhou rukavici pleteme stejně, jen zrcadlově převrácenou, tj. pro palec přidáváme na každé straně předposledního oka v kruhové řadě (namísto 2. oka).
----------------------------------------------------------

ČEPICE:
Pleteme v kruhových řadách na ponožkových jehlicích/kruhové jehlici.
Na ponožkové jehlice/kruhovou jehlici č.3 nahodíme smetanovou přízí 84-96 (104-108-112) ok a upleteme 6 kruhových řad lícovým žerzejem. Pak pleteme 6 kruhových řad pružným vzorem 2/2 (= střídáme 2 oka hladce, 2 obrace). Po dokončení pružného vzoru pleteme v kruhových řadách lícovým žerzejem vzor dle schématu A.2. Po dokončení 1 celé sekvence vzoru A.2 (na výšku) pokračujeme lícovým žerzejem rezavou přízí. Ve výši 17-19 (21-22-23) cm všechna oka volně uzavřeme.

DOKONČENÍ:
Sešijeme horní hranu čepice – nejlépe pletacím stehem. Černou přízí vyšijeme oči, čumáček a tlamičku – viz foto.
----------------------------------------------------------

PONOŽKA:
Pleteme v kruhových řadách na ponožkových jehlicích.
Na ponožkové jehlice č.2,5 nahodíme rezavou přízí (44-48-52) 52-56-56 (60-64-64) ok a pleteme pružným vzorem 2/2 (= střídáme 2 oka hladce, 2 oka obrace) do výše (8-10-10) 12-14-14 (16-18-18) cm. Následující kruhovou řadu pleteme takto: prvních (26-30-30) 30-34-34 (34-38-38) ok upleteme hladce a SOUČASNĚ nad nimi ujmeme rovnoměrně (8-8-8) 8-10-10 (10-10-10) ok = zůstane (18-22-22) 22-24-24 (24-28-28) ok hladce; tato oka odložíme na pomocnou jehlici (= nárt). Na jehlici nám zůstalo (18-18-22) 22-22-22 (26-26-26) ok = pata. Nad oky paty upleteme v řadách pružným vzorem jako dříve (3-3,5-4) 4-4,5-4,5 (5-5-5) cm výšky. Do pleteniny vložíme značku.
Teď TVARUJEME PATU - viz výše. Po dokončení tvarování nabereme po obou stranách paty (8-9-10) 10-11-12 (13-13-13) ok a odložených (18-22-22) 22-24-24 (24-28-28) ok vrátíme z pomocné jehlice zpět na jehlici = (44-50-52) 52-56-58 (64-68-68) ok. Na každou stranu nártu (= 18-22-22) 22-24-24 (24-28-28) ok) umístíme značku. Pokračujeme lícovým žerzejem v kruhových řadách a SOUČASNĚ ujímáme na obou stranách takto: poslední 2 oka PŘED (18-22-22) 22-24-24 (24-28-28) oky nártu spleteme hladce za zadní nit, první 2 oka ZA (18-22-22) 22-24-24 (24-28-28) oky nártu spleteme hladce. Toto ujímání opakujeme v každé 2. kruhové řadě celkem (4-4-5) 5-7-5 (8-7-7)x = (36-42-42) 42-42-48 (48-54-54) ok. Pleteme do výše (4-5-5) 6-8-9 (10-12-13) cm (= do ukončení práce zbývá doplést asi (6-6-7) 7-7-8 (8-8-9) cm výšky). Nyní pleteme v kruhových řadách vzor A.1 – POZN.: oko, které je ve schématu označené šipkou, by mělo ležet přibližně uprostřed horní strany, nártu. Po dokončení celé sekvence vzoru A.1 (na výšku) pleteme smetanovou přízí až do ukončení práce. Ve výši (7-8-9) 9-11-13 (14-16-18) cm od značky na patě (= do ukončení práce zbývá doplést asi (3-3-3) 4-4-4 (4-4-4) cm) vložíme na obou stranách novou značku tak, abychom na svrchní části (nártu) i na spodní části (šlapce) ponožky měli (18-21-21) 21-21-24 (24-27-27) ok. V následující kruhové řadě začneme tvarovat špičku - ujímáme 1 oko na obou stranách obou značek – viz TIP - UJÍMÁNÍ (= ujmeme 4 oka). Ujímání opakujeme v každé 2. kruhové řadě celkem (5-4-4) 7-6-5 (5-5-5)x, pak ještě v každé kruhové řadě celkem (1-3-3) 0-1-4 (4-5-5)x = na jehlicích zbývá (12-14-14) 14-14-12 (12-14-14) ok. V následující kruhové řadě spleteme každá 2 oka hladce. Přízi odstřihneme, protáhneme zbylými oky, stáhneme a zapošijeme.
Černou přízí vyšijeme na špičku ponožky oči a čumáček - viz foto.
Stejným způsobem upleteme i druhou ponožku.

Schéma

symbols = smetanová
symbols = rezavá
diagram
diagram

Potřebujete poradit s tímto návodem?

Děkujeme, že jste si vybrali návod DROPS Design. Zakládáme si na tom, že dáváme k dispozici návody ověřené a snadno srozumitelné. Všechny návody jsou přeložené z norského originálu a tak si můžete kdykoli srovnat rozměry a počty s původním návodem (DROPS Extra 0-1217) .

Máte s návodem potíže? Níže najdete seznam odkazů, které vám pomohou dokončit vaše dílo co nejdříve - nebo se třeba přiučit něco nového.

signature-image signature

Máte s návodem potíže? Níže najdete seznam odkazů, které vám pomohou dokončit vaše dílo co nejdříve - nebo se třeba přiučit něco nového.

Každý náš návod je doprovázen speciálními video-ukázkami, které vás navedou.

Máme takopodrobné rozpisy různých technik a postupů krok za krokem - najdete je zde.

1) Why is the knitting/crochet tension so important?

Knitting tension is what determines the final measurements of your work, and is usually measured per 10 x 10 cm. It is provided like so: number of stitches in width x number of rows in height - eg: 19 stitches x 26 rows = 10 x 10 cm.

The knitting tension is very individual; some people knit/crochet loosely while others work tightly. You adjust the knitting tension with the needle size, which is why the suggested needle size only serve as a guide! You need to adjust this (up or down) to ensure that YOUR knitting tension matches the knitting tension provided in the pattern. If you work with a different knitting tension than provided you will have a different yarn consumption, and your work will have different measurements than what the pattern suggests.

The knitting tension also determines which yarns can replace each other. As long as you achieve the same knitting tension you can replace one yarn with another.

See DROPS lesson: How to measure your tension/gauge

See DROPS video: How to make a gauge tension swatch

nahoru

2) What are the yarn groups?

All our yarns are categorised into yarn groups (from A to F) according to thickness and knitting tension – group A contains the thinnest yarns and group F the thickest. This makes it easier for you to find alternative yarns to our patterns, should you wish to switch yarn. All yarns within the same group have a similar knitting tension and can easily replace each other. However, different yarn qualities have different structures and properties which will give the finished work a unique look and feel.

Click here for an overview of the yarns in each yarn group

nahoru

3) Can I use a different yarn than what the pattern suggests?

The important thing when changing from one yarn to another is that the knitting/crochet tension remains the same. This is so that the measurements of the finished piece will be the same as on the sketch provided. It is easier to achieve the same knitting tension using yarns from the same yarn group. It is also possible to work with multiple strands of a thinner yarn to achieve the knitting tension of a thicker one. Please try our yarn converter. We recommend you to always work a test swatch.

Please NOTE: when changing yarn the garment might have a different look and feel to the garment in the photo, due to individual properties and qualities of each yarn.

See DROPS lesson: Can I use a different yarn than the one mentioned in the pattern?

nahoru

4) How do I use the yarn converter?

At the top of all our patterns you’ll find a link to our yarn converter, which is a helpful tool should you wish to use a different yarn than suggested. By filling in the yarn quality you wish to replace, the amount (in your size) and number of strands, the converter will present good alternative yarns with the same knitting tension. Additionally it will tell you how much you’ll require in the new qualities and whether you’ll need to work with multiple strands. Most skeins are 50g (some are 25g or 100g).

If the pattern is worked with multiple colours, every colour will have to be converted separately. Similarly, if the pattern is worked with several strands of different yarns (for example 1 strand Alpaca and 1 strand Kid-Silk) you will have to find alternatives for each, individually.

Click here to see our yarn converter

nahoru

5) Why do I get the wrong knitting tension with the suggested needle size?

The needle size provided in the pattern serves only as a guide, the important thing is to follow the knitting tension. And since knitting tension is very individual, you will have to adjust the needle size to ensure that YOUR tension is the same as in the pattern – maybe you’ll have to adjust 1, or even 2 needle sizes, up or down to achieve the correct tension. For this, we recommend that you work test swatches.

Should you work with a different knitting tension than the one provided, the measurements of the finished garment might deviate from the measurement sketch.

See DROPS lesson: How to measure your tension/gauge

See DROPS video: How to make a gauge tension swatch

nahoru

6) Why is the pattern worked top-down?

Working a garment top-down provides more flexibility and room for personal adjustment. For example it is easier to try the garment on while working, as well as making adjustments to length of yoke and shoulder caps.

The instructions are carefully explaining every step, in the correct order. Diagrams are adjusted to the knitting direction and are worked as usual.

nahoru

7) Why are the sleeves shorter in larger sizes?

The total width of the garment (from wrist-to-wrist) will be larger in the larger sizes, despite the actual sleeves being shorter. The larger sizes have longer sleeve caps and wider shoulders, so there will be a good fit in all sizes.

nahoru

8) What is a repeat?

Diagrams are often repeated on the round or in height. 1 repeat is the diagram the way it appears in the pattern. If it says to work 5 repeats of A.1 in the round, then you work A.1 a total of 5 times after/next to each other in the round. If it says to work 2 repeats of A.1 vertically/in height you work the entire diagram once, then begin again at the start and work the entire diagram one more time.

nahoru

9) How do I work according to a knitting diagram?

The diagram depicts all rows/rounds, and every stitch seen from the right side. It is read from bottom to top, from right to left. 1 square = 1 stitch.

When working back and forth, every other row is worked from the right side and every other row is worked from the wrong side. When working from the wrong side, the diagram will have to be worked reversed: from left to right, knit stitches are purled, purl stitches are knit etc.

When working in the round every round is worked from the right side and the diagram are worked from right to left on all rounds.

See DROPS lesson: How to read knitting diagrams

nahoru

10) How do I work according to a crochet diagram?

The diagram depicts all rows/rounds, and every stitch seen from the right side. It is worked from bottom to top, from right to left.

When working back and forth every other row is worked from the right side: from right to left and every other row is worked from the wrong side: from left to right.

When working in the round, every row in the diagram are worked from the right side, from right to left.

When working a circular diagram you start in the middle and work your way outwards, counter clockwise, row by row.

The rows usually start with a given number of chain stitches (equivalent to the height of the following stitch), this will either be depicted in the diagram or explained in the pattern.

See DROPS lesson: How to read crochet diagrams

nahoru

11) How do I work several diagrams simultaneously on the same row/round?

Instructions for working several diagrams after each other on the same row/round, will often be written like so: “work A.1, A.2, A.3 a total of 0-0-2-3-4 times". This means you work A.1 once, then A.2 is worked once, and A.3 is repeated (in width) the number of times provided for your size – in this case like so: S = 0 times, M = 0 times, L=2 times, XL= 3 times and XXL = 4 times.

The diagrams are worked as usual: begin with the first row in A.1, then work the first row in A.2 etc.

See DROPS lesson: How to read knitting diagrams

See DROPS lesson: How to read crochet diagrams

nahoru

12) Why does the piece start with more chain stitches than it’s worked with?

Chain stitches are slightly narrower than other stitches and to avoid working the cast-on edge too tight, we simply chain more stitches to begin with. The stitch count will be adjusted on the following row to fit the pattern and measurement sketch.

nahoru

13) Why increase before the rib edge when the piece is worked top-down?

The rib edge is more elastic and will contract slightly compared to, for example, stocking stitch. By increasing before the rib edge, you avoid a visible difference in width between the rib edge and the rest of the body.

nahoru

14) Why increase in the cast-off edge?

It’s very easy to cast off too tightly, and by making yarn overs while casting off (and simultaneously casting these off) you avoid a too tight cast off edge.

See DROPS video: How to bind off with yarn overs (yo)

nahoru

15) How do I increase/decrease on every 3rd and 4th row/round alternately?

To achieve an even increase (or decrease) you can increase on, for example: every 3rd and 4th row alternately, like so: work 2 rows and increase on the 3rd row, work 3 rows and increase on the 4th. Repeat this until the increase is complete.

See DROPS lesson: Increase or decrease 1 st on every 3rd and 4th row alternately

nahoru

16) Why is the pattern slightly different than what I see in the photo?

Pattern repeats can vary slightly in the different sizes, in order to get the correct proportions. If you’re not working the exact same size as the garment in the photo, yours might deviate slightly. This has been carefully developed and adjusted so that the complete impression of the garment is the same in all sizes.

Make sure to follow instructions and diagrams for your size!

nahoru

17) How can I work a jacket in the round instead of back and forth?

Should you prefer to work in the round instead of back and forth, you may of course adjust the pattern. You’ll need to add steeks mid-front (usually 5 stitches), and follow the instructions. When you would normally turn and work from the wrong side, simply work across the steek and continue in the round. At the end you’ll cut the piece open, pick up stitches to work bands, and cover the cut edges.

See DROPS video: How to knit steeks and cut open

nahoru

18) Can I work a jumper back and forth instead of in the round?

Should you prefer to work back and forth instead of in the round, you may of course adjust the pattern so you work the pieces separately and then assemble them at the end. Divide the stitches for the body in 2, add 1 edge stitch in each side (for sewing) and work the front and back pieces separately.

See DROPS lesson: Can I adapt a pattern for circular needles into straight needles?

nahoru

19) Why do you show discontinued yarns in the patterns?

Since different yarns have different qualities and textures we have chosen to keep the original yarn in our patterns. However, you can easily find options among our available qualities by using our yarn converter, or simply pick a yarn from the same yarn group.

It is possible that some retailers still have discontinued yarns in stock, or that someone has a few skeins at home that they would like to find patterns for.

The yarn converter will provide both alternative yarn as well as required amount in the new quality.

nahoru

20) How do I make a women’s size garment into a men’s size one?

If you have found a pattern you like which is available in women’s size it’s not very difficult to convert it to men’s size. The biggest difference will be the length of sleeves and body. Start working on the women size that you think would fit across the chest. The additional length will be worked right before you cast off for the armhole/sleeve cap. If the pattern is worked top-down you can add the length right after the armhole or before the first decrease on sleeve.

Regarding additional yarn amount, this will depend on how much length you add, but it is better with a skein too many than too few.

nahoru

21) How do I prevent a hairy garment from shedding?

All yarns will have excess fibres (from production) that might come off as lint or shedding. Brushed yarns (ie hairier yarns) have more of these loose, excess fibres, causing more shedding.

Shedding also depends on what is worn under or over the garment, and whether this pulls at the yarn fibres. It’s therefore not possible to guarantee that there will be no shedding

Below are some tips on how to get the best result when working with hairier yarns:

1. When the garment is finished (before you wash it) shake it vigorously so the looser hairs come off. NOTE: do NOT use a lint roller, brush or any method that pulls at the yarn.

2. Place the garment in a plastic bag and put it in your freezer - the temperature will cause the fibres to become less attached to each other, and excess fibres will come off easier.

3. Leave in the freezer for a few hours before taking it out and shaking it again.

4. Wash the garment according to the instructions on the yarn label.

nahoru

22) Where on the garment is the length measured?

The measurement sketch/schematic drawing provides information regarding the full length of the garment. If it’s a jumper or a jacket the length is measured from the highest point on the shoulder closest to the neckline, and straight down to the bottom of the garment. It is NOT measured from the tip of shoulder. Similarly, the length of yoke is measured from the highest point on the shoulder and down to where yoke is split into body and sleeves.

On a jacket measures are never taken along bands, unless specifically stated. Always measure inside band stitches when measuring the length.

See DROPS lesson: How to read a schematic drawing

nahoru

23) How do I know how many balls of yarn I need?

The required amount of yarn is provided in grams, eg: 450 g. To calculate how many balls you’ll need you first need to know how many grams are in 1 ball (25g, 50g or 100g). This information is available if you click on the individual yarn quality on our pages. Divide the amount required with the amount of each ball. For example, if each ball is 50g (the most common amount), the calculation will be as follows: 450 / 50 = 9 balls.

nahoru

Pořídili jste si přízi DROPS na tento model? Pak máte taky právo žádat po svém prodejci, u něhož jste nakoupili, pomoc a rady. Seznam DROPS obchodů najdete tady!
Pořád se nemůžete dobrat odpovědi, kterou hledáte? Pak posuňte stránku dolů a napište nám svůj dotaz, naši specialisté se vám pokusí poradit. Obvykle to zvládneme během 5 až 10 pracovních dnů.. Mezitím si můžete pročíst otázky a odpovědi, které k tomuto modelu položili ostatní, nebo navštívit skupinu DROPS Workshop na Facebooku, kde vám může poradit některá spřízněná duše!

Komentáře / Otázky (28)

country flag Gina Clegg wrote:

Is there any way possible these mittens could be knitted flat on straight needles? I really cannot get to grips with dpns. 🥴

23.03.2023 - 12:35

DROPS Design answered:

Dear Mrs Clegg, this might be possible, but it might be also easier in the round, what about magic loop, did you try? It might be easier than dpn?

23.03.2023 kl. 12:48

country flag Rike wrote:

Bitte um Hilfe zu den Fäustlingen: Welche Zahl muss ich denn jetzt wählen, wenn ich für 24 Monate stricken will? 0/6-12/24 Monate (3/5-6/9-10/14) Jahre stimmt doch nicht mit 36-40 (44-52-56) M überein. Zwei Größen fehlen! Welche entspricht denn welcher ? Danke

17.09.2022 - 20:18

DROPS Design answered:

Liebe Frau Rike, diese Fäustlingen sind nur in 5 Größen erhältlich; für 24 Monaten folgen Sie die 2. Größe: 12/24 Monaten. Beachten Sie, daß Ihre Maschenprobe stimmt (26 M x 34 Reihen glattrechts = 10 x 10 cm). Viel Spaß beim stricken!

19.09.2022 kl. 09:55

country flag Marieluise wrote:

Hallo! Ich kann das Diagramm für das Muster in der Anleitung finden. Wo finde ich das Diagramm?

11.10.2021 - 10:16

DROPS Design answered:

Liebe Marieluise, Manchmal haben wir derzeit Probleme mit der Anzeige der Bilder. Versuchen Sie, die Seite zu aktualisieren und den Browser-Cache zu leeren. Wenn die Fotos erneut auf der Website angezeigt werden, können Sie die Anleitung ausdrucken. Viel Spaß beim Stricken!

11.10.2021 kl. 11:28

country flag Baert wrote:

Modèle en français

09.10.2021 - 10:47

country flag Kirsti wrote:

Jeg strikker sokker, den minste størrelsen, de blir vakre. Men mønstret må være feil Etter hælfelling og opptak av nye masker, har jeg 44. Så skal jeg felle 4 masker 4 ganger, og det står at jeg skal ha 36 masker igjen. Det går ikke opp...

05.03.2021 - 18:38

country flag Lucelle wrote:

Even een vraagje over patroon van de muts. Hoe krijg ik de oren op de muts gebreid of mis ik iets in het patroon

14.12.2020 - 20:08

DROPS Design answered:

Dag Lucelle,

Er zijn niet speciaal oren op de muts gebreid. Het is een rechthoekig model en op de foto zijn de punten van de muts een beetje in vorm gebracht, zodat het oren lijken.

17.12.2020 kl. 23:02

country flag Leila wrote:

What does READ INCREASE TIP mean (mitten pattern)? On next round beg inc for thumb gusset and inc 1 st on each side of 2nd st on round – READ INCREASE TIP (= 2 sts inc)."

11.12.2020 - 00:56

DROPS Design answered:

Hi Leila, This refers to the description of how to increase, which is found at the beginning of the pattern. Happy knitting!

11.12.2020 kl. 06:58

country flag Li# wrote:

Hallo liebes Dropbox Design Team. Könnte ich eine Anleitung für die Socken in Größe 38/39 bekommen? Danke

09.06.2020 - 21:58

DROPS Design answered:

Liebe Li#, leider können wir nicht jede Anleitung nach jedem Wunsch umrechnen - gerne wird Ihnen aber Ihr DROPS Laden damit weiterhelfen, auch telefonisch oder per E-Mail. Viel Spaß beim stricken!

10.06.2020 kl. 06:31

country flag Marta wrote:

Hi, Not sure if this is just me, but this pattern for hat seems wrong to me... I'm trying to knit (size 3/5) hat but when I get into pattern A2 I end up with 4 stitches to knit in white instead of 2... When I calculated 104/ 18= 5,8... When I decreased 2 stitches then pattern A2 works for me. Is there anything I did wrong or pattern is not exactly correct for number of stitches?

31.01.2020 - 08:32

DROPS Design answered:

Dear Marta, thanks for your feedback, you are right in size 3/5 years you have to decrease 2 stitches evenly to get diagram fit in the round, pattern will be edited. Happy knitting!

14.02.2020 kl. 09:27

country flag Laura wrote:

Buongiorno, ho terminato il berretto chiudendo morbidamente i punti, la domanda sarà elementare ma come si cuce la sommità per fare la forma del pattern? Grazie Laura

20.08.2019 - 06:41

DROPS Design answered:

Buongiorno Laura. Può seguire le indicazioni del video riportato sotto o cucire come meglio preferisce. La forma verrà presa da sola, una volta indossato il berretto. Buon lavoro!

20.08.2019 kl. 08:39

Přidejte komentář k návodu DROPS Extra 0-1217

Rádi bychom věděli, co si o tomto modelu myslíte!

Pokud se chcete na něco zeptat, dbejte prosím na to, abyste ve formuláři níže vybrali správnou kategorii - díky tomu se dříve dozvíte, co potřebujete vědět. Povinná pole jsou označena *.

Z galerie #dropsfan

Miss Fox

Paulinette, United States

Miss Fox Socks

Alceaaa, France

Miss Fox

Anita, Sweden

Viz více