
Popular categories
Looking for a yarn?


|
|
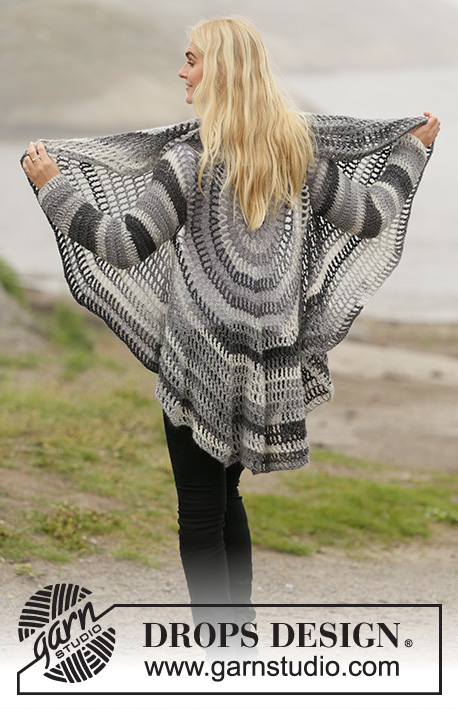
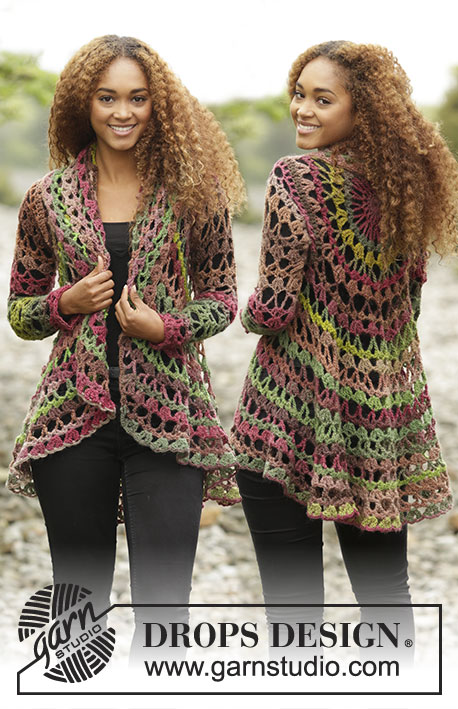
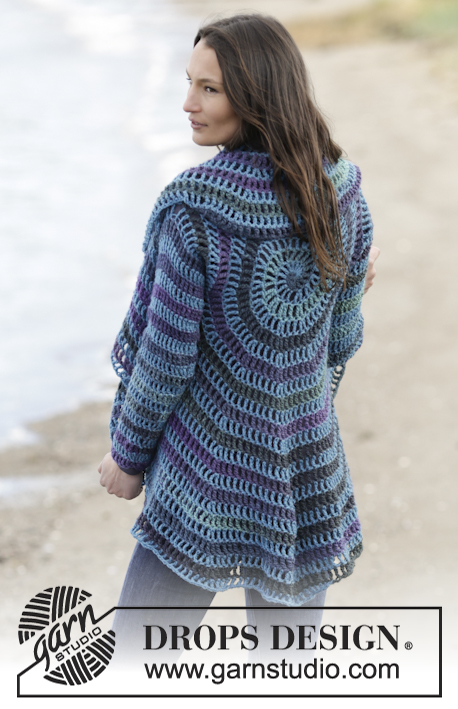
Gypsy Blue |
|
 |
 |
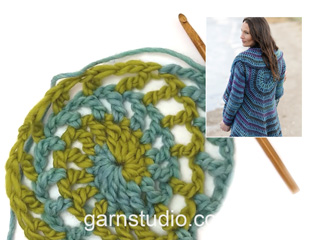
Crochet DROPS jacket worked in a circle in "Big Delight" and "Karisma". Size: S - XXXL.
DROPS 165-40 |
|
|
DECREASE TIP: 2 tr tog into 1 tr as follows: Work 1 tr but wait with last YO and pull through, work 1 tr in next st but pull last YO through all 3 sts on hook. CROCHET TIP: Replace first tr on round with 4 ch. Finish with 1 sl st in fourth ch from beg of round. ---------------------------------------------------------- CIRCLE: When piece is worked in the round, start with this technique to avoid hole in the middle (instead of ch-ring) use Big Delight: Hold the yarn end and wind the yarn one time around the index finger to make a loop. Hold the loop with left thumb and middle finger, place the yarn over left index finger. Insert hook through the loop, make a YO and pull yarn through loop, work ch 1, then work around the loop as follows: ROUND 1: ch 1, 1 sc, 2 hdc, 2 dc, 2 tr. Insert 1 stitch marker in loop on last tr so that it does not unravel and place yarn aside. Switch to Karisma and work as follows in loop: 1 sc, 2 hdc, 2 dc, 2 tr. Pull the yarn end to tighten loop. Fasten the yarn end on the back side. ROUND 2: (Continue with Karisma). Work 1 tr + 1 ch in each of the first 7 sts (= 1 sc, 2 hdc, 2 dc and 2 tr worked with Big Delight). Insert 1 stitch marker in loop on last tr so that it does not unravel and place yarn aside. Continue with Big Delight. Work 1 tr + 1 ch in each of the next 7 sts (= 1 sc, 2 hdc, 2 dc and 2 tr worked with Karisma) = 14 tr + 14 ch. ROUND 3: (Continue with Big Delight.) Work 1 tr + 1 ch + 1 tr + 1 ch in each of the first 7 tr, insert 1 stitch marker in loop on last tr so that it does not unravel and put yarn aside. Continue with Karisma, work 1 tr + 1 ch + 1 tr + 1 ch in each of the next 7 tr = 28 tr + 28 ch. ROUND 4: (Continue with Karisma). * Work 1 tr + 1 ch in the next tr, work 1 tr + 1 ch + 1 tr + 1 ch in the next tr *, repeat from *-* 7 times. Insert 1 stitch marker in loop on last tr so that it does not unravel and place yarn aside. Continue with Big Delight. * Work 1 tr + 1 ch in the next tr, work 1 tr + 1 ch + 1 tr + 1 ch in the next tr *, repeat from *-* 7 times = 42 tr + 42 ch. ROUND 5: (Continue with Big Delight.) * Work 1 tr + 1 ch in each of the next 2 tr, work 1 tr + 1 ch + 1 tr + 1 ch in the next tr *, repeat from *-* 7 times. Insert 1 stitch marker in loop on last tr so that it does not unravel and place yarn aside. Continue with Karisma. * Work 1 tr + 1 ch in each of the next 2 tr, work 1 tr + 1 ch + 1 tr + 1 ch in the next tr *, repeat from *-* 7 times = 56 tr + 56 ch. Repeat 4th and 5th round but on every round work 1 tr + 1 ch more between every inc = 14 tr + 14 ch inc on every round. Continue until there are 112-112-126-126-140-140 tr + 112-112-126-126-140-140 ch on round, circle measures approx. 20-20-23-23-25-25 cm / 8"-8"-9"-9"-9¾"-9¾" from middle (= 40-40-46-46-50-50 cm / 15¾"-15¾"-18"-18"-19¾"-19¾" in diameter). Work next round as follows: (Continue with spiral and color change but without inc.) Work 1 tr + 1 ch in each of the first 16-16-18-18-20-20 tr, work 24-24-28-28-32-32 loose ch for armhole, skip the next 16-16-18-18-20-20 tr, work 1 tr + 1 ch in every tr until 32-32-36-36-40-40 tr remain on round, work 24-24-28-28-32-32 loose ch for armhole, skip the next 16-16-18-18-20-20 tr, work 1 tr + 1 ch in each of the last 16-16-18-18-20-20 tr. Work next round as follows: * Work 1 tr + 1 ch in each of the next 7-7-8-8-9-9 tr, work 1 tr + 1 ch + 1 tr + 1 ch in next tr *, repeat from *-* 2 times, work 18-18-20-20-22-22 tr with 1 ch between each around ch-space, * work 1 tr + 1 ch in each of the next 7-7-8-8-9-9 tr, work 1 tr + 1 ch + 1 tr + 1 ch in next tr *, repeat from *-* 3 times. Insert 1 stitch marker in loop on last tr so that it does not unravel and place yarn aside. Switch yarn. * Work 1 tr + 1 ch in each of the next 7-7-8-8-9-9 tr, work 1 tr + 1 ch + 1 tr + 1 ch in next tr *, repeat from *-* 3 times, work 18-18-20-20-22-22 tr with 1 ch between each around ch-space, * work 1 tr + 1 ch in each of the next 7-7-8-8-9-9 tr, work 1 tr + 1 ch + 1 tr + 1 ch in next tr *, repeat from *-* 2 times = 126-126-140-140-154-154 tr + ch on round. Work as 4th and 5th round but on every round work 1 tr + 1 ch more between every inc = 14 tr + 14 ch inc on every round. Continue until circle measures 52-54-56-58-60-62 cm / 20½"-21¼"-22"-22¾"-23⅝"-24⅜" from middle (= 104-108-112-116-120-124 cm / 41"-42½"-44"-45¾"-47¼"-48¾" in diameter, or desired measurements). Finish circle as follows: Continue with the same yarn as last round. Work 1 tr in each of the next 2 tr, 1 dc in each of the next 2 tr, 1 hdc in each of the next 2 tr, 1 sc in next tr, 1 sl st in next tr, fasten off. SLEEVES: Work in the round from armhole and down. Use hook size 6 mm / J/10 and beg with opposite color of the one the last tr around armholes was worked with. Work stripes, i.e. work 1 round with Karisma and 1 round with Big Delight - READ CROCHET TIP. Work 36-38-40-42-44-46 tr around the opening for sleeve, beg of round should be under sleeve. Then work 3 rounds with 1 tr in every tr. Continue with 1 tr in every tr - AT THE SAME TIME dec 2 tr mid under sleeve - READ DECREASE TIP. Repeat dec every 8 cm / 3⅛" 6 more times = 22-24-26-28-30-32 tr. Continue to work until sleeve measures 54-55-54-55-54-55 cm / 21¼"-21½"-21¼"-21½"-21¼"-21½". Fasten off. Work the other sleeve the same way. |
|

|
|
|
Have you made this or any other of our designs? Tag your pictures in social media with #dropsdesign so we can see them! Do you need help with this pattern?You'll find tutorial videos, a Comments/Questions area and more by visiting the pattern on garnstudio.com. © 1982-2024 DROPS Design A/S. We reserve all rights. This document, including all its sub-sections, has copyrights. Read more about what you can do with our patterns at the bottom of each pattern on our site. |
|


With over 40 years in knitting and crochet design, DROPS Design offers one of the most extensive collections of free patterns on the internet - translated to 17 languages. As of today we count 304 catalogs and 11422 patterns - 11417 of which are translated into English (US/in).
We work hard to bring you the best knitting and crochet have to offer, inspiration and advice as well as great quality yarns at incredible prices! Would you like to use our patterns for other than personal use? You can read what you are allowed to do in the Copyright text at the bottom of all our patterns. Happy crafting!
Comments / Questions (168)
Hallo! Gibt es für diese schöne Kreisjacke keine Häkelschrift? Mit geschriebenen Anleitungen tu ich mir schwer. Ich möchte auch mit einer Farbverlaufswolle häkeln und nicht immer absichtlich die Farbe wechseln. LG
20.01.2016 - 22:24DROPS Design answered:
Nein, leider haben wir für diese Anleitung keine Häkelschrift. Es sieht aber auch schlimmer aus, als es ist, wenn Sie erst einmal bei jeder Rd sehen, was zu tun ist, wird Ihnen das Häkeln nach der Anleitung kaum schwerer fallen als nach einer Häkelschrift.
24.01.2016 - 20:36I found the pattern I was looking for....sort of. This ia womens (Gypsy Blue) It says sizes 2, m, l, xl, xxl, xxxl how do I know what size the free pattern is, it does not say. What I was really looking for is the little girls version of this pattern. Can you help me on the sizes and where to locate the childrens version?
19.01.2016 - 02:15DROPS Design answered:
Dear Cindy, you will find at the end of the pattern a measurement chart with all finished measurements in cm taken flat from side to side. Compare these to a similar garment you have and like the shape to find out the matching size. This pattern is only available in woman size, you can then adjust to a children size with the help of similar pattern - see here. Happy crocheting!
19.01.2016 - 10:11Hei! Takk for morsom oppskrift. Jeg mener det er liten feil når det f eks i omgang 4 og 5 står "gjenta 7 ganger " . Hvis en gjentar 7 ganger, blir det 8 ganger til sammen. Kanskje det kunne stått " gjenta 6 ganger, til sammen 7 ganger " eller liknende. Jeg fant jo ut av det, men vil bare formidle at jeg ble litt forvirret. Mvh Anne Margrethe
16.01.2016 - 11:57Debi Cortés wrote:
Gracias por sus patrones son bellos, pero me gustaría saber si tienen los patrones en dibujos se me hace más fácil. Gracias
09.01.2016 - 00:15DROPS Design answered:
Hola Debi. Cada vez añadimos más patrones con diagramas (en primer lugar los modelos con dibujos más complicados). El espacio limitado de la web no nos permite añadir diagramas para todos los patrones.
14.01.2016 - 09:32I can't get the recommended yarns where I am located. would red heart boutique unforgettable be a good substitute for Big delight?
08.01.2016 - 19:22DROPS Design answered:
Dear Nikki, you can order our yarns online to our DROPS Superstore in U.S, click here for more information. Happy crocheting!
11.01.2016 - 09:22Do you this in knitting version? I do not crotchet. Thank you!
06.01.2016 - 19:13DROPS Design answered:
Dear Caroline, you will find here all our knitted jacket with a similar shape - you will also find some videos showing how to learn crochet and how to start this jacket, get a try! Happy crocheting!
07.01.2016 - 09:15Ik zou dit vest graag maken met garen voor nld 8, in 1 kleur. kan dat of wordt dat te dik? Wat moet ik dan aanpassen in het patroon? En hoeveel meter zou ik ongeveer nodig hebben?
04.01.2016 - 21:11DROPS Design answered:
Hoi Bianca. Je kan een proeflapje maken met nld 8 en de stekenverhouding controleren en omdat het een cirkel is zou ik gewoon beginnen en dan meten onderweg hoe groot hij moet zijn voordat je de armsgaten maakt. Voor de mouwen heb je de stekenverhouding nodig om het ca aantal st te berekenen. Je kan ongeveer te berekenen hoeveel je nodig hebt met deze formule
05.01.2016 - 15:20When decreasing on sleeve every 3 1/4",do you mean down the sleeve or around the sleeve?
12.12.2015 - 08:44DROPS Design answered:
Dear Peggy, this mean "down the sleeve", ie work 3 1/8" and make a new dec. Happy crocheting!
14.12.2015 - 09:33What's wrong: the video or my interpretation of it? When I crochet the first 3 rounds from the pattern, my work is nice and flat and the amount of stitches is correct. But the work on the video is like a small bowl instead of anything I would use as a jacket... I keep on counting and wondering.... And I can't understand how the work of the video doesn!t look like the pattern...????
05.12.2015 - 00:40DROPS Design answered:
Dear Sandra, the video is worked with 2 yarn same thickness (Eskimo) while pattern is worked with 2 yarns different thickness so that the "curly" effect appears in our video showing the technique earlier than it will appears working with the recommanded yarn. Happy crocheting!
07.12.2015 - 09:47In rounds 2-5 what are the counts at the end? The # of tr/ch total between the 2 colors for that round or number of stitches of each individual color? The next directions after round 5(repeating 4th and 5th round) it says to continue until there are 112 tr/ch (for size S) on round. Again, is that 56tr/ch of each color or 112tr/ch of each color. Either way I try it, then it doesnt make sense with the following step
24.11.2015 - 20:20DROPS Design answered:
Dear Corissa, at the end of round 2, there is a total of 14 tr + 14 ch: 7 tr + 7 ch in each colour - same applies for all rounds. Video below shows how to work the first 3 rounds. Happy crocheting!
25.11.2015 - 09:36