
Popular categories
Looking for a yarn?


|
|
Ballade |
|
 |
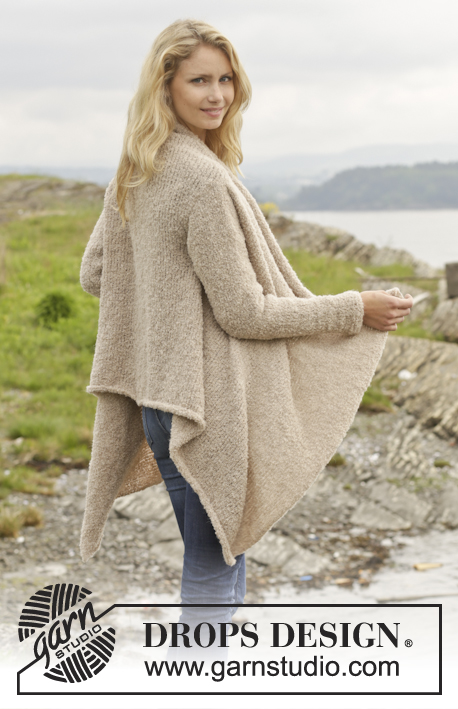 |
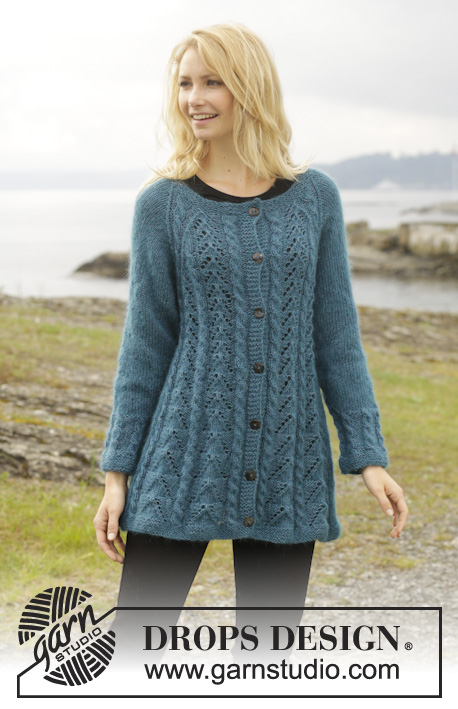
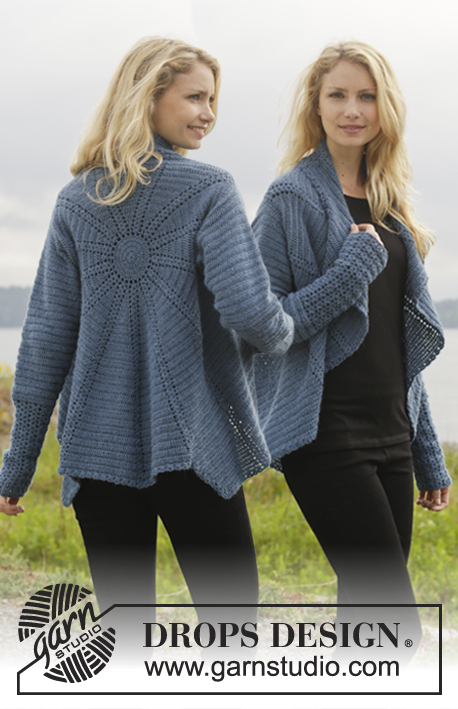
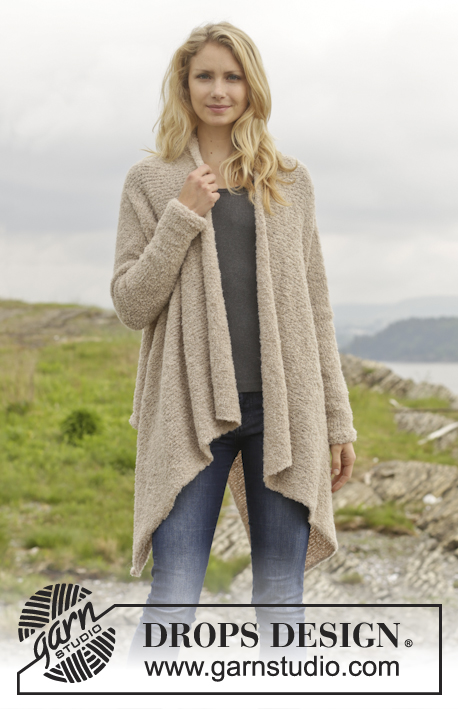
Knitted DROPS jacket in ”Alpaca Bouclé.” Size: S - XXXL.
DROPS 158-28 |
|
|
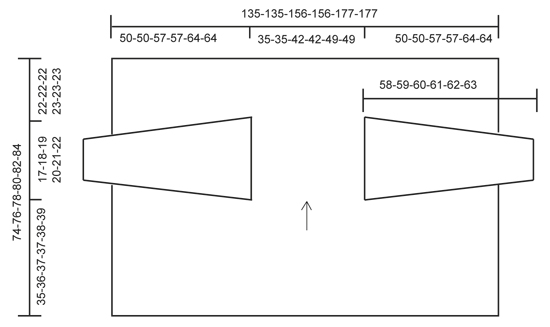
GARTER ST (back and forth on needle): K all rows. 1 ridge = K2 rows. ---------------------------------------------------------- JACKET: Worked back and forth on circular needle to make room for all the sts. Cast on 230-230-266-266-302-302 sts on circular needle size 4 mm / US 6 with Alpaca Bouclé. Work 2 ridges in GARTER ST - see explanation above. Switch to circular needle size 5 mm / US 8 and work in stockinette st with 2 edge sts in garter st each side until finished measurements. REMEMBER THE GAUGE! Work until piece measures 34-35-36-36-37-38 cm / 13½"-13 3/4"-14 1/4"-14 1/4"-14½"-15". On next row from RS, work as before over the first 81-81-93-93-105-105 sts, 7 sts in garter st, 54-54-66-66-78-78 sts in stockinette st, 7 sts in garter st and work as before over the last 81-81-93-93-105-105 sts. On WS work as before with 7 sts in garter st as from RS. On next row from RS bind off the middle of the 7 sts in garter st for armhole and work each part separately to make an opening for armhole. LEFT FRONT PIECE: Keep the first 84-84-96-96-108-108 sts on needle and slip the remaining 144-144-168-168-192-192 sts on a stitch holder. Work in stockinette st with 3 sts in garter st towards armhole and 2 edge sts in garter st towards mid front. Work until piece measures 51-53-55-56-58-60 cm / 20"-21"-21½"-22"-22 3/4"-23½". Slip sts on a stitch holder and work right front piece. RIGHT FRONT PIECE: Slip the outermost 84-84-96-96-108-108 sts back on needle, work as left front piece. Make sure to work right front piece the same length as left front piece. Slip sts on 1 stitch holder and work back piece. BACK PIECE: Slip the middle 60-60-72-72-84-84 sts back on needle. Work in stockinette st with 3 sts in garter st in each side. Work until piece measures 51-53-55-56-58-60 cm / 20"-21"-21½"-22"-22 3/4"-23½". Make sure to work back piece the same length as right and left front piece. Slip all three parts back on needle and work as follows: Stockinette st with 2 edge sts in garter st over the first 81-81-93-93-105-105 sts, 3 sts in garter st, cast on 1 new st, 3 sts in garter st, stockinette st over 54-54-66-66-78-78 sts, 3 sts in garter st, cast on 1 new st, 3 sts in garter st, stockinette st and 2 edge sts in garter st over the last 81-81-93-93-105-105 sts. Work in garter st and stockinette st the same way from WS. Then work in stockinette st with 2 edge sts in garter st until piece measures 73-75-77-79-81-84 cm / 28 3/4"-29½"-30½"-31"-32"-33". Switch to circular needle size 4 mm / US 6 and work 2 ridges. Loosely bind off from RS. SLEEVE: Worked back and forth on circular needle. Cast on 32-35-37-38-39-41 sts on circular needle size 4 mm / US 6 with Alpaca Bouclé. Work 4 ridges. Switch to circular needle size 5 mm / US 8 and work in stockinette st with 1 edge st in garter st in each side until finished measurements. When piece measures 9 cm / 3½'', inc 1 st inside 1 edge st in each side of piece. Repeat inc every 3-3-3-2½-2½-2½ cm / 1 1/8''-1 1/8''-1 1/8''-7/8''-7/8''-7/8'' 13-13-14-15-16-17 more times = 60-63-67-70-73-77 sts on needle. Work in stockinette st until piece measures 52-53-54-55-56-57 cm / 20½''-21''-21¼''-21 5/8''-22''-22½''. Bind off 1 edge st in each side of piece at beg of the next 2 rows = 58-61-65-68-71-75 sts remain on needle. Then bind off for sleeve cap in each side of piece at beg of every row as follows: bind off 4 sts 5 times in total = 18-21-25-28-31-35 sts remain on row. Bind off the remaining sts. Piece measures approx. 58-59-60-61-62-63 cm / 22¾''-23¼''-23 5/8''-24''-24 3/8''-24¾''. ASSEMBLY: Sew in sleeves. Sew underarm seams inside 1 edge st. |
|
|
|
|
Have you made this or any other of our designs? Tag your pictures in social media with #dropsdesign so we can see them! Do you need help with this pattern?You'll find tutorial videos, a Comments/Questions area and more by visiting the pattern on garnstudio.com. © 1982-2024 DROPS Design A/S. We reserve all rights. This document, including all its sub-sections, has copyrights. Read more about what you can do with our patterns at the bottom of each pattern on our site. |
|


With over 40 years in knitting and crochet design, DROPS Design offers one of the most extensive collections of free patterns on the internet - translated to 17 languages. As of today we count 304 catalogs and 11422 patterns - 11417 of which are translated into English (US/in).
We work hard to bring you the best knitting and crochet have to offer, inspiration and advice as well as great quality yarns at incredible prices! Would you like to use our patterns for other than personal use? You can read what you are allowed to do in the Copyright text at the bottom of all our patterns. Happy crafting!
Comments / Questions (51)
Hallo, ich habe nur 7 Knäuel der Wolle. Nun habe ich das Modell in den Vorderteilen reduziert. Pro Seite 15 Maschen, also insgesamt 30 Maschen weniger bei Größe s. Habe mit 50gr knapp 15cm in der Höhe über die gesamte Breite geschafft. Wenn ich das hochrechne, dürften auch 8 Knäuel nicht reichen für die gesamte Jacke... Wie viel Wolle benötige ich noch?
02.06.2016 - 08:34DROPS Design answered:
Liebe Tina, bitte haben Sie Verständnis dafür, dass wie die Anleitung nicht für einen kleineren Garnverbrauch umrechnenen können. Wenn Sie das gleiche Farbbad nicht mehr erhalten, könnten Sie z.B. an den Ärmeln in Streifen ein anderes Farbbad einarbeiten.
04.06.2016 - 06:26Hallo würde gerne wissen wie man von der anleitung jackenteil von 81 maschen auf 84 maschen bei der anleitung linkes vorderteil kommt?muss ich drei maschen aufnehmen oder wo kommen die zusätzlichen drei maschen her?
31.05.2016 - 15:58DROPS Design answered:
Hallo Ellen, diese Maschen werden nicht aufgenommen sondern sind Teil der 7 kraus rechts Maschen.
01.06.2016 - 08:23Bonjour, je voudrai commencer ce modele pour ma fille et j'aimerai savoir si les tailles correspondent aux tailles francaises. Merci
29.05.2016 - 15:22DROPS Design answered:
Bonjour Mme Tikimikis, vous trouverez à la fin des explications un schéma avec toutes les mesures pour chaque taille, comparez un vêtement similaire qui lui va avec ses mesures pour trouver la taille idéale - voir aussi ici. Bon tricot!
30.05.2016 - 09:59Please can you tell me the best way to set in the sleeves. As all you tube video refer to a pieces garment sewn together which isn't the case with this pattern.
26.03.2016 - 22:42DROPS Design answered:
Dear Mrs Strange, you will sew the sleeve as for any usual jumper/jacket - see video below. Top of sleeve should be at the top of armhole, and beg/end of rows on sleeve should be at the bottom of armhole. Happy knitting!
29.03.2016 - 09:40Thanks for the answer. I think, that in the czech instruction is a mistake. In the describe of the jacket is written: next row from RS cast off (close) 7 sts in garter st for armholes. Correct is the middle. Eva.
17.02.2016 - 09:18DROPS Design answered:
Thank you - pattern was corrected. Happy knitting! Hana
02.03.2016 - 10:50Dobry den, chapu navod dobre, kdyz upletu nejdrive jeden dil s 230 okami a ve vysce 35 cm ten to dil rozdelim na tri-levy predni, zada a pravy predni? Mam problem prave u toho deleni, kde je v navodu, ze mam uzavrit 7 ok pro pruramky. Nemam uzavrit jen 2x jedno oko? Neb mam mit na jehlici po uzavreni ok 228-tzn. 84,60,84. Dekuji za odpoved. Eva
08.02.2016 - 09:23DROPS Design answered:
Dobrý den, na každé straně uzavřete pro průramek prostřední 1 oko ze vroubkových 7 ok. Český návod byl opraven - snad bude teď srozumitelnější. Hodně zdaru! Hana
02.03.2016 - 10:59Hello, I don't understand of that, how to connect jacket to 3 parts.. Because the jacket has 81, 7, 54, 7, 81 - all 230 sts. The others 3 parts have 84, 60, 84 sts. All is 4 parts? Thanks for answer. Eva
07.02.2016 - 22:33DROPS Design answered:
Dear Mrs Habrova, after you have worked 1 ridge over the 7 sts on both places, work as follows: 81 sts as before, 3 sts in garter st (= front piece), cast off next st (mid st of the 7 sts in garter st), 3 sts in garter st, 54 sts in stocking st, 3 sts in garter st (back piece), cast off next st, 3 sts in garter st and 81 sts as before (= front piece). Continue then each piece separately. Happy knitting!
08.02.2016 - 13:42Elizabeth wrote:
How many yards approximately does this project need? I saw grams, but in the U.S. Grams vary so vastly due to the weight of the yarn. I could even convert from meters if you have that measurement. Thanks in advance.
17.09.2015 - 22:04DROPS Design answered:
Dear Elizabeth, you will find here all informations about DROPS Alpacabouclé in grams/oz and yds/m to calculate total yardage of yarn required. For ex. in first size: 400 g/50 g a ball= 8 balls x 153 yds= 1224 yds. Happy knitting!
18.09.2015 - 08:51Bonsoir Je n'ai ni aiguille circulaire ni double pointe puis je faire le modèle quand même et comment? Merci
12.08.2015 - 22:16DROPS Design answered:
Bonjour Mme Belloc, la veste se tricote sur aiguille circulaire pour avoir suffisamment de place pour y loger toutes les mailles. Vous pouvez tout à fait tricoter sur des aiguilles droites, toutefois pensez à bien vérifier votre tension (vos mailles seront beaucoup plus serrées), ou apprenez à l'aide de nos vidéos comment tricoter en allers et retours sur aiguille circulaire, votre magasin DROPS saura vous aider et vous conseiller. Bon tricot!
13.08.2015 - 09:37Would this be achievable to me , I am an absolute beginner at knitting?
14.06.2015 - 14:37DROPS Design answered:
Dear Mrs Scholiams, you will find under the tab "videos" some related videos to the techniques used in that pattern. Should you need any further assistance remember you can get help from your DROPS store or ask your question here. Happy knitting!
15.06.2015 - 10:32