
Popular categories
Looking for a yarn?


|
||||||||||||||||||||||
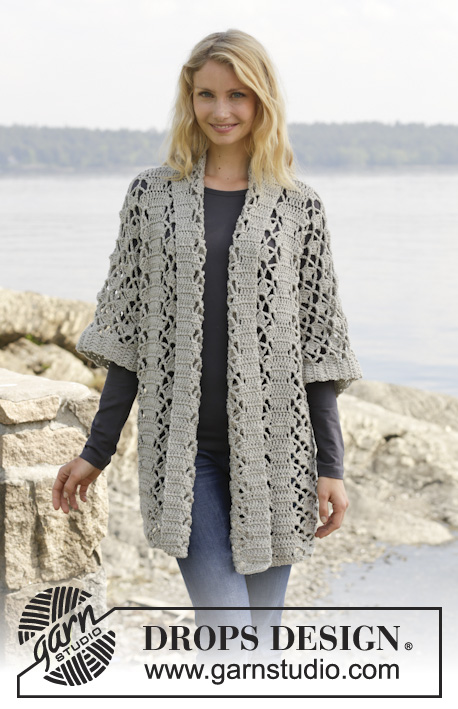
Shining Star |
||||||||||||||||||||||
 |
 |
|||||||||||||||||||||
Crochet DROPS jacket with lace pattern and shawl collar in ”Merino Extra Fine”. Size: S - XXXL.
DROPS 157-18 |
||||||||||||||||||||||
|
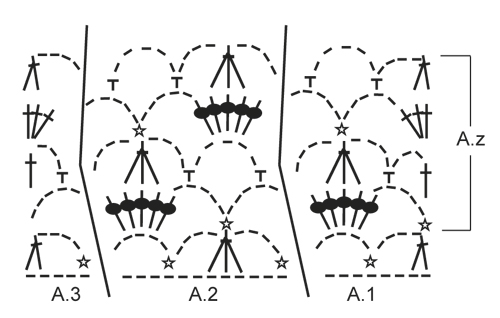
CROCHET INFO: Replace first dc at beg of every dc row with 3 ch. PATTERN: See diagrams A.1-A.3. ---------------------------------------------------------- BACK PIECE: Worked back and forth. Work 83-87-93-101-111-121 ch on hook size 5 mm / H/8 with Merino Extra Fine. Then work as follows from RS: Work A.1 – see explanation above, over the first 8 ch, NOTE: Replace 1st dc with 3 ch – see CROCHET INFO above, A.2 over the next 12-12-12-12-24-24 ch, A.3 over the next ch 5, 1 dc in each of the next 4-6-9-13-6-11 ch, A.1, A.2, A.3, 1 dc in each of the next 4-6-9-13-6-11 ch, A.1, A.2 over the next 12-12-12-12-24-24 ch and A.3. Then repeat A.z vertically until finished measurements. NOTE: On 1st row in A.z (= from WS) work as follows: Work A.3, A.2 1-1-1-1-2-2 times in width, A.1, 3 ch (replace 1 dc), 1 dc in each of the next 2-4-7-11-4-9 dc, 3 ch (replace 1 dc), 1 sc in next st, A.3, A.2, A.1, 3 ch (replace 1 dc), 1 dc in each of the next 2-4-7-11-4-9 dc, 3 ch (replace 1 dc), 1 sc in next st, A.3, A.2 1-1-1-1-2-2 times in width and A.1. REMEMBER THE CROCHET GAUGE! When piece measures approx. 45-46-47-48-49-50 cm / 17¾''-18''-18½''-19''-19¼''-19¾'', adjust to finish with 2nd row in A.z - cut the yarn. Then work sleeves as follows: Work 29 loose ch, beg from WS and continue A.3, A.2 and A.1 and dc over back piece as before and finish with 31 loose ch, turn piece. Now work 1st row in A.1-A.3 over ch from RS, AT THE SAME TIME continue with pattern over back piece as before (i.e. work 4th row in A.z over these sts) as follows: Work 1 dc in each of the first ch 6, A.1 over the next 8 ch, A.2 2 times in width (i.e. work last A.2 over the last ch 5, then work the rest of A.2 over A.1), work A.2 1-1-1-1-2-2 times in width as before, A.3, 1 dc in each of the next 4-6-9-13-6-11 dc, A.1, A.2, A.3, 1 dc in each of the next 4-6-9-13-6-11 dc, A.1, A.2 1-1-1-1-2-2 times in width, then work A.2 2 times in width (i.e. work the first A.2 over A.3 and the next 6 ch), A.3 over the next 5 ch and 1 dc in each of the last 6 ch. Continue this pattern until piece measures approx. 62-64-66-68-70-72 cm / 24 3/8''-25¼''-26''-26¾''-27½''-28 3/8'' - adjust to finish after a row from WS. Then finish each shoulder/sleeve separately as follows: RIGHT SHOULDER/SLEEVE: Work 6 dc, A.1 1 time and A.2 3-3-3-3-4-4 times, A.3, 1 dc in each of the next 4-6-9-13-6-11 dc. Turn and work pattern as before. Continue like this until piece measures 64-66-68-70-72-74 cm / 25¼''-26''-26¾''-27½''-28 3/8''-29 1/8'' in total, adjust to finish with a whole repetition of A.z. Fasten off. LEFT SHOULDER/SLEEVE: Work the left shoulder/sleeve the same way but reversed, work A.1 instead of A.3 at beg of row. RIGHT FRONT PIECE: Worked back and forth. Work 63-65-70-74-81-86 ch (includes 3 ch to turn with) on hook size 5 mm / H/8 with Merino Extra Fine. Work 1 dc in 4th ch from hook, 1 dc in each of the next 5-5-7-7-9-9 ch (= band), A.1 over the next 8 ch, A.2 over the next 12 ch, A.3 over the next ch 5, 1 dc in each of the next 4-6-9-13-6-11 ch, A.1 over the next 8 ch, A.2 over the next 12-12-12-12-24-24 ch, A.3 over the last 5 ch. Then repeat A.z vertically until finished measurements. NOTE: On 1st row in A.z (= from WS) work as follows: Work A.3, A.2 1-1-1-1-2-2 times in width, A.1, 3 ch (replace 1 dc), 1 sc in next st, 1 dc in each of the next 2-4-7-11-4-9 dc, 3 ch (replace 1 dc), A.3, A.2, A.1, 3 ch (replace 1 dc), 1 sc in next st, 1 dc in each of the next 5-5-7-7-9-9 dc. When piece measures approx. 45-46-47-48-49-50 cm / 17¾''-18''-18½''-19''-19¼''-19¾'', adjust to finish with 2nd row in A.z. Cut the yarn. Then work 29 loose ch for sleeve and continue as on back piece. When piece measures 64-66-68-70-72-74 cm / 25¼''-26''-26¾''-27½''-28 3/8''-29 1/8'', adjust to finish with a whole repetition of A.z (i.e. last row is from RS) - cut the yarn. Then work shawl collar. SHAWL COLLAR: Work shawl collar back and forth, beg from RS as follows: Work 1 dc in each of the first 6-6-8-8-10-10 dc, 1 dc in first dc on A.1, * 3 dc in next ch-space *, repeat from *-* 2 more times, 1 dc in next dc, * 3 dc in next ch-space *, repeat from *-* 2 more times, 1 dc in last dc in A.3, 0-0-0-1-1-1 dc in next dc = 27-27-29-30-32-32 dc. Then work short rows over band sts as follows: ROW 1 (WS): 5 sc, 5 hdc, 17-17-19-20-22-22 dc ROW 2 (RS): Work 1 dc in each of the 27-27-29-30-32-32 sts. Repeat these 2 rows until piece measures approx. 10 cm / 4'' on the most narrow part – adjust to finish with 2nd row (RS). Fasten off. LEFT FRONT PIECE: Work as right but reversed. Work according to diagram A.3 instead of A.1 at beg of row. When piece measures 45-46-47-48-49-50 cm / 17¾''-18''-18½''-19''-19¼''-19¾'', adjust to finish with 2nd row in A.z, work as before over front piece from WS, then work 31 loose ch for sleeve. When piece measures 64-66-68-70-72-74 cm / 25¼''-26''-26¾''-27½''-28 3/8''-29 1/8'', adjust to finish with a whole repetition of A.z (i.e. last row is from RS), work shawl collar. NOTE: There is no need to cut the yarn. ASSEMBLY: Place front pieces on top of back piece and work the shoulders as follows: 1 sc through both layers, * ch 3, 1 sc in next ch-space *, repeat from *-* along the entire shoulder/sleeve and finish with 1 sc. Work the sides tog as follows: 1 sc, * ch 3, 1 sc in ch-space on next row *, repeat from *-* along the entire side and finish with 1 sc. Work tog under sleeves as follows: * 1 sc in ch in next ch-space, 3 ch *, repeat from *-* and finish with 1 sc. |
||||||||||||||||||||||
Diagram explanations |
||||||||||||||||||||||
|
||||||||||||||||||||||
|
||||||||||||||||||||||

|
||||||||||||||||||||||
|
Have you made this or any other of our designs? Tag your pictures in social media with #dropsdesign so we can see them! Do you need help with this pattern?You'll find tutorial videos, a Comments/Questions area and more by visiting the pattern on garnstudio.com. © 1982-2024 DROPS Design A/S. We reserve all rights. This document, including all its sub-sections, has copyrights. Read more about what you can do with our patterns at the bottom of each pattern on our site. |
||||||||||||||||||||||


With over 40 years in knitting and crochet design, DROPS Design offers one of the most extensive collections of free patterns on the internet - translated to 17 languages. As of today we count 304 catalogs and 11422 patterns - 11417 of which are translated into English (US/in).
We work hard to bring you the best knitting and crochet have to offer, inspiration and advice as well as great quality yarns at incredible prices! Would you like to use our patterns for other than personal use? You can read what you are allowed to do in the Copyright text at the bottom of all our patterns. Happy crafting!
Comments / Questions (199)
Cuando la labor mida aprox 45-46-47-48-49-50 cm, ajustar para finalizar con la 2ª fila de A.z.- cortar el hilo. Ahora trabajar la manga como sigue: trabajar flojo 29 p.de cad, comenzar por el LR y continuar con A.3, A.2 y A.1 y p.a. sobre la espalda como antes, finalizar con 31 p.de cad flojos, girar la labor. Ahora trabajar la 1ª fila de A.1 - A.3 sobre los p.de cad por el LD, AL MISMO TIEMPO continuar con el patrón sobre la espalda como antes. pODRÍAN EXPLICARME ESTE PÁRRAFO?
27.01.2021 - 12:52Podrían poner el paso a paso en un video por favor
07.10.2020 - 00:38DROPS Design answered:
Hola Patricia. No hacemos ni patrones ni vídeos personalizados. Cada semana publicamos nuevos vídeos tutoriales, puede que alguno pueda ayudarte a realizar la labor.
07.10.2020 - 21:14Instructions in English are different then in German! Mein Rueckenteil ist fertig, 29LM habe ich angeschlagen und the WS Reihe gehaekelt. Muss ich jetzt dies Reihe an das Rueckenteil anhaekeln und dem Muster folgen und am Ende 31 LM dazuhaekeln? In Deutsch heisst es die Aermel werden angesetzt, in English the arms seem to be crochet separately. Very confusing! Can you clear this up?
01.08.2020 - 03:49DROPS Design answered:
Liebe Kirstina, die 29 LM sind für die 1. Ärmel, dann häkeln Sie Rückenteil wie zuvor, und enden diese Reihe mit 21 Lm für das 2. Ärmel, dann häkeln Sie weiter über alle Maschen mit 6 Stb beideseitig und im muster über Ärmel und Rückenteil dazwischen. Viel Spaß beim häkeln!
03.08.2020 - 07:39I noticed a comment that said in the American directions the slip stitch should actually be a single crochet. Is this correct?
03.06.2020 - 03:30DROPS Design answered:
Dear Mrs Miller, it should be a slip stitch as shown in diagram, but in the video a sc was made. Happy crocheting!
03.06.2020 - 07:20I am not sure, is this pattern referring to a tunisian hook?
29.05.2020 - 22:18DROPS Design answered:
Dear Sara, no, this pattern is regular crochet and not tunisian. I hope this helps. Happy Crafting!
30.05.2020 - 00:56Bonjour a 72cm du dos je n n'arive pas a comprendre comment on fait pour continuer les épaules Manche droite et Manche gauche faut t il rabattre des mailles et combien au milieu ?en sachant que je fait le modèle en xxxl merci d d'avence.
25.05.2020 - 18:05DROPS Design answered:
Bonjour Fabienne, à 72 cm (et après 1 rang sur l'envers), vous tournez l'ouvrage et continuez chaque épaule l'une après l'autre en ne crochetant que les mailles de la manche et de l'épaule, ainsi vu sur l'endroit: 6 B, 1 fois A.1 et 4 fois A.2, A.3, 11 B - laissez les autres mailles du rang non crochetées et continuez jusqu'à 74 cm. Crochetez ensuite le côté gauche de la même façon en commençant par la manche: 6 B, 1 fois A.3 et 4 fois A.2, A.1, 11 B. Les mailles non crochetées entre les 2 épaules/manches seront pour l'encolure dos. Bon crochet!
26.05.2020 - 09:07Is the "1 dc in next st" misplaced in the NOTE for the RIGHT FRONT PIECE? It says to work "3ch, 1 dc in next st, 1 tr in each of the next 2 tr, 3 ch (replace 1 tr)" I guess it should be the same as for the BACK PIECE, where the NOTE says to work "3 ch, 1 tr in each of the next 2 tr, 3 ch (replace 1 tr), 1 dc in next st" - this makes sence.
07.04.2020 - 08:21DROPS Design answered:
Dear Mrs Kavanina, it looks like you are right, after A.1 (from WS) you don't crochet 1 dc (= last stitch in A.1) but directly the 3 chains to replace first tr after.A1, thanks for noticing. Happy crocheting!
09.04.2020 - 15:23Are the instructions written out anywhere ? I love the Shining Star pattern, but I can not understand the diagrams at all. I will gladly purchase them if they are available.
12.03.2020 - 21:58DROPS Design answered:
Dear Eileen, we only have diagrams to this pattern ; you will find how to read crochet diagrams here and this video shows how to work A.1 to A.3. Here is the list of DROPS stores where our yarns are available. Happy crocheting!
13.03.2020 - 08:41Just a observation for those who crochet using American terms. The slip stitch in this pattern is actually a single crochet.
01.10.2019 - 14:49Je n'ai pas compris comment tricoter les manches est ce que je tricote sur les 31 ml puis sur le dos et je termine sur les 29ml je n'ai pas compris 2 fois A1 ou 2 fois A1 2
21.09.2019 - 20:30DROPS Design answered:
Bonjour Asma, vous commencez par la 1ère manche sur les 31 ml (= 1 bride dans la 4ème ml à partir du crochet car les 3 premières ml = 1ère bride, et 1 bride dans les 4 ml suivantes = 6 brides), puis A.1, 2 x A.2, crochetez ensuite les mailles du dos: 1 ou 2 fois A.2 (cf taille), A.3, 4-11 brides, A.1, A.2, A.3, 4-11 brides, A.1, 1 ou 2 fois A.1, 1 x A.2 au-dessus des dernières m du dos et 1 x A.2 au-dessus des 8 premières ml des 29 ml, 1 x A.3 et vous terminez par la 2ème manche (et 1 bride dans chacune des 6 dernières des 29 ml). Bon crochet!
23.09.2019 - 09:11