
Popular categories
Looking for a yarn?


|
||||||||||||||||||||||
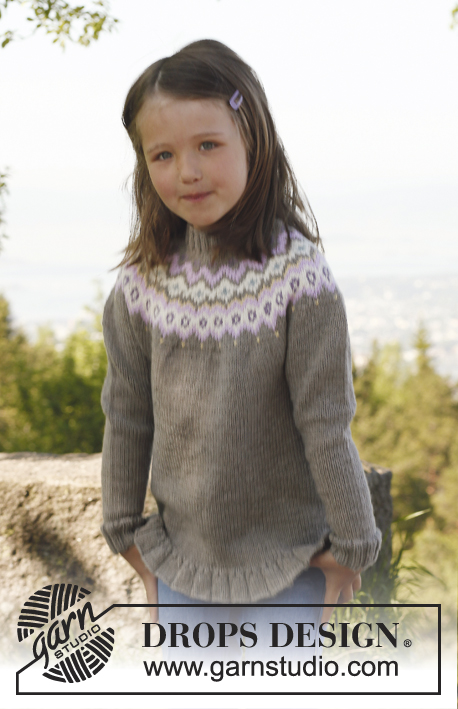
Silje jumper |
||||||||||||||||||||||
 |
 |
|||||||||||||||||||||
Knitted jumper with round yoke and flounce in DROPS Merino Extra Fine. Size children 3 to 12 years.
DROPS Children 23-16 |
||||||||||||||||||||||
|
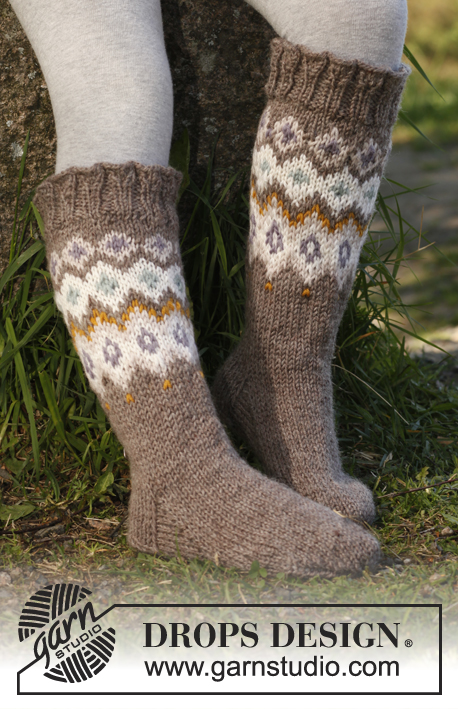
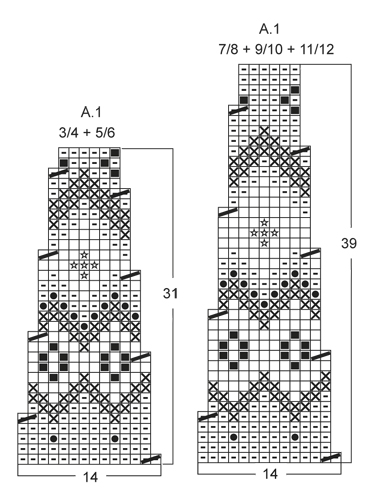
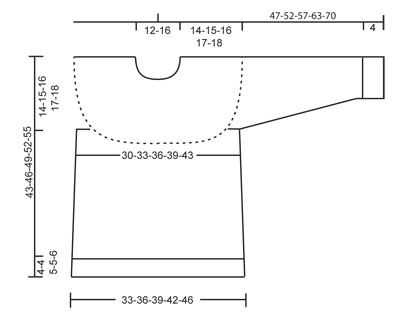
DECREASE TIP: Dec as follows before marker: K 2 tog. Dec as follows after marker: K 2 twisted tog. PATTERN: See diagram A.1 – choose diagram for your size. Work entire pattern in stockinette st. ---------------------------------------------------------- BODY: Worked in the round on circular needle. Cast on 280-304-328-352-384 sts on circular needle size 3.5 mm / US 4 with light brown. Work rib = K 6/P 2 for 3-3-4-4-5 cm / 1"-1"-1½"-1½"-2". Work next round as follows: * Slip 1 st as if to K, K 1, psso, K 2, K 2 tog, P 2 *, repeat from *-* the entire round = 210-228-246-264-288 sts. Work 1 round with K 4/P 2. Work next round as follows: * Slip 1 st as if to K, K 1, psso, K 2 tog, P 2 *, repeat from *-* the entire round = 140-152-164-176-192 sts. Work 1 round with K 2/P 2. Switch to circular needle size 4 mm / US 6, insert 1 marker at beg of round and 1 marker after 70-76-82-88-96 sts (these marks the sides). Continue in stockinette st. REMEMBER THE GAUGE! When piece measures 9 cm / 3½", dec 1 st on each side of both markers – READ DECREASE TIP (= 4 sts dec). Repeat dec every 7-8-9-10-11 cm / 2¾"-3"-3½"-4"-4½" 2 more times = 128-140-152-164-180 sts. When piece measures 29-31-33-35-37 cm / 11½"-12¼"-13"-13¾"-14½", bind off 6 sts in each side for armholes (i.e. 3 sts on each side of both markers) = 58-64-70-76-84 sts remain on needle on both back and front piece, cut the thread. Put piece aside and knit the sleeves. SLEEVE: Worked in the round on double pointed needles. Cast on 36-36-40-44-44 sts on double pointed needles size 3.5 mm / US 4 with light brown. Work rib = K 2/P 2. When piece measures 4 cm / 1½", K 1 round while AT THE SAME TIME dec 4-4-4-8-8 sts evenly = 32-32-36-36-36 sts. Switch to double pointed needles size 4 mm / US 6, insert 1 marker at beg of round (= mid under sleeve). Continue in stockinette st. When piece measures 7 cm / 2¾", inc 2 sts mid under sleeve (i.e. 1 st on each side of marker). Repeat inc every 2-2-2½-2½-2½ cm / ¾"-¾"-⅞"-⅞"-⅞" 8-11-10-12-14 more times = 50-56-58-62-66 sts. When piece measures 27-31-34-39-44 cm / 10½"-12¼"-13½"-15¼"-17¼", bind off 6 sts mid under sleeve (i.e. 3 sts on each side of marker) = 44-50-52-56-60 sts remain on needle, cut the thread. Put piece aside and knit another sleeve. YOKE: Slip sleeves on to same circular needle as body where armholes were bind off = 204-228-244-264-288 sts - insert 1 marker mid back - NOW ROUND BEG HERE. Work 3-4-2-3-4 cm / 1"-1½"-¾"-1"-1½" in stockinette st with light brown - AT THE SAME TIME dec 8-4-6-12-8 sts evenly on last round = 196-224-238-252-280 sts. Continue with diagram A.1 (= 14-16-17-18-20 repetitions on the round). After A.1 84-96-102-108-120 sts remain on needle. Continue to work an elevation in the back of neck with light brown and short rows as follows: K 10 sts past marker mid back, turn, tighten thread and P 20 sts, turn, tighten thread and K 30 sts, turn, tighten thread and P 40 sts. Continue like this until a total of 60-80-80-80-100 sts have been worked. Turn and K until mid back. Then K 1 round over all sts while AT THE SAME TIME dec 12-20-22-24-32 sts evenly = 72-76-80-84-88 sts. Piece measures approx. 43-46-49-52-55 cm / 17"-18"-19¼"-20½"-21½" up to shoulder, continue with neck edge. NECK EDGE: Switch to circular needle size 3.5 mm / US 4. Continue with light brown and rib = K 2/P 2 for approx. 2.5 cm / 1". Then loosely bind off sts with K over K and P over P. ASSEMBLY: Sew the openings under the sleeves. ---------------------------------------------------------- Jacket - see pattern SmåDrops 23-15 --------------------------------------------------------- Socks - see pattern SmåDrops 23-17 --------------------------------------------------------- |
||||||||||||||||||||||
Diagram explanations |
||||||||||||||||||||||
|
||||||||||||||||||||||
|
||||||||||||||||||||||
|
||||||||||||||||||||||
|
Have you made this or any other of our designs? Tag your pictures in social media with #dropsdesign so we can see them! Do you need help with this pattern?You'll find tutorial videos, a Comments/Questions area and more by visiting the pattern on garnstudio.com. © 1982-2024 DROPS Design A/S. We reserve all rights. This document, including all its sub-sections, has copyrights. Read more about what you can do with our patterns at the bottom of each pattern on our site. |
||||||||||||||||||||||


With over 40 years in knitting and crochet design, DROPS Design offers one of the most extensive collections of free patterns on the internet - translated to 17 languages. As of today we count 304 catalogs and 11422 patterns - 11417 of which are translated into English (US/in).
We work hard to bring you the best knitting and crochet have to offer, inspiration and advice as well as great quality yarns at incredible prices! Would you like to use our patterns for other than personal use? You can read what you are allowed to do in the Copyright text at the bottom of all our patterns. Happy crafting!
Comments / Questions (21)
Bonjour, je suis arrivée à la fin de la manche, j'ai commencé ma manche par le milieu j'ai donc mis mon marqueur j'ai bien rabattu mes 3 mailles au debut du rangaprès le marqueur mais comment faire pour rabattre les 3 autres mailles en fin de rangavant mon marqueur cla ne fonctionne pas il me reste 1 maille j'ai besoin de conseil pour continuer cordialement patricia
25.09.2018 - 09:59DROPS Design answered:
Bonjour Patricia, vous avez bien rabattu les 3 premières mailles du début du tour, continuez le tour jusqu'à ce qu'il reste 3 mailles avant la fin du tour (= avant les 3 mailles rabattues) et rabattez ces 3 dernières mailles, coupez le fil et passez-le dans la dernière maille = vous avez rabattu vos 6 mailles au milieu sous la manche, et il doit vous rester 44-50-52-56-60 mailles sur l'aiguille. Bon tricot!
25.09.2018 - 10:2620171227 köpte Jag garnet Merino extra fin i färg 08 som basfärg till två tröjor. Alla nystan av den färgen (färgbad 55208) var skarvade upp till 5 ggr. Nu står jag i begrepp att sticka ytterligare en tröja i det garnet men känner mig tveksam. Är det så med det garnet att det är mycket skarvar? Är det i sin ordning tycker ni?
13.01.2018 - 16:12DROPS Design answered:
Hej,Naturligvis skal der ikke være 5 skarvar på alle nystan, det er ekstremt usædvanligt. Du kan absolut købe DROPS Merino Extra Fine igen!
30.01.2018 - 10:22Wat wordt er bedoeld in het breiwerk als er staat brei recht tot er 20 steken over zijn keer trek de draad aan en brei verder av tot er 20 steken over zijn keer trek de draad aan en brei tot er 40 st. Over zijn trek de draad aan enbrei de rest van de nodig recht. Wat bedoel je trek aan de draad????
16.11.2016 - 23:49DROPS Design answered:
Hoi Tonny. Precies zoals er staat: Je moet even aan de draad (die je mee breit) trekken om de steek strakker te maken. Dit om de overgang tussen de verkorte toeren minder duidelijk te maken.
17.11.2016 - 13:27J'arrive à mon 22ème rang de l'empiècement et j'ai beaucoup de mal à passer mes mailles sur mon aiguille de gauche pour tricoter. Avez vous une astuce ? Merci (j'espère m'être bien fait comprendre)
31.03.2016 - 13:43DROPS Design answered:
Bonjour Mme Drigo, si je comprends bien, vous n'avez plus suffisamment de mailles pour tenir sur l'aiguille circulaire - vous pouvez alors soit continuer sur les aiguilles doubles pointes, soit continuer avec l'aig. circulaire de 80 cm avec la méthode du "magic loop" - voir vidéo ci-dessous. Bon tricot!
31.03.2016 - 13:55Merci de bien vouloir m'expliquer comment reprendre les manches sur l'aiguille circulaire ?
02.03.2016 - 23:33DROPS Design answered:
Bonjour Mme Drigo, la vidéo ci-dessous montre comment glisser les manches sur l'aiguille circulaire: placez les 6 m rabattues de la manche contre les 6 m rabattues pour les emmanchures et tricotez ensuite en rond. Bon tricot!
03.03.2016 - 08:50Comment peut on tricoter en rond (pour les manches) sur les aiguilles doubles pointes ? Merci
22.02.2016 - 18:11DROPS Design answered:
Bonjour Mme Drigo, la vidéo ci-dessous montre comment monter les mailles et tricoter (en jersey) en rond sur les aiguilles doubles pointes. Bon tricot!
23.02.2016 - 08:46Jeg vil gerne strikke blusen i ensfarvet Merino Extra Fine i str. 11/12 år hvor mange nøgler garn behøver jeg? Mvh. Helle
12.08.2015 - 22:29DROPS Design answered:
Hej Helle. Der staar i mönstret: 3/4 - 5/6 - 7/8 - 9/10 - 11/12 år Str i cm: 98/104 - 110/116 - 122/128 - 134/140 - 146/152 Materialer: DROPS MERINO EXTRA FINE fra Garnstudio 250-300-300-350-350 g f.nr 07, lys brun 50 g f.nr 01, natur 50 g f.nr 15, lys grågrønn 50 g f.nr 16, lys rosa 50 g f.nr 22, lys lilla 50 g f.nr 24, lys gul. Dvs, 350 gr. 07 og 50 gr af de övrige farver.
13.08.2015 - 14:02Ik brei het vest. Ik ben aan het begin van het patroon A1 , en snap het niet meer. rij 1 van patroon : moet ik hier na de kantsteek wel of niet minderen? Rij 3 (de eerste rij met contrastkleur) Wordt rechts gebreid. Als ik in steek 4 begin met motief, heb ik laatste gekleurde stip op 1 steek voor de kantsteek:dit is toch niet symmetrisch? Moet je bij het volgen van patroon A1 nooit minderen aan het begin van een naald?
20.01.2015 - 17:40DROPS Design answered:
Hoi Renee. Je breit deze trui in de rondte, dus er is geen kantsteek. Bijvoorbeeld maat 3/4 jaar heb je 196 st aan het begin van patroon A.1 = 14 herhalingen van het patroon in de eerste nld. Je breit de eerste rij als volgt: 2 st r samen breien, 12 st r met lichtbruin. Herhaal dit op de hele nld = 14 st per herhaling wordt 13 st na de eerste rij. Enzovoort.
21.01.2015 - 15:45Geneviève TAlAN wrote:
Comment est-il possible d'avoir en vis-à-vis deux dessins identiques (rangs 5 à 9 et 12 à 16) alors qu'on a des diminutions aux rangs 11 et 13 ! Je suis arrivée au rang 12 du diagramme A.1, du modèle Silje jumper, en taille 3/4. Merci de m'expliquer comment faire la suite.
02.01.2015 - 05:08DROPS Design answered:
Bonjour Mme Taian, au 1er rang de A.1, vous tricotez 14 fois les 14 m de A.1 sur 196 m, il reste 182 à la fin du tour 1, au tour 5, vous diminuez 1 m dans les 14 motifs, il reste 168 m, répétez 14 fois les 12 m de A.1 des rangs 6 à 10, et diminuez 1 m dans chaque motif A.1 au tour suivant comme indiqué dans le diagramme. Bon tricot!
02.01.2015 - 16:49Ist es richtig dass ich beim rumpfteil eine markierung am beginn und eine an der seite machen soll?
04.05.2014 - 22:08DROPS Design answered:
Liebe Christiane, ja genau. Die beiden Markierer kennzeichnen die Seiten des Pullovers (also jeweils nach der Hälfte der Maschen), an denen abgenommen wird. Der Rundenbeginn ist also die eine Seite des Pullis, die andere Seite folgt nach 70-76-82-88-96 M. Gutes Gelingen!
05.05.2014 - 00:39