
Popular categories
Looking for a yarn?


|
|
Wild Flower |
|
 |
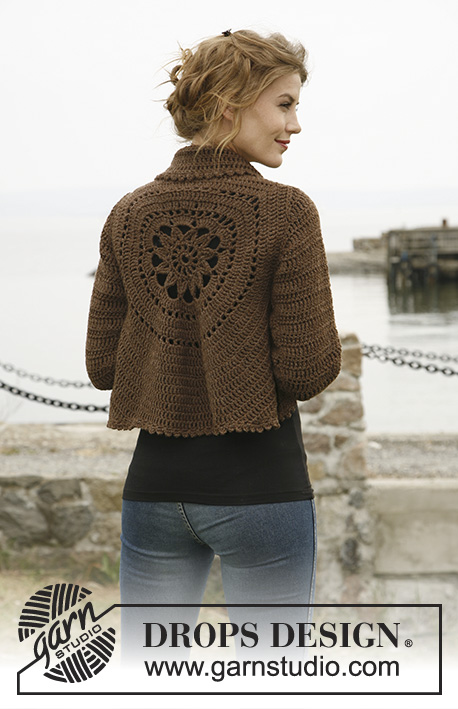 |
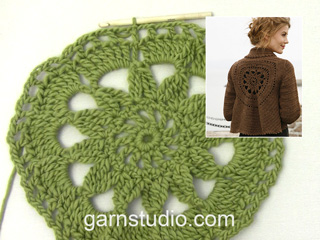
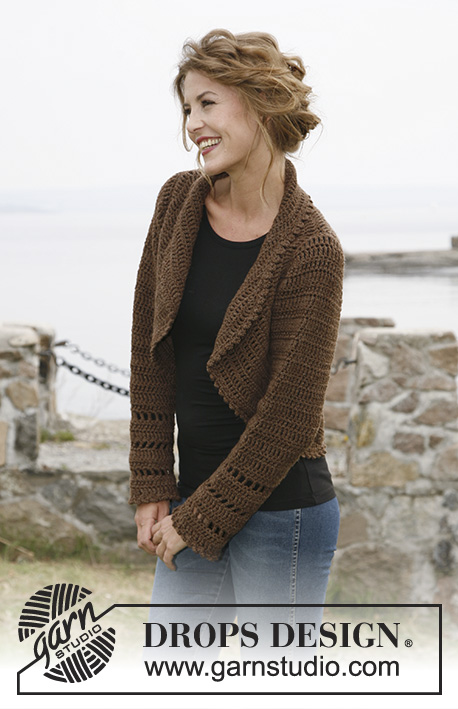
Crochet DROPS jacket worked in a circle in ”Nepal”. Size: S to XXXL
DROPS 132-2 |
|
|
CROCHET TIP: Replace first tr on every round/row with ch 4. DECREASE TIP 1 (applies to the body): Dec as follows: Work tr until 3 tr remain, * in the first of these work 1 dc, in the next 1 hdc and in the last 1 sc, turn with ch 1, skip sc, work 1 sl st in hdc and 1 sl st in dc, then 1 sc in first tr, 1 hdc in next tr and 1 dc in next tr, work tr until 3 tr remain at end of row *, repeat from *-* until a total of 6-8-12 rows have been worked. DECREASE TIP 2 (applies to sleeve cap): Dec at beg of row by working sl st over the no of tr to be dec. Dec at end of row by working until same no of sts to be dec remains, turn piece. -------------------------------------------------------- -------------------------------------------------------- BODY: Worked in the round in a circle from mid back. Ch 8 on hook size 5 mm / H/8 with Nepal and form a ring with 1 sl st in first ch. ROUND 1: Work 12 sc in ch-ring, finish with 1 sl st in first sc. ROUND 2: ch 5 (= 1 dc + 2 ch), * 1 dc in next sc, ch 2 *, repeat from *-* the entire round and finish with 1 sl st in 3rd ch from beg of round = 12 dc with 2 ch between each. ROUND 3: 1 ch, continue to crochet as follows in every ch-space the entire round: 1 sc + ch 1 + 1 sc + ch 1, finish round with 1 sl st in first ch = 24 sc with 1 ch between each. ROUND 4: 1 sl st in first sc, 1 sl st in first ch, ch 5, 1 dtr in same ch, * ch 7, then work 4 dtr tog as follows: Work 2 dtr in same ch as last dtr but wait with last YO and pull through on both dtr, skip 1 sc + 1 ch + 1 sc, work 1 dtr in next ch but wait with last YO and pull through, then work last dtr in same ch and pull last YO through all 5 sts on hook *, repeat from *-* a total of 11 times, ch 7, work 2 dtr tog in same ch (but wait with last YO and pull through on both), work 1 sl st in 5th ch from beg of round and pull thread through all 3 sts on hook. ROUND 5: 1 sl st in first ch-space, ch 4 (= 1 tr), 7 tr in same ch-space, then work 8 tr in every ch-space, finish with 1 sl st in 4th ch from beg of round = a total of 96 tr. ROUND 6: ch 5 (= 1 dc + 2 ch), * skip 1 tr, 1 dc in next tr, ch 2 *, repeat from *-* the entire round and finish with 1 sl st in 3rd ch from beg of round = 48 ch-spaces. ROUND 7 – READ CROCHET TIP: Work 1 tr in every dc and work 1 and 2 tr alternately in every ch-space the entire round = 120 tr. ROUND 8: Work 1 tr in every tr but work 2 tr in every 10th tr = 132 tr. ROUND 9: ch 5 (= 1 dc + 2 ch), * skip 1 tr, 1 dc in next tr, ch 2 *, repeat from *-* the entire round and finish with 1 sl st in 3rd ch from beg of round = 66 ch-spaces. ROUND 10: Work 1 tr in every dc and work 1 and 2 tr alternately in every ch-space the entire round = 165 tr. ROUND 11: Work 1 tr in every tr but work 2 tr in every 15th tr = 176 tr. ROUND 12: Work 1 tr in every tr but work 2 tr in every 16th tr = 187 tr. Piece measures approx. 20 cm / 8" from center and outwards. SIZE S/M: ROUND 13: ch 1, then work 1 sc in each of the first 45 tr (= up towards neck), ch 30 loosely, skip the next 27 tr (= armhole), then work 1 sc in each of the next 88 tr (= down towards back), ch 30 loosely, skip the next 27 tr (= armhole) and fasten with 1 sl st in first sc on round. ROUND 14: Work 1 tr in every sc - but inc 2 tr evenly over the first 45 sc (= 47 tr), then work 30 tr in ch-row over armhole, work 1 tr in every sc – but inc 3 tr evenly over the bottom 88 sc (= 91 tr), and work 30 tr in ch-row over armhole = 198 tr. ROUND 15 to 19: Continue with tr – while at the same time inc 6 tr evenly on every round. After 19th round there are 228 tr on the round and piece measures approx. 33 cm / 13" from center and outwards. Continue working only over 79 tr in each side – i.e. do not work over 35 tr at top by neck or 35 tr at bottom of back. Continue with explanation under FRONT PIECE. SIZE L/XL: ROUND 13: Work 1 tr in every tr but work 2 tr in every 17th tr = 198 tr. ROUND 14: ch 1, then work 1 sc in each of the first 50 tr (= up towards neck), ch 32 loosely, skip the next 29 tr (= armhole), then work 1 sc in each of the next 90 tr (= down towards back), ch 32 loosely, skip the next 29 tr (= armhole) and fasten with 1 sl st in first sc on round. ROUND 15: Work 1 tr in every sc - but inc 3 tr evenly over the first 50 sc (= 53 tr), then work 32 tr in ch-row over armhole, work 1 tr in every sc – but inc 3 tr evenly over the bottom 90 sc (= 93 tr), and work 32 tr in ch-row over armhole = 210 tr. ROUND 16 to 20: Continue with tr – while at the same time inc 6 tr evenly on every round. After 20th round there are 240 tr on the round and piece measures approx. 35 cm / 13¾" from center and outwards. Continue working only over 81 tr in each side – i.e. do not work over 39 tr at top by neck or 39 tr at bottom of back. Continue with explanation under FRONT PIECE. SIZE XXL and XXXL: ROUND 13: Work 1 tr in every tr but work 2 tr in every 17th tr = 198 tr. ROUND 14: Work 1 tr in every tr but work 2 tr in every 18th tr = 209 tr. ROUND 15: ch 1, then work 1 sc in each of the first 54 tr (= up towards neck), ch 36 loosely, skip the next 32 tr (= armhole), then work 1 sc in each of the next 91 tr (= down towards back), ch 36 loosely, skip the next 32 tr (= armhole) and fasten with 1 sl st in first sc on round. ROUND 16: Work 1 tr in every sc - but inc 2 tr evenly over the first 54 sc (= 56 tr), then work 36 tr in ch-row over armhole, work 1 tr in every sc – but inc 3 tr evenly over the bottom 91 sc (= 94 tr), and work 36 tr in ch-row over armhole = 222 tr. ROUND 17 to 22: Continue with tr – while at the same time inc 6 tr evenly on every round. After 22nd round there are 258 tr on the round and piece measures approx. 37 cm / 14½" from center and outwards. Continue working only over 89 tr in each side – i.e. do not work over 40 tr at top by neck or 40 tr at bottom of back. Continue with explanation under FRONT PIECE. LEFT FRONT PIECE - ALL SIZES: = 79-81-89 tr. Insert a marker after 23-24-27 sts in from each side (= 33-33-35 sts between markers). Then work tr back and forth over these sts while at the same time inc 1 st at every marker on every row (i.e. inc 2 sts on row, inc alternately before and after marker) and dec 3 sts at beg and end of every row in each side – SEE DECREASE TIP 1 until a total of 6-8-12 rows back and forth have been worked. RIGHT FRONT PIECE: Work same way as on left piece over 79-81-89 tr in right side. SLEEVE (worked back and forth): Ch 46-48-53 loosely (includes 4 ch to turn with) on hook size 5 mm / H/8 with Nepal. ROW 1: 1 tr in 5th ch from hook, 1 tr in each of the next 2-4-2 ch, * skip ch 1, 1 tr in each of the next 6 ch *, repeat from *-* until 4 ch remain, skip 1 ch and work 1 tr in each of the last 3 ch = 37-39-43 tr. ROW 2: 1 tr in every tr – READ CROCHET TIP! ROW 3: ch 6 (= 1 tr + 2 ch), skip 1 tr, 1 tr in next tr, * ch 2, skip 1 tr, 1 tr in next tr *, repeat from *-* the entire row = 18-19-21 ch-spaces. ROW 4: Work 1 tr in every tr and 1 tr in every ch-space = 37-39-43 tr. Repeat row 2-4 a total of 3 times. Piece measures approx. 18 cm / 7". Then work tr on all rows until finished measurements, while at the same time inc as follows: SIZE S/M: * Inc 1 tr in one side by working 2 tr in next to last tr. On next row inc 1 tr in the other side the same way. Inc 1 more time the same way in each side, then work 1 row without inc *, repeat from *-* a total of 3 times = 12 inc = 49 tr. SIZE L/XL + XXL/XXXL: * Inc 1 tr in one side by working 2 tr in next to last tr. On next row inc 1 tr in the other side the same way *, repeat from *-* a total of 8 times = 16 inc = 55-59 tr. ALL SIZES: Continue to work until piece measures 49 cm / 19¼" in all sizes. Now dec on every row in each side for sleeve cap – SEE DECREASE TIP 2: 3 tr 1 time, 2 tr 3 times and 3 tr 1 time = 25-31-35 tr remain at the top. Fasten off. ASSEMBLY: Sew sleeve seams tog edge to edge to avoid a chunky seam. Work 1 round around the entire body and at bottom of sleeves as follows: * ch 5, 1 dc in first ch, skip 1 st, fasten with 1 sc in next st *, repeat from *-* the entire round and finish with 1 sl st in first ch. Sew in the sleeves. If desired, close the jacket with a pin or sew on a button on to left front piece (try the jacket on to see where button should be) and button it in crochet edge. |
|
|
|
|
Have you made this or any other of our designs? Tag your pictures in social media with #dropsdesign so we can see them! Do you need help with this pattern?You'll find tutorial videos, a Comments/Questions area and more by visiting the pattern on garnstudio.com. © 1982-2024 DROPS Design A/S. We reserve all rights. This document, including all its sub-sections, has copyrights. Read more about what you can do with our patterns at the bottom of each pattern on our site. |
|


With over 40 years in knitting and crochet design, DROPS Design offers one of the most extensive collections of free patterns on the internet - translated to 17 languages. As of today we count 304 catalogs and 11422 patterns - 11417 of which are translated into English (US/in).
We work hard to bring you the best knitting and crochet have to offer, inspiration and advice as well as great quality yarns at incredible prices! Would you like to use our patterns for other than personal use? You can read what you are allowed to do in the Copyright text at the bottom of all our patterns. Happy crafting!
Comments / Questions (433)
Susan wrote:
I just found this pattern and would love to make it, however I can't see how you would know what size to make - am I missing something? Please advise - thanks so much.
16.09.2016 - 17:01DROPS Design answered:
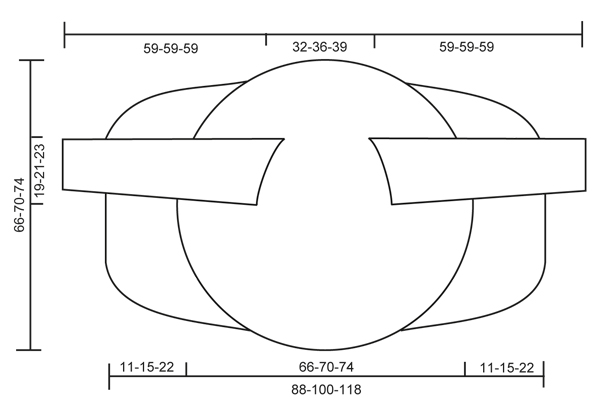
Dear Susan, scrolling down the page you can find a measurement chart in cm: compare them with a garment you have with a similar shape and you'll find the right size. Happy crocheting!
18.09.2016 - 23:16FRANKIE HALEY wrote:
I am on Wildflower. I cannot understand this part where it talks about increasing and decreasing. The diagram doesnt look as though there are any increases. Help needed fast as it is for a birthday present happening soon. Thanks so much, I love this pattern. (don't laugh I made it before without any problems! but now it doesnt make sense to me ) thankyou so much form Australia
06.09.2016 - 22:51DROPS Design answered:
Dear Mrs Haley, when you are working front pieces, you have to dec on each side of front piece as explained under "DECREASE TIP 1" and at the same time inc at both markers, ie you will dec 3 sts in each side on every row and inc 2 sts inc on every row. Happy knitting!
07.09.2016 - 09:09JANETH ELENA MARTINEZ MARTINEZ wrote:
Hola buenas noches: Me pueden colaborar explicando esta disminución. VER TIP-2 PARA DISMINUCIÓN: 3 p.a.d. 1 vez, 2 p.a.d. 3 veces y 3 p.a.d. 1 vez. Gracias
30.08.2016 - 03:47DROPS Design answered:
Hola Janeth. Para dism, según TIP 2 PARA LAS DISMINUCIONES, hay que trabajar puntos enanos (= p.e.) sobre los p.a.d. de la fila anterior y repetir las dism cada 2ª fila 1 vez sobre 3 p.a.d., 3 vcs sobre 2 p.a.d. y 1 vez sobre 3 p.a.d..
04.09.2016 - 23:07JANETH ELENA MARTINEZ MARTINEZ wrote:
Hola ya termine el tejido, hice las uniones de las mangas, pero se me ha dificultado unir las mangas con el cuerpo. Sugerencia podrían realizar un video ya que es más fácil de entender. Gracias
24.08.2016 - 17:19DROPS Design answered:
Ver la respuesta abajo.
25.08.2016 - 16:05JANETH ELENA MARTINEZ MARTINEZ wrote:
Hola ya termine el tejido, hice las uniones de las mangas, pero se me ha dificultado unir las mangas con el cuerpo. Sugerencia podrían realizar un video ya que es más fácil de entender. Gracias
21.08.2016 - 03:38DROPS Design answered:
Hola Janet. Paso tu sugerencia al departamento de los videos.
25.08.2016 - 16:04JANETH ELENA MARTINEZ MARTINEZ wrote:
Gracias por la colaboración, resolví la inquietud. En cuanto a la manga tengo dudas en la vuelta 1 donde dice ...en cada una de las 2-4-2 cad sig... no entiendo que significa ya que sigo la instrucción a partir del * todo es claro. Agradezco aclarar el inconveniente.
04.06.2016 - 02:10DROPS Design answered:
Hola Janet. Significa "en cada una de las 2 cadenetas siguientes (talla S/M), cada una de las 4 cadenetas siguientes (talla L/XL), cada una de las 2 cadenetas siguientes (talla XXL/XXXL)".
04.06.2016 - 10:16Well, I finally finished this fab jacket. It's only the second garmet I've ever made, and I did find the pattern confusing to begin with. However, the secret is to persevere and keep reading back - it eventually 'clicks'. I used Drops Alaska, rather than Nepal (it was on offer!), and it worked well, though I did have to order and extra 100g. Good luck everyone. 😊
03.04.2016 - 17:57Hej! Har just virkat färdigt min kofta och är nöjd på det stora hela. Har dock svårt att få den att sitta på bra. Själva halsöppningen är liksom för stor, har provat att sy fast kragen för formens skull men då "säckar" den liksom bak i nacken och bakstycket får ett veck längst upp under kragen. Har det rek garnet och den passar i stlk annars. Har ni nåt tips? Ska jag prova att tvätta den? Hälsn Lena
21.03.2016 - 12:00Grazie Giulia. Io però intendevo dalla riga 15 dove dice di aumentare 6 m.a.d. in modo uniforme ogni giro fino al 19. Queste 6 m.a.d.si aumentano sempre solo sul collo e sulla parte inferiore? Grazie!!
08.03.2016 - 21:19DROPS Design answered:
Buonasera Laura. Nei giri dal 15 al 19, taglia S, deve aumentare 6 m.a.d a intervalli regolari su tutte le m del giro. Buon lavoro!
08.03.2016 - 21:38Buon giorno sono arrivata alla riga 14 della taglia s m e non ho capito se gli aumenti vanno fatto anche sulle 30 m.a.d. sopra i buchi o solo su collo e dietro. Grazie!!
06.03.2016 - 10:18DROPS Design answered:
Buonasera Laura, deve aumentare 2 maglie alte doppie nelle prime 45 m.b. (diventano 47 m.a.d.), poi lavorare 30 m.a.d. nella riga di catenelle sullo scalfo, e aumentare 3 maglie alte doppie sulle 88 m.b. in basso (= diventano 91 m.a.d), e lavorare 30 m.a.d. nella riga di catenelle sullo scalfo = 198 m.a.d. Ci riscriva se non è chiaro. Buon lavoro!
06.03.2016 - 18:35