


Komentáře / Otázky (13)
![]() Marilyn Gittos napsala:
Marilyn Gittos napsala:
Please can I have the pattern for number 223-45 ThankYou
30.01.2024 - 04:05Odpověď DROPS Design :
Dear Mrs Gittos, sure, you can always find any pattern using the search engine or just click here to get the socks 223-45. Happy knitting!
30.01.2024 - 08:13
![]() Heike napsala:
Heike napsala:
Es ist etwas verwirrend für mich, wie finde ich die gewünschte Maschenanzahl z.B. bei Grösse 38?
13.02.2019 - 10:32Odpověď DROPS Design :
Liebe Heike, die Grösse 38 ist hier die 10. Grösse, so folgen Sie je die 10. Maschenanzahl/cm, dh Sie schlagen 68 M an, und Bündchen werden gestrickt bis die Arbeit 13 cm misst. Viel Spaß beim stricken!
05.03.2019 - 12:26
![]() Emilia napsala:
Emilia napsala:
I have needles size 3 instead of recommended 2,5 and using drops fabel yarn in this pattern. I want to make socks for 6 month old baby or 12cm in a foot
19.01.2018 - 21:35Odpověď DROPS Design :
Dear Emilia, since every person knits differently, it is possible that someone knits thightly enough to get the recomended gauge with size 3 needles. However, I would not advise to use looser gauge than the given as making a sock should be a careful balance between knitting thight enough - so the sock will be hard wearing enough, loosely knitted items are ruined much faster- and knitting loosely enough so the knitted fabric is still soft enough to wear comfortably. Happy Knitting!
20.01.2018 - 01:07
![]() Melli napsala:
Melli napsala:
Habe mal eine allgemeine Frage : Sollte man Stricknadeln , z.B. Knitpro nadeln mit einem Öl Pflegen . Habe das irgendwo gelesen. Dort wurde Leinöl empfohlen. Habe das aber noch nie gemacht. Liebe Grüße Melli, über eine Antwort wär ich dankbar.
11.03.2015 - 21:08Odpověď DROPS Design :
Liebe Melli, dazu können wir Ihnen an dieser Stelle schwerlich Auskunft geben. Wir können hier nur Fragen beantworten, die sich auf unsere Anleitungen beziehen. Ich halte es für abwegig, da diese Nadeln lackiert sind, fragen Sie am besten direkt beim Hersteller nach oder in dem Laden, in dem Sie Ihre Knit-Pro-Nadeln gekauft haben.
11.03.2015 - 21:41
![]() DROPS Design NL napsala:
DROPS Design NL napsala:
Deze sok wordt met één draad gebreid. Als het met 2 draden zou zijn, dan zou het in zowel de titel en in het patroon zelf vermeld worden. Succes.
12.09.2011 - 12:34
![]() Monique napsala:
Monique napsala:
Beste Tine, wordt dit gebreid met een dubbele of enkele draad? ik kan het niet ontdekken in het patroon?
11.09.2011 - 11:49
![]() Anne-Lie Andersson napsala:
Anne-Lie Andersson napsala:
Perfekt att sticka av mitt redan inköpta Fabelgarn!!
18.01.2011 - 21:24
![]() Elisabeth napsala:
Elisabeth napsala:
:):):) søde
07.01.2011 - 17:49
![]() Strikkemor napsala:
Strikkemor napsala:
Ja men dog, er det ikke de samme sokker bare i tre forskellige farver. gaaaaab...
07.01.2011 - 17:08
![]() Vera Friis napsala:
Vera Friis napsala:
Nu lidt "kritik " Nu stopper vi lige med flere sokker----kan dem i "søvne".
07.01.2011 - 15:39
|
|
Rose Twine#rosetwinesocks |
|
|
|
|
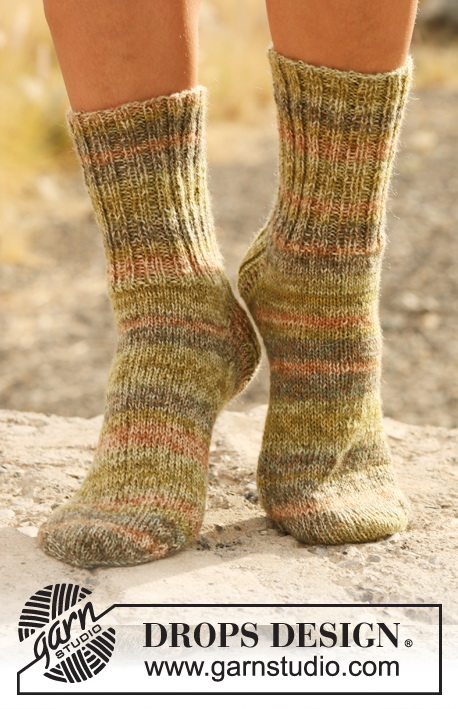
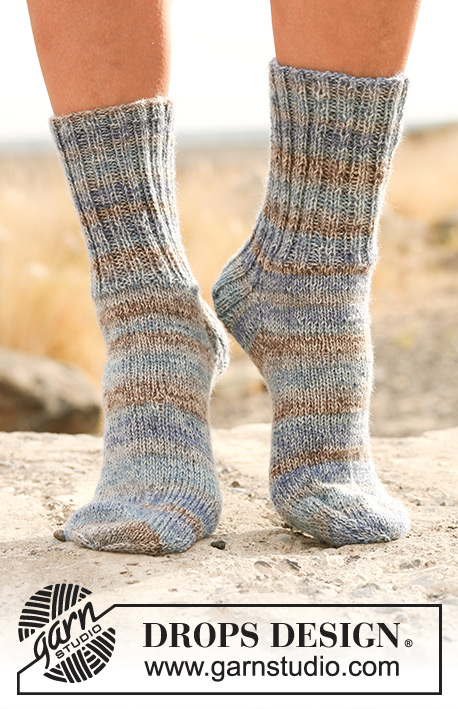
DROPS ponožky s žebrovým lemem z příze "Fabel". Velikost 15/17 – 44/46.
DROPS 130-17 |
|
|
TVAROVÁNÍ PATY (pleteme lícovým žerzejem): 1. řada (= lícová): pleteme po posledních 6-7-7-7 (7-7-8-8) 7-7-8-10 ok v řadě, 1 oko sejmeme hladce, 1 oko upleteme hladce a sejmuté přes ně přetáhneme, práci otočíme. 2.ř. (= rubová): pleteme po posledních 6-7-7-7 (7-7-8-8) 7-7-8-10 ok v řadě, 1 oko sejmeme obrace, 1 oko upleteme obrace a sejmuté přes ně přetáhneme, práci otočíme. 3.ř. (= lícová): pleteme po posledních 5-6-6-6 (6-6-7-7) 6-6-7-9 ok v řadě, 1 oko sejmeme hladce, 1 oko upleteme hladce a sejmuté přes ně přetáhneme, práci otočíme. 4.ř. (= rubová): pleteme po posledních 5-6-6-6 (6-6-7-7) 6-6-7-9 ok v řadě, 1 oko sejmeme obrace, 1 oko upleteme obrace a sejmuté přes ně přetáhneme, práci otočíme. Tímto způsobem pokračujeme v ujímání (vždy o 1 oko snížíme počet ok zbylých v řadě), až nám v řadě zůstane 8-10-10-10 (10-10-12-12) 14-14-16-16 ok. ---------------------------------------------------------------------- PONOŽKA: Pleteme v kruhových řadách na ponožkových jehlicích – kruhová řada začíná ve středu zadní části. Na ponožkové jehlice č.2,5 nahodíme přízí Fabel 44-48-52-52 (56-56-64-64) 64-68-72-76 ok. Pleteme žebrovým vzorem 2/2 (tj. 2 oka hladce, 2 obrace), takto (POZOR na odlišný začátek u jednotlivých velikostí): Velikosti 15/17 - 29/31 - 32/34 - 35/37 - 38/40 - 44/46: 1 oko obrace, *2 hladce, 2 obrace*, *-* opakujeme a kruhovou řadu končíme 2 oky hladce a 1 obrace. Velikosti 18/19 - 20/21 - 22/23 - 24/25 - 26/28 - 41/43: 1 oko hladce, *2 obrace, 2 hladce*, *-* opakujeme a kruhovou řadu končíme 2 oky obrace a 1 hladce. VŠECHNY VELIKOSTI: Pokračujeme žebrovým vzorem 2/2 do výše 4-5-6-7 (8-9-10-11) 12-13-14-15 cm. Následující kruhovou řadu pleteme takto: 9-11-11-11 (11-11-13-13) 13-13-15-17 ok žebrovým vzorem, dalších 26-26-30-30 (34-34-38-38) 38-42-42-42 ok pleteme hladce a SOUČASNĚ ujmeme rovnoměrně 8-8-10-10 (12-12-8-6) 6-6-6-4 ok (= 18-18-20-20 (22-22-30-32) 32-36-36-38 ok hladce), zbylých 9-11-11-11 (11-11-13-13) 13-13-15-17 ok žebrovým vzorem = 36-40-42-42 (44-44-56-58) 58-62-66-72 ok. Takto pleteme do výše 6-7-8-9 (10-11-12-13) 14-15-16-17 cm. Nyní ponecháme prvních 9-11-11-11 (11-11-13-13) 13-13-15-17 ok na jehlicích, následujících 18-18-20-20 (22-22-30-32) 32-36-36-38 ok odložíme na pomocné jehlice (= nárt) a posledních 9-11-11-11 (11-11-13-13) 13-13-15-17 ok ponecháme na jehlicích = 18-22-22-22 (22-22-26-26) 26-26-30-34 ok paty. Upleteme v řadách nad těmito oky žebrovým vzorem 3-3,5-4-4 (4,5-4,5-5-5) 5-5,5-6-6 cm výšky. Do pleteniny umístíme značku. Nyní TVARUJEME PATU – viz výše! Po dokončení tvarování nabereme po obou stranách paty 8-9-10-10 (11-12-13-13) 13-14-16-16 ok a odložených 18-18-20-20 (22-22-30-32) 32-36-36-38 ok vrátíme z pomocné jehlice zpět na jehlice = 42-46-50-50 (54-56-68-70) 72-78-84-86 ok. Pleteme opět v kruhových řadách. Před a za 18-18-20-20 (22-22-30-32) 32-36-36-38 ok nártu umístíme značku. Pokračujeme lícovým žerzejem a SOUČASNĚ ujímáme na obou stranách, takto: poslední 2 oka před oky nártu spleteme hladce anglicky, první 2 oka za oky nártu spleteme hladce. Takto ujímáme v každé 2. kruhové řadě, celkem 3-4-5-5 (6-6-10-10) 10-11-11-11x = 36-38-40-40 (42-44-48-50) 52-56-62-64 ok. Pleteme do výše 7-8-9-9 (11-13-14-16) 18-19-22-24 cm od značky na patě - 3-3-3-4 (4-4-4-4) 4-5-5-6 cm zbývá uplést do požadovaných rozměrů. Nyní si označíme boční strany ponožky = mezi značkami máme na horní i dolní straně 18-19-20-20 (21-22-24-25) 26-28-31-32 ok. Tvarujeme špičku: pleteme lícovým žerzejem nad všemi oky a SOUČASNĚ ujímáme na obou stranách obou značek: PŘED značkami splétáme 2 oka hladce, ZA značkami splétáme 2 oka hladce anglicky. Takto ujímáme na obou stranách v každé 2. kruhové řadě, celkem 3-3-3-6 (6-6-5-5) 6-7-6-7x, poté v každé kruhové řadě, a to celkem 4-4-4-2 (2-2-4-4) 4-4-6-6x = 8-10-12-8 (10-12-12-14) 12-12-14-12 ok. V následující kruhové řadě splétáme vždy 2 oka hladce. Přízi odstřihneme, protáhneme zbylými oky, stáhneme a zapošijeme. Stejným způsobem pleteme druhou ponožku. |
|
Dokončili jste tento model?Pak označte své fotky tagem #dropspattern #rosetwinesocks nebo je pošlete do galerie #dropsfan. Potřebujete s tímto návodem poradit?Otevřete-li si návod na stránce garnstudio.com, najdete tam 18 výukových video-ukázek, Komentáře/Dotazy a další užitečné informace. © 1982-2025 DROPS Design A/S. Vyhrazujeme si veškerá práva. Tento dokument, včetně všech jeho dílčích částí, podléhá autorským právům. Podrobnější komentář k možnostem užití našich návodů najdete dole pod každým návodem na našich stránkách. |


V oblasti pletené a háčkované módy působí DROPS Design více než 40 let. Díky tomu vám můžeme nabídnout jednu z nejrozsáhlejších kolekcí modelů s bezplatnými návody dostupnými na internetu - navíc v 17 jazycích. K dnešnímu dni máme na 314 katalogů a 11822 návodů celkem - z nich je už 7048 dostupných v [češtině].
Přidejte komentář k návodu DROPS 130-17
Rádi bychom věděli, co si o tomto modelu myslíte!
Pokud se chcete na něco zeptat, dbejte prosím na to, abyste ve formuláři níže vybrali správnou kategorii - díky tomu se dříve dozvíte, co potřebujete vědět. Povinná pole jsou označena *.