
Popular categories
Looking for a yarn?


Comments / Questions (15)
![]() Elena Klimenko wrote:
Elena Klimenko wrote:
Liebes Team, mit welche Garn kann ich die Drops Ull Boucle und Pellizia ersetzen? Wenn ich Garn Umrechnung anwende soll ich für beide Garnen umrechnen? Extra für Garn Boucle und extra für die Garn Pellizia? Richtig ? Und in zwei Faden stricken , habe ich richtig verstanden? Dankeschön!
10.11.2024 - 13:41DROPS Design answered:
Liebe Frau Klimenko, benutzen Sie den Garnumrechner, um die Garnalternative sowie die neue passende Garnmenge zu finden; die Arbeit wird hier mit je 1 Faden von diesen beiden Wolle gestrickt, je nach der Wahl der Alternative anpassen; Viel Spaß beim Stricken!
11.11.2024 - 09:28
![]() Massé Chantal wrote:
Massé Chantal wrote:
Bonjour, : "fermer a 2m". Que veut dire le "m", mailles, mètres ou autre chose?. Merci de votre aide. Chantal
24.01.2024 - 10:48DROPS Design answered:
Bonjour Mme Massé, vous montez 36 mailles et vous tricotez ces 36 mailles au point mousse pendant 2 mètres (longueur totale de l'écharpe)/capuche. Bon tricot!
25.01.2024 - 08:06
![]() Massé Chantal wrote:
Massé Chantal wrote:
Bonjour, je n\'ai pas l’habitude de lire des explications, et là je bloque:\r\n\"Tricoter au point mousse pendant environ 2 m et rabattre.\" \r\npendant 2m....mètres , mailles, ou autre choses? Merci beaucoup de votre réponse.\r\nChantal Massé
24.01.2024 - 10:45
![]() Christine wrote:
Christine wrote:
Votre réponse ne répond pas à ma question, l'écharpe est-elle en continue ?? Je trouve vos explications difficile il y a 40 ans les explications étaient vraiment plus claire cordialement
21.12.2022 - 13:49DROPS Design answered:
Bonjour Christine, ce modèle est une écharpe capuche: une longue écharpe de 2mètres de long pliée en double puis cousue sur 25 cm à partir du pli le long d'un côté pour former la capuche - les 2 extrémités formant l'écharpe. En espérant que ceci puisse vous aider. Bon tricot!
21.12.2022 - 14:19
![]() Christine wrote:
Christine wrote:
Je croyais que ce modèle ce faisait en une fois sans couture les explications de bonnet sont incompréhensibles. Je dois faire ce modèle j'ai la laine faut-il commencer par un côté . Commencer par la moitié du bonnet et diminuer pour l'écharpe ou l'inverse
21.12.2022 - 12:50DROPS Design answered:
Bonjour Christine, ce modèle se tricote en une seule partie: vous tricotez un long rectangle de 36 mailles au point mousse pendant 2 mètres. Vous pliez ensuite ce rectangle en double et cousez l'un des côtés à partir du pli sur 25 cm pour former la capuche. Bon tricot!
21.12.2022 - 13:13
![]() Christine wrote:
Christine wrote:
Je ne trouve pas les explications pour ce modèle quand je clique sur 67-26 ce n'est pas en français. Pourriez-vous me dire comment avoir les explications en français Merci cordialement
21.12.2022 - 12:11DROPS Design answered:
Bonjour Christine, il faut cliquer sur le menu déroulant sous la photo et faire défiler les langues pour sélectionner "français". Bon tricot!
21.12.2022 - 13:10
![]() Ida wrote:
Ida wrote:
Hej! Det här verkar vara en fin modell! Jag är nybörjare på stickning och vet inte mycket om hur man räknar om garner och mönster. Har märkt att mössor i damstorlekar är för stora för mig så jag brukar välja barnstorlek ca 12-14 år istället. Kan man välja sticknummer 5 eller 6 istället för att få den 1-2 storlekar mindre? Går det att använda ett istället för två garner och isåfall ur vilken grupp? Tacksam för hjälp!
15.09.2022 - 12:55DROPS Design answered:
Hei Ida. Om man bytter strikkepinner i en oppskrift for å få plagget mindre, vil ikke alle målene i oppskriften stemme. I denne oppskriften strikkes det bare frem og tilbake og da kan du regne ut fra den strikkefastheten du får på det garnet du skal strikke med. For å få den strikkefastheten på pinne 7 som er opplyst er DROPS Melody det nærmeste garnet du kan erstatte Pelliza og Ull-Bouclé med. mvh DROPS Design
19.09.2022 - 09:25
![]() Maj-Britt wrote:
Maj-Britt wrote:
Jeg vil gerne strikke denne hættehalstørklæde - men jeg kan ikke finde alternativt garn - hvad vil i anbefale ? Mvh Maj-Britt
24.09.2019 - 10:02DROPS Design answered:
Hej Maj-Britt, du skal få 13 m på 10 cm og vi har flere garnkombinationer som stemmer med det. Her ser du nogle stykker: garnkombinationer Det vil sige hvis du vælger et garn fra garngruppe A og strikker sammen med et garn fra garngruppe C så får du 13-14 m på 10 cm. God fornøjelse!
25.09.2019 - 07:56
![]() Elfriede Bene wrote:
Elfriede Bene wrote:
Bonjour j ai assembler l ovrage mais je ne comprends pas ce que veut dire faFaire un gland en Ull-Bouclé avec environ 30 fils de 20 cm chacun ? d avance merci de votre réponse cordialement
11.01.2019 - 09:45DROPS Design answered:
Bonjour Mme Bene, cette vidéo montre comment réaliser un gland, pour ce modèle coupez un total de 30 fils de 20 cm chacun pour former le gland ou bien entourez-le fil autour d'un carton de 10 cm comme dans la vidéo. Bonnes finitions!
11.01.2019 - 15:15
![]() Annita Haasnoot wrote:
Annita Haasnoot wrote:
Bedankt voor de uitleg! Nu is het duidelijk!
02.11.2017 - 13:05
|
|
Date with Winter |
|
|
|
|
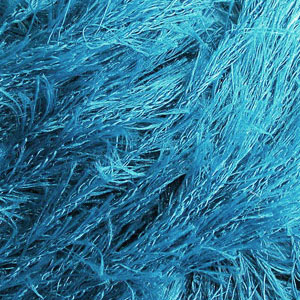
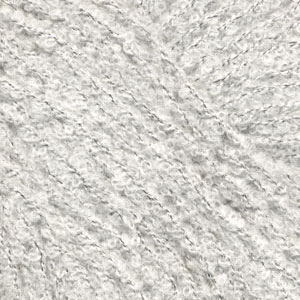
DROPS Hatscarf in Pelliza and Ull-Bouclé.
DROPS 67-26 |
|
|
Gauge: 12 sts x 20 rows with 1 strand Pelliza and 1 strand Ull-Bouclé in garter st = 10 x 10 cm Garter st, when knitting flat: Knit all sts, all rows. Scarf: Cast on 36 sts with 1 strand Pelliza and 1 strand Ull-Bouclé. Knit garter st for approx. 2 meters, bind off. Assembly: Fold scarf double, sew 25 cm together from fold on one side = center back on head. Make a tassel with Ull-Bouclé -- approx. 30 strands 20 cm long, attach to the top of cap. |
|
Have you finished this pattern?Tag your pictures with #dropspattern or submit them to the #dropsfan gallery. Do you need help with this pattern?You'll find 9 tutorial videos, a Comments/Questions area and more by visiting the pattern on garnstudio.com. © 1982-2025 DROPS Design A/S. We reserve all rights. This document, including all its sub-sections, has copyrights. Read more about what you can do with our patterns at the bottom of each pattern on our site. |


With over 40 years in knitting and crochet design, DROPS Design offers one of the most extensive collections of free patterns on the internet - translated to 17 languages. As of today we count 314 catalogues and 11822 patterns translated into English (UK/cm).
We work hard to bring you the best knitting and crochet have to offer, inspiration and advice as well as great quality yarns at incredible prices! Would you like to use our patterns for other than personal use? You can read what you are allowed to do in the Copyright text at the bottom of all our patterns. Happy crafting!
Post a comment to pattern DROPS 67-26
We would love to hear what you have to say about this pattern!
If you want to leave a question, please make sure you select the correct category in the form below, to speed up the answering process. Required fields are marked *.