
Catégories populaires
Vous cherchez un fil?


Commentaires / Questions (38)
![]() Anne a écrit:
Anne a écrit:
Hej Når symbolerne i diagrammet er tegnet oveni hinanden, betyder det så at der skal hækles to nye masker i én maske fra den tidligere omgang?Hilsen Anne
13.12.2021 - 23:21DROPS Design a répondu:
Hei Anne. Ja, da økes det. mvh DROPS Design
14.12.2021 - 14:07
![]() Loreto Pedreros a écrit:
Loreto Pedreros a écrit:
Bonjour, Voilà ma question: a la fin de A2, j'obtiens 88 brides ou doubles brides + 3 mailles en l'air correspondantes au début de chaque rang. C'est bien ça ? Merci d'avance et je tiens aussi à vous remercier pour tant de jolis modèles, explications et belles vidéos qui m'ont permis de progresser. Merci mille fois! Loreto
24.11.2021 - 18:33DROPS Design a répondu:
Bonjour Loreto et merci! Tout à fait, lorsque A.2 est terminé, vous avez bien 88 mailles (brides ou double-brides) + les 3 ml du début du tour si vous avez choisi de les faire en plus ou bien 88 mailles: 3 ml au début du tour pour remplacer la 1ère bride + 87 brides/double-brides. Bonne continuation!
25.11.2021 - 08:45
![]() Lupe Vasquez a écrit:
Lupe Vasquez a écrit:
Do you have written instructions to the "deep December fjords crochet hat"?
06.09.2021 - 22:30DROPS Design a répondu:
Dear Mrs Vasquez, there are only diagrams to this pattern, but this lesson will help you understanding how to read crochet diagrams. Happy crocheting!
07.09.2021 - 08:23
![]() Nina a écrit:
Nina a écrit:
1.Hvordan starter man med en relieffmaske i runde fire? Videoen viser relieffmønster hvor man starter med tre luftmasker. 2. hva er forskjellen på å hekle relieffmaske i en stav (runde 4) og det å hekle stav og så relieffmaske slik man ser i feks runde 5? Hvordan gjør man det? 3. hva menes med 11-12 ganger rundt på omgangen? «…. A.2 totalt 11-12 ganger rundt på omgangen.» 4. hvorfor kan dere ikke legge ut video som viser hvordan man hekler denne lua?
28.08.2021 - 18:45DROPS Design a répondu:
Hei Nina. 1) Runde 4, mener du da 2. omgang i A.2? Da hekler du 3 staver (les Hekleinformasjon) + 1 relieff-dobbelstav i neste maske. 2) Runde 4 og 5, mener du da 2.og 3. omgang i A.2? I omgang 4 hekles det 2 masker (1 stav+1 relieff-dobbeltstav) i samme maske, men det i 5. omgang hekles det 1 stav i 1 maske og 1 relieff-dobbeltstav i neste maske). 3) Hekler du str. S/M gjentar du A.2 11 ganger rundt på omgangen, mens hekler du str. M/L gjentar du A.2 12 ganger rundt på omgangen. 4) Å lage en hjelpevideo til hvordan man hekler denne luen vil bli altfor lang, så til denne luen har vi lagt til 8 video som vi mener er til god hjelp. Mvh DROPS design
30.08.2021 - 14:31
![]() Laura a écrit:
Laura a écrit:
Hej, jeg har et spørgsmål til A. 3. Altså man vender først huen, så mønsteret dvs. retsiden vender ind af og vrangsiden ud af. Jeg er dog i tvivl om hækleretningen? Skal man også lave de tre luftmasker og en kædemaske inden man starter eller hvordan? Skal man holde på huen så siden man hækle vender væk fra dig eller ind imod dig?
12.03.2021 - 14:32DROPS Design a répondu:
Hei Laura. Ja, hekle de 3 luftmaskene og kjedemaskene du tidligere har heklet i begynnelsen og slutten av hver omgang. Når du vender arbeidet må du også vri på luen slik at du nå får vrangen/nålen nærmest mot deg og du hekler videre som vanlig, - fra høyre til venstre. mvh DROPS design
15.03.2021 - 13:39
![]() Natasja a écrit:
Natasja a écrit:
Tak for hjælpen tidligere. Jeg fandt ud af det, men jeg har et spørgsmål i forhold til de 21-23cm, som arbejdet skal måle før man går til A. 3. Er de 21-13cm i diameteren på huen eller fra top til bund?
09.03.2021 - 22:51DROPS Design a répondu:
Hej Natasja, de 21-23 cm er fra toppen og ned i hækleretningen :)
10.03.2021 - 15:45
![]() Natasja a écrit:
Natasja a écrit:
Hej. Jeg forstår ikke helt, hvordan der kun skal være fire luftmasker i den inderste ring, når der er 11 stangmasker i næste række (A.1)?
07.03.2021 - 22:08DROPS Design a répondu:
Hej Natasja, jo det stemmer, du hækler de 11 stangmasker rundt om ringen som består af 4 luftmasker. Hækler du i DROPS Merino Extra Fine? :)
08.03.2021 - 14:40
![]() Maja a écrit:
Maja a écrit:
Dzień dobry. Czy schemat A3 również zaczynamy 3 oczkami łańcuszka i kończymy oczkiem ścisłym? Dziękuję.
15.02.2021 - 06:29DROPS Design a répondu:
Witaj Maju, dokładnie tak. Zobacz WSKAZÓWKĘ, która znajduje się na początku objaśnień do wzoru. Pozdrawiamy!
15.02.2021 - 09:49
![]() Sara a écrit:
Sara a écrit:
Hvordan skal man begynne på rad 4, når det er en relieffmaske..?
03.02.2021 - 02:32DROPS Design a répondu:
Hej Sara, da hækler du 1 dobbeltstangmaske rundt om stangmasken fra forrige omgang. Se gerne vores video nederst i opskriften. God fornøjelse!
03.02.2021 - 15:28
![]() Gosia a écrit:
Gosia a écrit:
Czy dobrze rozumiem, że słupki nawijane mają być robione od przodu? Robiłam zgodnie z oznaczeniem tylne słupki reliefowe, ale wtedy wzorek czapki pojawia się wewnątrz robótki, zamiast na zewnątrz. Czy u Was te symbole są używane odwrotnie?
25.01.2021 - 10:51DROPS Design a répondu:
Gosiu, później wyłożysz dół czapki na prawą stronę i wzorek pojawi się na prawej stronie. Pozdrawiamy!
25.01.2021 - 11:03
|
||||||||||||||||
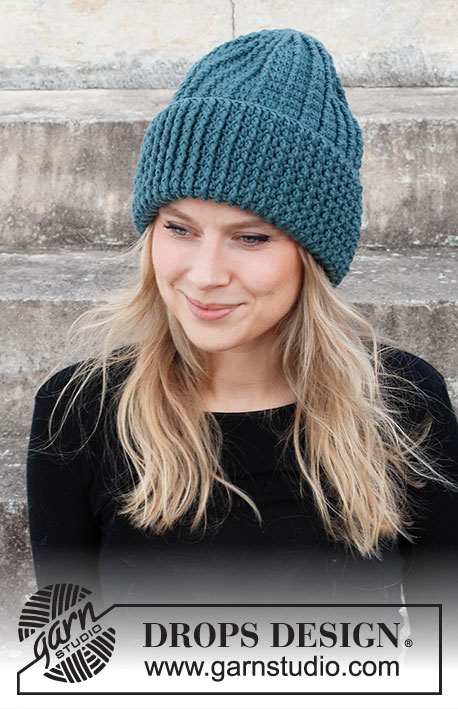
Deep December Fjords#deepdecemberfjordshat |
||||||||||||||||
 |
 |
|||||||||||||||
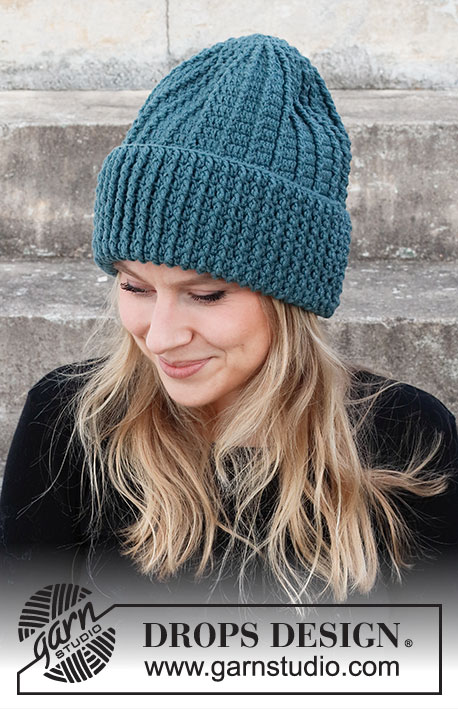
Bonnet crocheté de haut en bas en mailles relief, en DROPS Merino Extra Fine.
DROPS 214-38 |
||||||||||||||||
|
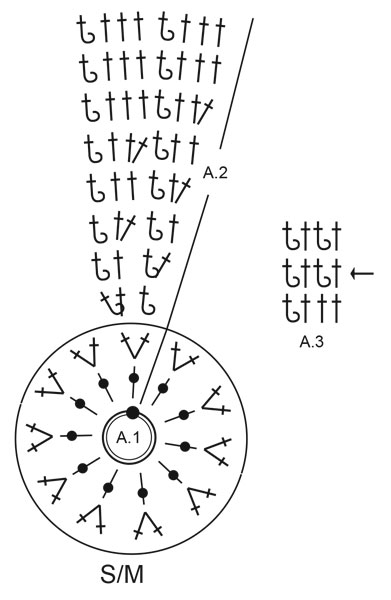
------------------------------------------------------- TECHNIQUES EMPLOYÉES ------------------------------------------------------- MAILLES EN L'AIR: Si on crochète sur le bout du crochet seulement, les mailles en l'air seront souvent trop serrées; 1 maille en l'air doit être aussi longue qu'1 bride est large. POINT FANTAISIE: Voir diagrammes A.1 à A.3. Voir diagrammes (A.1 et A.2) appropriés à la taille. INFO CROCHET: Au début de chaque tour de brides, crocheter 3 mailles en l'air qui remplacent la première bride; c'est-à-dire sauter la première bride/maille serrée du tour précédent. Le tour se termine par 1 maille coulée dans la 3ème maille en l'air du début du tour. ------------------------------------------------------- L'OUVRAGE COMMENCE ICI: ------------------------------------------------------- BONNET – PETIT APERÇU DE L'OUVRAGE: Se crochète en rond et de haut en bas. BONNET: Crocheter 4 mailles en l'air – voir MAILLES EN L'AIR, avec le crochet 4 et Merino Extra Fine et fermer en rond avec 1 maille coulée dans la première maille en l'air. Crocheter ensuite en suivant le diagramme A.1 – voir INFO CROCHET. Quand A.1 est terminé, crocheter 11-12 fois A.2 au total en largeur. PENSER À BIEN CONSERVER LA MÊME TENSION QUE POUR L'ÉCHANTILLON! Quand A.2 est terminé, on a 88-96 mailles. Répéter ensuite les 2 derniers tours du diagramme jusqu'à ce que l'ouvrage mesure 21-23 cm. Tourner maintenant l'ouvrage sur l'envers (pour que le revers soit sur l'endroit quand il est retourné). Crocheter maintenant A.3 en rond, à partir de la flèche. Quand le bonnet mesure 33-35 cm de haut en bas, il est terminé. Couper et rentrer le fil. Le bonnet mesure environ 23-25 cm avec les 10 cm de revers. |
||||||||||||||||
Légende diagramme(s) |
||||||||||||||||
|
||||||||||||||||
 |
||||||||||||||||
 |
||||||||||||||||
Vous avez terminé ce modèle?Alors taguez vos photos avec #dropspattern #deepdecemberfjordshat ou bien présentez-les dans la galerie #dropsfan Vous avez besoin d'aide pour ce modèle ?Vous trouverez 8 tutoriels vidéo, une rubrique commentaires/questions et plus encore en vous rendant sur la page du modèle sur garnstudio.com © 1982-2026 DROPS Design A/S. Tous droits réservés. Ce document, y compris ces sous-sections, est protégé par les droits d'auteur (copyright). Apprenez-en davantage sur ce que vous pouvez faire avec nos modèles en bas de chacune des pages de notre site. |
||||||||||||||||


Avec plus de 40 ans dans la conception de modèles tricot et crochet, DROPS Design offre l'une des plus vastes collections de modèles gratuits sur internet - traduits dans 17 langues. À ce jour, on compte 324 catalogues et 12290 modèles en français.
Nous nous efforçons de vous apporter le meilleur de ce que le tricot et le crochet peuvent vous offrir, inspiration et conseils mais également des fils de haute qualité à des prix incroyables! Vous souhaiteriez utiliser nos modèles autrement que pour un usage personnel? Vous pouvez lire ce que vous êtes autorisés à faire dans le Copyright en bas de page de chacun de nos modèles. Bon tricot!
Poster un commentaire sur le modèle DROPS 214-38
Nous aimerions connaître votre avis sur ce modèle !
Si vous souhaitez poser une question, merci de bien vouloir vérifier que vous avez choisi la bonne catégorie dans le formulaire ci-dessous afin d'accélérer la réponse. Les champs obligatoires sont indiqués par une *.