
Catégories populaires
Vous cherchez un fil?


Commentaires / Questions (30)
![]() Louise a écrit:
Louise a écrit:
Ik begrijp niet goed hoe ik moet meerderen bij de mouwen. Dit omdat wanneer ik meerder, het telpatroon niet meer klopt. Hoe kan ik meerderen en het telpatroon behouden?
11.12.2022 - 22:23DROPS Design a répondu:
Dag Louise,
Het telpatroon wordt inderdaad verbroken door het meerderen onder de mouwen, hier is niets aan te doen. Probeer het telpatroon zo ver mogelijk door te laten lopen, indien mogelijk.
12.12.2022 - 20:31
![]() Francoise Lucienne a écrit:
Francoise Lucienne a écrit:
Bonsoir encore merci a bientot
07.02.2022 - 17:56
![]() Francoise Lucienne a écrit:
Francoise Lucienne a écrit:
Bonsoir pourquoi on a au début 232 mailles et après 112 merci bonne soirée
06.02.2022 - 19:57DROPS Design a répondu:
Bonjour Mme Lucienne, vous tricotez d'abord le bas du pull en rond, sur 232 mailles, puis vous rabattez les mailles des emmanchures (4 de chaque côté) et terminez chaque partie séparément soit: 4 mailles rabattues de chaque côté + 112 m pour le devant + 112 m rabattues pour le dos = 4+112+4+112= 232 m. Bon tricot!
07.02.2022 - 11:10
![]() Leen Sels a écrit:
Leen Sels a écrit:
Welke naalddikte gebruik ik best? Safran geeft volgens het label in tricot op nld3 een verhouding van 24st op 10cm. Ik brei vrij vast en heb nld4 nodig om in tricot deze verhouding te krijgen. Volgens het patroon heb je nld3,5 nodig om met teltekening een verhouding van 23st op 10cm te krijgen. Met nld4 heb ik 30st op 10cm. Met nld5 heb ik 25st op 10cm, maar dit is al vrij los gebreid (doorschijnend en losser dan op de foto) en ik zou nog omhoog moeten gaan naar nld 5,5 of 6. Klopt dit wel?
16.05.2021 - 21:08DROPS Design a répondu:
Dag Leen Sels,
Ja, de stekenverhouding zoals aangegeven in het patroon klopt. Je hebt 23 steken op 10 cm in de breedte. Met name de breedte is van belang in dit geval bij de stekenverhouding. In deze link vind je meer informatie over de stekenverhouding.
20.05.2021 - 16:52
![]() Petra a écrit:
Petra a écrit:
Wat betekend sm ik dacht 2 samen breien. Daarna een omslag, ik krijg dan gaatjes klopt dit. Gr Petra
03.04.2021 - 14:32
![]() Myrna Laupland a écrit:
Myrna Laupland a écrit:
Ribbed Fantasy Should I do the neck ribbing and sew in the sleeves before or after blocking? Thank you
08.11.2020 - 05:31DROPS Design a répondu:
Dear Mrs Laupland, some knitters always block, some other never - so this look to be just a personnal question. Contact your DROPS store for any further individual assistance. Happy knitting!
09.11.2020 - 10:42
![]() Fata Viden a écrit:
Fata Viden a écrit:
Kan jag få beskrivning på svenska tack på förhand Mvh //Fata
20.10.2020 - 17:40DROPS Design a répondu:
Hej. Under bilden kan du ändra språk så att du får mönstret på svenska. Mvh DROPS Design
21.10.2020 - 09:48Carol a écrit:
I've finally gotten the courage to pick it up again, but (sorry) I still don't understand how I'm meant to work the front & back separately with new yarn whilst on circular needles. Do I need to work back & forth, front & back separately, on straight needles, keeping half of the work on a stitch holder? I'm getting discouraged. Thanks.
04.12.2017 - 08:39DROPS Design a répondu:
Dear Carol, that's right, just slip the sts on back piece onto a stitch holder/a thread and work the sts for front piece back and forth on straight (or circular) needle. Happy knitting!
04.12.2017 - 10:38Carol a écrit:
Thanks for your reply. When you say: "Cut the yarn and continue front piece separately with 1st st on needle for front piece... " you don't take into account that the first stitch on the needle is actually two bound-off stitches away from the front, so there's a hole. If I can figure out a way to overcome that, do I then have to work it back & forth, not in a circle? Do I need extra needles? Thanks for your speedy reply.
27.11.2017 - 20:52DROPS Design a répondu:
Dear Carol, you should bind off the last 2 sts on round so that there are 4 sts bound off on each side for armholes (= no st should remain on the side). Then work each piece separately with new yarn. Happy knitting!
28.11.2017 - 08:58Carol a écrit:
I'm just at the point where I'm meant to bind off 2 or 4 stitches to begin the armhole, but I end up left with one stitch in the middle of a bound-off section. I have no idea how to proceed with this, and I've never worked in the round before. Can you explain how I proceed? It says I should work the front and back separately, so does that mean I add another ball of yarn and continue in the round? I'm completely confused! Thanks! Carol
26.11.2017 - 11:18DROPS Design a répondu:
Dear Carol, you bind off for the armholes 2 sts at beg of round (half 1st armhole), 4 sts for 2nd armhole and the last 2 sts on round for 1st armhole (= 2nd half). Cut the yarn and continue front piece separately with 1st st on needle for front piece. Happy knitting!
27.11.2017 - 10:14
|
|||||||
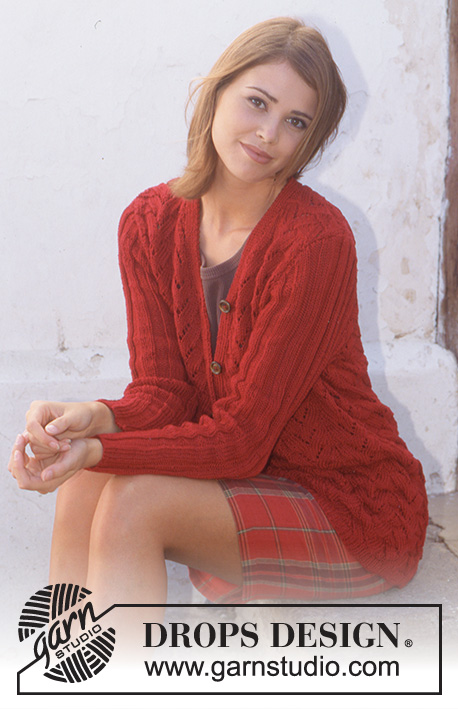
Ribbed Fantasy |
|||||||
 |
 |
||||||
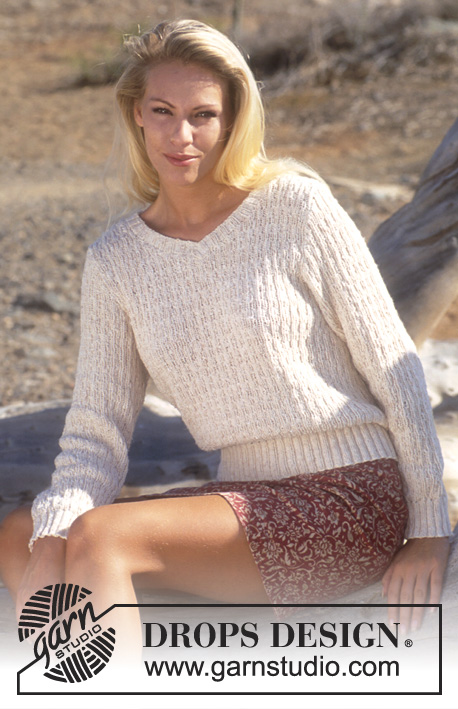
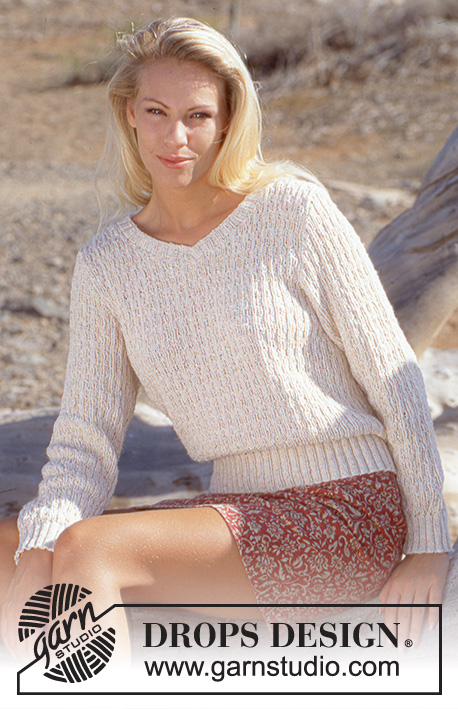
Pull tricoté DROPS en Safran
DROPS 56-8 |
|||||||
|
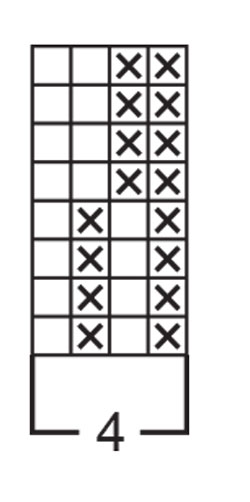
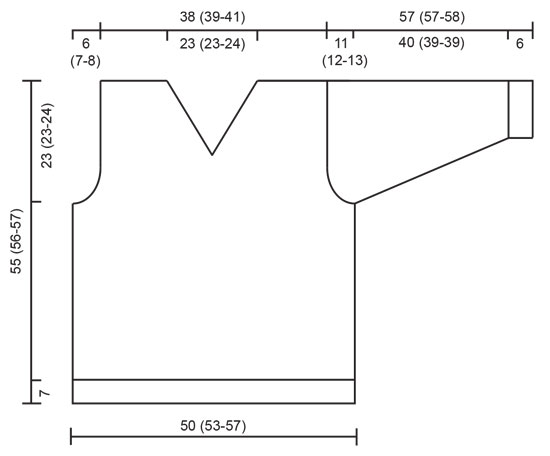
Échantillon : 23 m x 30 rangs = 10 x 10 cm en point fantaisie avec les aiguilles 3,5 Côtes : *2 m end, 2 m env *, répéter de *à * Point fantaisie : Voir diagramme ci-dessous. Le diagramme montre le motif sur l'endroit. Dos & devant : Avec l'aiguille circulaire 2,5 monter 232-244-260 m. Joindre et placer un marqueur en début de rang. Tricoter 7 cm de côtes. Continuer avec l'aiguille circulaire 3,5 et tricoter le rang suivant : *2 m ens à l'end, 1 jeté *, répéter de * à * tout le rang. Continuer en point fantaisie. À 32-33-33 cm de hauteur totale, tricoter le rang suivant : rabattre 2 m pour l'emmanchure, 112-118-126 m pour le devant, rabattre 4 m pour l'emmanchure, 112-118-126 m pour le dos, rabattre 2 m pour l'emmanchure. Terminer chaque partie séparément. Devant : = 112-118-126 m. Rabattre de chaque côté tous les 2 rangs pour les emmanchures : 2 fois 3 m, 2-3-3 fois 2 m et diminuer 2-2-4 fois 1 m = 88-90-94 m. À 43-44-45 cm de hauteur totale, diviser l'ouvrage au milieu devant et rabattre pour l'encolure V tous les 2 rangs : 1 fois 3 m, 10 fois 2 m et 2-3-4 fois 1 m puis tous les 4 rangs 1 fois 1 m. À 55-56-57 cm de hauteur totale, rabattre toutes les mailles. Dos : = 112-118-126 m. Former les emmanchures comme pour le devant = 88-90-94 m. À 53-54-55 cm de hauteur totale, rabattre pour l'encolure les 46-48-50 m centrales, puis côté encolure tous les 2 rangs : 1 fois 2 m et 1 fois 1 m. Rabattre toutes les mailles à 55-56-57 cm de hauteur totale. Manches : Avec les aiguilles doubles pointes 2,5 monter 60-64-64 m. Joindre et placer un marqueur en début de rang. Tricoter 6 cm de côtes puis continuer avec les aiguilles doubles pointes 3,5 et tricoter le rang suivant : *2 m ens à l'end, 1 jeté *, répéter de * à * tout le tour. Continuer en point fantaisie et, en même temps, augmenter 1 m de chaque côté du marqueur 21-20-21 fois : Taille S et L : tous les 5 rangs Taille M : alternativement tous les 5 et 6 rangs = 102-104-106 m. À 46-45-45 cm de hauteur totale, rabattre 2 m de chaque côté du marqueur et continuer en allers retours en rabattant de chaque côté tous les 2 rangs : 4-3-3 fois 3 m, 8-11-13 fois 2 m et 4-3-3 fois 3 m, rabattre toutes les mailles au rang suivant. Assemblage : Coudre les épaules. Avec les aiguilles 2,5 relever environ 142 – 162 m (nbe multiple de 4 + 2 ) autour de l'encolure. Tricoter en côtes en allers retours à partir du milieu devant pendant 2,5 cm et rabattre. Placer le côté droit du col par dessus le côté gauche et coudre. Monter les manches. |
|||||||
Légende diagramme(s) |
|||||||
|
|||||||
 |
|||||||
 |
|||||||
Vous avez terminé ce modèle?Alors taguez vos photos avec #dropspattern ou bien présentez-les dans la galerie #dropsfan Vous avez besoin d'aide pour ce modèle ?Vous trouverez 18 tutoriels vidéo, une rubrique commentaires/questions et plus encore en vous rendant sur la page du modèle sur garnstudio.com © 1982-2026 DROPS Design A/S. Tous droits réservés. Ce document, y compris ces sous-sections, est protégé par les droits d'auteur (copyright). Apprenez-en davantage sur ce que vous pouvez faire avec nos modèles en bas de chacune des pages de notre site. |
|||||||


Avec plus de 40 ans dans la conception de modèles tricot et crochet, DROPS Design offre l'une des plus vastes collections de modèles gratuits sur internet - traduits dans 17 langues. À ce jour, on compte 324 catalogues et 12290 modèles en français.
Nous nous efforçons de vous apporter le meilleur de ce que le tricot et le crochet peuvent vous offrir, inspiration et conseils mais également des fils de haute qualité à des prix incroyables! Vous souhaiteriez utiliser nos modèles autrement que pour un usage personnel? Vous pouvez lire ce que vous êtes autorisés à faire dans le Copyright en bas de page de chacun de nos modèles. Bon tricot!
Poster un commentaire sur le modèle DROPS 56-8
Nous aimerions connaître votre avis sur ce modèle !
Si vous souhaitez poser une question, merci de bien vouloir vérifier que vous avez choisi la bonne catégorie dans le formulaire ci-dessous afin d'accélérer la réponse. Les champs obligatoires sont indiqués par une *.