
Catégories populaires
Vous cherchez un fil?


Commentaires / Questions (9)
![]() Michelle a écrit:
Michelle a écrit:
When moving from m1 to m2 what do I do with the first two stitches when they move over
24.02.2026 - 18:19DROPS Design a répondu:
Hi Maichelle, row 13: at the beginning put 2 sts on a cable needle behind the work (2 first sts in M1 diagram), then K 2, P 2 from the cable needle. Happy knitting!
08.04.2026 - 15:29
![]() Barbara Vagianos a écrit:
Barbara Vagianos a écrit:
How is the best way to adjust this pattern for a larger size? I want to make it for a 34.5 inch bust. Should I try to get a larger gauge and following the instructions for size L or should I add more cable repeats? Thanks for your help.
29.08.2025 - 16:59DROPS Design a répondu:
Dear Barbara, if you modify the gauge then it will be difficult to ensure that you have the correct gauge when working the different steps of the pattern. It would be best to cast on more initial stitches and work more cable repeats for a larger size. Happy knitting!
31.08.2025 - 20:54
![]() Petra Mannsshardt a écrit:
Petra Mannsshardt a écrit:
Wie ist das zu verstehen? Ich habe die Schultern zusammen genäht und wollte jetzt den Halsausschnitt sticken. 80 Maschen Plus die ca 88 Maschen vom hilfsfaden aufnehmen? Das kommt mir so viel vor. Da ich „Anfängerin“ bin , kenne ich mich da nicht so aus.
09.04.2024 - 13:29
![]() Jean Grimble a écrit:
Jean Grimble a écrit:
I am reading the chart. I have 208 stitches on my needles. The chart says to knit 5 repeats of Pattern 1 (80 sts) , then Pattern 2 one time (16 stiches) for a total of 96 stitches. Repeat that sequence and you have 192 stitches, leaving 16 stitches. Am I to knit 8 stiches either side of the cables????? The photo of the pattern does not indicate this. Bear with me, this is my first time reading a chart!!! I am sure this is my confusion!!
30.06.2023 - 17:05DROPS Design a répondu:
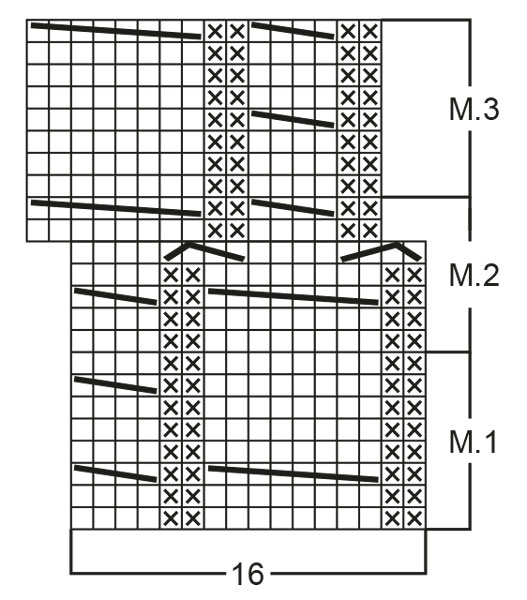
Dear Jean, the repeats are not horizontally but rather vertically. That is, you will work 1st row of M.1 on the whole row, then the 2nd row of M.1, e.t.c. After working all rows of M.1, instead of working M.2 you need to work M.1 again, until you have worked all of M.1 5 times vertically in total. On the next row, work 1st row of M.2, which will displace the pattern slightly, as explained in the pattern. After the last row of M.2, start working M.3 and repeat M.3 until you reach the final measurements. Happy knitting!
30.06.2023 - 21:09
![]() Ellen Rachich a écrit:
Ellen Rachich a écrit:
Your instructions are not very clear when decreasing or armholes...please explain when we start knitting front And start decreasing
03.04.2021 - 22:22DROPS Design a répondu:
Dear Ellen, the numbers that are not in the description can be calculated from teh schematic drawing: you start decreasing for the armhole, when the piece is 29-31-33 cm long (depending on the size you are making). Happy Knitting!
04.04.2021 - 21:30
![]() Ellen Rachich a écrit:
Ellen Rachich a écrit:
How can I make this into a vneck for size small?
16.03.2021 - 20:12DROPS Design a répondu:
Dear Mrs Rachich, we are unfortunately not able to adjust every pattern to every single request - please contact your yarn store for any assistance adjusting the pattern to your own wishes. Thanks for your comprehension. Happy knitting!
17.03.2021 - 08:37
![]() Robyn a écrit:
Robyn a écrit:
For shaping the shoulders; since the middle 28 stitches are on a stitch holder how can I continue knitting in full rows? Surely I'll have to focus on one shoulder at a time rejoining the yarn for the second shoulder? Can you clarify?
21.06.2020 - 23:23DROPS Design a répondu:
Dear Robyn, after you have slipped the middle 28 sts for neck on a thread/stitch holder, continue each shoulder separately continuing dec for armhole as before and slipping more sts on same thread for neck. When first shoulder is finished, just work the 2nd one the same way but mirrored. Happy knitting!
22.06.2020 - 08:45
![]() Robyn a écrit:
Robyn a écrit:
I don't understand how to continue after the last part of the Body instruction, "Knit the rest of each part separately." Doesn't that mean I'll have to cut and rejoin the yarn for the back? Thank you
16.06.2020 - 00:18DROPS Design a répondu:
Dear Robyn, that's right you will slip all stitches for back piece on a thread or on a extra needle and continue first front piece, then join yarn to work back piece to the end. Happy knitting!
16.06.2020 - 09:04Heather a écrit:
What does this mean at the front "then put sts at each neck edge on the st holder every other row: 2 sts 2 times, 1 st 2 times = 40-48-48 sts on the st holder and 19-17-17 sts on each shoulder". I normally bind off for neck shaping, not sure about the way this is worded. Can you explain a little more in detail what I am to do here. I am stuck at this point and no local yarn store to assist. Thanks.!
19.07.2017 - 20:48DROPS Design a répondu:
Dear Heather, When working rows from neckline work the first 2 sts, then put them on the same st holder as sts for neckline, work to the end of row, work next row as before, then at the beg of next row work the first 2 sts and slip them on the st holder, continue row as before, work next row, then at the beg of next row, work the first st and slip it on the st holder. Repeat the last 2 rows = 6 sts are slipped on the st holder. Happy knitting!
20.07.2017 - 09:34
|
|||||||||||||||||||
Whiteout#whiteouttop |
|||||||||||||||||||
 |
 |
||||||||||||||||||
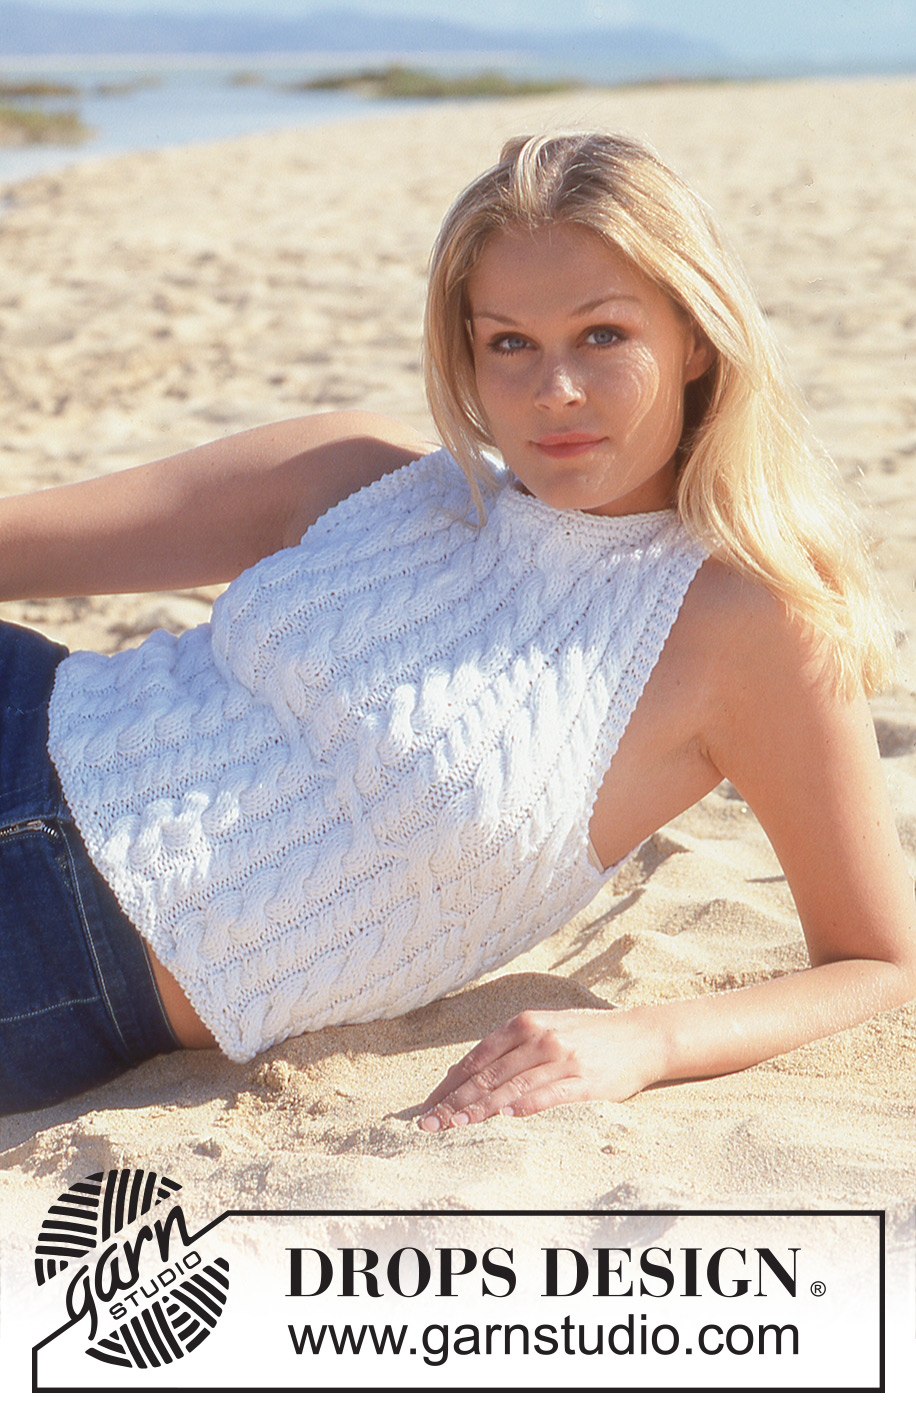
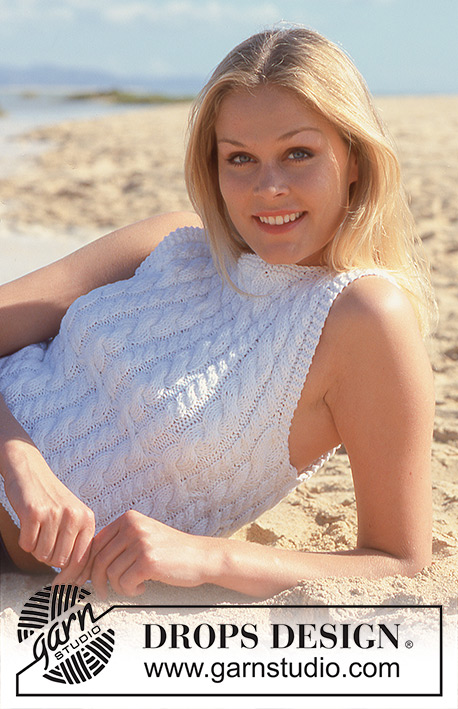
Débardeur DROPS à Torsades en Paris
DROPS 64-9 |
|||||||||||||||||||
|
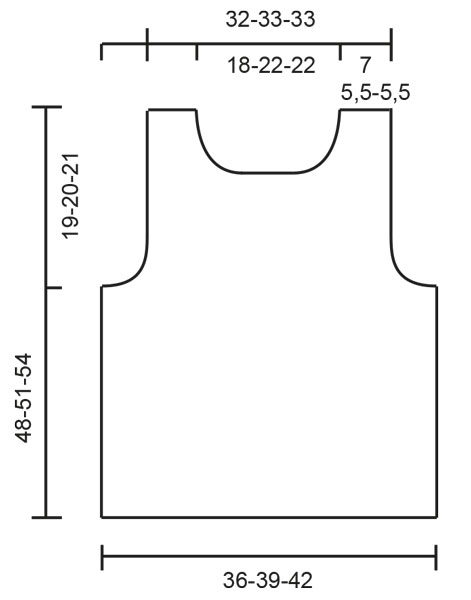
Échantillon : 18 m x 23 rangs = 10 x 10 cm en jersey 1 motif point fantaisie = 6 cm environ de large Diminutions : Toutes les diminutions se font sur l'endroit. Diminuer 2 m : Après les 3 m : glisser 1 m à l'end, 2 m ens à l'end, passer la m glissée par dessus la m tricotée Avant les 3 m : 3 m ens à l'endroit Diminuer 1 m : Après les 3 m : glisser 1 m à l'end, 1m end, passer la m glissée par dessus la m tricotée Avant les 3 m : 2 m ens à l'end Point fantaisie : Voir diagramme ci-dessous. Le diagramme montre le point fantaisie sur l'endroit. Point mousse tricoté en allers retours : Tricoter tous les rangs à l'endroit Point mousse tricoté en rond : *1 rang end, 1 rang envers * répéter de * à * Réalisation Dos & devant Avec l'aiguille circulaire monter 130-140-152 m, joindre et tricoter 4 rangs au point mousse en répartissant 62-68-72 augmentations sur le dernier rang = 192-208-224 m. Tricoter 5 fois M1 puis 1 fois M2 (M2 déplace le point fantaisie de 2 m – les petites torsades deviennent des grandes et vice versa). Tricoter ensuite M3 jusqu'à la fin. A 28-30-32 cm de hauteur totale, placer des marqueurs sur les côtés (soit 96-104-112 m entre les marqueurs pour le dos et le devant). Veiller à les placer de sorte que : Taille S : il y ait une petite torsade au milieu devant Taille M et L : il y ait une grande torsade au milieu devant. Continuer en point fantaisie comme avant, mais tricoter 14 m de chaque côté (7 m de chaque côté de chaque marqueur) au point mousse, puis rabattre 8 m de chaque côté (=4 m de chaque côté du marqueur) pour les emmanchures. Terminer chaque partie séparément. Devant : = 88-96-104 m. Continuer avec 3 m au point mousse côté emmanchure et diminuer pour les emmanchures à 3 m des bords tous les 2 rangs : 2-2-4 fois 2 m et 1-3-3 fois 1 m = 78-82-82 m. A 42-45-48 cm de hauteur totale, placer en attente sur un arrêt de mailles les 28-36-36 m centrales pour l'encolure, puis tous les 2 rangs mettre en attente 2 fois 2 m et 2 fois 1 m = 40-48-48 m en attente et 19-17-17 m pour chaque épaule. À 47-50-53 cm de hauteur totale, Tricoter 1 rang end (sur l'endroit) sur les mailles des épaules en répartissant 3-2-2 diminutions = 16-15-15 m. Tricoter 2 rangs au point mousse et rabattre. Dos : = 88-96-104 m. Former les emmanchures de chaque côté comme pour le devant = 78-82-82 m. A 46-49-52 cm de hauteur totale, placer en attente sur un arrêt de mailles les 36-44-44 m centrales pour l'encolure puis 2 m côté encolure au rang suivant = 19-17-17 m pour chaque épaule. À 47-50-53 cm de hauteur totale, tricoter 1 rang endroit sur l'endroit sur les mailles des épaules en répartissant 3-2-2 diminutions = 16-15-15 m. Tricoter 2 rangs au point mousse et rabattre. Assemblage : Coudre les épaules. Avec les aiguilles doubles pointes relever autour de l'encolure environ 80-100 m (y compris les m en attente). Joindre et tricoter 1 rang jersey endroit en répartissant 14-20-20 diminutions, puis 4 rangs au point mousse et rabattre. |
|||||||||||||||||||
Légende diagramme(s) |
|||||||||||||||||||
|
|||||||||||||||||||
 |
|||||||||||||||||||
 |
|||||||||||||||||||
Vous avez terminé ce modèle?Alors taguez vos photos avec #dropspattern #whiteouttop ou bien présentez-les dans la galerie #dropsfan Vous avez besoin d'aide pour ce modèle ?Vous trouverez 23 tutoriels vidéo, une rubrique commentaires/questions et plus encore en vous rendant sur la page du modèle sur garnstudio.com © 1982-2026 DROPS Design A/S. Tous droits réservés. Ce document, y compris ces sous-sections, est protégé par les droits d'auteur (copyright). Apprenez-en davantage sur ce que vous pouvez faire avec nos modèles en bas de chacune des pages de notre site. |
|||||||||||||||||||


Avec plus de 40 ans dans la conception de modèles tricot et crochet, DROPS Design offre l'une des plus vastes collections de modèles gratuits sur internet - traduits dans 17 langues. À ce jour, on compte 324 catalogues et 12290 modèles en français.
Nous nous efforçons de vous apporter le meilleur de ce que le tricot et le crochet peuvent vous offrir, inspiration et conseils mais également des fils de haute qualité à des prix incroyables! Vous souhaiteriez utiliser nos modèles autrement que pour un usage personnel? Vous pouvez lire ce que vous êtes autorisés à faire dans le Copyright en bas de page de chacun de nos modèles. Bon tricot!
Poster un commentaire sur le modèle DROPS 64-9
Nous aimerions connaître votre avis sur ce modèle !
Si vous souhaitez poser une question, merci de bien vouloir vérifier que vous avez choisi la bonne catégorie dans le formulaire ci-dessous afin d'accélérer la réponse. Les champs obligatoires sont indiqués par une *.