
Catégories populaires
Vous cherchez un fil?


Commentaires / Questions (166)
![]() Aina Eilen Krogh a écrit:
Aina Eilen Krogh a écrit:
Nydelig🤩
13.06.2024 - 10:43
![]() Julia a écrit:
Julia a écrit:
Garnmenge für Größe S passte bei mir nicht! Sonst stimmten die Angaben für den Garnverbrauch von Drops in den letzten 10 Jahren bei mir immer. Ich musste jetzt für die letzten sechs Reihen noch Wolle nachbestellen.
24.05.2024 - 21:10
![]() Marilyn Growns a écrit:
Marilyn Growns a écrit:
Thankyou for all the support given over the various stages with issues I have had understanding how to knit this cardigan. I am extremely happy as I have finished it and it looks amazing:)
20.05.2024 - 14:20
![]() Marilyn Growns a écrit:
Marilyn Growns a écrit:
Really appreciate the support. Last question I hope. Re Raglan sleeve and raglan body. At row 17 size L - . Would this starting row look like the following..Knit pattern to 1st sleeve - K2 tog,k2,slip 1,k1, psso, repeated at end of sleeve, then immediaetly the same instruction k2 tog, k2, slip 1,k1,psso at the start of the back body, knit the rest of the pattern, then k2 tog, k2, slip 1, k1, psso and then start the decrease process again for the next sleeve? Cannot find a video for this. Thanks
08.05.2024 - 10:11DROPS Design a répondu:
Dear Mrs Growns, in size L you will first decrease 8 sts for raglan 17 times on every other row, ie decrease on both sleeve and body (front and back pieces), then decrease only on body on next row from RS (18th decrease for body), then decrease again 8 sts (1st decrease on every 4th row on sleeves + 19th decrease on body); from now on, decrease on every other right side row = on every 4th row 8 sts (both body and sleeve) a total of 2 times then increase only on sleeve a total of 3 times on every 4th row - you have increased (17+1+2+3= 23 times on sleeves and 17+1+1+2=21 times on body). Happy knitting!
08.05.2024 - 13:09
![]() Marilyn Growns a écrit:
Marilyn Growns a écrit:
Please clarify - RAGLAN SLEEVE instruction - decrease every other row 17 times for LARGE and then decrease every row 6 times. Does this mean - Dec on the RS only 17 times - 34 rows in total (K2tog, K2,slip 1 st as if to knit, K1, psso) and thereafter decrease on the RS (K2tog, K2,slip 1 st as if to knit, K1, psso) followed by the WS (P2 twisted tog, P2, P2 tog) 6 times Thanks in advance
05.05.2024 - 08:58DROPS Design a répondu:
Dear Marilyn, yes, it means just that. "Every other row" is every row from the right side, "every row" means every right side AND every wrong side row as well. Happy Crafting!
05.05.2024 - 15:30
![]() Marilyn Growns a écrit:
Marilyn Growns a écrit:
Drops 169-1 no w‐583. Size Large Re instruction: Yoke - slip sleeves on to same circular needle as body where armholes were cast off = 306 stitches. My question is....instructions say slip. However looking at the video on YouTube for' how to work raglan from the bottom up' the video shows 'knitting' the sleeve on NOT 'slipping' the sleeves onto the circular needle. Please could you clarify if I should SLIP or KNIT the sleeve onto the circular needle. Thanks in advance
03.05.2024 - 19:55DROPS Design a répondu:
Dear Marily, honestly, it does not really matter. If you slip the stitches, then you can continue from the right side, if you knit the stitches, the next row will be from the wrong side. In both cases you should pay attention to continue the pattern from the right place in the diagram. Happy Knitting!
03.05.2024 - 23:13
![]() Marilyn Growns a écrit:
Marilyn Growns a écrit:
Re - Sleeve....when piece measures 48 cm ( size large) the pattern says... cast off 6 stitches mid under sleeve which leaves 60 stitches.. I have placed markers all the way up the sleeve, therefore should I decrease 3 stitches either side of the last marker? The video is not working. Thankyou
02.04.2024 - 00:10DROPS Design a répondu:
Hi Marilyn, Yes you cast off 3 stitches on each side of the marker. Happy knitting!
02.04.2024 - 06:38
![]() Marilyn Growns a écrit:
Marilyn Growns a écrit:
Can you please let me know how often the cable is done? i cannot see it in the pattern. I am making size L. I do however note that on 16/06/21 you answered Jenny's question - every 8th row. Have I interpreted that correctly? Looking at the picture of the cardigan it looks like in total there are 11 cables to the neckline. Please could you confirm. Sorry for the many questions. I love this pattern and really want to be able to complete it. Thanks in advance
23.01.2024 - 14:54DROPS Design a répondu:
Dear Mrs Growsn, cables are worked on every 8th row as follows in A.1: Row 1 with cable, Row 2 til 8 without cable, repeat these 8 rows. Happy knitting!
24.01.2024 - 08:14
![]() Marilyn Growns a écrit:
Marilyn Growns a écrit:
I posted 7/01/24 re the 11 decreases for size L. Decrease at the beginning of first Purl section and decrease at the end of the next purl section. Julia's question on 29/04/17 says in one row you do all decreases at the beginning of each P section and in the second decrease row you do them at the end of each P section. This contradicts what I have done and is concerning me that I have done this incorrectly. Please can you clarify. Thanks in advance
23.01.2024 - 14:35DROPS Design a répondu:
Dear Mrs Growns, you should decrease 11 stitches on every decrease row = 1 stitch in each of the P-sections and work these decreases a total of 5 times. the first time you will decrease at the beg of every P-section, the 2nd time at the end of every P-section and continue like this decreasing alternately one time at the beg of every P-section and next time at the end of every P-section. Happy knitting!
24.01.2024 - 08:10
![]() Marilyn Growns a écrit:
Marilyn Growns a écrit:
Thanks for answering my question. However, what I am confused with is 'When piece measures 5 cm, dec 1 sts in all P-sections (= 11-11-11-12-12-12 dec per dec round)' Read decrease tip which is ' Dec 1 st by P 2 tog. Dec alternately at beg and end of P section'. From 8 stitches it would mean each purl section decreases to 6 which would make the calculation wrong. What does it mean - alternately? I am just totally confused. :(
05.01.2024 - 22:50DROPS Design a répondu:
Dear Marilyn, you decrease by purling 2 together in each section once. However, in each purl section you will decrease either at the beginning or the end of the section (alternately means every other or on alternate sections). For example, in the first section you purl together the first 2 stitches, in the second section you purl together the last 2 stitches, in the third section you purl together the first 2 stitches, e.t.c. Happy knitting!
07.01.2024 - 23:34
|
||||||||||
Romantic Twist#romantictwistcardigan |
||||||||||
 |
 |
|||||||||
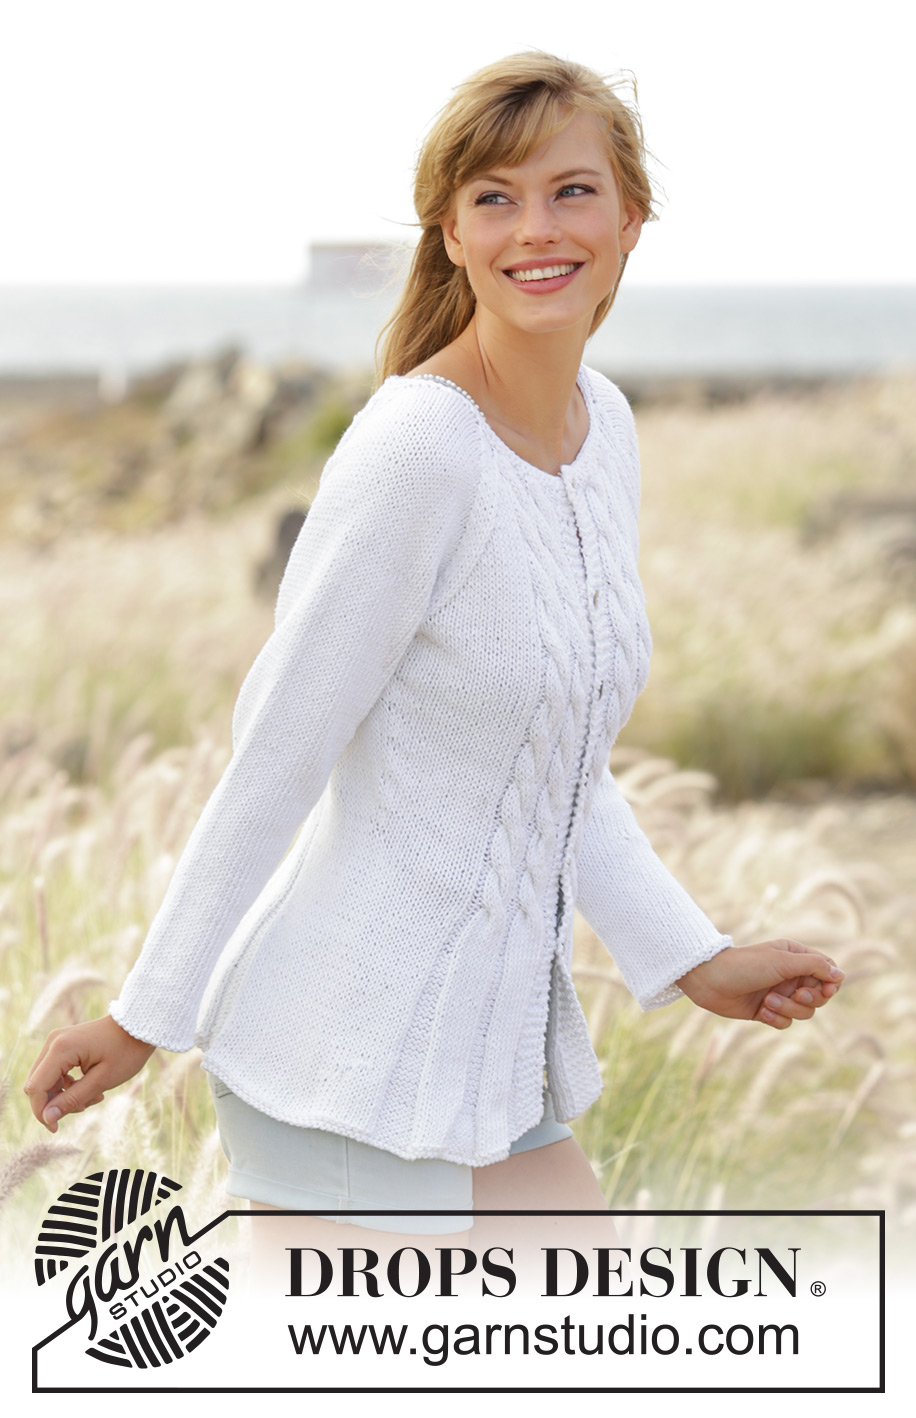
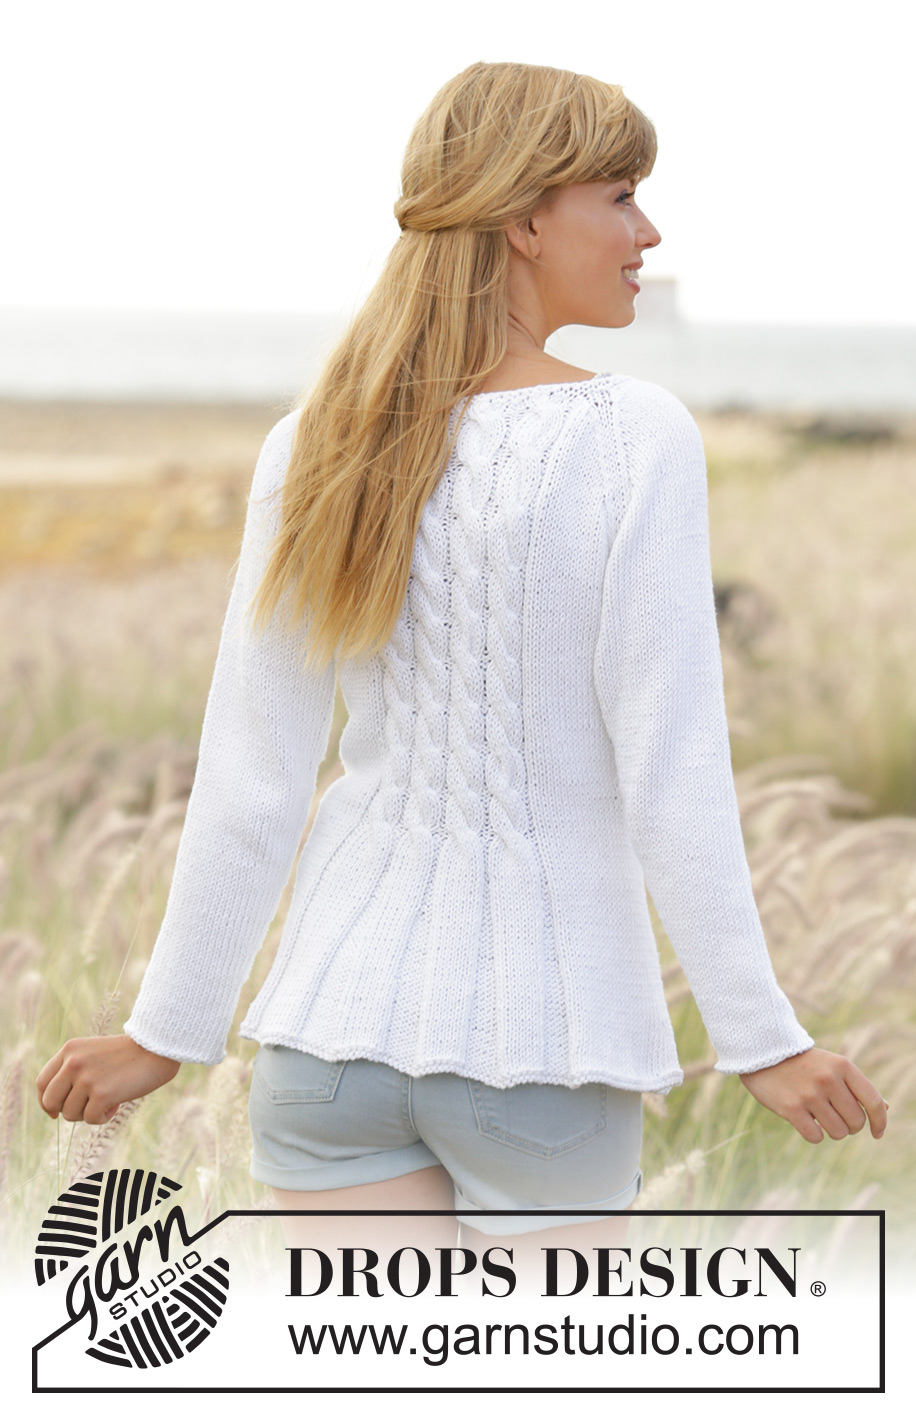
Veste cintrée DROPS avec torsades et raglan, en ”Paris”. Du S au XXXL.
DROPS 169-1 |
||||||||||
|
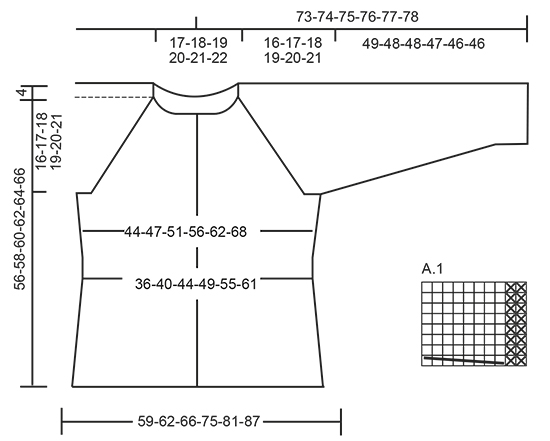
POINT MOUSSE (en allers et retours): Tricoter tous les rangs à l'endroit. 1 côte mousse = 2 rangs end. POINT MOUSSE (en rond): 1 côte mousse = 2 tours. Tricoter: *1 tour end, 1 tour env*, répéter de *-*. DIMINUTIONS: Pour diminuer 1 m, tricoter 2 m ens à l'env. Diminuer alternativement au début et à la fin des sections en mailles envers. POINT FANTAISIE: Voir diagramme A.1. Le diagramme montre tous les rangs du point fantaisie, vus sur l'endroit. RAGLAN: Diminuer 2 m à chaque transition entre le dos/les devants et les manches. Diminuer sur l'endroit ainsi: 2 m ens à l'end, 2 m end (le marqueur se trouve entre ces mailles), glisser 1 m à l'end, 1 m end, passer la m glissée par-dessus la m tricotée. Diminuer ainsi sur l'envers: 2 m ens torse à l'env, 2 m env (le marqueur se trouve entre ces mailles), 2 m ens à l'env. ASTUCE TRICOT: Si la tension n'est pas juste en hauteur et le tricot trop serré, le raglan sera trop court et les emmanchures trop courtes. On peut ajuster en tricotant 1 rang supplémentaire sans diminuer à intervalles réguliers entre les rangs de diminutions. BOUTONNIÈRES: Ouvrir les boutonnières sur la bordure devant droit. 1 boutonnière = tricoter ens à l'end la 2ème et la 3ème m à partir du milieu devant, puis faire 1 jeté. Emplacement des boutonnières (en cm de hauteur totale): TAILLE S: 19, 26, 33, 40, 47 et 54 cm. TAILLE M: 19, 26, 33, 40, 48 et 56 cm. TAILLE L: 19, 26, 34, 42, 50 et 58 cm. TAILLE XL: 19, 28, 36, 44, 52 et 60 cm. TAILLE XXL: 19, 26, 33, 40, 47, 54 et 62 cm TAILLE XXXL: 19, 26, 33, 40, 48, 56 et 64 cm ---------------------------------------------------------- DOS & DEVANTS: Se tricotent en allers et retours sur aiguille circulaire à partir du milieu devant. Monter 216-228-240-266-286-306 m (y compris 5 m de bordure devant de chaque côté) avec l'aiguille circulaire 5 en Paris. Tricoter 1 côte au POINT MOUSSE - voir ci-dessus, puis tricoter ainsi - sur l'endroit: 5 m point mousse, *8 m env, 8 m end*, répéter de *-* 2 fois au total, 8 m env, 27-33-39-44-54-64 m jersey, *8 m env, 8 m end*, répéter de *-* 4-4-4-5-5-5 fois au total, 8 m env, 27-33-39-44-54-64 m jersey, *8 m env, 8 m end*, répéter de *-* 2 fois au total, 8 m env, 5 m point mousse. Continuer ainsi. PENSER À BIEN CONSERVER LA MÊME TENSION QUE POUR L'ÉCHANTILLON! À 5 cm de hauteur totale, diminuer 1 m dans toutes les sections en mailles envers (= 11-11-11-12-12-12 m diminuées par tour de diminutions) - VOIR DIMINUTIONS. Répéter ces diminutions encore 5 fois tous les 3 cm = 150-162-174-194-214-234 m. Ouvrir les BOUTONNIÈRES sur la bordure devant droit - voir ci-dessus. À 21 cm de hauteur totale, tricoter ainsi: 5 m point mousse, 2 fois A.1, 2 m env, 27-33-39-44-54-64 m jersey, 4-4-4-5-5-5 fois A.1, 2 m env, 27-33-39-44-54-64 m jersey, 2 fois A.1, 2 m env, 5 m point mousse. Placer 2 marqueurs, à 40-43-46-51-56-61 m du bord de chaque côté (dos = 70-76-82-92-102-112 m). À 23 cm de hauteur totale, augmenter 1 m de chaque côté de chaque marqueur (= 4 augmentations), répéter ces augmentations encore 5 fois tous les 2½-3-3-3½-3½-4 cm = 174-186-198-218-238-258 m. À 40-41-42-43-44-45 cm de hauteur totale, tricoter le rang suivant (sur l'endroit) ainsi: Tricoter 43-46-49-54-59-64 m, rabattre les 6 m suivantes, tricoter 76-82-88-98-108-118 m, rabattre les 6 m suivantes et tricoter les 43-46-49-54-59-64 m restantes. Mettre en attente et tricoter les manches. MANCHES: Se tricotent en rond sur aiguilles doubles pointes. Monter 32-34-36-38-40-42 m avec les aiguilles doubles pointes 5 en Paris. Tricoter 1 côte mousse, puis continuer en jersey. Placer 1 marqueur au début du tour (= milieu sous la manche). À 8 cm de hauteur totale, augmenter 2 m au milieu sous la manche. Augmenter encore 13-13-14-15-16-16 fois tous les 3-2½-2½-2½-2-2 cm = 60-62-66-70-74-76 m. À 49-48-48-47-46-46 cm de hauteur totale (plus court dans les grandes tailles, car l'arrondi de la manche est plus long), rabattre 6 m au milieu sous la manche = 54-56-60-64-68-70 m. Mettre en attente et tricoter l'autre manche. EMPIÈCEMENT: Glisser les mailles des manches sur la même aiguille circulaire que le dos et les devants, au-dessus des mailles rabattues pour les emmanchures = 270-286-306-334-362-386 m. Placer un marqueur à chaque transition entre les manches et le dos/les devants. Continuer comme avant, EN MÊME TEMPS, diminuer pour le RAGLAN – voir ci-dessus. Les diminutions sont différentes sur le dos/les devants et sur les manches. RAGLAN MANCHES: Diminuer 16-17-17-18-18-19 fois tous les 2 rangs, puis 4-4-6-7-9-9 fois tous les rangs (= 20-21-23-25-27-28 fois au total). RAGLAN DOS & DEVANTS: Diminuer 4-2-0-0-0-0 fois tous les 4 rangs, 11-16-19-21-19-16 fois tous les 2 rangs, puis 0-0-2-0-7-15 fois tous les rangs (= 15-18-21-21-26-31 fois au total). Quand toutes les diminutions sont faites, il reste 130-130-130-150-150-150 m. Au rang suivant, diminuer 2 m au-dessus de chaque torsade A.1 = 114-114-114-132-132-132 m. Tricoter 2 côtes mousse sur toutes les mailles, en même temps, au 1er rang, répartir 20-16-12-26-22-18 diminutions = 94-98-102-106-110-114 m. Rabattre. ASSEMBLAGE: Fermer l'ouverture sous les manches par une couture. Coudre les boutons sur la bordure devant gauche. |
||||||||||
Légende diagramme(s) |
||||||||||
|
||||||||||
 |
||||||||||
Vous avez terminé ce modèle?Alors taguez vos photos avec #dropspattern #romantictwistcardigan ou bien présentez-les dans la galerie #dropsfan Vous avez besoin d'aide pour ce modèle ?Vous trouverez 26 tutoriels vidéo, une rubrique commentaires/questions et plus encore en vous rendant sur la page du modèle sur garnstudio.com © 1982-2026 DROPS Design A/S. Tous droits réservés. Ce document, y compris ces sous-sections, est protégé par les droits d'auteur (copyright). Apprenez-en davantage sur ce que vous pouvez faire avec nos modèles en bas de chacune des pages de notre site. |
||||||||||


Avec plus de 40 ans dans la conception de modèles tricot et crochet, DROPS Design offre l'une des plus vastes collections de modèles gratuits sur internet - traduits dans 17 langues. À ce jour, on compte 324 catalogues et 12290 modèles en français.
Nous nous efforçons de vous apporter le meilleur de ce que le tricot et le crochet peuvent vous offrir, inspiration et conseils mais également des fils de haute qualité à des prix incroyables! Vous souhaiteriez utiliser nos modèles autrement que pour un usage personnel? Vous pouvez lire ce que vous êtes autorisés à faire dans le Copyright en bas de page de chacun de nos modèles. Bon tricot!
Poster un commentaire sur le modèle DROPS 169-1
Nous aimerions connaître votre avis sur ce modèle !
Si vous souhaitez poser une question, merci de bien vouloir vérifier que vous avez choisi la bonne catégorie dans le formulaire ci-dessous afin d'accélérer la réponse. Les champs obligatoires sont indiqués par une *.